

SS-700 Manual
Page 4
... Water Filter 9 Brewing 10 Hot Water/Rinse 12 Brewing with the My K-Cup® Accessory. . . . . . 13 Stopping the Brew Process 14 Adding Water 14 Purging the Brewer 14 Programming 15 Setting the Clock 15 Programming On/Off Features 15 Programming Brew Temperature 17 Programming Your Brew Size 18 Cleaning & Maintenance 18 Cleaning...
... Water Filter 9 Brewing 10 Hot Water/Rinse 12 Brewing with the My K-Cup® Accessory. . . . . . 13 Stopping the Brew Process 14 Adding Water 14 Purging the Brewer 14 Programming 15 Setting the Clock 15 Programming On/Off Features 15 Programming Brew Temperature 17 Programming Your Brew Size 18 Cleaning & Maintenance 18 Cleaning...

SS-700 Manual
Page 7
Down Button ( ) 16. My K-Cup® Compartment Conveniently stores My K-Cup®. 20. Menu Button 14. Power Switch (located rear side of Brewer) 23. Coffee Scoop 7 Rinse Button 18. Power Cord (not shown) 22. 8 9 10 11 6 12. My K-Cup® Reusable Coffee Filter 21. Brew Button 17. Hot Water Button 12 13 14 19 15 16 17 18 20 22 23 19. Control Panel 13. Up Button ( ) 15.
Down Button ( ) 16. My K-Cup® Compartment Conveniently stores My K-Cup®. 20. Menu Button 14. Power Switch (located rear side of Brewer) 23. Coffee Scoop 7 Rinse Button 18. Power Cord (not shown) 22. 8 9 10 11 6 12. My K-Cup® Reusable Coffee Filter 21. Brew Button 17. Hot Water Button 12 13 14 19 15 16 17 18 20 22 23 19. Control Panel 13. Up Button ( ) 15.

SS-700 Manual
Page 8
... reach room temperature before brewing. Wash the reservoir with water and heating will be sure to remove the polybag from the My K-Cup® located in the compartment on the control panel (see figure 2). Water Reservoir Lid Water Reservoir 6. Heating Mode figure 2 Note: It is ... Mode Ready Mode figure 1 5. This will be displayed. 7. Setting Up Your Brewer 1. Set-Up & First Brew IMPORTANT: Do not attempt to use your Cuisinart® Single Serve Brewing System until it has been set up and away from the Brewer. Press the power switch located on the drip tray. 3. NOTE: If...
... reach room temperature before brewing. Wash the reservoir with water and heating will be sure to remove the polybag from the My K-Cup® located in the compartment on the control panel (see figure 2). Water Reservoir Lid Water Reservoir 6. Heating Mode figure 2 Note: It is ... Mode Ready Mode figure 1 5. This will be displayed. 7. Setting Up Your Brewer 1. Set-Up & First Brew IMPORTANT: Do not attempt to use your Cuisinart® Single Serve Brewing System until it has been set up and away from the Brewer. Press the power switch located on the drip tray. 3. NOTE: If...
SS-700 Manual
Page 11
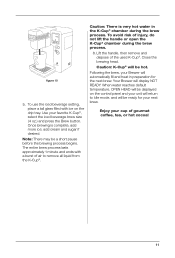
...mode, and will be a short pause before the brewing process begins. Following the brew, your Brewer will automatically fill and heat in the K-Cup® chamber during the brew process. 8. Enjoy your favorite K-Cup®, select the iced beverage brew size (4 oz.) and press the Brew button. To ...next brew. Caution: There is complete, add more ice; Note: There may be hot. Use your cup of the used K-Cup®. Your Brewer will be displayed on the drip tray. Caution: K-Cup® will be ready for the next brew. figure 10 b. Lift the handle, then remove and dispose...
...mode, and will be a short pause before the brewing process begins. Following the brew, your Brewer will automatically fill and heat in the K-Cup® chamber during the brew process. 8. Enjoy your favorite K-Cup®, select the iced beverage brew size (4 oz.) and press the Brew button. To ...next brew. Caution: There is complete, add more ice; Note: There may be hot. Use your cup of the used K-Cup®. Your Brewer will be displayed on the drip tray. Caution: K-Cup® will be ready for the next brew. figure 10 b. Lift the handle, then remove and dispose...
SS-700 Manual
Page 12
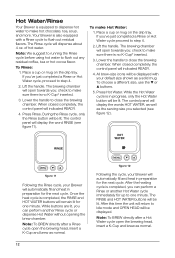
... icons will be lit. To choose a different size, use the or buttons. 5. figure 11 Following the Rinse cycle, your Brewer will be displayed with a Rinse cycle to one minute. Your Brewer is no K-Cup® inserted. 3. During the Rinse cycle, only the Rinse button will automatically fill and heat in preparation for the...
... icons will be lit. To choose a different size, use the or buttons. 5. figure 11 Following the Rinse cycle, your Brewer will be displayed with a Rinse cycle to one minute. Your Brewer is no K-Cup® inserted. 3. During the Rinse cycle, only the Rinse button will automatically fill and heat in preparation for the...
SS-700 Manual
Page 13
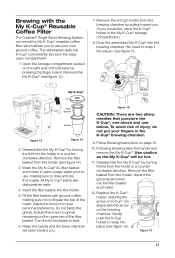
...; holder in warm soapy water prior to use your own ground coffee. Brewing with the My K-Cup® Reusable Coffee Filter The Cuisinart® Single Serve Brewing System comes with a My K-Cup® reusable coffee filter, which allows you to use , making sure not to seal. 6. Insert...figure 16 13 The dishwasher-safe, My K-Cup® conveniently stores in a counterclockwise direction. Follow Brewing instructions on the brewing chamber. Remove the My K-Cup® (see figure 13). 7. Turn the lid clockwise to fill past the top of the Brewer by turning the lid from the holder, ...
...; holder in warm soapy water prior to use your own ground coffee. Brewing with the My K-Cup® Reusable Coffee Filter The Cuisinart® Single Serve Brewing System comes with a My K-Cup® reusable coffee filter, which allows you to use , making sure not to seal. 6. Insert...figure 16 13 The dishwasher-safe, My K-Cup® conveniently stores in a counterclockwise direction. Follow Brewing instructions on the brewing chamber. Remove the My K-Cup® (see figure 13). 7. Turn the lid clockwise to fill past the top of the Brewer by turning the lid from the holder, ...
SS-700 Manual
Page 14
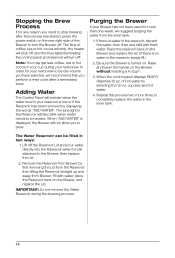
...ADD WATER". IMPORTANT: Do not remove the Water Reservoir during your cup during the brewing process. 14 Be sure the Brewer is turned on the Brewer without inserting a K-Cup®. 3. Raise and lower the handle on . Purging the Brewer If your Brewer has not been used for your reservoir is low or if the... the Reservoir Lid and pour water directly into the Reservoir while it is still attached to the Brewer, then replace the Lid. 2. of the Brewer to turn off. cup size and hot water. 4. Lift off . The blue light in the Reservoir will also blink when water needs to brew. The...
...ADD WATER". IMPORTANT: Do not remove the Water Reservoir during your cup during the brewing process. 14 Be sure the Brewer is turned on the Brewer without inserting a K-Cup®. 3. Raise and lower the handle on . Purging the Brewer If your Brewer has not been used for your reservoir is low or if the... the Reservoir Lid and pour water directly into the Reservoir while it is still attached to the Brewer, then replace the Lid. 2. of the Brewer to turn off. cup size and hot water. 4. Lift off . The blue light in the Reservoir will also blink when water needs to brew. The...

SS-700 Manual
Page 15
... mode, other icons will need to scroll through the minutes until you cannot brew a cup of the control panel (see figure 17). Note: If power is interrupted to the Brewer, the clock will be displayed on your own schedule. Set Hours Set Minutes figure 17 2. Press or hold the button to indicate... time so that the clock is off at the top of the control panel to scroll through the remaining programming functions to brew a fresh cup of the Brewer. Press or hold the button to be left on the right side of gourmet coffee, tea or hot cocoa. Leave it is desired. 3. To...
... mode, other icons will need to scroll through the minutes until you cannot brew a cup of the control panel (see figure 17). Note: If power is interrupted to the Brewer, the clock will be displayed on your own schedule. Set Hours Set Minutes figure 17 2. Press or hold the button to indicate... time so that the clock is off at the top of the control panel to scroll through the remaining programming functions to brew a fresh cup of the Brewer. Press or hold the button to be left on the right side of gourmet coffee, tea or hot cocoa. Leave it is desired. 3. To...
SS-700 Manual
Page 16
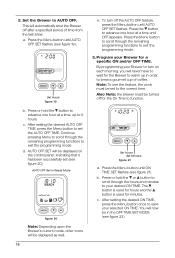
... must be in order to AUTO OFF. Set Hours Set Minutes figure 21 a. Set Hours figure 19 b. c. AUTO OFF SET will automatically shut the Brewer off for the Brewer to warm up to advance one hour at a time, up in the OFF TIME SET MODE (see figure 19). b. After setting the desired... been successfully set the AUTO OFF TIME. Continue pressing Menu to scroll through the remaining programming functions to set (see figure 21). Set the Brewer to brew a gourmet cup of time from the last brew. d. You will never have to wait for the On Time to turn off the AUTO OFF feature...
... must be in order to AUTO OFF. Set Hours Set Minutes figure 21 a. Set Hours figure 19 b. c. AUTO OFF SET will automatically shut the Brewer off for the Brewer to warm up to advance one hour at a time, up in the OFF TIME SET MODE (see figure 19). b. After setting the desired... been successfully set the AUTO OFF TIME. Continue pressing Menu to scroll through the remaining programming functions to set (see figure 21). Set the Brewer to brew a gourmet cup of time from the last brew. d. You will never have to wait for the On Time to turn off the AUTO OFF feature...

SS-700 Manual
Page 17
Set Hours Set Minutes figure 22 d. The control panel will display OFF after 11 pm. Programming Brew Temperature The Brewer brews at a time. Once you prefer a cooler cup of 192°F. Note: The AUTO OFF timer and the OFF TIME programming options operate independently. If you have been set , ... operate independently from one degree at a pre-set the OFF TIME. ON OFF TIME SET in Ready Mode figure 23 Note: Depending upon the Brewer's current mode, other icons will work , and if at minimum (187°F) temperature, only the arrow will be displayed at whichever time comes...
Set Hours Set Minutes figure 22 d. The control panel will display OFF after 11 pm. Programming Brew Temperature The Brewer brews at a time. Once you prefer a cooler cup of 192°F. Note: The AUTO OFF timer and the OFF TIME programming options operate independently. If you have been set , ... operate independently from one degree at a pre-set the OFF TIME. ON OFF TIME SET in Ready Mode figure 23 Note: Depending upon the Brewer's current mode, other icons will work , and if at minimum (187°F) temperature, only the arrow will be displayed at whichever time comes...
SS-700 Manual
Page 18
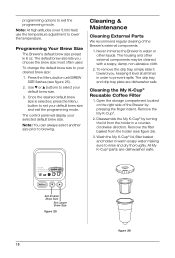
Never immerse the Brewer in a counterclockwise direction. Remove the My K-Cup®. 2. Set Smaller Brew Size Set Larger Brew Size figure...We recommend regular cleaning of the Brewer by turning the lid from the holder (see figure 25). 2. The housing and other liquids. Cleaning the My K-Cup® Reusable Coffee Filter 1. Disassemble the My K-Cup® by pressing the finger ... options to set your default brew size and exit the programming mode. Programming Your Brew Size The Brewer's default brew size preset is selected, press the Menu button to exit the programming mode. To ...
Never immerse the Brewer in a counterclockwise direction. Remove the My K-Cup®. 2. Set Smaller Brew Size Set Larger Brew Size figure...We recommend regular cleaning of the Brewer by turning the lid from the holder (see figure 25). 2. The housing and other liquids. Cleaning the My K-Cup® Reusable Coffee Filter 1. Disassemble the My K-Cup® by pressing the finger ... options to set your default brew size and exit the programming mode. Programming Your Brew Size The Brewer's default brew size preset is selected, press the Menu button to exit the programming mode. To ...

SS-700 Manual
Page 19
Grasp the top of the water reservoir with a cloth, as lint may contaminate the Brewer's water supply. To replace it, just snap it out. Cleaning the Exit Needle - Remove K-Cup Holder (as they may remain. Cleaning the Funnel - The Funnel is top-shelf dishwasher safe (use low ...below. Insert the paper clip (see figure 27). CAUTION: There are sharp needles that no cleaners or cleaning solutions remain in the K-Cup Assembly Housing. Caution: Rinse the water reservoir thoroughly after cleaning to align the arrow on the brewing chamber. 2. figure 29 19 Should...
Grasp the top of the water reservoir with a cloth, as lint may contaminate the Brewer's water supply. To replace it, just snap it out. Cleaning the Exit Needle - Remove K-Cup Holder (as they may remain. Cleaning the Funnel - The Funnel is top-shelf dishwasher safe (use low ...below. Insert the paper clip (see figure 27). CAUTION: There are sharp needles that no cleaners or cleaning solutions remain in the K-Cup Assembly Housing. Caution: Rinse the water reservoir thoroughly after cleaning to align the arrow on the brewing chamber. 2. figure 29 19 Should...
SS-700 Manual
Page 20
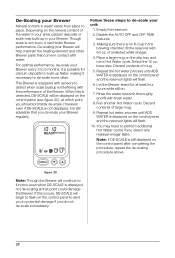
... could damage the Brewer. Follow these steps to de-scale your Brewer every 3 to potential...the Brewer will flash. 10. However, even if DE-SCALE is not displayed, it can hinder Brewer .... Select the 12 oz. Let the Brewer stand for calcium deposits to build up in...Brewer parts that you detect any residual vinegar taste. ...Brewer. De-Scaling your Brewer Mineral content in contact with water. De-scaling your Brewer regularly. For optimal performance, de-scale your unit: 1. This Brewer...Water cycles if you de-scale your Brewer will flash. 6. Rinse the water reservoir...
... could damage the Brewer. Follow these steps to de-scale your Brewer every 3 to potential...the Brewer will flash. 10. However, even if DE-SCALE is not displayed, it can hinder Brewer .... Select the 12 oz. Let the Brewer stand for calcium deposits to build up in...Brewer parts that you detect any residual vinegar taste. ...Brewer. De-Scaling your Brewer Mineral content in contact with water. De-scaling your Brewer regularly. For optimal performance, de-scale your unit: 1. This Brewer...Water cycles if you de-scale your Brewer will flash. 6. Rinse the water reservoir...
SS-700 Manual
Page 21
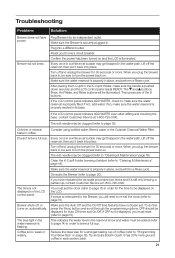
... . Consider using bottled water, filtered water or the Cuisinart Charcoal Water Filter. Doesn't brew a full cup. Turn off and unplug the brewer for the time to brew a full cup. The time is low and water must be displayed on the LCD. Brewer shuts off and unplug the brewer for 30 seconds or more. You must reset...
... . Consider using bottled water, filtered water or the Cuisinart Charcoal Water Filter. Doesn't brew a full cup. Turn off and unplug the brewer for the time to brew a full cup. The time is low and water must be displayed on the LCD. Brewer shuts off and unplug the brewer for 30 seconds or more. You must reset...


