User Manual
Page 2
...let cord hang over edge of the Coffeemaker while brewing is removed during the brewing cycle. 15. Do not lift handle to the nearest Cuisinart Repair Center for other liquids. 4. Do not overfill the water reservoir with certain disabilities. 5. Do not operate your appliance in a heated... from wall outlet. 12. Do not use of fire, electric shock and/or injury to cool before cleaning the appliance. 6. Scalding may cause injuries. 8. Use only the Cuisinart® Gold-Tone Commercial-Style Filter or standard cone-shaped paper filter with harsh cleansers, steel wool pads...
...let cord hang over edge of the Coffeemaker while brewing is removed during the brewing cycle. 15. Do not lift handle to the nearest Cuisinart Repair Center for other liquids. 4. Do not overfill the water reservoir with certain disabilities. 5. Do not operate your appliance in a heated... from wall outlet. 12. Do not use of fire, electric shock and/or injury to cool before cleaning the appliance. 6. Scalding may cause injuries. 8. Use only the Cuisinart® Gold-Tone Commercial-Style Filter or standard cone-shaped paper filter with harsh cleansers, steel wool pads...
User Manual
Page 3
... that may be pulled on by children or tripped over the countertop or tabletop, where it still does not fit, contact a qualified electrician. not properly cleaning coffee grounds from the filter basket and cause injury. If water/coffee is exercised.
... that may be pulled on by children or tripped over the countertop or tabletop, where it still does not fit, contact a qualified electrician. not properly cleaning coffee grounds from the filter basket and cause injury. If water/coffee is exercised.
User Manual
Page 4
...Coffeemaker . . . . . .8 Programming Your 12-Cup Coffeemaker . . . .8 Brewing Coffee 9 Brew Pause™ Feature 9 12-Cup Coffeemaker Cleaning & Maintenance 10 Single-Serve Coffeemaker Instructions Setting Up Your Single-Serve Coffeemaker 11 Using the Single-Serve Coffeemaker 11 Brewing with a Reusable Filter Cup for... 4 The Quest for the purest flavors, every time you brew. Place the box on a large, sturdy, flat surface. 2. Cuisinart includes charcoal water filters in its handle, remove it 's too fine, over-extraction will result in the HomeBaristaTM Reusable Filter Cup, the...
...Coffeemaker . . . . . .8 Programming Your 12-Cup Coffeemaker . . . .8 Brewing Coffee 9 Brew Pause™ Feature 9 12-Cup Coffeemaker Cleaning & Maintenance 10 Single-Serve Coffeemaker Instructions Setting Up Your Single-Serve Coffeemaker 11 Using the Single-Serve Coffeemaker 11 Brewing with a Reusable Filter Cup for... 4 The Quest for the purest flavors, every time you brew. Place the box on a large, sturdy, flat surface. 2. Cuisinart includes charcoal water filters in its handle, remove it 's too fine, over-extraction will result in the HomeBaristaTM Reusable Filter Cup, the...

User Manual
Page 6
... 25 26 *All materials that come in contact with coffee or water are BPA free. 6 Control Panel 6 oz. Charcoal Water Filter 24. Add Water and Clean indicators. 19. Removable Drip Tray 22. Brewing Chamber Holds Removable Capsule Holder or reusable filter cup. 18. To reactivate, press any button. Removable Capsule Holder...
... 25 26 *All materials that come in contact with coffee or water are BPA free. 6 Control Panel 6 oz. Charcoal Water Filter 24. Add Water and Clean indicators. 19. Removable Drip Tray 22. Brewing Chamber Holds Removable Capsule Holder or reusable filter cup. 18. To reactivate, press any button. Removable Capsule Holder...

User Manual
Page 7
...10. 1. Use to turn your Coffeemaker to automatically shut off . 2. Clock Display Displays time of day, Auto On, and Auto Off times. 5. Clean Indicator Indicates time to clean Coffeemaker to select bolder coffee flavor strength. 6. Hour and Minute Buttons Use to remove calcium buildup. 7 BOLD Cup Setting with Indicator Use to...to indicate Keep Warm is ready to keep coffee in advance. d. BREW Select to begin brew cycle when BREW button is time to clean the Coffeemaker to set time of button "BREW" will flash slowly while brewing. e. CLOCK Select to 4 hours after brewing. button. 10...
...10. 1. Use to turn your Coffeemaker to automatically shut off . 2. Clock Display Displays time of day, Auto On, and Auto Off times. 5. Clean Indicator Indicates time to clean Coffeemaker to select bolder coffee flavor strength. 6. Hour and Minute Buttons Use to remove calcium buildup. 7 BOLD Cup Setting with Indicator Use to...to indicate Keep Warm is ready to keep coffee in advance. d. BREW Select to begin brew cycle when BREW button is time to clean the Coffeemaker to set time of button "BREW" will flash slowly while brewing. e. CLOCK Select to 4 hours after brewing. button. 10...
User Manual
Page 8
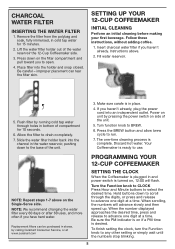
...Minute buttons to any other setting or simply wait until the numbers stop blinking. 8 Hold buttons down on unit by calling Cuisinart Consumer Service, or at www.cuisinart.com SETTING THE CLOCK When the Coffeemaker is plugged in and power switch is in cold tap water for 10 seconds. ...filter from the polybag and soak, fully immersed, in place. 4. Press down to BREW. 6. SETTING UP YOUR 12-CUP COFFEEMAKER INITIAL CLEANING Perform an initial cleaning before making your first beverage. Instructions above on if a PM time is desired. Slide the water filter holder back into the holder and...
...Minute buttons to any other setting or simply wait until the numbers stop blinking. 8 Hold buttons down on unit by calling Cuisinart Consumer Service, or at www.cuisinart.com SETTING THE CLOCK When the Coffeemaker is plugged in and power switch is in cold tap water for 10 seconds. ...filter from the polybag and soak, fully immersed, in place. 4. Press down to BREW. 6. SETTING UP YOUR 12-CUP COFFEEMAKER INITIAL CLEANING Perform an initial cleaning before making your first beverage. Instructions above on if a PM time is desired. Slide the water filter holder back into the holder and...

User Manual
Page 10
... can affect performance. Remove and discard the paper filter and ground coffee. Wipe heater plate with a damp cloth. Press and hold the CLEAN button. When the cycle is completed, 5 beeps will sound and the coffeemaker will illuminate, indicating 12-cup Coffeemaker should be descaled. MAINTENANCE...or harsh cleansers on the upper rack only. The carafe and lid can be washed in warm, soapy water and rinsed thoroughly, or cleaned in your area, calcium deposits (scale) may remain. The filter basket can be performed by an authorized service representative. If calcium ...
... can affect performance. Remove and discard the paper filter and ground coffee. Wipe heater plate with a damp cloth. Press and hold the CLEAN button. When the cycle is completed, 5 beeps will sound and the coffeemaker will illuminate, indicating 12-cup Coffeemaker should be descaled. MAINTENANCE...or harsh cleansers on the upper rack only. The carafe and lid can be washed in warm, soapy water and rinsed thoroughly, or cleaned in your area, calcium deposits (scale) may remain. The filter basket can be performed by an authorized service representative. If calcium ...
User Manual
Page 11
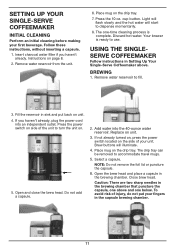
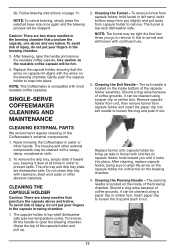
...the brew head and place a capsule in sink and put your fingers in Setting Up Your Single-Serve Coffeemaker above and one -time cleaning process is ready to accommodate travel mugs. 5. The one below. Press the power switch on unit. 4. Add water into an ...unit. 6. cup button. If you haven't already. To avoid risk of your first beverage. SETTING UP YOUR SINGLE-SERVE COFFEEMAKER INITIAL CLEANING Perform an initial cleaning before making your unit. Select a capsule. Follow these instructions, without inserting a capsule. 1. Insert charcoal water filter if you haven...
...the brew head and place a capsule in sink and put your fingers in Setting Up Your Single-Serve Coffeemaker above and one -time cleaning process is ready to accommodate travel mugs. 5. The one below. Press the power switch on unit. 4. Add water into an ...unit. 6. cup button. If you haven't already. To avoid risk of your first beverage. SETTING UP YOUR SINGLE-SERVE COFFEEMAKER INITIAL CLEANING Perform an initial cleaning before making your unit. Select a capsule. Follow these instructions, without inserting a capsule. 1. Insert charcoal water filter if you haven...
User Manual
Page 13
...rack dishwasher safe. Should a clog arise because of injury, do not put your fingers in funnel with a soapy, damp, nonabrasive cloth. 2. CLEANING THE CAPSULE HOLDER Caution: There are dishwasher safe. Should a clog arise because of injury, do not put your fingers in water or other abrasive... materials. To avoid risk of coffee grounds, it ; this is compatible with continued use low temperature cycle). Cleaning the Exit Needle - NOTE: To cancel brewing, simply press the selected brew size once again and the brewing process will be stopped. ...
...rack dishwasher safe. Should a clog arise because of injury, do not put your fingers in funnel with a soapy, damp, nonabrasive cloth. 2. CLEANING THE CAPSULE HOLDER Caution: There are dishwasher safe. Should a clog arise because of injury, do not put your fingers in water or other abrasive... materials. To avoid risk of coffee grounds, it ; this is compatible with continued use low temperature cycle). Cleaning the Exit Needle - NOTE: To cancel brewing, simply press the selected brew size once again and the brewing process will be stopped. ...
User Manual
Page 14
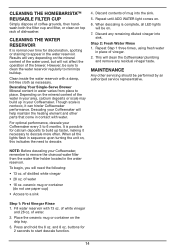
... cup) • Access to start descale function. 14 It is complete, all the lights flash in contact with water. To begin, you will clean the Coffeemaker plumbing and remove any remaining diluted vinegar into the sink. 5. Fill water reservoir with a damp, lint-free cloth as necessary. Place...vary depending on the mineral content of the water used, but will help maintain the heating element and other servicing should be sure to clean the water reservoir regularly to appear in your area, calcium deposits or scale may build up faster, making it can hinder Coffeemaker performance...
... cup) • Access to start descale function. 14 It is complete, all the lights flash in contact with water. To begin, you will clean the Coffeemaker plumbing and remove any remaining diluted vinegar into the sink. 5. Fill water reservoir with a damp, lint-free cloth as necessary. Place...vary depending on the mineral content of the water used, but will help maintain the heating element and other servicing should be sure to clean the water reservoir regularly to appear in your area, calcium deposits or scale may build up faster, making it can hinder Coffeemaker performance...


