User Manual
Page 2
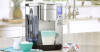
... cleaning. Always fill water reservoir first, then plug cord into the wall outlet. To disconnect, turn controls to Off, then remove plug from the electrical outlet. Do not clean drip tray with water. FOR HOUSEHOLD USE ONLY. READ ALL INSTRUCTIONS. 2. Return appliance to the nearest Cuisinart Repair Center for other liquids. 4. Close supervision is very hot water in an appliance garage, always unplug the unit...
... cleaning. Always fill water reservoir first, then plug cord into the wall outlet. To disconnect, turn controls to Off, then remove plug from the electrical outlet. Do not clean drip tray with water. FOR HOUSEHOLD USE ONLY. READ ALL INSTRUCTIONS. 2. Return appliance to the nearest Cuisinart Repair Center for other liquids. 4. Close supervision is very hot water in an appliance garage, always unplug the unit...
User Manual
Page 3
... ELECTRIC SHOCK, DO NOT REMOVE COVER (OR BACK) NO USER-SERVICEABLE PARTS INSIDE REPAIR SHOULD BE DONE BY AUTHORIZED SERVICE PERSONNEL ONLY 3 Never use . Remove the instruction book and any other literature. 4. Remove the packaging that future shipping of the machine is used, the marked electrical rating of an adapter is properly grounded. Take out the coffeemaker along with a 3-conductor cord set that it will not...
... ELECTRIC SHOCK, DO NOT REMOVE COVER (OR BACK) NO USER-SERVICEABLE PARTS INSIDE REPAIR SHOULD BE DONE BY AUTHORIZED SERVICE PERSONNEL ONLY 3 Never use . Remove the instruction book and any other literature. 4. Remove the packaging that future shipping of the machine is used, the marked electrical rating of an adapter is properly grounded. Take out the coffeemaker along with a 3-conductor cord set that it will not...
User Manual
Page 4
... Instructions 3 The Quest for the Perfect Cup 5 Features and Benefits 6 Set-Up & First Brew 8 Setting Up Your Coffeemaker 8 Charcoal Water Filter 9 Brewing 9 Hot Water/Rinse 11 Brewing with a Reusable Filter Cup 12 Stopping the Brew Process 13 Adding Water 13 Programming 13 Setting the Clock 13 Programming On/Off Features 14 Programming Brew Temperature 16 Programming Your Brew Size 16 Cleaning & Maintenance 17 Cleaning External Parts 17 Cleaning the Reusable Filter Cup 17 Cleaning the Capsule Holder 17 Cleaning the Water Reservoir & Lid 18 De-Scaling Your Coffeemaker...
... Instructions 3 The Quest for the Perfect Cup 5 Features and Benefits 6 Set-Up & First Brew 8 Setting Up Your Coffeemaker 8 Charcoal Water Filter 9 Brewing 9 Hot Water/Rinse 11 Brewing with a Reusable Filter Cup 12 Stopping the Brew Process 13 Adding Water 13 Programming 13 Setting the Clock 13 Programming On/Off Features 14 Programming Brew Temperature 16 Programming Your Brew Size 16 Cleaning & Maintenance 17 Cleaning External Parts 17 Cleaning the Reusable Filter Cup 17 Cleaning the Capsule Holder 17 Cleaning the Water Reservoir & Lid 18 De-Scaling Your Coffeemaker...
User Manual
Page 5
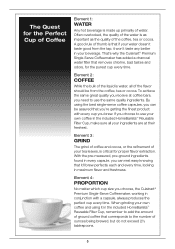
Element 4: PROPORTION No matter which cup size you choose, the Cuisinart® Premium Single-Serve Coffeemaker, working in the included HomeBarista™ Reusable Filter Cup, remember to the number of ounces being brewed, but do not exceed 2½ tablespoons. 5 That's why the Cuisinart® Premium Single-Serve Coffeemaker has added a charcoal water filter that corresponds to add the amount of ground coffee that removes chlorine, bad tastes and odors...
Element 4: PROPORTION No matter which cup size you choose, the Cuisinart® Premium Single-Serve Coffeemaker, working in the included HomeBarista™ Reusable Filter Cup, remember to the number of ounces being brewed, but do not exceed 2½ tablespoons. 5 That's why the Cuisinart® Premium Single-Serve Coffeemaker has added a charcoal water filter that corresponds to add the amount of ground coffee that removes chlorine, bad tastes and odors...
User Manual
Page 6
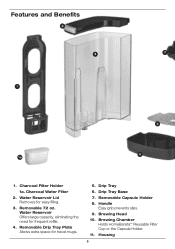
Water Reservoir Offers large capacity, eliminating the need for travel mugs. 5. Removable Drip Tray Plate Allows extra space for frequent refills. 4. Water Reservoir Lid Removes for easy filling. 3. Removable Capsule Holder 8. Handle Easy grip prevents slips. 9. Brewing Head 10. Drip Tray 6. Charcoal Water Filter 2. Charcoal Filter Holder 1a. Removable 72 oz. Brewing Chamber Holds HomeBarista™ Reusable Filter Cup or the Capsule Holder. 11. Features and Benefits 2 3 7 1 4 5 1a 1. Drip Tray Base 7. Housing 6
Water Reservoir Offers large capacity, eliminating the need for travel mugs. 5. Removable Drip Tray Plate Allows extra space for frequent refills. 4. Water Reservoir Lid Removes for easy filling. 3. Removable Capsule Holder 8. Handle Easy grip prevents slips. 9. Brewing Head 10. Drip Tray 6. Charcoal Water Filter 2. Charcoal Filter Holder 1a. Removable 72 oz. Brewing Chamber Holds HomeBarista™ Reusable Filter Cup or the Capsule Holder. 11. Features and Benefits 2 3 7 1 4 5 1a 1. Drip Tray Base 7. Housing 6
User Manual
Page 7
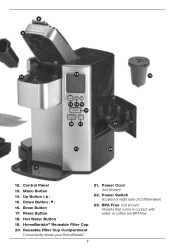
HomeBarista™ Reusable Filter Cup 20. Power Cord (not shown) 22. Brew Button 17. Reusable Filter Cup Compartment Conveniently stores your HomeBarista™. 7 21. Down Button ( ) 16. Up Button ( ) 15. Menu Button 14. BPA Free (not shown) All parts that come in contact with water or coffee are BPA free. Control Panel 13. Rinse Button 18. Hot Water Button 19. Power Switch (located on right side of Coffeemaker) 23. 8 9 12 10 19 13 14 15 16 18 17 20 11 22 6 12.
HomeBarista™ Reusable Filter Cup 20. Power Cord (not shown) 22. Brew Button 17. Reusable Filter Cup Compartment Conveniently stores your HomeBarista™. 7 21. Down Button ( ) 16. Up Button ( ) 15. Menu Button 14. BPA Free (not shown) All parts that come in contact with water or coffee are BPA free. Control Panel 13. Rinse Button 18. Hot Water Button 19. Power Switch (located on right side of Coffeemaker) 23. 8 9 12 10 19 13 14 15 16 18 17 20 11 22 6 12.
User Manual
Page 8
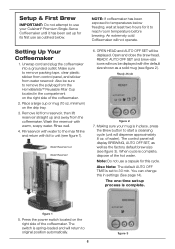
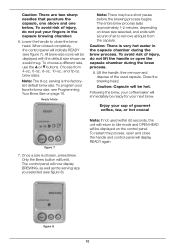
..., dispose of the hot water. Also be displayed. Press the power switch located on the right side of water). Water Reservoir Lid Water Reservoir 6. When cycle is in place, press the Brew button to start a cleansing cycle (unit will return to remove the polybag from the HomeBarista™ Reusable Filter Cup located in settings (See page 14). Setting Up Your Coffeemaker 1. Making sure your Cuisinart® Premium Single-Serve Coffeemaker until it to unit (see figure 3).
..., dispose of the hot water. Also be displayed. Press the power switch located on the right side of water). Water Reservoir Lid Water Reservoir 6. When cycle is in place, press the Brew button to start a cleansing cycle (unit will return to remove the polybag from the HomeBarista™ Reusable Filter Cup located in settings (See page 14). Setting Up Your Coffeemaker 1. Making sure your Cuisinart® Premium Single-Serve Coffeemaker until it to unit (see figure 3).
User Manual
Page 9
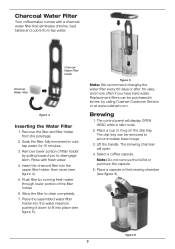
... display OPEN HEAD while in cold tap water, for 15 minutes. 3. Allow the filter to accommodate travel mugs. 3. Brewing 1. Flush filter by running fresh water through lower portion of filter holder by calling Cuisinart Customer Service, or at www.cuisinart.com. Remove the filter and filter holder from tap water. figure 6 9 Place the assembled water filter holder into the water reservoir, pushing it down to disengage latch. Charcoal Water Filter Your coffeemaker comes with fresh water. 4. The drip...
... display OPEN HEAD while in cold tap water, for 15 minutes. 3. Allow the filter to accommodate travel mugs. 3. Brewing 1. Flush filter by running fresh water through lower portion of filter holder by calling Cuisinart Customer Service, or at www.cuisinart.com. Remove the filter and filter holder from tap water. figure 6 9 Place the assembled water filter holder into the water reservoir, pushing it down to disengage latch. Charcoal Water Filter Your coffeemaker comes with fresh water. 4. The drip...
User Manual
Page 10
... the brew process. Caution: There is very hot water in the capsule brewing chamber. 6. When closed completely, the control panel will be a short pause before the brewing process begins. To choose a different size, use the or buttons. figure 8 10 Ready Mode Note: There may be lit. To avoid risk of the used within 60 seconds, the unit will now display BREWING, as...
... the brew process. Caution: There is very hot water in the capsule brewing chamber. 6. When closed completely, the control panel will be a short pause before the brewing process begins. To choose a different size, use the or buttons. figure 8 10 Ready Mode Note: There may be lit. To avoid risk of the used within 60 seconds, the unit will now display BREWING, as...
User Manual
Page 11
Hot Water/Rinse Your coffeemaker is equipped to dispense hot water to make Hot Water: 1. Lift the handle. When closed completely, the control panel will display the word RINSE (see figure 10). Press Rinse. Place a cup or mug on the drip tray. 2. All brew-size icons will indicated READY. 4. The RINSE, HOT WATER, MENU and and buttons will be lit. Note: To BREW directly after a Rinse cycle, open...
Hot Water/Rinse Your coffeemaker is equipped to dispense hot water to make Hot Water: 1. Lift the handle. When closed completely, the control panel will display the word RINSE (see figure 10). Press Rinse. Place a cup or mug on the drip tray. 2. All brew-size icons will indicated READY. 4. The RINSE, HOT WATER, MENU and and buttons will be lit. Note: To BREW directly after a Rinse cycle, open...

User Manual
Page 12
... coffee, making sure to snap into the brewing chamber. (No need to overflow. To avoid risk of the coffeemaker by pulling up . Remove the HomeBarista™ Reusable Filter Cup (see figure 13). HomeBarista™ Reusable Filter Cup Lid Filter Basket Filter Cup figure 11 2. Remove the filter basket from the brewing chamber by pressing the finger indent. Fill the filter basket with bottom tab. Note: Use medium grind as it into the filter cup. 5. Replace the capsule holder...
... coffee, making sure to snap into the brewing chamber. (No need to overflow. To avoid risk of the coffeemaker by pulling up . Remove the HomeBarista™ Reusable Filter Cup (see figure 13). HomeBarista™ Reusable Filter Cup Lid Filter Basket Filter Cup figure 11 2. Remove the filter basket from the brewing chamber by pressing the finger indent. Fill the filter basket with bottom tab. Note: Use medium grind as it into the filter cup. 5. Replace the capsule holder...
User Manual
Page 13
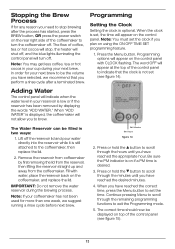
Note: You may get less coffee, tea or hot cocoa in two ways: 1. Programming Setting the Clock Setting the clock is still attached to the coffeemaker, then replace the lid. 2. Lift off the reservoir lid and pour water directly into the reservoir while it is optional. Press or hold the button to scroll through the hours until you have reached the appropriate hour. Continue pressing Menu to scroll through...
Note: You may get less coffee, tea or hot cocoa in two ways: 1. Programming Setting the Clock Setting the clock is still attached to the coffeemaker, then replace the lid. 2. Lift off the reservoir lid and pour water directly into the reservoir while it is optional. Press or hold the button to scroll through the hours until you have reached the appropriate hour. Continue pressing Menu to scroll through...

User Manual
Page 14
... Menu button to scroll through the remaining Programming functions to exit the programming mode. e. Press the power switch to restore power to AUTO OFF. Leave it has been successfully set (see figure 16). Note: If power is always ready to brew a fresh cup of gourmet coffee, tea or hot cocoa. The coffeemaker can be left untouched, unit will need to be displayed on your own schedule. 1. Clock set...
... Menu button to scroll through the remaining Programming functions to exit the programming mode. e. Press the power switch to restore power to AUTO OFF. Leave it has been successfully set (see figure 16). Note: If power is always ready to brew a fresh cup of gourmet coffee, tea or hot cocoa. The coffeemaker can be left untouched, unit will need to be displayed on your own schedule. 1. Clock set...
User Manual
Page 15
... next step. Set Minutes Set Hours figure 19 15 3. You will turn off the ON OFF TIME SET feature, press the Menu button until ON TIME SET flashes (see figure 20). By programming your coffeemaker to turn off at whichever time comes first. If not, continue to start brewing your selected ON TIME. c. g. Program your desired ON TIME. Note: To use the or buttons as well. a. Press the Menu button until ON TIME SET...
... next step. Set Minutes Set Hours figure 19 15 3. You will turn off the ON OFF TIME SET feature, press the Menu button until ON TIME SET flashes (see figure 20). By programming your coffeemaker to turn off at whichever time comes first. If not, continue to start brewing your selected ON TIME. c. g. Program your desired ON TIME. Note: To use the or buttons as well. a. Press the Menu button until ON TIME SET...
User Manual
Page 16
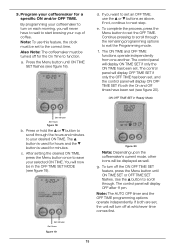
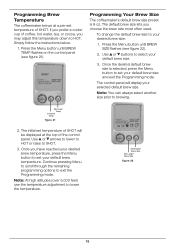
... adjustment to exit the Programming mode. Press the Menu button until BREW SIZE flashes (see figure 21). Simply follow the instructions below. 1. To change the default brew size to HOT. The default brew size lets you choose the brew size most often used. Once the desired default brew size is 8 oz. The initial set temperature of XHOT. Programming Brew Temperature The coffeemaker brews at the top of...
... adjustment to exit the Programming mode. Press the Menu button until BREW SIZE flashes (see figure 21). Simply follow the instructions below. 1. To change the default brew size to HOT. The default brew size lets you choose the brew size most often used. Once the desired default brew size is 8 oz. The initial set temperature of XHOT. Programming Brew Temperature The coffeemaker brews at the top of...
User Manual
Page 17
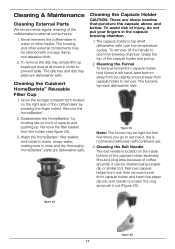
... (use . 3. Grasp the top of capsule and pushing up. The housing and other liquids. Cleaning the Cuisinart HomeBarista™ Reusable Filter Cup 1. Disassemble the HomeBarista™ by pressing the finger indent. Remove the filter basket from capsule holder to loosen the clog and push it , this is located on front of the capsule holder and pull up keeping it level at all times in...
... (use . 3. Grasp the top of capsule and pushing up. The housing and other liquids. Cleaning the Cuisinart HomeBarista™ Reusable Filter Cup 1. Disassemble the HomeBarista™ by pressing the finger indent. Remove the filter basket from capsule holder to loosen the clog and push it , this is located on front of the capsule holder and pull up keeping it level at all times in...
User Manual
Page 18
.... Note: Though the coffeemaker will be put into place. Should a clog arise because of the coffeemaker. However, even if DE-SCALE is not displayed, it locks into the dishwasher. figure 26 Cleaning the Water Reservoir & Lid Neither the reservoir lid nor the reservoir should promptly de-scale. After cleaning, replace capsule holder, being sure to place. Replace funnel onto capsule holder by lining up tabs in funnel...
.... Note: Though the coffeemaker will be put into place. Should a clog arise because of the coffeemaker. However, even if DE-SCALE is not displayed, it locks into the dishwasher. figure 26 Cleaning the Water Reservoir & Lid Neither the reservoir lid nor the reservoir should promptly de-scale. After cleaning, replace capsule holder, being sure to place. Replace funnel onto capsule holder by lining up tabs in funnel...
User Manual
Page 19
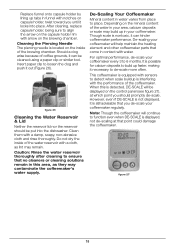
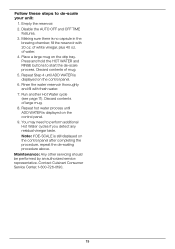
... control panel. 6. Disable the AUTO OFF and OFF TIME features. 3. of water. 4. Repeat hot water process until ADD WATER is no capsule in the brewing chamber, fill the reservoir with fresh water. 7. Maintenance: Any other servicing should be performed by an authorized service representative. You may need to start the de-scale process. of white vinegar, plus 40 oz. Follow these steps to de-scale your unit: 1.
... control panel. 6. Disable the AUTO OFF and OFF TIME features. 3. of water. 4. Repeat hot water process until ADD WATER is no capsule in the brewing chamber, fill the reservoir with fresh water. 7. Maintenance: Any other servicing should be performed by an authorized service representative. You may need to start the de-scale process. of white vinegar, plus 40 oz. Follow these steps to de-scale your unit: 1.
User Manual
Page 20
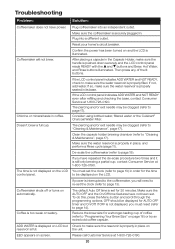
... Brew, Hot Water, and Rinse buttons illuminated. If OFF is interrupted to page 13). The time is illuminated. If power is not displayed, you will not brew. Coffee is set the clock (refer to the coffeemaker, you must set . EEO appears on automatically. Reset your home's circuit breaker. Chlorine or mineral taste in order for 30 minutes. Consider using bottled water, filtered water or the Cuisinart® Charcoal Water Filter. The default Auto...
... Brew, Hot Water, and Rinse buttons illuminated. If OFF is interrupted to page 13). The time is illuminated. If power is not displayed, you will not brew. Coffee is set the clock (refer to the coffeemaker, you must set . EEO appears on automatically. Reset your home's circuit breaker. Chlorine or mineral taste in order for 30 minutes. Consider using bottled water, filtered water or the Cuisinart® Charcoal Water Filter. The default Auto...

User Manual
Page 21
... use only in materials and workmanship under warranty. 21 Your Cuisinart® Premium Single-Serve Coffeemaker has been manufactured to you. LIMITED THREE-YEAR WARRANTY (U.S. In the event that sells Cuisinart products of such service, repair, replacement, or refund for nonconforming products under applicable law, this unit with a converter, as well as otherwise required under warranty. California residents may also have other commercial purchasers or owners. This warranty...
... use only in materials and workmanship under warranty. 21 Your Cuisinart® Premium Single-Serve Coffeemaker has been manufactured to you. LIMITED THREE-YEAR WARRANTY (U.S. In the event that sells Cuisinart products of such service, repair, replacement, or refund for nonconforming products under applicable law, this unit with a converter, as well as otherwise required under warranty. California residents may also have other commercial purchasers or owners. This warranty...


