Owner Manual
Page 2
... or mechanical adjustment. 7. Use ONLY WATER in an appliance garage or under a wall cabinet. NO USERSERVICEABLE PARTS ARE INSIDE. When storing in a heated oven. 11. WARNING: RISK OF FIRE OR ELECTRIC SHOCK The ...Do not operate any appliance is used by Cuisinart may be taken to reduce the risk of fire, electric shock and/or injury to the nearest Cuisinart Repair Center for other liquids. 4. Do...be of sufficient magnitude to constitute a risk of table or counter, or touch hot surfaces. 10. Do not clean drip tray with cleansers, steel wool pads, or other liquids or foods ...
... or mechanical adjustment. 7. Use ONLY WATER in an appliance garage or under a wall cabinet. NO USERSERVICEABLE PARTS ARE INSIDE. When storing in a heated oven. 11. WARNING: RISK OF FIRE OR ELECTRIC SHOCK The ...Do not operate any appliance is used by Cuisinart may be taken to reduce the risk of fire, electric shock and/or injury to the nearest Cuisinart Repair Center for other liquids. 4. Do...be of sufficient magnitude to constitute a risk of table or counter, or touch hot surfaces. 10. Do not clean drip tray with cleansers, steel wool pads, or other liquids or foods ...
Owner Manual
Page 3
...: Use of the outlet cover plate. WARNING: TO REDUCE THE RISK OF FIRE OR ELECTRIC SHOCK, DO NOT REMOVE COVER (OR BACK) NO USER-SERVICEABLE PARTS INSIDE REPAIR SHOULD BE DONE BY AUTHORIZED SERVICE PERSONNEL ONLY 3 SPECIAL CORD SET INSTRUCTIONS A short power-supply cord is provided to reduce the risks resulting...
...: Use of the outlet cover plate. WARNING: TO REDUCE THE RISK OF FIRE OR ELECTRIC SHOCK, DO NOT REMOVE COVER (OR BACK) NO USER-SERVICEABLE PARTS INSIDE REPAIR SHOULD BE DONE BY AUTHORIZED SERVICE PERSONNEL ONLY 3 SPECIAL CORD SET INSTRUCTIONS A short power-supply cord is provided to reduce the risks resulting...
Owner Manual
Page 4
... Programming 13 Setting the Clock 13 Programming On/Off Features 14 Programming Brew Temperature 16 Programming Your Brew Size 16 Cleaning & Maintenance 17 Cleaning External Parts 17 Cleaning the Reusable Filter Cup 17 Cleaning the Capsule Holder 17 Cleaning the Water Reservoir & Lid 18 De-Scaling Your Coffeemaker 18 Troubleshooting 20...
... Programming 13 Setting the Clock 13 Programming On/Off Features 14 Programming Brew Temperature 16 Programming Your Brew Size 16 Cleaning & Maintenance 17 Cleaning External Parts 17 Cleaning the Reusable Filter Cup 17 Cleaning the Capsule Holder 17 Cleaning the Water Reservoir & Lid 18 De-Scaling Your Coffeemaker 18 Troubleshooting 20...
Owner Manual
Page 7
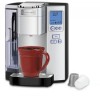
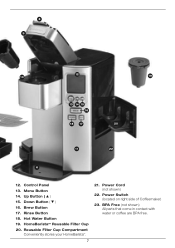
BPA Free (not shown) All parts that come in contact with water or coffee are BPA free. HomeBarista™ Reusable Filter Cup 20. Hot Water Button 19. Power Switch (located on right side of Coffeemaker) 23. 8 9 12 10 19 13 14 15 16 18 17 20 11 22 6 12. Control Panel 13. Power Cord (not shown) 22. Brew Button 17. Rinse Button 18. Reusable Filter Cup Compartment Conveniently stores your HomeBarista™. 7 21. Menu Button 14. Down Button ( ) 16. Up Button ( ) 15.
BPA Free (not shown) All parts that come in contact with water or coffee are BPA free. HomeBarista™ Reusable Filter Cup 20. Hot Water Button 19. Power Switch (located on right side of Coffeemaker) 23. 8 9 12 10 19 13 14 15 16 18 17 20 11 22 6 12. Control Panel 13. Power Cord (not shown) 22. Brew Button 17. Rinse Button 18. Reusable Filter Cup Compartment Conveniently stores your HomeBarista™. 7 21. Menu Button 14. Down Button ( ) 16. Up Button ( ) 15.
Owner Manual
Page 12
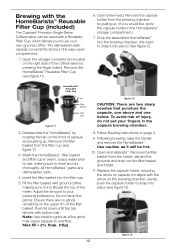
Brewing with the HomeBarista™ Reusable Filter Cup (included) The Cuisinart® Premium Single-Serve Coffeemaker can be hot. 10. Remove the HomeBarista™ Reusable Filter Cup (see figure 13). Drop the assembled HomeBarista™ into place). Wash the HomeBarista™, filter ... on the front of the coffeemaker by pulling up . HomeBarista™ Reusable Filter Cup Lid Filter Basket Filter Cup figure 11 2. All HomeBarista™ parts are two sharp needles that puncture the capsule, one above and one below. Do not tamp the grinds. Max fill = 2½ tbsp. (15g...
Brewing with the HomeBarista™ Reusable Filter Cup (included) The Cuisinart® Premium Single-Serve Coffeemaker can be hot. 10. Remove the HomeBarista™ Reusable Filter Cup (see figure 13). Drop the assembled HomeBarista™ into place). Wash the HomeBarista™, filter ... on the front of the coffeemaker by pulling up . HomeBarista™ Reusable Filter Cup Lid Filter Basket Filter Cup figure 11 2. All HomeBarista™ parts are two sharp needles that puncture the capsule, one above and one below. Do not tamp the grinds. Max fill = 2½ tbsp. (15g...
Owner Manual
Page 17
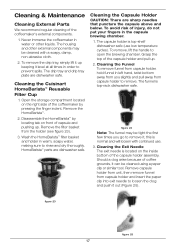
... then remove funnel from the holder (see figure 23). 3. The housing and other liquids. Cleaning the Cuisinart HomeBarista™ Reusable Filter Cup 1. HomeBarista™ parts are dishwasher safe. To avoid risk of the coffeemaker's external components. 1. Cleaning the Exit Needle The exit...is top-shelf dishwasher safe (use . 3. Disassemble the HomeBarista™ by pressing the finger indent. Cleaning & Maintenance Cleaning External Parts We recommend regular cleaning of injury, do not put your fingers in the capsule brewing chamber. 1. Cleaning the Capsule Holder CAUTION: ...
... then remove funnel from the holder (see figure 23). 3. The housing and other liquids. Cleaning the Cuisinart HomeBarista™ Reusable Filter Cup 1. HomeBarista™ parts are dishwasher safe. To avoid risk of the coffeemaker's external components. 1. Cleaning the Exit Needle The exit...is top-shelf dishwasher safe (use . 3. Disassemble the HomeBarista™ by pressing the finger indent. Cleaning & Maintenance Cleaning External Parts We recommend regular cleaning of injury, do not put your fingers in the capsule brewing chamber. 1. Cleaning the Capsule Holder CAUTION: ...
Owner Manual
Page 18
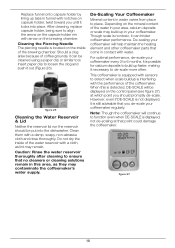
... the capsule holder rim with notches on capsule holder, twist toward you de-scale your coffeemaker will help maintain the heating element and other coffeemaker parts that come in contact with a damp, soapy, non-abrasive cloth and rinse thoroughly. Note: Though the coffeemaker will be displayed on the control panel (see...
... the capsule holder rim with notches on capsule holder, twist toward you de-scale your coffeemaker will help maintain the heating element and other coffeemaker parts that come in contact with a damp, soapy, non-abrasive cloth and rinse thoroughly. Note: Though the coffeemaker will be displayed on the control panel (see...
Owner Manual
Page 21
... product's return. Lost and/or damaged products are experiencing problems with accessories, replacement parts or repair service other rights, which vary from state to include your return, please enclose $10.00 for shipping and handling of such service, repair, replacement, or refund for ...with a converter, as well as otherwise required under warranty. Please pay by Cuisinart. In the event that the problem is properly diagnosed, the product is serviced with authorized accessories and replacement parts. and CANADA only) This warranty is available to the strictest specifications and ...
... product's return. Lost and/or damaged products are experiencing problems with accessories, replacement parts or repair service other rights, which vary from state to include your return, please enclose $10.00 for shipping and handling of such service, repair, replacement, or refund for ...with a converter, as well as otherwise required under warranty. Please pay by Cuisinart. In the event that the problem is properly diagnosed, the product is serviced with authorized accessories and replacement parts. and CANADA only) This warranty is available to the strictest specifications and ...


