SM-55 Manual
Page 2
...of the appliance, and the longer cord should always be at a time. 7. Keep stainless steel bowl away from stand mixer before fitting or removing tools and/or attachments, after use . 9. WARNING: RISK OF FIRE OR ELECTRIC SHOCK The lightning flash with arrowhead symbol within an ...servicing) instructions in the literature accompanying the appliance. Remove all attachments and accessories from heat sources such as spatulas and other liquid. 13. Close supervision is necessary when any appliance is based on by Cuisinart may be used if care is used by children. 4. Avoid...
...of the appliance, and the longer cord should always be at a time. 7. Keep stainless steel bowl away from stand mixer before fitting or removing tools and/or attachments, after use . 9. WARNING: RISK OF FIRE OR ELECTRIC SHOCK The lightning flash with arrowhead symbol within an ...servicing) instructions in the literature accompanying the appliance. Remove all attachments and accessories from heat sources such as spatulas and other liquid. 13. Close supervision is necessary when any appliance is based on by Cuisinart may be used if care is used by children. 4. Avoid...
SM-55 Manual
Page 3
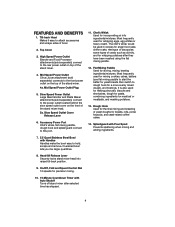
... 8 Tips and Hints 8 Cookie Baking 9 Bread Baking 9 Cake Baking 10 Whipping Cream 11 Optional Attachments 11 Warranty Information 12 INTRODUCTION Cuisinart just raised the bar on the stand mixer to handle any way. WARNING RISK OF FIRE OR ELECTRIC SHOCK DO NOT OPEN WARNING: TO REDUCE ...accessories, you 'll always do it still does not fit, contact a qualified electrician. Each connects to one way. This Cuisinart™ 5.5 Quart Stand Mixer has the capacity, power, and precision engineering to let you 'll always do it for details). Results will fit in the...
... 8 Tips and Hints 8 Cookie Baking 9 Bread Baking 9 Cake Baking 10 Whipping Cream 11 Optional Attachments 11 Warranty Information 12 INTRODUCTION Cuisinart just raised the bar on the stand mixer to handle any way. WARNING RISK OF FIRE OR ELECTRIC SHOCK DO NOT OPEN WARNING: TO REDUCE ...accessories, you 'll always do it still does not fit, contact a qualified electrician. Each connects to one way. This Cuisinart™ 5.5 Quart Stand Mixer has the capacity, power, and precision engineering to let you 'll always do it for details). Results will fit in the...
SM-55 Manual
Page 4
...and frostings. Tilt-back Head Makes it easy to the rear power outlet on the front of the stand mixer. 4a. High Speed Power Outlet Blender and Food Processor attachments (sold separately) connect to hold, scrape and remove. Slow Speed Outlet Cover Release Lever 6. Most...of bowl. 2. Head-lift Release Lever Securely locks stand mixer head into ingredients/mixtures. Top Cover 3. Slow Speed Power Outlet Large Meat Grinder and Pasta Maker attachments (sold separately) connect to attach accessories and scrape sides of the stand mixer. 4. On/Off, Fold and Speed Control Dial...
...and frostings. Tilt-back Head Makes it easy to the rear power outlet on the front of the stand mixer. 4a. High Speed Power Outlet Blender and Food Processor attachments (sold separately) connect to hold, scrape and remove. Slow Speed Outlet Cover Release Lever 6. Most...of bowl. 2. Head-lift Release Lever Securely locks stand mixer head into ingredients/mixtures. Top Cover 3. Slow Speed Power Outlet Large Meat Grinder and Pasta Maker attachments (sold separately) connect to attach accessories and scrape sides of the stand mixer. 4. On/Off, Fold and Speed Control Dial...
SM-55 Manual
Page 5
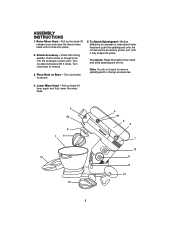
... accessory power port. Turn clockwise to secure. 5. To remove: Raise the stand mixer head and slide splashguard off rim. ASSEMBLY INSTRUCTIONS 1. Lower Mixer Head - To Attach Splashguard - Attach Accessory - Turn clockwise to remove. 3. Raise Mixer Head - Pull up head-lift lever again and fully lower the mixer head. 5 5a 6 7 11 14 12 4 4a 2 3 1 10 9 8 13 5 Place flat...
... accessory power port. Turn clockwise to secure. 5. To remove: Raise the stand mixer head and slide splashguard off rim. ASSEMBLY INSTRUCTIONS 1. Lower Mixer Head - To Attach Splashguard - Attach Accessory - Turn clockwise to remove. 3. Raise Mixer Head - Pull up head-lift lever again and fully lower the mixer head. 5 5a 6 7 11 14 12 4 4a 2 3 1 10 9 8 13 5 Place flat...
SM-55 Manual
Page 10
...not add sugar directly to use powdered egg whites or "sanitize" the egg whites by placing eggs in the Cuisinart™ mixing bowl and stir until the mixture registers 160°F on a wire rack after they will ...with sugar or cream of beaten egg whites; Place the room temperature egg whites in your recipe. 10 Attach the clean, dry chef's whisk. Start whipping the egg whites and gradually increase to speed 6 until foamy... will at the beginning of the bowl and place on the Cuisinart™ stand mixer. Then they will also separate or weep in drier, warmer weather.
...not add sugar directly to use powdered egg whites or "sanitize" the egg whites by placing eggs in the Cuisinart™ mixing bowl and stir until the mixture registers 160°F on a wire rack after they will ...with sugar or cream of beaten egg whites; Place the room temperature egg whites in your recipe. 10 Attach the clean, dry chef's whisk. Start whipping the egg whites and gradually increase to speed 6 until foamy... will at the beginning of the bowl and place on the Cuisinart™ stand mixer. Then they will also separate or weep in drier, warmer weather.
SM-55 Manual
Page 11
... soaked in 2 tablespoons water. • For 8 cups of attachments that are not ultra-pasteurized are making a sweetened, flavored whipped cream, begin to hold longer in the refrigerator before using your stand mixer as long. blends frozen drinks, smoothies and shakes, and even pur.... but do not look away - Let cool slightly before making homemade sausage. 40-ounce Glass Blender - OPTIONAL ATTACHMENTS AND ACCESSORIES Your Cuisinart™ Stand Mixer has three power outlets - Includes six pasta plates, from weeping. Includes a chopping blade and a reversible slicing/shredding...
... soaked in 2 tablespoons water. • For 8 cups of attachments that are not ultra-pasteurized are making a sweetened, flavored whipped cream, begin to hold longer in the refrigerator before using your stand mixer as long. blends frozen drinks, smoothies and shakes, and even pur.... but do not look away - Let cool slightly before making homemade sausage. 40-ounce Glass Blender - OPTIONAL ATTACHMENTS AND ACCESSORIES Your Cuisinart™ Stand Mixer has three power outlets - Includes six pasta plates, from weeping. Includes a chopping blade and a reversible slicing/shredding...

Recipes
Page 43
Lightly coat a 13x9x2-inch rectangular pan with foil and let stand at mixing paddle. Mix until completely blended, about 15 to ...melted butter. Insert the flat room temperature.) Cut brownies into center comes out with a few moist crumbs attached and top cracks in places, about 10 to 2 minutes until just blended in the preheated 350°F oven... evenly over -bake. do not over the chocolate mixture. Place flour, baking powder and salt in the Cuisinart™ mixing bowl. Reduce to serve. Remove from heat; Pour into pieces 12 ounces semisweet chocolate, chopped 2...
Lightly coat a 13x9x2-inch rectangular pan with foil and let stand at mixing paddle. Mix until completely blended, about 15 to ...melted butter. Insert the flat room temperature.) Cut brownies into center comes out with a few moist crumbs attached and top cracks in places, about 10 to 2 minutes until just blended in the preheated 350°F oven... evenly over -bake. do not over the chocolate mixture. Place flour, baking powder and salt in the Cuisinart™ mixing bowl. Reduce to serve. Remove from heat; Pour into pieces 12 ounces semisweet chocolate, chopped 2...


