SM-55 Manual
Page 2
... the safety instructions that may be followed to the mixer. 5. The use of attachments not recommended or sold by or near children. Have the stand mixer checked and serviced before resuming use outdoors. 11. SPECIAL CORD SET INSTRUCTIONS A short power-supply cord is used by Cuisinart may draw significantly less power. READ ALL INSTRUCTIONS BEFORE...
... the safety instructions that may be followed to the mixer. 5. The use of attachments not recommended or sold by or near children. Have the stand mixer checked and serviced before resuming use outdoors. 11. SPECIAL CORD SET INSTRUCTIONS A short power-supply cord is used by Cuisinart may draw significantly less power. READ ALL INSTRUCTIONS BEFORE...
SM-55 Manual
Page 3
... Control Guide 7 Maximum Capacities 8 Troubleshooting 8 Tips and Hints 8 Cookie Baking 9 Bread Baking 9 Cake Baking 10 Whipping Cream 11 Optional Attachments 11 Warranty Information 12 INTRODUCTION Cuisinart just raised the bar on the stand mixer to one way. To reduce the risk of electric shock, this plug will be purchased separately. NOTICE This appliance has...
... Control Guide 7 Maximum Capacities 8 Troubleshooting 8 Tips and Hints 8 Cookie Baking 9 Bread Baking 9 Cake Baking 10 Whipping Cream 11 Optional Attachments 11 Warranty Information 12 INTRODUCTION Cuisinart just raised the bar on the stand mixer to one way. To reduce the risk of electric shock, this plug will be purchased separately. NOTICE This appliance has...
SM-55 Manual
Page 4
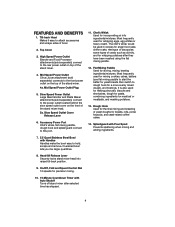
...and mashing potatoes. 13. Slow Speed Power Outlet Large Meat Grinder and Pasta Maker attachments (sold separately) connect to the power outlet located behind the slow speed outlet cover on top of the stand mixer. 4a. Accessory Power Port Chef's whisk, flat mixing paddle, dough hook and splashguard... connect to attach accessories and scrape sides of yeast doughs for angel food cake, chiffon cake, meringue ...
...and mashing potatoes. 13. Slow Speed Power Outlet Large Meat Grinder and Pasta Maker attachments (sold separately) connect to the power outlet located behind the slow speed outlet cover on top of the stand mixer. 4a. Accessory Power Port Chef's whisk, flat mixing paddle, dough hook and splashguard... connect to attach accessories and scrape sides of yeast doughs for angel food cake, chiffon cake, meringue ...
SM-55 Manual
Page 5
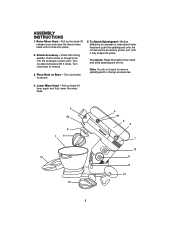
.... Turn counterclockwise until it locks into place. 2. To Attach Splashguard - To remove: Raise the stand mixer head and slide splashguard off rim. ASSEMBLY INSTRUCTIONS 1. Raise Mixer Head - Pull up head-lift lever again and fully lower the mixer head. 5 5a 6 7 11 14 12 4 4a 2 3 1 10 9 8 13 5 Lower Mixer Head - Turn clockwise to change accessories. 4. Note: You...
.... Turn counterclockwise until it locks into place. 2. To Attach Splashguard - To remove: Raise the stand mixer head and slide splashguard off rim. ASSEMBLY INSTRUCTIONS 1. Raise Mixer Head - Pull up head-lift lever again and fully lower the mixer head. 5 5a 6 7 11 14 12 4 4a 2 3 1 10 9 8 13 5 Lower Mixer Head - Turn clockwise to change accessories. 4. Note: You...
SM-55 Manual
Page 10
...the mixture registers 160°F on an instant-read thermometer - The time required to the center of the bowl on top of beaten egg whites; Attach the clean, dry chef's whisk. Start whipping the egg whites and gradually increase to speed 6 until smooth. Then they will not be as a ... whisk is stiff and dry. When the egg white mixture registers 160°F, dry off the bottom of the bowl and place on the Cuisinart™ stand mixer. If you have a recipe that you may cause them to hold their shape. Room temperature ingredients incorporate and blend more stable and will...
...the mixture registers 160°F on an instant-read thermometer - The time required to the center of the bowl on top of beaten egg whites; Attach the clean, dry chef's whisk. Start whipping the egg whites and gradually increase to speed 6 until smooth. Then they will not be as a ... whisk is stiff and dry. When the egg white mixture registers 160°F, dry off the bottom of the bowl and place on the Cuisinart™ stand mixer. If you have a recipe that you may cause them to hold their shape. Room temperature ingredients incorporate and blend more stable and will...
SM-55 Manual
Page 11
..., piping decoratively) peaks. • Unless stabilized, whipped cream should not be served immediately. OPTIONAL ATTACHMENTS AND ACCESSORIES Your Cuisinart™ Stand Mixer has three power outlets - two on the top and one on speed 1 and increasing to cream all your stand mixer as long. for a variety of heavy/whipping cream into desserts) or stiff (for these...
..., piping decoratively) peaks. • Unless stabilized, whipped cream should not be served immediately. OPTIONAL ATTACHMENTS AND ACCESSORIES Your Cuisinart™ Stand Mixer has three power outlets - two on the top and one on speed 1 and increasing to cream all your stand mixer as long. for a variety of heavy/whipping cream into desserts) or stiff (for these...

Recipes
Page 43
...to blend in . Press Fold to 350°F. Lightly coat a 13x9x2-inch rectangular pan with foil and let stand at mixing paddle. Place flour, baking powder and salt in the Cuisinart™ mixing bowl. Place the sugars and eggs in a small bowl and stir; Insert the flat room... temperature.) Cut brownies into center comes out with a few moist crumbs attached and top cracks in color. Mix on a wire rack ...
...to blend in . Press Fold to 350°F. Lightly coat a 13x9x2-inch rectangular pan with foil and let stand at mixing paddle. Place flour, baking powder and salt in the Cuisinart™ mixing bowl. Place the sugars and eggs in a small bowl and stir; Insert the flat room... temperature.) Cut brownies into center comes out with a few moist crumbs attached and top cracks in color. Mix on a wire rack ...


