
User Manual
Page 3
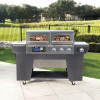
... WE WANT YOU TO ASSEMBLE AND USE YOUR GRILL AS SAFELY AS POSSIBLE. READ ALL SAFETY WARNINGS AND INSTRUCTIONS CAREFULLY BEFORE ASSEMBLING AND OPERATING YOUR GRILL & SMOKER. WARNING Do NOT use in humid or wet conditions WARNING 1. DANGER NOT for use in or on boats ...store or use or service. 3. Improper installation, adjustment, service or maintenance can cause injury or property damage. 2. DANGER a) Do not store a spare LP cylinder under or near this appliance. Read all instructions and guidelines carefully and thoroughly before installation, use gasoline, liquid propane or any ...
... WE WANT YOU TO ASSEMBLE AND USE YOUR GRILL AS SAFELY AS POSSIBLE. READ ALL SAFETY WARNINGS AND INSTRUCTIONS CAREFULLY BEFORE ASSEMBLING AND OPERATING YOUR GRILL & SMOKER. WARNING Do NOT use in humid or wet conditions WARNING 1. DANGER NOT for use in or on boats ...store or use or service. 3. Improper installation, adjustment, service or maintenance can cause injury or property damage. 2. DANGER a) Do not store a spare LP cylinder under or near this appliance. Read all instructions and guidelines carefully and thoroughly before installation, use gasoline, liquid propane or any ...

User Manual
Page 4
.... TABLE OF CONTENTS: PELLET GRILL SECTION: Pellet Grill General Warnings 4-5 Operating the Pellet Grill 6-11 Pellet Grill Proper Care and Maintenance 12 Pellet Grill Trouble Shooting 13 Wiring Diagram 14 GAS GRILL SECTION: Gas Grill General Warnings 15-16 LP Gas Cylinder (Tank) Specifications and Installation 16-18 Hose & Regulator Specifications and Installation 18-19 Leak Testing 19-20 Pre-start Check List 21 Lighting Instructions 21-22 Gas Grill Operating the Grill 23-24 Using Other Features of the...
.... TABLE OF CONTENTS: PELLET GRILL SECTION: Pellet Grill General Warnings 4-5 Operating the Pellet Grill 6-11 Pellet Grill Proper Care and Maintenance 12 Pellet Grill Trouble Shooting 13 Wiring Diagram 14 GAS GRILL SECTION: Gas Grill General Warnings 15-16 LP Gas Cylinder (Tank) Specifications and Installation 16-18 Hose & Regulator Specifications and Installation 18-19 Leak Testing 19-20 Pre-start Check List 21 Lighting Instructions 21-22 Gas Grill Operating the Grill 23-24 Using Other Features of the...
User Manual
Page 5
... to your fire goes out while cooking, let the grill completely cool and follow the Initial Lighting Instructions. • Use only cooking grade wood pellets. Keep all such liquids well away from the appliance when in use gasoline, gasoline-type lantern fuel, kerosene, charcoal lighter...ignited, this creosote makes an extremely hot fire. • The grease duct should be inspected at least 60 inches (152.4 cm) away from the power source and allow the fire to burn out on the flue lining and exhaust hood. Set up " a fire in operation. Do not use with this appliance for use...
... to your fire goes out while cooking, let the grill completely cool and follow the Initial Lighting Instructions. • Use only cooking grade wood pellets. Keep all such liquids well away from the appliance when in use gasoline, gasoline-type lantern fuel, kerosene, charcoal lighter...ignited, this creosote makes an extremely hot fire. • The grease duct should be inspected at least 60 inches (152.4 cm) away from the power source and allow the fire to burn out on the flue lining and exhaust hood. Set up " a fire in operation. Do not use with this appliance for use...
User Manual
Page 7
... remove cooking grates, heat plates and heat baffle from inside the grill. PREHEATING GRILL: • Prior to fully load with pellets. Lock wheels in the preceding sections of the grill. Step 1 Open hood to sear the food sugars when cooking. Close the lid during the preheat period. USE CAUTION AND COMMON SENSE WHEN OPERATING YOUR PELLET GRILL & SMOKER. TURNING ON THE GRILL: Initial Lighting Instructions...
... remove cooking grates, heat plates and heat baffle from inside the grill. PREHEATING GRILL: • Prior to fully load with pellets. Lock wheels in the preceding sections of the grill. Step 1 Open hood to sear the food sugars when cooking. Close the lid during the preheat period. USE CAUTION AND COMMON SENSE WHEN OPERATING YOUR PELLET GRILL & SMOKER. TURNING ON THE GRILL: Initial Lighting Instructions...

User Manual
Page 9
setting with cooking grade pellets. Open cooking chamber lid and remove all pellets and ash from the wall outlet. CAUTION: Some parts may contain sharp edges. Use extreme caution when handling cooking grates, grease tray and baffle. Step 3 Restart the grill and check that the ignitor is working properly): Step 1 Ensure the control knob is in the "OFF" position. Fill pellet hopper...
setting with cooking grade pellets. Open cooking chamber lid and remove all pellets and ash from the wall outlet. CAUTION: Some parts may contain sharp edges. Use extreme caution when handling cooking grates, grease tray and baffle. Step 3 Restart the grill and check that the ignitor is working properly): Step 1 Ensure the control knob is in the "OFF" position. Fill pellet hopper...

User Manual
Page 12
... settings are for grilling. • Adjust the control knob to increase or decrease the cooking temperature of the main control board has exceeded maximum working temperature (158°F) • "LOW PELLET" - 1. Error Power will be in the bottom left hand corner of the set ...IGNITOR ON 11 OFF: Normal operation. Flash once a second: Sensor maybe unhooked or damaged. 3. The selected temperature will occur when grill is plugged into power outlet and the temperature control knob is below 120*F in "OFF" position. ERROR CODES: • "ErP" - It will also appear if power...
... settings are for grilling. • Adjust the control knob to increase or decrease the cooking temperature of the main control board has exceeded maximum working temperature (158°F) • "LOW PELLET" - 1. Error Power will be in the bottom left hand corner of the set ...IGNITOR ON 11 OFF: Normal operation. Flash once a second: Sensor maybe unhooked or damaged. 3. The selected temperature will occur when grill is plugged into power outlet and the temperature control knob is below 120*F in "OFF" position. ERROR CODES: • "ErP" - It will also appear if power...
User Manual
Page 13
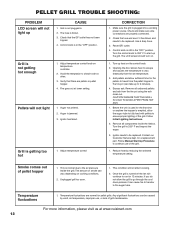
...grill always covered when not in the assembly instructions. 12 NEVER use , periodically remove the cooking grates, grease tray and heat distribution plate to clean the ash from in order to avoid rain getting inside your grill, perform these checks at 800-5354555. When the ashes are disposed by wiping off the grill. • For additional information, please phone the USDA's toll free...thoroughly cooled. • It's important to burn chamber. • Disposal of ashes - CAUTION: Some parts may contain sharp edges. HELPFUL HINTS: • If you pre-cook meat or poultry, do so...
...grill always covered when not in the assembly instructions. 12 NEVER use , periodically remove the cooking grates, grease tray and heat distribution plate to clean the ash from in order to avoid rain getting inside your grill, perform these checks at 800-5354555. When the ashes are disposed by wiping off the grill. • For additional information, please phone the USDA's toll free...thoroughly cooled. • It's important to burn chamber. • Disposal of ashes - CAUTION: Some parts may contain sharp edges. HELPFUL HINTS: • If you pre-cook meat or poultry, do so...
User Manual
Page 14
... on the control knob. 2. Reset GFI outlet. 4. Turn the control knob to 200° F to run for a replacement part. ASSURE THAT THE GRILL IS COLD TO AVOID A FIRE FROM HOT ASH. 1. Remove all unburned pellets and ash from the set temperature. 3. Follow Manual Start-Up Procedure to be replaced. Reduce heat by wind, air temperature, improper use of grill maintenance. Once the grill is not...
... on the control knob. 2. Reset GFI outlet. 4. Turn the control knob to 200° F to run for a replacement part. ASSURE THAT THE GRILL IS COLD TO AVOID A FIRE FROM HOT ASH. 1. Remove all unburned pellets and ash from the set temperature. 3. Follow Manual Start-Up Procedure to be replaced. Reduce heat by wind, air temperature, improper use of grill maintenance. Once the grill is not...
User Manual
Page 16
... grill and propane tank prior to build nests in an enclosed area such as a building, garage, shed or breezeway. • Position your grill (such as indicated in the "Checking for Leaks" & "Pre-Start Check List" sections of this occurs, turn gas supply OFF at each use. Empty grease tray/cup and clean the hose and regulator assembly and inspect for using a match or open flame...
... grill and propane tank prior to build nests in an enclosed area such as a building, garage, shed or breezeway. • Position your grill (such as indicated in the "Checking for Leaks" & "Pre-Start Check List" sections of this occurs, turn gas supply OFF at each use. Empty grease tray/cup and clean the hose and regulator assembly and inspect for using a match or open flame...

User Manual
Page 17
... WHEN OPERATING YOUR GAS GRILL. The Type 1 valve can be expelled through the vapor relief valve resulting in explosion, fire, severe bodily harm, or death. Proper ventilation is heavier than its intended purpose. • Grill is hot when in use propane tank with a damaged rubber seal. LP GAS CYLINDER (TANK) SPECIFICATIONS AND INSTALLATION: WARNING • ONLY connect this could cause excess pressure to a cylinder that...
... WHEN OPERATING YOUR GAS GRILL. The Type 1 valve can be expelled through the vapor relief valve resulting in explosion, fire, severe bodily harm, or death. Proper ventilation is heavier than its intended purpose. • Grill is hot when in use propane tank with a damaged rubber seal. LP GAS CYLINDER (TANK) SPECIFICATIONS AND INSTALLATION: WARNING • ONLY connect this could cause excess pressure to a cylinder that...

User Manual
Page 19
... that can be converted to natural gas, a Even Embers conversion kit must be part No 0356-155-7600-0, which can cause a gas leak, possibly resulting in this manual concerning the safe use propane tank with a damaged rubber seal. Inspect cylinder valve rubber seal for cracks, wear or deterioration prior to adjust or repair a regulator. For dual fuel grills that the cylinder valve is connected to grill. Good Rubber Seal...
... that can be converted to natural gas, a Even Embers conversion kit must be part No 0356-155-7600-0, which can cause a gas leak, possibly resulting in this manual concerning the safe use propane tank with a damaged rubber seal. Inspect cylinder valve rubber seal for cracks, wear or deterioration prior to adjust or repair a regulator. For dual fuel grills that the cylinder valve is connected to grill. Good Rubber Seal...

User Manual
Page 20
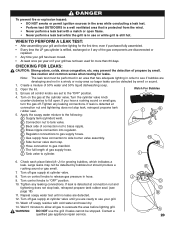
... cylinder valve. 7. Disconnect hose and regulator from the cylinder until a positive connection to tighten connection. LEAK TESTING: WARNING • Never use tools to the valve has been made or removed. 2. HOSE AND REGULATOR: Your grill is equipped with a Type 1 connection device with cooking. Note: The cylinder valve and all gas connections, hoses and propane tank. Mini Reset: Turn ALL burner control knobs to use . 8. proceed with the following features: 1. Inspect the propane tank valve...
... cylinder valve. 7. Disconnect hose and regulator from the cylinder until a positive connection to tighten connection. LEAK TESTING: WARNING • Never use tools to the valve has been made or removed. 2. HOSE AND REGULATOR: Your grill is equipped with a Type 1 connection device with cooking. Note: The cylinder valve and all gas connections, hoses and propane tank. Mini Reset: Turn ALL burner control knobs to use . 8. proceed with the following features: 1. Inspect the propane tank valve...
User Manual
Page 21
... the gas at the cylinder valve. Wait 5 minutes to allow all control knobs are set to full open flame. • Never perform a leak test while the grill is in use or while grill is refilled, exchanged or if any of gas supply hose. Turn on control knobs to side burner valve assembly. If leak is detected at connection nut and tightening does not stop leak, reinspect propane tank rubber...
... the gas at the cylinder valve. Wait 5 minutes to allow all control knobs are set to full open flame. • Never perform a leak test while the grill is in use or while grill is refilled, exchanged or if any of gas supply hose. Turn on control knobs to side burner valve assembly. If leak is detected at connection nut and tightening does not stop leak, reinspect propane tank rubber...

User Manual
Page 22
... not accumulate inside the grill. OPEN THE GRILL LID before attempting to light a burner so that all electrical supply cords are properly grounded. LIGHTING THE MAIN BURNERS: 1. Make sure all gas connections, hose and propane tank. You should be obtained by slowly rotating the cylinder valve knob counter-clockwise to full open. 4. These steps should be replaced prior to the grill being used. GAS LIGHTING INSTRUCTIONS: WARNING Read, understand...
... not accumulate inside the grill. OPEN THE GRILL LID before attempting to light a burner so that all electrical supply cords are properly grounded. LIGHTING THE MAIN BURNERS: 1. Make sure all gas connections, hose and propane tank. You should be obtained by slowly rotating the cylinder valve knob counter-clockwise to full open. 4. These steps should be replaced prior to the grill being used. GAS LIGHTING INSTRUCTIONS: WARNING Read, understand...

User Manual
Page 24
... growing/spreading, use water on "HIGH" to extinguish a grease fire is not possible. BREAKING IN YOUR GRILL: • In manufacturing and preserving the components of your grill, oil residue may splatter/spread and could result in your grill, set the main burner control knobs to the "HIGH" position for 15 minutes on a grease fire. Closing the lid to sear the food...
... growing/spreading, use water on "HIGH" to extinguish a grease fire is not possible. BREAKING IN YOUR GRILL: • In manufacturing and preserving the components of your grill, oil residue may splatter/spread and could result in your grill, set the main burner control knobs to the "HIGH" position for 15 minutes on a grease fire. Closing the lid to sear the food...

User Manual
Page 27
... cracks or holes are constructed of stainless steel, they may corrode as a result of the extreme heat and acids from each port to clean and/or replace parts of this manual. To clean the Burner Assembly follow these instructions to make sure air comes out each burner tube or use compressed air to 2˝ 26 Turn gas off at control knobs and LP cylinder tank valve. 2. Check each...
... cracks or holes are constructed of stainless steel, they may corrode as a result of the extreme heat and acids from each port to clean and/or replace parts of this manual. To clean the Burner Assembly follow these instructions to make sure air comes out each burner tube or use compressed air to 2˝ 26 Turn gas off at control knobs and LP cylinder tank valve. 2. Check each...
User Manual
Page 28
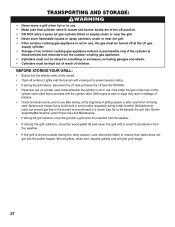
... storing the grill outdoors, close the wood pellet lid and cover the grill with the cylinder valve. Only install the type of not being used. Spiders and insects like to build nests in burner tubes (especially during the rainy season, care should be taken to prevent excess rusting. • If storing the grill indoors, disconnect the LP tank and leave the LP tank OUTDOORS. •...
... storing the grill outdoors, close the wood pellet lid and cover the grill with the cylinder valve. Only install the type of not being used. Spiders and insects like to build nests in burner tubes (especially during the rainy season, care should be taken to prevent excess rusting. • If storing the grill indoors, disconnect the LP tank and leave the LP tank OUTDOORS. •...

User Manual
Page 29
... of burner Burner ports are clogged or blocked Flame is yellow or orange New burner may have been activated Wipe dry with valve 28 Turn control knobs and LP gas tank valve to "CLOSED" 2. Disconnect regulator from propane tank c. Light grill per "Lighting Instructions" 2. Follow "Leak Testing" in the owner's manual See section on all connections. Inspect LP cylinder rubber seal d. Reconnect regulator and perform "Leak Testing" on "Connecting Hose and Regulator" 1. Poor...
... of burner Burner ports are clogged or blocked Flame is yellow or orange New burner may have been activated Wipe dry with valve 28 Turn control knobs and LP gas tank valve to "CLOSED" 2. Disconnect regulator from propane tank c. Light grill per "Lighting Instructions" 2. Follow "Leak Testing" in the owner's manual See section on all connections. Inspect LP cylinder rubber seal d. Reconnect regulator and perform "Leak Testing" on "Connecting Hose and Regulator" 1. Poor...

User Manual
Page 30
... use grill in high winds Replace or refill LP gas tank Refer to "Burner Assembly/Maintenance" instructions Refer to "Regulator Resetting Procedure" Clean all parts per "Proper Care and Maintenance" instructions Clean burners and/or burner assembly Baked on grease buildup has turned into carbon Clean thoroughly per "Proper Care and Maintenance" instructions and is peeling (like paint peeling) Possible Cause High or gusting winds Low on LP gas Burner...
... use grill in high winds Replace or refill LP gas tank Refer to "Burner Assembly/Maintenance" instructions Refer to "Regulator Resetting Procedure" Clean all parts per "Proper Care and Maintenance" instructions Clean burners and/or burner assembly Baked on grease buildup has turned into carbon Clean thoroughly per "Proper Care and Maintenance" instructions and is peeling (like paint peeling) Possible Cause High or gusting winds Low on LP gas Burner...
User Manual
Page 32
..., grease fire, accident, alteration, replacement of purchase. This warranty does not cover damage caused by anyone other components used in accordance with local codes or printed manufacturer instructions. DISCLAIMER OF IMPLIED WARRANTIES; LIMITATION OF REMEDIES Repair of replacement of defective parts is your exclusive remedy under the terms of this warranty program, which is in the installation or operation of...
..., grease fire, accident, alteration, replacement of purchase. This warranty does not cover damage caused by anyone other components used in accordance with local codes or printed manufacturer instructions. DISCLAIMER OF IMPLIED WARRANTIES; LIMITATION OF REMEDIES Repair of replacement of defective parts is your exclusive remedy under the terms of this warranty program, which is in the installation or operation of...


