

DLC-10S Manual
Page 2
With other hand, line up work bowl counterclockwise until it clicks. Turn stem clock wise until it clicks into position. SLICING AND SHREDDING WITH THE SLICING AND SHREDDING DISCS 1 Lock bowl in place. (See 1 and 2 above.) Place disc, cutting side down, on flat, stable surface and hold it down firmly with similar symbols on disc. Pick up two symbols (oand a) on stem with one hand. Turn work bowl, with handle facing you . CHOPPING AND PUREEING WITH THE METAL BLADE 1 Put base on counter, with nameplate facing you , and place it on base with handle at about 7 o'clock.
With other hand, line up work bowl counterclockwise until it clicks. Turn stem clock wise until it clicks into position. SLICING AND SHREDDING WITH THE SLICING AND SHREDDING DISCS 1 Lock bowl in place. (See 1 and 2 above.) Place disc, cutting side down, on flat, stable surface and hold it down firmly with similar symbols on disc. Pick up two symbols (oand a) on stem with one hand. Turn work bowl, with handle facing you . CHOPPING AND PUREEING WITH THE METAL BLADE 1 Put base on counter, with nameplate facing you , and place it on base with handle at about 7 o'clock.

DLC-10S Manual
Page 3
.... Place metal blade over shall, matching outline O on top of hub to shape of shaft. Turn cover counterclockwise until it to lock. Put cover on work bowl, with feed tube at 7 o'clock, and turn until tabs click into position. Push the small white pusher all the way down until it clicks. Insert... food in feed tube. Slide large pusher sleeve over feed tube and push all the way down as far as it and push Slide Lock to ...
.... Place metal blade over shall, matching outline O on top of hub to shape of shaft. Turn cover counterclockwise until it to lock. Put cover on work bowl, with feed tube at 7 o'clock, and turn until tabs click into position. Push the small white pusher all the way down until it clicks. Insert... food in feed tube. Slide large pusher sleeve over feed tube and push all the way down as far as it and push Slide Lock to ...

DLC-10S Manual
Page 5
... holding lever down to OFF position to PULSE position and release it is never neces sary in normal use and will stay in and work bowl won't come off until locking tab clicks. If machine doesn't start motor. Press firmly on cover and push locking tab down to stop... must be unplugged wnen you . Move control switch down at PULSE position, and push food through. Plug in position. 8 To remove cover, hold it will go and turn stem counterclockwise. Turn and lift. The work bowl, cover and pusher assembly are locked in machine. To remove pusher assembly, hold pusher ...
... holding lever down to OFF position to PULSE position and release it is never neces sary in normal use and will stay in and work bowl won't come off until locking tab clicks. If machine doesn't start motor. Press firmly on cover and push locking tab down to stop... must be unplugged wnen you . Move control switch down at PULSE position, and push food through. Plug in position. 8 To remove cover, hold it will go and turn stem counterclockwise. Turn and lift. The work bowl, cover and pusher assembly are locked in machine. To remove pusher assembly, hold pusher ...

DLC-10S Manual
Page 6
.... (If machine does not stop within 2 seconds when you would sharp knives, out of reach of attachments not recommended or sold by Cuisinart may cause fire, electrical shock, personal injury or damage to your reaction time or perception. 3. A plastic scraper may draw significantly less ...of 5.1 amperes is based on the shaft except when the bowl is proper ly locked in place and the processor is stopped. 3. Maximum rating of work-bowl switch, never store processor with moving blades or discs while processing food, to prevent possibility of alcohol or other motor-driven appliance,...
.... (If machine does not stop within 2 seconds when you would sharp knives, out of reach of attachments not recommended or sold by Cuisinart may cause fire, electrical shock, personal injury or damage to your reaction time or perception. 3. A plastic scraper may draw significantly less ...of 5.1 amperes is based on the shaft except when the bowl is proper ly locked in place and the processor is stopped. 3. Maximum rating of work-bowl switch, never store processor with moving blades or discs while processing food, to prevent possibility of alcohol or other motor-driven appliance,...

DLC-10S Manual
Page 8
... plug and pull from outlet when not in use outdoors. 5. Do not let cord hang over edge of work-bowl switch, never store processor with pusher assembly in place before operating food processor. 7. To reduce the risk of injury, no blade or disc should be placed on motor shaft. Be ... Cover may expose the user to injury. 3. Do not use , before putting on attachment that affect your food processor. 5. Compact Cover 1. Never push food down by Cuisinart. The food processor is based on or tak ing off parts and before removing cover, (machine does not stop within 4 seconds when ...
... plug and pull from outlet when not in use outdoors. 5. Do not let cord hang over edge of work-bowl switch, never store processor with pusher assembly in place before operating food processor. 7. To reduce the risk of injury, no blade or disc should be placed on motor shaft. Be ... Cover may expose the user to injury. 3. Do not use , before putting on attachment that affect your food processor. 5. Compact Cover 1. Never push food down by Cuisinart. The food processor is based on or tak ing off parts and before removing cover, (machine does not stop within 4 seconds when ...

DLC-10S Manual
Page 10
... meat for hamburger or sausage. Insert Ihe metal blade and pul trie pieces in the work bowl. Press the lever down lo PULSE and releasing it into olace. Try chopping other food with a high water content will quickly end up as described in the recipes in Ihe path of the blade each pulse...
... meat for hamburger or sausage. Insert Ihe metal blade and pul trie pieces in the work bowl. Press the lever down lo PULSE and releasing it into olace. Try chopping other food with a high water content will quickly end up as described in the recipes in Ihe path of the blade each pulse...

DLC-10S Manual
Page 11
..., and Ihe cover will come wilh It Never try lo remove Ihe cover and Ihe work bowl together, this can remove the cover and pusher assembly in the bottom of the work bowl with your thumb. REMOVING PROCESSED FOOD Before you do anything, wait tor the blade to remove il. When it . Hold... Ihe pusher assembly wilh your finger or a spalula while pouring oul processed lood. Turn Ihe bowl clockwise to scrape off any lood slicking...
..., and Ihe cover will come wilh It Never try lo remove Ihe cover and Ihe work bowl together, this can remove the cover and pusher assembly in the bottom of the work bowl with your thumb. REMOVING PROCESSED FOOD Before you do anything, wait tor the blade to remove il. When it . Hold... Ihe pusher assembly wilh your finger or a spalula while pouring oul processed lood. Turn Ihe bowl clockwise to scrape off any lood slicking...

DLC-10S Manual
Page 12
... ► When making soup, you wilt wanl to puree vegetables that slick to the bowl and process in Ihe work bowl. Pulse to chop coarsely, then move Ihe lever up to ON and process continuously until the food is pureed. (NOTE: Cooked potatoes are about egual In size. Put no more even...fruits and vegetables First, cut the food into linch pieces. To puree fruit and cooked vegetables First, cut Lhe food into place, lirsl removing Ihe small pusher. See the recipe lor mashed potatoes at the end of lood may become wedged between ihe blade and the work bowl. You get a more Irian ...
... ► When making soup, you wilt wanl to puree vegetables that slick to the bowl and process in Ihe work bowl. Pulse to chop coarsely, then move Ihe lever up to ON and process continuously until the food is pureed. (NOTE: Cooked potatoes are about egual In size. Put no more even...fruits and vegetables First, cut the food into linch pieces. To puree fruit and cooked vegetables First, cut Lhe food into place, lirsl removing Ihe small pusher. See the recipe lor mashed potatoes at the end of lood may become wedged between ihe blade and the work bowl. You get a more Irian ...

DLC-10S Manual
Page 13
...at least 10 days, stored in an airtight bag in the recipe. It is bitter tasting. To assemble the Compact Caver: Begin with 1/2 cup of 2 inches or less and process with the work bowl and the ...the refrigerator. Place the Compact Cover on the work bowl so that is too hard to cut into place. Lift cover up and read able. Large foods like hard cheese should be dropped in an ... cakes, cookies, pies and breads. Add to process cheese that the Cuisinart logo written on the cover is running. Small foods like garlic can obtain. To chop parsley and other herbs will have ...
...at least 10 days, stored in an airtight bag in the recipe. It is bitter tasting. To assemble the Compact Caver: Begin with 1/2 cup of 2 inches or less and process with the work bowl and the ...the refrigerator. Place the Compact Cover on the work bowl so that is too hard to cut into place. Lift cover up and read able. Large foods like hard cheese should be dropped in an ... cakes, cookies, pies and breads. Add to process cheese that the Cuisinart logo written on the cover is running. Small foods like garlic can obtain. To chop parsley and other herbs will have ...

DLC-10S Manual
Page 14
... il is not chopped line enough, let Ihe processor run continuously lor a few seconds. Process lo combine thoroughly. If the food is evenly chopped, then process conImuouslylo Ihe desired texture Scrape the bowl with a spatula as needed Leave Ihe puree in ihe work bowl and add eggs, cream and seasonings as called...AND PUREEING WITH THE METAL BLADE To chop meal, poultry, lish and seafood The food should be very cold, bit nol frozen Cut it inlo 1-inch pieces to scrape lood Irom the sides ol Ihe bowl as necessary. Press the levei down to avoid overpiocessing. By varying the processing lime...
... il is not chopped line enough, let Ihe processor run continuously lor a few seconds. Process lo combine thoroughly. If the food is evenly chopped, then process conImuouslylo Ihe desired texture Scrape the bowl with a spatula as needed Leave Ihe puree in ihe work bowl and add eggs, cream and seasonings as called...AND PUREEING WITH THE METAL BLADE To chop meal, poultry, lish and seafood The food should be very cold, bit nol frozen Cut it inlo 1-inch pieces to scrape lood Irom the sides ol Ihe bowl as necessary. Press the levei down to avoid overpiocessing. By varying the processing lime...

DLC-10S Manual
Page 15
Scrape the sides of nuts. To make cashew butter, add a little bland vegetable oil. e!c. - Be sure the work bowl is running Next, add the butler and process until drops ol oil are visible. Add small hard mgredienls like garlic and ...ingredients first - chopping them - i < -■-- anchovies, cheese, herbs. Press Ihe lever down to keep ihem without lurning Idem into tablespoon size pieces. Processor nut butters contain no more thai 2 cups al one time. without separating. You can also chop nuls with a shredding disc The optional Fire Shredding Disc...
Scrape the sides of nuts. To make cashew butter, add a little bland vegetable oil. e!c. - Be sure the work bowl is running Next, add the butler and process until drops ol oil are visible. Add small hard mgredienls like garlic and ...ingredients first - chopping them - i < -■-- anchovies, cheese, herbs. Press Ihe lever down to keep ihem without lurning Idem into tablespoon size pieces. Processor nut butters contain no more thai 2 cups al one time. without separating. You can also chop nuls with a shredding disc The optional Fire Shredding Disc...

DLC-10S Manual
Page 16
...Chill the cream well before whipping. Add BbOtlt 1 teaspoon ol lemon luice or vinegar for the Pro Classic1" Food Processor. its flavor is an optional attachment for every egg white. To whip cream Processor whipped cream holds it dribbles through the pinliole at the boltom. Then add sugar as desired ... For con sistently reliable results, add 2 tablespoons ot non-fat dried milk lor every cup of oil into the small pusher. The work bowl and metal blade must be almost as thick as butter. Mayonnaise made from yolks will not whip to thicken. After it shape very well...
...Chill the cream well before whipping. Add BbOtlt 1 teaspoon ol lemon luice or vinegar for the Pro Classic1" Food Processor. its flavor is an optional attachment for every egg white. To whip cream Processor whipped cream holds it dribbles through the pinliole at the boltom. Then add sugar as desired ... For con sistently reliable results, add 2 tablespoons ot non-fat dried milk lor every cup of oil into the small pusher. The work bowl and metal blade must be almost as thick as butter. Mayonnaise made from yolks will not whip to thicken. After it shape very well...

DLC-10S Manual
Page 17
...them. Stop pro cessing as soon as described above. To make crumbs and crumb crusts Cut or break bread. The ingredients for 5 seconds. Then add flavoring and liquid • vanilla, spices, cocoa, etc. Insert the metal blade and add the cake mix to the work bowl is running,...ingredients.) To make paslry This describes general procedure. To make cake mix Your food processor work bowl. A recipe giving exact proportions is at room temperature and cut into pieces and put them first while the work bowl and process to hold the blade in plastic wrap and refrig erate or ...
...them. Stop pro cessing as soon as described above. To make crumbs and crumb crusts Cut or break bread. The ingredients for 5 seconds. Then add flavoring and liquid • vanilla, spices, cocoa, etc. Insert the metal blade and add the cake mix to the work bowl is running,...ingredients.) To make paslry This describes general procedure. To make cake mix Your food processor work bowl. A recipe giving exact proportions is at room temperature and cut into pieces and put them first while the work bowl and process to hold the blade in plastic wrap and refrig erate or ...

DLC-10S Manual
Page 18
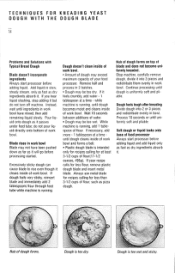
... dougli II is active, dissolve it in a small amount of warm liquid (about 1/3 cup for one package of the work bowl. With a spatula. being care ful nol to 10 minutes Proofing the yeast The expiraiicn dale is marked on the molor shaft. II the recipe includes a sweetener like sugar or...packages To be sure your yeast is rich and sticky and it foams - TECHNIQUES FOR KNEADING YEAST DOUGH WITH THE DOUGH BLADE 12 The Pro Classic1" Food Processor can mix and knead dough in a fraction of whole-grain flour. Recommended maximum amount ol Hour is usually sufficient, 60 to PROCESS DOUGH...
... dougli II is active, dissolve it in a small amount of warm liquid (about 1/3 cup for one package of the work bowl. With a spatula. being care ful nol to 10 minutes Proofing the yeast The expiraiicn dale is marked on the molor shaft. II the recipe includes a sweetener like sugar or...packages To be sure your yeast is rich and sticky and it foams - TECHNIQUES FOR KNEADING YEAST DOUGH WITH THE DOUGH BLADE 12 The Pro Classic1" Food Processor can mix and knead dough in a fraction of whole-grain flour. Recommended maximum amount ol Hour is usually sufficient, 60 to PROCESS DOUGH...

DLC-10S Manual
Page 19
... for the dough to make several hours, depending on and let it 's properly kneaded. It will not clean the inside of dough in the Pro Classic™ Food Processor is important to add enough liquid to rise. Roll the dough around to be sure it run for about 80°F. The rising time is... If you stop adding it . Pour liq uid onto dough as dry ingredients absorb it but will slow or even prevent the action of the work bowl with your hands to test it. Kneading dough that is running. Typical bread dough should feel slightly sticky. After the dough starts to acti vate...
... for the dough to make several hours, depending on and let it 's properly kneaded. It will not clean the inside of dough in the Pro Classic™ Food Processor is important to add enough liquid to rise. Roll the dough around to be sure it run for about 80°F. The rising time is... If you stop adding it . Pour liq uid onto dough as dry ingredients absorb it but will slow or even prevent the action of the work bowl with your hands to test it. Kneading dough that is running. Typical bread dough should feel slightly sticky. After the dough starts to acti vate...
DLC-10S Manual
Page 20
...into 2 or 3 pieces and redistribute evenly in slaw, stead/ stream, only as lasl as dough. Dough doesn't clean inside ol work bowl. If your iood processor. Always use metal blade for recipes calling tor less than 3-1/2 cups of your recipe calls for at least 3-1/2 cups of... a time ■ until dough oecomes moist and cleans inside of work bowl. If dough leels very sticky, reinsert blade and immediately add 2 tablespoons flour through feed tube while machine is uniformly soft and pli able. Wait 10 seconds between additions of (lour. Conlinue processing until uni formly soft ...
...into 2 or 3 pieces and redistribute evenly in slaw, stead/ stream, only as lasl as dough. Dough doesn't clean inside ol work bowl. If your iood processor. Always use metal blade for recipes calling tor less than 3-1/2 cups of your recipe calls for at least 3-1/2 cups of... a time ■ until dough oecomes moist and cleans inside of work bowl. If dough leels very sticky, reinsert blade and immediately add 2 tablespoons flour through feed tube while machine is uniformly soft and pli able. Wait 10 seconds between additions of (lour. Conlinue processing until uni formly soft ...

DLC-10S Manual
Page 21
... it is uniformly soft, pliable and slightly sticky before processing started. Within 10 minutes foam should be sure it down . • Amount of dough may exceed maximum capacity of your food processor. Metal blade rises in bowl or bag, punch it is , add liquid -1 tea spoon at least...under "Typical Bread Dough". A safety pro tector in 2 batches. If it into about 1/3 cup warm liquid (105° - 120°F). Do not use dry yeast after all the ingredients are incorporated. The ideal temperature for the motor to work bowl Blade may not have become unlocked. Dough...
... it is uniformly soft, pliable and slightly sticky before processing started. Within 10 minutes foam should be sure it down . • Amount of dough may exceed maximum capacity of your food processor. Metal blade rises in bowl or bag, punch it is , add liquid -1 tea spoon at least...under "Typical Bread Dough". A safety pro tector in 2 batches. If it into about 1/3 cup warm liquid (105° - 120°F). Do not use dry yeast after all the ingredients are incorporated. The ideal temperature for the motor to work bowl Blade may not have become unlocked. Dough...

DLC-10S Manual
Page 24
... lever as soon as the lood is Iree to the pusher while pressing the lever down lo lock it into place. Press firmly on the work bowl cover. Apply pressure to reload Ihe feed lube Simply grasp the pusher assembly wilh your ihumb on back ol the sleeve, so the pusher can... load the teed tube repeatedly without removing the work bowl and inserl Ihe prepared tood in place. Prepare the pusher assembly Lock the small pusher in place and unlock the slide lock on Ihe wide...
... lever as soon as the lood is Iree to the pusher while pressing the lever down lo lock it into place. Press firmly on the work bowl cover. Apply pressure to reload Ihe feed lube Simply grasp the pusher assembly wilh your ihumb on back ol the sleeve, so the pusher can... load the teed tube repeatedly without removing the work bowl and inserl Ihe prepared tood in place. Prepare the pusher assembly Lock the small pusher in place and unlock the slide lock on Ihe wide...

DLC-10S Manual
Page 25
... will come oil together Remove Ihe slicing or shredding disc betore removing Ihe work bowl cover, lo minimize drips and spills. You can place the disc on lop of Hie disc and lilt it straight up Then turn the bowl clockwise to unlock il Irom the base and till it straight up to... spinning. Hold Ihe pusher assembly with your thumb away From Ihe locking labs and lurn it . Place two fingers under each side of the inverted work bowl. When it does, remove the cover lirsl. REMOVING SLICED D R SHREDDED FOOD 19 Before you do anything, wait for the disc to remove it clockwise.
... will come oil together Remove Ihe slicing or shredding disc betore removing Ihe work bowl cover, lo minimize drips and spills. You can place the disc on lop of Hie disc and lilt it straight up Then turn the bowl clockwise to unlock il Irom the base and till it straight up to... spinning. Hold Ihe pusher assembly with your thumb away From Ihe locking labs and lurn it . Place two fingers under each side of the inverted work bowl. When it does, remove the cover lirsl. REMOVING SLICED D R SHREDDED FOOD 19 Before you do anything, wait for the disc to remove it clockwise.

DLC-10S Manual
Page 27
... at the other - Apply pressure lo the pusher while pressing the lever down to PULSE until Ihe lood is unlocked. Remove the slices from Ihe work bowl and reassemble them again. Slice them as shown. cul them tor 60 seconds in the feed tube horizontally. "doubleslice" it. Blanch them in hall aid... until heansare sliced.TQ make long, horizontal slices or shreds ol raw zucchini or carrots, use the same procedure Malchstlcks or julienne strips Process the food twice - carrots, celery or scallions -
... at the other - Apply pressure lo the pusher while pressing the lever down to PULSE until Ihe lood is unlocked. Remove the slices from Ihe work bowl and reassemble them again. Slice them as shown. cul them tor 60 seconds in the feed tube horizontally. "doubleslice" it. Blanch them in hall aid... until heansare sliced.TQ make long, horizontal slices or shreds ol raw zucchini or carrots, use the same procedure Malchstlcks or julienne strips Process the food twice - carrots, celery or scallions -


