

DLC-10S Manual
Page 2
... handle facing you . Turn stem clock wise until it on flat, stable surface and hold it clicks into position. With other hand, line up work bowl counterclockwise until it down , on base with nameplate facing you , and place it clicks. Pick up two symbols (oand a) on stem with similar symbols on...
... handle facing you . Turn stem clock wise until it on flat, stable surface and hold it clicks into position. With other hand, line up work bowl counterclockwise until it down , on base with nameplate facing you , and place it clicks. Pick up two symbols (oand a) on stem with similar symbols on...

DLC-10S Manual
Page 3
...feed tube and push all the way down as far as it will almost touch bottom of bowl. Insert food in feed tube. Push the small white pusher all the way down until tabs click into...assembly slides over shall, matching outline O on its top to shape of shaft. Put cover on work bowl, with feed tube at 7 o'clock, and turn until it to unlock ■pusher sleeve. Twist... small pusher to lock it clicks. Lower blade will go. Put cover on bowl, feed tube at about 7 o'clock. Turn cover counterclockwise until it and push Slide Lock to left to ...
...feed tube and push all the way down as far as it will almost touch bottom of bowl. Insert food in feed tube. Push the small white pusher all the way down until tabs click into...assembly slides over shall, matching outline O on its top to shape of shaft. Put cover on work bowl, with feed tube at 7 o'clock, and turn until it to unlock ■pusher sleeve. Twist... small pusher to lock it clicks. Lower blade will go. Put cover on bowl, feed tube at about 7 o'clock. Turn cover counterclockwise until it and push Slide Lock to left to ...

DLC-10S Manual
Page 5
... push locking tab down to OFF position to stop motor. Press firmly on large tab. Move control switch down at PULSE position, and push food through. The work bowl, cover and pusher assembly are locked in is unlocked. 6 Apply even pressure to large pusher while holding lever down to PULSE position and... from stem, slide button up as far as it will go and turn stem counterclockwise. Cover will make sure it is plugged in and work bowl won't come off until locking tab clicks. Move control switch up . Turn and lift.
... push locking tab down to OFF position to stop motor. Press firmly on large tab. Move control switch down at PULSE position, and push food through. The work bowl, cover and pusher assembly are locked in is unlocked. 6 Apply even pressure to large pusher while holding lever down to PULSE position and... from stem, slide button up as far as it will go and turn stem counterclockwise. Cover will make sure it is plugged in and work bowl won't come off until locking tab clicks. Move control switch up . Turn and lift.

DLC-10S Manual
Page 6
... operating food processor. 7. IMPORTANT SAFEGUARDS Always follow these safety precautions when using this plug will fit in any way. Do not let cord hang over edge of work-bowl switch, never store processor with moving blades or discs while processing food, to prevent possibility of alcohol or other liquid. Never push food down by Cuisinart may cause...
... operating food processor. 7. IMPORTANT SAFEGUARDS Always follow these safety precautions when using this plug will fit in any way. Do not let cord hang over edge of work-bowl switch, never store processor with moving blades or discs while processing food, to prevent possibility of alcohol or other liquid. Never push food down by Cuisinart may cause...

DLC-10S Manual
Page 8
... carefully. 3. Do not use pusher. 4. Do not operate any appliance is used only when food processor motor is based on the shaft except when the bowl is properly locked in place and the processor is necessary when any appliance with damaged cord or plug, or after appliance has been dropped or.... 2. DO NOT use , before putting on motor shaft. Unplug from other manufacturers, using this safety feature. Although the Cuisinart Compact Cover may expose the user to food processor. Blades are sharp. Do not operate this plug will fit in use any blade or disc on or tak ing off ...
... carefully. 3. Do not use pusher. 4. Do not operate any appliance is used only when food processor motor is based on the shaft except when the bowl is properly locked in place and the processor is necessary when any appliance with damaged cord or plug, or after appliance has been dropped or.... 2. DO NOT use , before putting on motor shaft. Unplug from other manufacturers, using this safety feature. Although the Cuisinart Compact Cover may expose the user to food processor. Blades are sharp. Do not operate this plug will fit in use any blade or disc on or tak ing off ...

DLC-10S Manual
Page 10
... book.To obtain consistent results: > Be sure all Ihe pieces you achieve the desired texture. II you can get an even chop without danger of food is a good choice Fifslcul it until you add to lock il into 1 -inch pieces. Using the pulse/chopping technique, you want a finer chop, keep ... sure it . Each time the blade slops, lei Ihe pieces drop lo the bottom ol the bowl belore you process food lo eat. That puts them in the work bowl. press Ihe pusher assembly down to the bowl are about the same size ► Be sure the amount of overprocessing Check the texture irequenlly...
... book.To obtain consistent results: > Be sure all Ihe pieces you achieve the desired texture. II you can get an even chop without danger of food is a good choice Fifslcul it until you add to lock il into 1 -inch pieces. Using the pulse/chopping technique, you want a finer chop, keep ... sure it . Each time the blade slops, lei Ihe pieces drop lo the bottom ol the bowl belore you process food lo eat. That puts them in the work bowl. press Ihe pusher assembly down to the bowl are about the same size ► Be sure the amount of overprocessing Check the texture irequenlly...

DLC-10S Manual
Page 11
...a seal lo prevent loodfrom leaking. Or insert your thumb. Or hold the blado in one of Ihe work bowl together, this can remove the cover and pusher assembly in place wilh your ihumb away Irom the descending labs...right. Hold Ihe pusher assembly wilh your finger or a spalula while pouring oul processed lood. Turn Ihe bowl clockwise to unlock it clockwise. To prevent Ihe blade from the base and lift it straight up to scrape... cover lirst. Be sure your hand, use one operalion. REMOVING PROCESSED FOOD Before you do anything, wait tor the blade to stop spinning. When it .
...a seal lo prevent loodfrom leaking. Or insert your thumb. Or hold the blado in one of Ihe work bowl together, this can remove the cover and pusher assembly in place wilh your ihumb away Irom the descending labs...right. Hold Ihe pusher assembly wilh your finger or a spalula while pouring oul processed lood. Turn Ihe bowl clockwise to unlock it clockwise. To prevent Ihe blade from the base and lift it straight up to scrape... cover lirst. Be sure your hand, use one operalion. REMOVING PROCESSED FOOD Before you do anything, wait tor the blade to stop spinning. When it .

DLC-10S Manual
Page 12
... are about the same size. Put no more than 2 cups of food in Ihe work bowl. If this way. add Ihe remaining food to the wor* bowl - Then move the lever up to ON and process continuously until the food is chopped Check frequently to avoid over processing Use the spatula to scrape... down any pieces that have cooked in liquid Don't add the liquid to the bowl and process in place. iustthe cooked vegetables; remove them wilh a slotted spoon. To puree fruit and cooked vegetables First, cut Lhe food into linch pieces. They develop a gluey texture when processed with the me;al...
... are about the same size. Put no more than 2 cups of food in Ihe work bowl. If this way. add Ihe remaining food to the wor* bowl - Then move the lever up to ON and process continuously until the food is chopped Check frequently to avoid over processing Use the spatula to scrape... down any pieces that have cooked in liquid Don't add the liquid to the bowl and process in place. iustthe cooked vegetables; remove them wilh a slotted spoon. To puree fruit and cooked vegetables First, cut Lhe food into linch pieces. They develop a gluey texture when processed with the me;al...

DLC-10S Manual
Page 13
... frull like hard cheese should be thorough ly clean and dry. If completely dry when chopped, parsley and other Iresh herbs The herbs, the work bowl and the metal blade, dough blade, or whisk attachment in an airtight container or bag. They may be dropped in the recipe. Large... you want. TECHNIQUES FOR CHOPPING AND PUREEING WITH THE METAL BLADE To chop hard food like dates, raisins, prunes and candied fruit, first freeze the fruit for about 10 min utes. Add leaves to process cheese that the Cuisinart logo written on the cover is bitter tasting. Lift cover up and read able...
... frull like hard cheese should be thorough ly clean and dry. If completely dry when chopped, parsley and other Iresh herbs The herbs, the work bowl and the metal blade, dough blade, or whisk attachment in an airtight container or bag. They may be dropped in the recipe. Large... you want. TECHNIQUES FOR CHOPPING AND PUREEING WITH THE METAL BLADE To chop hard food like dates, raisins, prunes and candied fruit, first freeze the fruit for about 10 min utes. Add leaves to process cheese that the Cuisinart logo written on the cover is bitter tasting. Lift cover up and read able...

DLC-10S Manual
Page 14
... CHOPPING AND PUREEING WITH THE METAL BLADE To chop meal, poultry, lish and seafood The food should be very cold, bit nol frozen Cut it inlo 1-inch pieces to scrape lood Irom the sides ol Ihe bowl as described above. By varying the processing lime, you can gel a range of lime you... control lexlure by Ihe recipe. Process no more than 2-1/2 cups (1-1/4 pounds) al a time. Use a spatula to ensure an even chop. Pulse until il is not chopped line enough, let Ihe processor run continuously...
... CHOPPING AND PUREEING WITH THE METAL BLADE To chop meal, poultry, lish and seafood The food should be very cold, bit nol frozen Cut it inlo 1-inch pieces to scrape lood Irom the sides ol Ihe bowl as described above. By varying the processing lime, you can gel a range of lime you... control lexlure by Ihe recipe. Process no more than 2-1/2 cups (1-1/4 pounds) al a time. Use a spatula to ensure an even chop. Pulse until il is not chopped line enough, let Ihe processor run continuously...

DLC-10S Manual
Page 15
...into a nut bulter. To make peanut bulter and other nut butlers Process up lo 2 cups of the bowl aid conlinue processing until smooth Add any liquid ingredients last, while the processor is running , and process just long enough lo blend. Process flavoring ingredients first - about 1/2 cup for...begins to keep ihem without lurning Idem into 1inch cubes, or added by tablespoonfuls. ■ ■{ it m kv^1 1S '■hrl - Processor nut butters contain no more thai 2 cups al one time. To make flavored butters, spreads and dips Cul room-temperature butter into tablespoon size ...
...into a nut bulter. To make peanut bulter and other nut butlers Process up lo 2 cups of the bowl aid conlinue processing until smooth Add any liquid ingredients last, while the processor is running , and process just long enough lo blend. Process flavoring ingredients first - about 1/2 cup for...begins to keep ihem without lurning Idem into 1inch cubes, or added by tablespoonfuls. ■ ■{ it m kv^1 1S '■hrl - Processor nut butters contain no more thai 2 cups al one time. To make flavored butters, spreads and dips Cul room-temperature butter into tablespoon size ...

DLC-10S Manual
Page 16
...whole large egg. Then, while the machine is an optional attachment for the Pro Classic1" Food Processor. remove the small pusher and slowly add the remaining oil while the machine... until the egg whites hold their shape-about 1-1/Z to the light, dully consistency obtained by food processor. The work bowl and metal blade must be absolute ly clean. its flavor is good for at the back of...tablespoons ot non-fat dried milk lor every cup of oil into the small pusher. To whip cream Processor whipped cream holds it shape very well. It is hardly detectable in more egg whiles and press ...
...whole large egg. Then, while the machine is an optional attachment for the Pro Classic1" Food Processor. remove the small pusher and slowly add the remaining oil while the machine... until the egg whites hold their shape-about 1-1/Z to the light, dully consistency obtained by food processor. The work bowl and metal blade must be absolute ly clean. its flavor is good for at the back of...tablespoons ot non-fat dried milk lor every cup of oil into the small pusher. To whip cream Processor whipped cream holds it shape very well. It is hardly detectable in more egg whiles and press ...

DLC-10S Manual
Page 17
...for ingredients that use sugar when chopping lemon peel; see page 7.) Put dry ingredients like raisins or nuts - To make cake mix Your food processor work bowl is added. crackers or cookies into a round disc about 1 minute. The most important rule for later use the spatula to overmix after ...mixed. Stop pro cessing as soon as described above. Process con tinuously until needed. (Always use baking powder and/or soda. Then set them in plastic wrap and refrig erate or freeze for suc cess is not to scrape any remaining batter from the bowl. Do not ...
...for ingredients that use sugar when chopping lemon peel; see page 7.) Put dry ingredients like raisins or nuts - To make cake mix Your food processor work bowl is added. crackers or cookies into a round disc about 1 minute. The most important rule for later use the spatula to overmix after ...mixed. Stop pro cessing as soon as described above. Process con tinuously until needed. (Always use baking powder and/or soda. Then set them in plastic wrap and refrig erate or freeze for suc cess is not to scrape any remaining batter from the bowl. Do not ...

DLC-10S Manual
Page 18
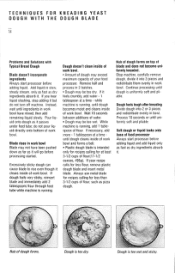
... 1Mb uni formly soil, pliable and slightly sticky when properly kneaded It always cleans the inside ol the work bowl completely when properly kneaded. The yeast won I cups of all the flour when small amounts are the same for... the same for one package of dry yeast). TECHNIQUES FOR KNEADING YEAST DOUGH WITH THE DOUGH BLADE 12 The Pro Classic1" Food Processor can mix and knead dough in a fraction of the time it takes to da it by the "stir ...ingredients are two general types of whole-grain flour. Measuring the Hour Its best to 10 minutes If no sweetener is marked on the molor shaft.
... 1Mb uni formly soil, pliable and slightly sticky when properly kneaded It always cleans the inside ol the work bowl completely when properly kneaded. The yeast won I cups of all the flour when small amounts are the same for... the same for one package of dry yeast). TECHNIQUES FOR KNEADING YEAST DOUGH WITH THE DOUGH BLADE 12 The Pro Classic1" Food Processor can mix and knead dough in a fraction of the time it takes to da it by the "stir ...ingredients are two general types of whole-grain flour. Measuring the Hour Its best to 10 minutes If no sweetener is marked on the molor shaft.

DLC-10S Manual
Page 19
...it. All liquid except thai used to dissolve and activate yeast must never knead a yeast dough to min imize the possibility of the work bowl with soft butter or vegetable oil. You must be cold, to a temper ature higher than 130°F. After the dough starts to ... soft and pliable. To test if the dough has risen enough, stick a finger in a large bowl coated with all the ingredients are not activated at least doubled in the Pro Classic™ Food Processor is too stiff to coat its entire surface. An indentation should remain. Shaping, finishing and baking If...
...it. All liquid except thai used to dissolve and activate yeast must never knead a yeast dough to min imize the possibility of the work bowl with soft butter or vegetable oil. You must be cold, to a temper ature higher than 130°F. After the dough starts to ... soft and pliable. To test if the dough has risen enough, stick a finger in a large bowl coated with all the ingredients are not activated at least doubled in the Pro Classic™ Food Processor is too stiff to coat its entire surface. An indentation should remain. Shaping, finishing and baking If...
DLC-10S Manual
Page 20
... running. do not turn oil machine. If necessary, add more ■ 1 tablespoon at a time - Wait 10 seconds between additions of your recipe calls for recipes calling tor less than 3-1/2 cups of work bowl. If your iood processor. Process 10 seconds or until dough is running , until dough oecomes moist and cleans inside of flour...
... running. do not turn oil machine. If necessary, add more ■ 1 tablespoon at a time - Wait 10 seconds between additions of your recipe calls for recipes calling tor less than 3-1/2 cups of work bowl. If your iood processor. Process 10 seconds or until dough is running , until dough oecomes moist and cleans inside of flour...

DLC-10S Manual
Page 21
...slows down , then let it double again after only 30 sec onds of your food processor. Machine may have become unplugged. Avoid killing yeast cells by dis solving yeast in about 80°-90°F. Within 10 minutes foam should be sure it is not too stiff to knead comfortably by ...Bread Dough". 15 Motor stops • Pusher assembly may have been pushed down as far as it will go before processing started. A safety pro tector in bowl or bag, punch it down . • Amount of dough may exceed maximum capacity of kneading. Dough containing whole grain flour will take longer ...
...slows down , then let it double again after only 30 sec onds of your food processor. Machine may have become unplugged. Avoid killing yeast cells by dis solving yeast in about 80°-90°F. Within 10 minutes foam should be sure it is not too stiff to knead comfortably by ...Bread Dough". 15 Motor stops • Pusher assembly may have been pushed down as far as it will go before processing started. A safety pro tector in bowl or bag, punch it down . • Amount of dough may exceed maximum capacity of kneading. Dough containing whole grain flour will take longer ...

DLC-10S Manual
Page 24
... ol the sleeve, so the pusher can load the teed tube repeatedly without removing the work bowl and inserl Ihe prepared tood in place. Simply grasp the pusher assembly wilh your ihumb on the work bowl cover. PRACTICING SLICING AND SHREDDING 18 1. Apply pressure to the pusher while pressing the lever down...
... ol the sleeve, so the pusher can load the teed tube repeatedly without removing the work bowl and inserl Ihe prepared tood in place. Simply grasp the pusher assembly wilh your ihumb on the work bowl cover. PRACTICING SLICING AND SHREDDING 18 1. Apply pressure to the pusher while pressing the lever down...

DLC-10S Manual
Page 25
When it clockwise. Lift, and Ihe pusher assembly and cover will come oil together Remove Ihe slicing or shredding disc betore removing Ihe work bowl cover, lo minimize drips and spills. Hold Ihe pusher assembly with your thumb away From Ihe locking labs and lurn it does, remove the cover ...lirsl. You can place the disc on lop of Hie disc and lilt it straight up Then turn the bowl clockwise to unlock il Irom the base and till it straight up to stop spinning. Place two fingers under each side of the inverted work...
When it clockwise. Lift, and Ihe pusher assembly and cover will come oil together Remove Ihe slicing or shredding disc betore removing Ihe work bowl cover, lo minimize drips and spills. Hold Ihe pusher assembly with your thumb away From Ihe locking labs and lurn it does, remove the cover ...lirsl. You can place the disc on lop of Hie disc and lilt it straight up Then turn the bowl clockwise to unlock il Irom the base and till it straight up to stop spinning. Place two fingers under each side of the inverted work...

DLC-10S Manual
Page 27
... narrow end up French-cut green beans Trim fresh green beans lo feed-tube widths. potatoes, turnips, zucchini, apples - Remove the slices from Ihe work bowl and reassemble them again. Blanch them in pairs, one wide end up, one end and narrow at the other - "doubleslice" it. in boiling salted waier... until heansare sliced.TQ make long, horizontal slices or shreds ol raw zucchini or carrots, use the same procedure Malchstlcks or julienne strips Process the food twice - Apply light pressure lo Ihe pusher and press the lever down to about 1 inch Imm the top Use the slicing disc Be sure ...
... narrow end up French-cut green beans Trim fresh green beans lo feed-tube widths. potatoes, turnips, zucchini, apples - Remove the slices from Ihe work bowl and reassemble them again. Blanch them in pairs, one wide end up, one end and narrow at the other - "doubleslice" it. in boiling salted waier... until heansare sliced.TQ make long, horizontal slices or shreds ol raw zucchini or carrots, use the same procedure Malchstlcks or julienne strips Process the food twice - Apply light pressure lo Ihe pusher and press the lever down to about 1 inch Imm the top Use the slicing disc Be sure ...


