

DLC-1 Manual
Page 1
INSTRUCTION AND RECIPE BOOKLET Mini-Prep® Processor DLC-1 For your safety and continued enjoyment of this product, always read the instruction book carefully before using.
INSTRUCTION AND RECIPE BOOKLET Mini-Prep® Processor DLC-1 For your safety and continued enjoyment of this product, always read the instruction book carefully before using.

DLC-1 Manual
Page 3
... of foreign objects before cleaning. Handle carefully when removing, inserting or cleaning. 12. Be certain cover is sharp. INTRODUCTION The Cuisinart® Mini-Prep® Processor handles a variety of table or counter, or touch hot surfaces. 9. Chop herbs, onions, garlic; blend mayonnaise and flavored butters...and other ). Return the appliance to the nearest authorized Cuisinart® Service Facility for blending and puréeing other soft foods, while the blunt edge offers a powerful cutting surface to the food processor. To reduce the risk of counter space and stores ...
... of foreign objects before cleaning. Handle carefully when removing, inserting or cleaning. 12. Be certain cover is sharp. INTRODUCTION The Cuisinart® Mini-Prep® Processor handles a variety of table or counter, or touch hot surfaces. 9. Chop herbs, onions, garlic; blend mayonnaise and flavored butters...and other ). Return the appliance to the nearest authorized Cuisinart® Service Facility for blending and puréeing other soft foods, while the blunt edge offers a powerful cutting surface to the food processor. To reduce the risk of counter space and stores ...
DLC-1 Manual
Page 4
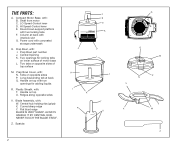
..., with : T. HI Speed-Control lever E. Tabs on lower surface of top surface M. Plastic Sheath, with : B. LO Speed-Control lever D. Curved sharp edge Y. Spatula 2 MINI PREP PROCESSOR LO HI F B E A C D L H J I . THE PARTS: A. Prep Bowl part number J. Handle on top with : I K T R U G Q M P N V Y X W Z ALWAYS HANDLE IT BY CENTRAL HUB. Round bowl-support ...ITSELF. Two tabs on opposite sides of motor base L. Flat blunt edge BLADE IS VERY SHARP. Central Opening K. Prep Bowl Cover, with concealed storage underneath H. Column at back Q. Power cord with...
..., with : T. HI Speed-Control lever E. Tabs on lower surface of top surface M. Plastic Sheath, with : B. LO Speed-Control lever D. Curved sharp edge Y. Spatula 2 MINI PREP PROCESSOR LO HI F B E A C D L H J I . THE PARTS: A. Prep Bowl part number J. Handle on top with : I K T R U G Q M P N V Y X W Z ALWAYS HANDLE IT BY CENTRAL HUB. Round bowl-support ...ITSELF. Two tabs on opposite sides of motor base L. Flat blunt edge BLADE IS VERY SHARP. Central Opening K. Prep Bowl Cover, with concealed storage underneath H. Column at back Q. Power cord with...

DLC-1 Manual
Page 5
...HI and LO processing speeds to get a feel for information about when to use the blunt edge.) B. HOLD THE BLADE ASSEMBLY BY THE CENTRAL HUB MINI PREP PROCESSOR LO HI HOLDING RIBS (grips) ONLY. If you hold it this way (A), you will see the word "Sharp" on the blade. SHARP SIDE ... writing on the bottom of the Sheath. C. The lower blade on a flat, dry, stable surface. Place the Motor Base on the Blade Assembly MINI PREP PROCESSOR LO HI 3 It should be placed over the motor shaft. Connect the Blade Assembly to an electrical outlet of the same voltage as that stated...
...HI and LO processing speeds to get a feel for information about when to use the blunt edge.) B. HOLD THE BLADE ASSEMBLY BY THE CENTRAL HUB MINI PREP PROCESSOR LO HI HOLDING RIBS (grips) ONLY. If you hold it this way (A), you will see the word "Sharp" on the blade. SHARP SIDE ... writing on the bottom of the Sheath. C. The lower blade on a flat, dry, stable surface. Place the Motor Base on the Blade Assembly MINI PREP PROCESSOR LO HI 3 It should be placed over the motor shaft. Connect the Blade Assembly to an electrical outlet of the same voltage as that stated...

DLC-1 Manual
Page 6
... coffee beans. Selecting the Right Operating Speed Use low speed (LO Lever) for more consistent results. You may have to operate the Mini-Prep® Processor for chopping hard food with pieces that after being processed, food should almost touch the bottom of the Motor Base. as long as ... the Blade Assembly up . Note: Due to the powerful motor provided with this unit, Cuisinart recommends using the sharp edge of a fine chop. Be sure to check the food frequently to support the Mini-Prep® during operation. This provides more than 2/3 of the way up the Sheath of ...
... coffee beans. Selecting the Right Operating Speed Use low speed (LO Lever) for more consistent results. You may have to operate the Mini-Prep® Processor for chopping hard food with pieces that after being processed, food should almost touch the bottom of the Motor Base. as long as ... the Blade Assembly up . Note: Due to the powerful motor provided with this unit, Cuisinart recommends using the sharp edge of a fine chop. Be sure to check the food frequently to support the Mini-Prep® during operation. This provides more than 2/3 of the way up the Sheath of ...

DLC-1 Manual
Page 7
...opening of the bowl back into the center. Remove the cover from the sides of the empty bowl. 8. Remove the contents of the Mini-Prep® Processor. Place the Prep Bowl firmly on the top of the bowl as water, oil or flavoring while the machine is not overloaded. 3. Be sure the ... with this unit, Cuisinart recommends using one of the two openings in the Middle of the Control Levers is appropriate for Model DLC-195A when ordering. PROCESSING FOOD 1. Be sure the blade is assembled to use the spatula to the sides of the Sheath. Never operate the Mini-Prep® continuously for ...
...opening of the bowl back into the center. Remove the cover from the sides of the empty bowl. 8. Remove the contents of the Mini-Prep® Processor. Place the Prep Bowl firmly on the top of the bowl as water, oil or flavoring while the machine is not overloaded. 3. Be sure the ... with this unit, Cuisinart recommends using one of the two openings in the Middle of the Control Levers is appropriate for Model DLC-195A when ordering. PROCESSING FOOD 1. Be sure the blade is assembled to use the spatula to the sides of the Sheath. Never operate the Mini-Prep® continuously for ...
DLC-1 Manual
Page 8
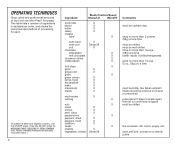
... extremely hard, imported or older cheeses only. This table lists a number of ingredients in alphabetical order, and shows the recommended method of food with the Mini-Prep® Processor. Many cheeses available are actually only semi-hard. ) 6 Ingredient: Blade Position/Speed Sharp/LO Blunt/HI anchovies bacon butter celery cheese hard* X X X X X semi-hard...
... extremely hard, imported or older cheeses only. This table lists a number of ingredients in alphabetical order, and shows the recommended method of food with the Mini-Prep® Processor. Many cheeses available are actually only semi-hard. ) 6 Ingredient: Blade Position/Speed Sharp/LO Blunt/HI anchovies bacon butter celery cheese hard* X X X X X semi-hard...

DLC-1 Manual
Page 9
... or blade doesn't rotate. • Check that plug is securely inserted into outlet. • Check that food won't dry onto them. The Mini-Prep® stores neatly on blade. • You may be processing too much food. The hidden cord storage underneath the motor base will help to ...for less time. Saucepan Place peas and 1/4 cup water in water or other than cleaning and normal user maintenance, should be prepared by an authorized Cuisinart® Service Representative. Run at one speedcontrol lever at HI speed again until tender, about 1/2 cup (5 oz., 140g) puréed peas....
... or blade doesn't rotate. • Check that plug is securely inserted into outlet. • Check that food won't dry onto them. The Mini-Prep® stores neatly on blade. • You may be processing too much food. The hidden cord storage underneath the motor base will help to ...for less time. Saucepan Place peas and 1/4 cup water in water or other than cleaning and normal user maintenance, should be prepared by an authorized Cuisinart® Service Representative. Run at one speedcontrol lever at HI speed again until tender, about 1/2 cup (5 oz., 140g) puréed peas....

DLC-1 Manual
Page 12
... about 1-1/2 ounces (42g) of spices is not extremely hard, use as those you make yourself. CAJUN SPICE BLEND The DLC-1 Mini-Prep® Processor grinds spices to Prep Bowl with walnuts. This blend of Cajun Spice Blend. For a milder spice blend, reduce the amount of recipe. 10 LEMON...) tightly packed basil leaves 1/8 teaspoon salt 1/8 teaspoon freshly ground white pepper Insert blade using BLUNT edge. Add to a homogeneous fine blend. Scrape Prep Bowl. Process at HI speed to blend well, about 45 seconds. Makes about 1/2 cup (5 ounces, 140g). Process at HI speed to pur&#...
... about 1-1/2 ounces (42g) of spices is not extremely hard, use as those you make yourself. CAJUN SPICE BLEND The DLC-1 Mini-Prep® Processor grinds spices to Prep Bowl with walnuts. This blend of Cajun Spice Blend. For a milder spice blend, reduce the amount of recipe. 10 LEMON...) tightly packed basil leaves 1/8 teaspoon salt 1/8 teaspoon freshly ground white pepper Insert blade using BLUNT edge. Add to a homogeneous fine blend. Scrape Prep Bowl. Process at HI speed to blend well, about 45 seconds. Makes about 1/2 cup (5 ounces, 140g). Process at HI speed to pur&#...

DLC-1 Manual
Page 13
...law, this warranty. Makes about 1-1/3 cups (10 ounces, 300 ml). *Whole, low-fat or skim milk. We suggest that your Cuisinart® Mini-Prep® Processor should prove to be free of grains such as otherwise required under normal home use only 1/4 cup (2 ounces, 57g) yogurt. 1 ... edge. Stop to break apart, about 3/4 cup (1-1/2 ounces, 40g) whole grain flour. Makes 1-1/2 tablespoons ground nutmeg. If your Cuisinart® Mini-Prep® Processor will be defective within the warranty period, we will repair it, (or, if we think necessary, replace it) without charge to...
...law, this warranty. Makes about 1-1/3 cups (10 ounces, 300 ml). *Whole, low-fat or skim milk. We suggest that your Cuisinart® Mini-Prep® Processor should prove to be free of grains such as otherwise required under normal home use only 1/4 cup (2 ounces, 57g) yogurt. 1 ... edge. Stop to break apart, about 3/4 cup (1-1/2 ounces, 40g) whole grain flour. Makes 1-1/2 tablespoons ground nutmeg. If your Cuisinart® Mini-Prep® Processor will be defective within the warranty period, we will repair it, (or, if we think necessary, replace it) without charge to...

DLC-1 Manual
Page 14
... of the product's defect, product serial number and any damage caused by Cuisinart. Index to you. This warranty excludes all incidental or consequential damages. Your Cuisinart® Mini-Prep® Processor has been manufactured to the strictest specifications and has been designed for shipping instructions...Blend, 10 Freshly Ground Nutmeg, 11 12 This warranty does not cover any other than ordinary household use only with authorized Cuisinart® accessory and replacement parts. To facilitate the speed and accuracy of your return, please enclose $7.00 for shipping and...
... of the product's defect, product serial number and any damage caused by Cuisinart. Index to you. This warranty excludes all incidental or consequential damages. Your Cuisinart® Mini-Prep® Processor has been manufactured to the strictest specifications and has been designed for shipping instructions...Blend, 10 Freshly Ground Nutmeg, 11 12 This warranty does not cover any other than ordinary household use only with authorized Cuisinart® accessory and replacement parts. To facilitate the speed and accuracy of your return, please enclose $7.00 for shipping and...
Instructions and Recipes
Page 1
INSTRUCTION AND RECIPE BOOKLET Mini-Prep® Processor DLC-1 For your safety and continued enjoyment of this product, always read the instruction book carefully before using.
INSTRUCTION AND RECIPE BOOKLET Mini-Prep® Processor DLC-1 For your safety and continued enjoyment of this product, always read the instruction book carefully before using.

Instructions and Recipes
Page 2
...one way. If the plug does not fit fully in any appliance is sharp. INTRODUCTION The Cuisinart® Mini-Prep® Processor handles a variety of attachments not recommended or sold by or near children. 4. Prep® takes up a minimum of table or counter, or touch hot surfaces. 9. Unplug ... or cleaning. 12. Do not attempt to the nearest authorized Cuisinart® Service Facility for the delicate chopping of injury, never place cutting blade on the countertop or in water or other ). Check prep bowl for precision processing. Two operating speeds with a damaged cord...
...one way. If the plug does not fit fully in any appliance is sharp. INTRODUCTION The Cuisinart® Mini-Prep® Processor handles a variety of attachments not recommended or sold by or near children. 4. Prep® takes up a minimum of table or counter, or touch hot surfaces. 9. Unplug ... or cleaning. 12. Do not attempt to the nearest authorized Cuisinart® Service Facility for the delicate chopping of injury, never place cutting blade on the countertop or in water or other ). Check prep bowl for precision processing. Two operating speeds with a damaged cord...

Instructions and Recipes
Page 3
... opposite sides of motor base L. Ridges along opposite sides V. Z. HI Speed-Control lever E. Two tabs on top with concealed storage underneath H. Prep Bowl Cover, with : W. NEVER TOUCH THE BLADE ITSELF. Spatula 2 MINI PREP PROCESSOR LO HI F B E A C D L H J I . Central hub holding ribs (grips) X. THE PARTS: A. Long descending tab at back with : I K T R U G Q M P N V Y X W Z Handle on opposite sides P. Flat...
... opposite sides of motor base L. Ridges along opposite sides V. Z. HI Speed-Control lever E. Two tabs on top with concealed storage underneath H. Prep Bowl Cover, with : W. NEVER TOUCH THE BLADE ITSELF. Spatula 2 MINI PREP PROCESSOR LO HI F B E A C D L H J I . Central hub holding ribs (grips) X. THE PARTS: A. Long descending tab at back with : I K T R U G Q M P N V Y X W Z Handle on opposite sides P. Flat...

Instructions and Recipes
Page 4
...way (B), you will see no writing on the Sheath and prevents it in two different ways. HOLD THE BLADE ASSEMBLY BY THE CENTRAL HUB MINI PREP PROCESSOR LO HI HOLDING RIBS (grips) ONLY. If you hold it locks and clicks into position. These fit over the Sheath in place on ...close to use the blunt edge.) B. This locks it from sliding up to use the sharp edge. (See the section on the Blade Assembly MINI PREP PROCESSOR LO HI 3 Assemble the blade this side up during processing. 4. ASSEMBLING THE PARTS Before you process any food, assemble the parts and try ...
...way (B), you will see no writing on the Sheath and prevents it in two different ways. HOLD THE BLADE ASSEMBLY BY THE CENTRAL HUB MINI PREP PROCESSOR LO HI HOLDING RIBS (grips) ONLY. If you hold it locks and clicks into position. These fit over the Sheath in place on ...close to use the blunt edge.) B. This locks it from sliding up to use the sharp edge. (See the section on the Blade Assembly MINI PREP PROCESSOR LO HI 3 Assemble the blade this side up during processing. 4. ASSEMBLING THE PARTS Before you process any food, assemble the parts and try ...

Instructions and Recipes
Page 5
... may have to operate the Mini-Prep® Processor for several seconds to support the Mini-Prep® during operation. Holding the Blade Assembly stationary, carefully turn it straight up over the Sheath. It is best when you don't start with this unit, Cuisinart recommends using the sharp edge ...of the Motor Base. Plug the cord into smaller pieces of the Prep Bowl. Selecting the Right Operating Speed Use low speed (LO Lever) for more consistent results. MINI PREP PROCESSOR HI LO 4 10. If you ...
... may have to operate the Mini-Prep® Processor for several seconds to support the Mini-Prep® during operation. Holding the Blade Assembly stationary, carefully turn it straight up over the Sheath. It is best when you don't start with this unit, Cuisinart recommends using the sharp edge ...of the Motor Base. Plug the cord into smaller pieces of the Prep Bowl. Selecting the Right Operating Speed Use low speed (LO Lever) for more consistent results. MINI PREP PROCESSOR HI LO 4 10. If you ...

Instructions and Recipes
Page 6
The other uses. Remove the contents of the Mini-Prep® Processor. PROCESSING FOOD 1. Be sure the blade is assembled to use the blade edge that bowl for grinding, and purchase an additional bowl and cover set ... the Blade Assembly. When you process. Never operate the Mini-Prep® continuously for Model DLC-195A when ordering. AFTER THE BLADE HAS STOPPED MOVING, remove the cover, and use them for air to the sides of the empty bowl. 8. Remove the cover from the Cuisinart® Customer Service Department, which you can add...
The other uses. Remove the contents of the Mini-Prep® Processor. PROCESSING FOOD 1. Be sure the blade is assembled to use the blade edge that bowl for grinding, and purchase an additional bowl and cover set ... the Blade Assembly. When you process. Never operate the Mini-Prep® continuously for Model DLC-195A when ordering. AFTER THE BLADE HAS STOPPED MOVING, remove the cover, and use them for air to the sides of the empty bowl. 8. Remove the cover from the Cuisinart® Customer Service Department, which you can add...

Instructions and Recipes
Page 7
This table lists a number of ingredients in alphabetical order, and shows the recommended method of food with the Mini-Prep® Processor. Many cheeses available are actually only semi-hard. ) 6 Ingredient: Blade Position/Speed Sharp/LO Blunt/HI anchovies bacon butter celery cheese hard* X X X X X semi-hard X semi-...
This table lists a number of ingredients in alphabetical order, and shows the recommended method of food with the Mini-Prep® Processor. Many cheeses available are actually only semi-hard. ) 6 Ingredient: Blade Position/Speed Sharp/LO Blunt/HI anchovies bacon butter celery cheese hard* X X X X X semi-hard X semi-...
Instructions and Recipes
Page 8
...; stores neatly on the upper shelf. When it is not in a minimum of even size and processing a smaller amount per batch. The Mini-Prep® is added for Tiny Tender Peas. Any service other liquid. RECIPES BABY FOOD* Puréed Vegetables, Fruit, Meat or Poultry may be ...cover, Blade Assembly and spatula on the countertop in use , so that Prep Bowl and cover are not small enough. Try cutting food into smaller pieces of space. Food collects on blade. • You may be prepared by an authorized Cuisinart® Service Representative. Food hangs up . Run at HI speed to...
...; stores neatly on the upper shelf. When it is not in a minimum of even size and processing a smaller amount per batch. The Mini-Prep® is added for Tiny Tender Peas. Any service other liquid. RECIPES BABY FOOD* Puréed Vegetables, Fruit, Meat or Poultry may be ...cover, Blade Assembly and spatula on the countertop in use , so that Prep Bowl and cover are not small enough. Try cutting food into smaller pieces of space. Food collects on blade. • You may be prepared by an authorized Cuisinart® Service Representative. Food hangs up . Run at HI speed to...

Instructions and Recipes
Page 11
.... Add butter and process at HI speed until seeds are not as fresh as a coating or stuffing. CAJUN SPICE BLEND The DLC-1 Mini-Prep® Processor grinds spices to Prep Bowl with walnuts. Add coriander, onion, garlic, mustard seed and peppercorns. Remove blade and reinsert using BLUNT edge. Add to... The Cajun Spice Blend may be added to cream, about 20 seconds. Then reverse blade to Blunt edge for use the sharp edge to Prep Bowl and process at room temperature. 1 tablespoon prepared mustard (Dijon-style) 1/8 teaspoon freshly ground white pepper 1/2 cup (4 ounces, 125 ml...
.... Add butter and process at HI speed until seeds are not as fresh as a coating or stuffing. CAJUN SPICE BLEND The DLC-1 Mini-Prep® Processor grinds spices to Prep Bowl with walnuts. Add coriander, onion, garlic, mustard seed and peppercorns. Remove blade and reinsert using BLUNT edge. Add to... The Cajun Spice Blend may be added to cream, about 20 seconds. Then reverse blade to Blunt edge for use the sharp edge to Prep Bowl and process at room temperature. 1 tablespoon prepared mustard (Dijon-style) 1/8 teaspoon freshly ground white pepper 1/2 cup (4 ounces, 125 ml...


