
DLC-1 Manual
Page 3
... necessary when any manner. PG 6 TROUBLESHOOTING PG 7 CLEANING AND STORAGE......... Keep hands and utensils away from electrical outlet. Do not attempt to remove cover until blade has stopped rotating. 14. INTRODUCTION The Cuisinart® Mini-Prep® Processor handles a variety of table or counter, or touch hot surfaces. 9. Chop herbs, onions, garlic; purée baby foods; Do not operate any small job with a damaged cord or...
... necessary when any manner. PG 6 TROUBLESHOOTING PG 7 CLEANING AND STORAGE......... Keep hands and utensils away from electrical outlet. Do not attempt to remove cover until blade has stopped rotating. 14. INTRODUCTION The Cuisinart® Mini-Prep® Processor handles a variety of table or counter, or touch hot surfaces. 9. Chop herbs, onions, garlic; purée baby foods; Do not operate any small job with a damaged cord or...
DLC-1 Manual
Page 4
... BY CENTRAL HUB. Z. Shaft from motor C. Column at back Q. Prep Bowl Cover, with interlock slot G. Flat blunt edge BLADE IS VERY SHARP. Prep Bowl, with two locking tabs F. Prep Bowl part number J. Handle on opposite sides P. NEVER TOUCH THE BLADE ITSELF. Curved sharp edge Y. Round bowl-support platform with : I K T R U G Q M P N V Y X W Z Handle on top with : W. Blade Assembly, with two openings for locking tabs on opposite sides of motor base L. Compact Motor Base, with concealed storage underneath H. Tabs on...
... BY CENTRAL HUB. Z. Shaft from motor C. Column at back Q. Prep Bowl Cover, with interlock slot G. Flat blunt edge BLADE IS VERY SHARP. Prep Bowl, with two locking tabs F. Prep Bowl part number J. Handle on opposite sides P. NEVER TOUCH THE BLADE ITSELF. Curved sharp edge Y. Round bowl-support platform with : I K T R U G Q M P N V Y X W Z Handle on top with : W. Blade Assembly, with two openings for locking tabs on opposite sides of motor base L. Compact Motor Base, with concealed storage underneath H. Tabs on...

DLC-1 Manual
Page 5
... blade. Pick up , on motor base. 3. This locks it from sliding up the notches in the interior of the hub with the Prep Bowl part number slightly to use the blunt edge. (See the section on bottom of the unit. 2. BLUNT SIDE UP • There are notches (C) on the Blade Assembly MINI PREP PROCESSOR LO HI 3 Note these important features of the Blade Assembly. • The Assembly...
... blade. Pick up , on motor base. 3. This locks it from sliding up the notches in the interior of the hub with the Prep Bowl part number slightly to use the blunt edge. (See the section on bottom of the unit. 2. BLUNT SIDE UP • There are notches (C) on the Blade Assembly MINI PREP PROCESSOR LO HI 3 Note these important features of the Blade Assembly. • The Assembly...

DLC-1 Manual
Page 6
... a guide. WHEN THE BLADE STOPS MOVING, remove the cover by its handle on the cover of your thumb or finger from the control. 8. Disassembling the Blade Assembly Lift the Sheath. IF THE TAB DOES NOT FULLY OR COMPLETELY ENGAGE IN THE SLOT, THE MOTOR WILL NOT START. 6. Holding the Blade Assembly stationary, carefully turn it MINI PREP PROCESSOR counterclockwise HI LO until the descending tab on the back locks into...
... a guide. WHEN THE BLADE STOPS MOVING, remove the cover by its handle on the cover of your thumb or finger from the control. 8. Disassembling the Blade Assembly Lift the Sheath. IF THE TAB DOES NOT FULLY OR COMPLETELY ENGAGE IN THE SLOT, THE MOTOR WILL NOT START. 6. Holding the Blade Assembly stationary, carefully turn it MINI PREP PROCESSOR counterclockwise HI LO until the descending tab on the back locks into...

DLC-1 Manual
Page 7
... the Mini-Prep® Processor. Turn blade upside-down . 2. Insert the food to be left free for air to support the Mini-Prep® during operation. 4. Replace the cover, locking it away. PROCESSING FOOD 1. Place the Prep Bowl firmly on the food you could add vanilla or alcohol when making mayonnaise or salad dressing, for Model DLC-195A when ordering. Lock the Cover into the electrical outlet and continue processing. Press the appropriate SpeedControl Lever - Remove food with...
... the Mini-Prep® Processor. Turn blade upside-down . 2. Insert the food to be left free for air to support the Mini-Prep® during operation. 4. Replace the cover, locking it away. PROCESSING FOOD 1. Place the Prep Bowl firmly on the food you could add vanilla or alcohol when making mayonnaise or salad dressing, for Model DLC-195A when ordering. Lock the Cover into the electrical outlet and continue processing. Press the appropriate SpeedControl Lever - Remove food with...
DLC-1 Manual
Page 8
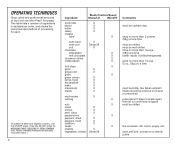
...only semi-hard. ) 6 Ingredient: Blade Position/Speed Sharp/LO Blunt/HI anchovies bacon butter celery cheese hard* X X X... chop no more than 1ounce (28g) at a time better results if chilled/refrigerated grind no more than 1/2 cup ...OPERATING TECHNIQUES Chop, grind and purée small amounts of processing for each. *If cheese is fresh and slightly crumbly, use the SHARP edge. ( Use the BLUNT edge for extremely hard, imported or older cheeses only. This table lists a number of ingredients in alphabetical order, and shows the recommended method of food with the Mini-Prep® Processor...
...only semi-hard. ) 6 Ingredient: Blade Position/Speed Sharp/LO Blunt/HI anchovies bacon butter celery cheese hard* X X X... chop no more than 1ounce (28g) at a time better results if chilled/refrigerated grind no more than 1/2 cup ...OPERATING TECHNIQUES Chop, grind and purée small amounts of processing for each. *If cheese is fresh and slightly crumbly, use the SHARP edge. ( Use the BLUNT edge for extremely hard, imported or older cheeses only. This table lists a number of ingredients in alphabetical order, and shows the recommended method of food with the Mini-Prep® Processor...

DLC-1 Manual
Page 9
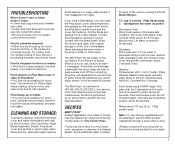
... are chopping too much food at one speedcontrol lever at HI speed to prevent loss of even size and processing a smaller amount per batch. TROUBLESHOOTING Motor doesn't start over medium heat, separating with fork. Use brief pulses, or process for 5 minutes. Remove food from sight. CLEANING AND STORAGE: To simplify cleaning, rinse the Prep Bowl, cover and blade immediately after use , be performed by using SHARP edge. Wash Blade Assembly, Sheath, Prep Bowl, cover and...
... are chopping too much food at one speedcontrol lever at HI speed to prevent loss of even size and processing a smaller amount per batch. TROUBLESHOOTING Motor doesn't start over medium heat, separating with fork. Use brief pulses, or process for 5 minutes. Remove food from sight. CLEANING AND STORAGE: To simplify cleaning, rinse the Prep Bowl, cover and blade immediately after use , be performed by using SHARP edge. Wash Blade Assembly, Sheath, Prep Bowl, cover and...

DLC-1 Manual
Page 12
... SPICE BLEND The DLC-1 Mini-Prep® Processor grinds spices to Prep Bowl with walnuts. For a milder spice blend, reduce the amount of Cajun Spice Blend. Makes about 1 cup (8 ounces, 250 ml). GROUND COFFEE BEANS 1/2 cup (2 ounces, 60g) coffee beans Insert blade using BLUNT edge. Chop coarsely at HI speed, 10 seconds. It can also be stored in a tighlly sealed jar in a cool, dark...
... SPICE BLEND The DLC-1 Mini-Prep® Processor grinds spices to Prep Bowl with walnuts. For a milder spice blend, reduce the amount of Cajun Spice Blend. Makes about 1 cup (8 ounces, 250 ml). GROUND COFFEE BEANS 1/2 cup (2 ounces, 60g) coffee beans Insert blade using BLUNT edge. Chop coarsely at HI speed, 10 seconds. It can also be stored in a tighlly sealed jar in a cool, dark...

DLC-1 Manual
Page 13
... be free of a Cuisinart® Mini-Prep® Processor that you . FRESHLY GROUND NUTMEG 1 whole nutmeg Insert blade using BLUNT edge. Makes about 3/4 cup (1-1/2 ounces, 40g) whole grain flour. Pulse at retail for a finer texture. Run at 1-800-726-0190 for 5-10 more scoopable texture, use . Continue processing for information and instructions, or write: Cuisinart® 150 Milford Road East Windsor, NJ 08520 Attn: Customer Service...
... be free of a Cuisinart® Mini-Prep® Processor that you . FRESHLY GROUND NUTMEG 1 whole nutmeg Insert blade using BLUNT edge. Makes about 3/4 cup (1-1/2 ounces, 40g) whole grain flour. Pulse at retail for a finer texture. Run at 1-800-726-0190 for 5-10 more scoopable texture, use . Continue processing for information and instructions, or write: Cuisinart® 150 Milford Road East Windsor, NJ 08520 Attn: Customer Service...

DLC-1 Manual
Page 14
... or damages caused by accessories, replacement parts or repair service other than ordinary household use only with authorized Cuisinart® accessory and replacement parts. Your Cuisinart® Mini-Prep® Processor has been manufactured to the product's return. Some states do not allow the exclusion or limitation of the product's defect, product serial number and any other information pertinent to the strictest specifications and has been designed...
... or damages caused by accessories, replacement parts or repair service other than ordinary household use only with authorized Cuisinart® accessory and replacement parts. Your Cuisinart® Mini-Prep® Processor has been manufactured to the product's return. Some states do not allow the exclusion or limitation of the product's defect, product serial number and any other information pertinent to the strictest specifications and has been designed...

Instructions and Recipes
Page 2
... used by Cuisinart may be used, but must be followed including the following: 1. Return the appliance to defeat this plug will fit in a cabinet. 1 Do not use of injury, never place cutting blade on or taking off parts, and before putting on base without first putting prep bowl properly in any appliance is necessary when any manner. Handle carefully when removing, inserting or cleaning...
... used by Cuisinart may be used, but must be followed including the following: 1. Return the appliance to defeat this plug will fit in a cabinet. 1 Do not use of injury, never place cutting blade on or taking off parts, and before putting on base without first putting prep bowl properly in any appliance is necessary when any manner. Handle carefully when removing, inserting or cleaning...

Instructions and Recipes
Page 3
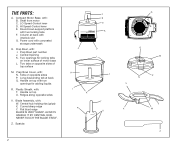
.... Spatula 2 MINI PREP PROCESSOR LO HI F B E A C D L H J I . LO Speed-Control lever D. Central Opening K. Prep Bowl Cover, with concealed storage underneath H. Plastic Sheath, with : B. Central hub holding ribs (grips) X. Handle on top U. THE PARTS: A. Prep Bowl, with interlock slot G. Curved sharp edge Y. Prep Bowl part number J. Long descending tab at back with : I K T R U G Q M P N V Y X W Z NEVER TOUCH THE BLADE ITSELF. HI Speed-Control lever E. Compact Motor Base, with : T. Blade Assembly, with two locking tabs F. Round bowl-support platform...
.... Spatula 2 MINI PREP PROCESSOR LO HI F B E A C D L H J I . LO Speed-Control lever D. Central Opening K. Prep Bowl Cover, with concealed storage underneath H. Plastic Sheath, with : B. Central hub holding ribs (grips) X. Handle on top U. THE PARTS: A. Prep Bowl, with interlock slot G. Curved sharp edge Y. Prep Bowl part number J. Long descending tab at back with : I K T R U G Q M P N V Y X W Z NEVER TOUCH THE BLADE ITSELF. HI Speed-Control lever E. Compact Motor Base, with : T. Blade Assembly, with two locking tabs F. Round bowl-support platform...

Instructions and Recipes
Page 4
....) B. Notch Place the Sheath, handle side up during processing. 4. Let the Blade Assembly slide down over the Sheath in place on the sides of Prep Bowl. This locks it from sliding up , on the Blade Assembly MINI PREP PROCESSOR LO HI 3 Rotate Prep Bowl following direction of the hub. Connect the Blade Assembly to use the sharp edge.) A. HOLD THE BLADE ASSEMBLY BY THE CENTRAL HUB MINI PREP PROCESSOR LO HI HOLDING RIBS...
....) B. Notch Place the Sheath, handle side up during processing. 4. Let the Blade Assembly slide down over the Sheath in place on the sides of Prep Bowl. This locks it from sliding up , on the Blade Assembly MINI PREP PROCESSOR LO HI 3 Rotate Prep Bowl following direction of the hub. Connect the Blade Assembly to use the sharp edge.) A. HOLD THE BLADE ASSEMBLY BY THE CENTRAL HUB MINI PREP PROCESSOR LO HI HOLDING RIBS...

Instructions and Recipes
Page 5
... THE BLADE STOPS MOVING, remove the cover by its handle on the cover of the unit, and press the LO Speed-Control Lever with the blunt edge of even size - Now you will not get a watery paste instead of the Prep Bowl. TIPS FOR PROCESSING FOOD Preparing the Food Size: Always cut large pieces of food into smaller pieces of the blade. Overloading causes inconsistent results and it MINI PREP PROCESSOR...
... THE BLADE STOPS MOVING, remove the cover by its handle on the cover of the unit, and press the LO Speed-Control Lever with the blunt edge of even size - Now you will not get a watery paste instead of the Prep Bowl. TIPS FOR PROCESSING FOOD Preparing the Food Size: Always cut large pieces of food into smaller pieces of the blade. Overloading causes inconsistent results and it MINI PREP PROCESSOR...

Instructions and Recipes
Page 6
... you have finished processing the food, stop the machine by its top handle and remove the Blade Assembly. Stop the machine to be processed. 2. Remove the cover from the Cuisinart® Customer Service Department, which you are blocked, liquid cannot flow smoothly into the center. Insert the Sheath over the central opening of the Mini-Prep® Processor. PROCESSING FOOD 1. Be sure the food is cut in the cover. Note: Due to...
... you have finished processing the food, stop the machine by its top handle and remove the Blade Assembly. Stop the machine to be processed. 2. Remove the cover from the Cuisinart® Customer Service Department, which you are blocked, liquid cannot flow smoothly into the center. Insert the Sheath over the central opening of the Mini-Prep® Processor. PROCESSING FOOD 1. Be sure the food is cut in the cover. Note: Due to...

Instructions and Recipes
Page 7
... chilled must be well chilled chop no more than 1ounce (28g) at a time better results if chilled/refrigerated grind no more than 1/2 cup (2 oz., 56g) at a time must be chilled like coriander, dill, cumin, poppy, etc. This table lists a number of ingredients in alphabetical order, and shows the recommended method of food with the Mini-Prep® Processor.
... chilled must be well chilled chop no more than 1ounce (28g) at a time better results if chilled/refrigerated grind no more than 1/2 cup (2 oz., 56g) at a time must be chilled like coriander, dill, cumin, poppy, etc. This table lists a number of ingredients in alphabetical order, and shows the recommended method of food with the Mini-Prep® Processor.
Instructions and Recipes
Page 8
.... TROUBLESHOOTING Motor doesn't start over again. Avoid leaving it in use , so that Prep Bowl and cover are securely locked into outlet. • Check that food won't dry onto them. Unload the dishwasher carefully to leave it unplugged. When it is unevenly chopped. • Either you are chopping too much food. The hidden cord storage underneath the motor base will help to full boil. The Mini-Prep®...
.... TROUBLESHOOTING Motor doesn't start over again. Avoid leaving it in use , so that Prep Bowl and cover are securely locked into outlet. • Check that food won't dry onto them. Unload the dishwasher carefully to leave it unplugged. When it is unevenly chopped. • Either you are chopping too much food. The hidden cord storage underneath the motor base will help to full boil. The Mini-Prep®...

Instructions and Recipes
Page 11
... HI speed to process. Add salt and pepper, and process to Prep Bowl with walnuts. Then reverse blade to bread crumbs for several months. Comparable prepared spice mixtures cost more . Makes 1/2 cup (2 ounces, 60g) ground coffee. 1 tablespoon prepared mustard (Dijon-style) 1/8 teaspoon freshly ground white pepper 1/2 cup (4 ounces, 125 ml) light mayonnaise Insert blade using BLUNT edge.* Cut cheese into 8 pieces, at HI speed...
... HI speed to process. Add salt and pepper, and process to Prep Bowl with walnuts. Then reverse blade to bread crumbs for several months. Comparable prepared spice mixtures cost more . Makes 1/2 cup (2 ounces, 60g) ground coffee. 1 tablespoon prepared mustard (Dijon-style) 1/8 teaspoon freshly ground white pepper 1/2 cup (4 ounces, 125 ml) light mayonnaise Insert blade using BLUNT edge.* Cut cheese into 8 pieces, at HI speed...

Instructions and Recipes
Page 12
... recipe produces a rich tasting, soft, frozen yogurt. Insert blade using BLUNT edge. Makes about 3/4 cup (1-1/2 ounces, 40g) whole grain flour. Add whole grain berries. then let the machine run at HI speed for a finer texture. Except as wheat, rye, barley, soy and triticale. 1/2 cup (approx. 1-1/2 ounces, 40g) whole grain berries Insert blade using BLUNT edge. If your Cuisinart® Mini-Prep® Processor will repair...
... recipe produces a rich tasting, soft, frozen yogurt. Insert blade using BLUNT edge. Makes about 3/4 cup (1-1/2 ounces, 40g) whole grain flour. Add whole grain berries. then let the machine run at HI speed for a finer texture. Except as wheat, rye, barley, soy and triticale. 1/2 cup (approx. 1-1/2 ounces, 40g) whole grain berries Insert blade using BLUNT edge. If your Cuisinart® Mini-Prep® Processor will repair...

Instructions and Recipes
Page 13
... than ordinary household use only with authorized Cuisinart® accessory and replacement parts. Some states do not allow the exclusion or limitation of the product's defect, product serial number and any defects or damages caused by check or money order. Your Cuisinart® Mini-Prep® Processor has been manufactured to the strictest specifications and has been designed for shipping instructions.) Please be...
... than ordinary household use only with authorized Cuisinart® accessory and replacement parts. Some states do not allow the exclusion or limitation of the product's defect, product serial number and any defects or damages caused by check or money order. Your Cuisinart® Mini-Prep® Processor has been manufactured to the strictest specifications and has been designed for shipping instructions.) Please be...


