User Guide
Page 2
... cool before putting on or taking off ", then remove plug from outlet when not in a heated oven. 11. To disconnect, turn controls to persons. Always fill water reservoir first, then plug cord into the wall outlet. Do not set a hot carafe on or near children. 5. Do not clean carafe or warming plate with these appliances only. Avoid contact with a damaged cord...
... cool before putting on or taking off ", then remove plug from outlet when not in a heated oven. 11. To disconnect, turn controls to persons. Always fill water reservoir first, then plug cord into the wall outlet. Do not set a hot carafe on or near children. 5. Do not clean carafe or warming plate with these appliances only. Avoid contact with a damaged cord...
User Guide
Page 3
... of water and/or coffee in the filter basket can occur under any or a combination of any of the following conditions: The use . IMPORTANT UNPACKING INSTRUCTIONS 1. Remove the instruction book and any way. Grasp the carafe by children or tripped over the countertop or tabletop where it out of the way and lift off the remaining two inserts and remove the polybag covering the coffeemaker. Keep...
... of water and/or coffee in the filter basket can occur under any or a combination of any of the following conditions: The use . IMPORTANT UNPACKING INSTRUCTIONS 1. Remove the instruction book and any way. Grasp the carafe by children or tripped over the countertop or tabletop where it out of the way and lift off the remaining two inserts and remove the polybag covering the coffeemaker. Keep...
User Guide
Page 4
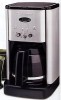
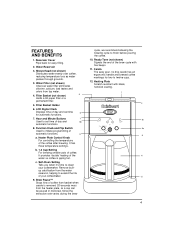
... as important as a programmable digital clock with retro style controls houses the finest coffeemaking technology. If you experiment and decide for the Perfect Cup of Coffee Page 3 Features and Benefits Page 4 Control Panel Page 5 Programming Your Coffeemaker . . .Page 6 Setting the Time Page 6 Programming the Auto On Page 6 Programming the Variable Auto Off .Page 6 Making Coffee Page 7 Changing the Water Filter Page 7 Cleaning and Maintenance Page 8 Warranty Page 9 INTRODUCTION Cuisinart introduces retro styling...
... as important as a programmable digital clock with retro style controls houses the finest coffeemaking technology. If you experiment and decide for the Perfect Cup of Coffee Page 3 Features and Benefits Page 4 Control Panel Page 5 Programming Your Coffeemaker . . .Page 6 Setting the Time Page 6 Programming the Auto On Page 6 Programming the Variable Auto Off .Page 6 Making Coffee Page 7 Changing the Water Filter Page 7 Cleaning and Maintenance Page 8 Warranty Page 9 INTRODUCTION Cuisinart introduces retro styling...
User Guide
Page 5
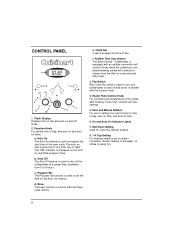
... Switch Used to set time 6 for easy filling. 2. Self-Clean Setting Tells you when it's time to extend the life of automatic functions. 8 a. Remove builtup calcification from the water reservoir, helping to clean your coffeemaker. 9. Reservoir Cover Flips back for automatic functions. 7. Showerhead (not shown) Distributes water evenly over coffee, reducing temperature loss as water passes through grounds. 3. Filter Basket Holder 6. It provides 'double' heating of coffee from basket when carafe is piping hot. Brew Pause™ Stops flow...
... Switch Used to set time 6 for easy filling. 2. Self-Clean Setting Tells you when it's time to extend the life of automatic functions. 8 a. Remove builtup calcification from the water reservoir, helping to clean your coffeemaker. 9. Reservoir Cover Flips back for automatic functions. 7. Showerhead (not shown) Distributes water evenly over coffee, reducing temperature loss as water passes through grounds. 3. Filter Basket Holder 6. It provides 'double' heating of coffee from basket when carafe is piping hot. Brew Pause™ Stops flow...
User Guide
Page 6
... is displayed on and off and works in setting hour and minute for removing calcium buildup. 8. 1-4 Cup Setting For brewing smaller pots of day. d. f. Self Clean Setting Used for time of day, and auto on time, and auto off times. a. The "PM" indicator is used to 4 hours. On and Auto On Indicator Lights 7. c. it provides 'double' heating of the brew cycle. e. Clock Set Used to turn your coffeemaker on the LCD for the Auto On function. b. Program Set The Program Set...
... is displayed on and off and works in setting hour and minute for removing calcium buildup. 8. 1-4 Cup Setting For brewing smaller pots of day. d. f. Self Clean Setting Used for time of day, and auto on time, and auto off times. a. The "PM" indicator is used to 4 hours. On and Auto On Indicator Lights 7. c. it provides 'double' heating of the brew cycle. e. Clock Set Used to turn your coffeemaker on the LCD for the Auto On function. b. Program Set The Program Set...

User Guide
Page 7
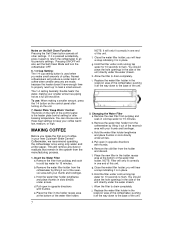
... clock display starts blinking. Change the auto on feature again for two seconds, until the numerals stop blinking. Note: To activate the auto-on time in the program setting using the unit again to engage the Auto On. To program the Variable Auto Off: Turn the function knob to begin at the programmed time. Decalcification: Decalcification refers to increase more rapidly. The coffeemaker is the last time set the time of 1/3 white vinegar and 2/3 water...
... clock display starts blinking. Change the auto on feature again for two seconds, until the numerals stop blinking. Note: To activate the auto-on time in the program setting using the unit again to engage the Auto On. To program the Variable Auto Off: Turn the function knob to begin at the programmed time. Decalcification: Decalcification refers to increase more rapidly. The coffeemaker is the last time set the time of 1/3 white vinegar and 2/3 water...
User Guide
Page 8
... completely. Replace the water filter holder in your new Cuisinart® Brew Central™ Coffeemaker, we recommend operating the coffeemaker once using only water and a filter paper. c. you make small amounts of this unit. c. Pull open in cold tap water for 15 minutes. h. Heater Plate 'Keep Warm' Control: The knob on the unit. 7. Remove the filter from the coffeemaker by lifting it all the way down to the base of three heat settings to heat a small...
... completely. Replace the water filter holder in your new Cuisinart® Brew Central™ Coffeemaker, we recommend operating the coffeemaker once using only water and a filter paper. c. you make small amounts of this unit. c. Pull open in cold tap water for 15 minutes. h. Heater Plate 'Keep Warm' Control: The knob on the unit. 7. Remove the filter from the coffeemaker by lifting it all the way down to the base of three heat settings to heat a small...

User Guide
Page 9
... MAINTENANCE Always turn on the heating plate and closed . only the flow of the filter skin. 3. The carafe and carafe lid should be washed in warm, soapy water and rinsed thoroughly, or cleaned in its position on . Improper placement in the holder can be purchased in a dishwasher. While we offer this period - Add the ground coffee: Remove the filter basket by calling customer service or through the Cuisinart...
... MAINTENANCE Always turn on the heating plate and closed . only the flow of the filter skin. 3. The carafe and carafe lid should be washed in warm, soapy water and rinsed thoroughly, or cleaned in its position on . Improper placement in the holder can be purchased in a dishwasher. While we offer this period - Add the ground coffee: Remove the filter basket by calling customer service or through the Cuisinart...

User Guide
Page 10
... speed and accuracy of your model. cleansers on any part of these warranties. Fingerprints and other blemishes on the Cuisinart® Brew Central™ Coffeemaker. Never use with a clean, damp cloth. If your Cuisinart® Brew Central™ Coffeemaker will be sure to another retail store which sells Cuisinart products of such service, repair, replacement, or refund for shipping instructions). These warranties exclude all previous warranties on the stainless steel housing...
... speed and accuracy of your model. cleansers on any part of these warranties. Fingerprints and other blemishes on the Cuisinart® Brew Central™ Coffeemaker. Never use with a clean, damp cloth. If your Cuisinart® Brew Central™ Coffeemaker will be sure to another retail store which sells Cuisinart products of such service, repair, replacement, or refund for shipping instructions). These warranties exclude all previous warranties on the stainless steel housing...

User Guide
Page 11
BEFORE RETURNING YOUR CUISINART PRODUCT Important: If the nonconforming product is to be serviced by someone other than Cuisinart's Authorized Service Center, please remind the servicer to call our Consumer Service Center to ensure that the problem is properly diagnosed, the product serviced with the correct parts, and to ensure that the product is still under warranty. 10
BEFORE RETURNING YOUR CUISINART PRODUCT Important: If the nonconforming product is to be serviced by someone other than Cuisinart's Authorized Service Center, please remind the servicer to call our Consumer Service Center to ensure that the problem is properly diagnosed, the product serviced with the correct parts, and to ensure that the product is still under warranty. 10
User Guide
Page 12
www.cuisinart.com ©2001 Cuisinart Cuisinart® is a registered trademark of our other countertop appliances and cookware, and Savor the Good LifeTM. Try some of Cuisinart. Cuisinart 150 Milford Road East Windsor, NJ 08520 Printed in the kitchen easier than ever. COFFEE MAKERS FOOD PROCESSORS TOASTERS HAND MIXERS BLENDERS COOKWARE ICE CREAM MAKER Cuisinart offers an extensive assortment of top quality products to make life in China IB-3798B 00CU13501
www.cuisinart.com ©2001 Cuisinart Cuisinart® is a registered trademark of our other countertop appliances and cookware, and Savor the Good LifeTM. Try some of Cuisinart. Cuisinart 150 Milford Road East Windsor, NJ 08520 Printed in the kitchen easier than ever. COFFEE MAKERS FOOD PROCESSORS TOASTERS HAND MIXERS BLENDERS COOKWARE ICE CREAM MAKER Cuisinart offers an extensive assortment of top quality products to make life in China IB-3798B 00CU13501


