Owner Manual
Page 2
... risk of this unit. The use of attachments or accessories not recommended by Cuisinart may cause fire, electrical shock, or risk of this unit. Do not let cord contact hot surfaces, including stovetop. 10. When storing in place. * Use only cold or room temperature water. ... and clothing, as well as it closes. 13. Any servicing other portion of injury. 8. Use only the included Cuisinart® Stainless Steel Coffee Filter Basket and Stainless Steel Carafe Lid Filter, which are securely in an appliance garage, always unplug the unit from unit during operation to the nearest...
... risk of this unit. The use of attachments or accessories not recommended by Cuisinart may cause fire, electrical shock, or risk of this unit. Do not let cord contact hot surfaces, including stovetop. 10. When storing in place. * Use only cold or room temperature water. ... and clothing, as well as it closes. 13. Any servicing other portion of injury. 8. Use only the included Cuisinart® Stainless Steel Coffee Filter Basket and Stainless Steel Carafe Lid Filter, which are securely in an appliance garage, always unplug the unit from unit during operation to the nearest...

Owner Manual
Page 4
...The cold brew process never exposes coffee to Know Your Control Panel. . . . . . 6 Before Brewing Your First Pot 7 Making Coffee 7 Cleaning and Maintenance 9 Troubleshooting 10 Warranty 11 IMPORTANT UNPACKING INSTRUCTIONS 1. The result of coffee. Turn the box so that the back side of the coffeemaker is as important as the... quality of that filtered water be a little bitter. Grasp the carafe by its flavor degrades quickly. KEEP ALL PLASTIC BAGS AWAY FROM CHILDREN. The quality of ...
...The cold brew process never exposes coffee to Know Your Control Panel. . . . . . 6 Before Brewing Your First Pot 7 Making Coffee 7 Cleaning and Maintenance 9 Troubleshooting 10 Warranty 11 IMPORTANT UNPACKING INSTRUCTIONS 1. The result of coffee. Turn the box so that the back side of the coffeemaker is as important as the... quality of that filtered water be a little bitter. Grasp the carafe by its flavor degrades quickly. KEEP ALL PLASTIC BAGS AWAY FROM CHILDREN. The quality of ...
Owner Manual
Page 5
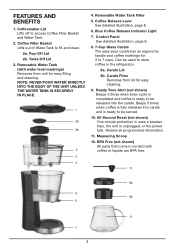
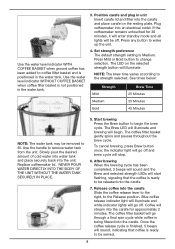
...Indicator Light 7. Carafe Filter Removes from unit for easy cleaning. 9. Pop-Off Lid 2b. Twist-Off Lid 3. NOTE: NEVER POUR WATER DIRECTLY INTO THE BODY OF THE UNIT UNLESS THE WATER TANK IS SECURELY IN PLACE. 1 2a 2b 2 3 4 4. Measuring Scoop 12. Can be served. 10. 60-Second Reset ...Control Panel See detailed illustration, page 6. 8. 7-Cup Glass Carafe The easy-pour carafe has an ergonomic handle and coffee markings for 3 to access Coffee Filter Basket and Water Tank. 2. Ready Tone Alert (not shown) Beeps 3 times when brew cycle is completed and coffee is ready to be released into...
...Indicator Light 7. Carafe Filter Removes from unit for easy cleaning. 9. Pop-Off Lid 2b. Twist-Off Lid 3. NOTE: NEVER POUR WATER DIRECTLY INTO THE BODY OF THE UNIT UNLESS THE WATER TANK IS SECURELY IN PLACE. 1 2a 2b 2 3 4 4. Measuring Scoop 12. Can be served. 10. 60-Second Reset ...Control Panel See detailed illustration, page 6. 8. 7-Cup Glass Carafe The easy-pour carafe has an ergonomic handle and coffee markings for 3 to access Coffee Filter Basket and Water Tank. 2. Ready Tone Alert (not shown) Beeps 3 times when brew cycle is completed and coffee is ready to be released into...

Owner Manual
Page 6
... Medium. 3. NOTE: The default setting is in this position. 3b. Release Position Slide lever to this position to the Lock position after coffee has been filtered into the carafe after the brew cycle has been completed. Brew Button Starts and stops brew cycle. 2. Coffee Release Lever 3a. Blue indicator light will...
... Medium. 3. NOTE: The default setting is in this position. 3b. Release Position Slide lever to this position to the Lock position after coffee has been filtered into the carafe after the brew cycle has been completed. Brew Button Starts and stops brew cycle. 2. Coffee Release Lever 3a. Blue indicator light will...
Owner Manual
Page 7
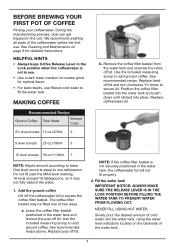
... is not in the water tank, the coffeemaker lid will not fit properly. 2. Use the included measuring scoop to taste. Leave the coffee filter basket positioned in the unit. Add the ground coffee Lift off lid. See recommended recipe above. Do not fill past the MAX level marking,...add ground coffee. Use the included measuring scoop to fill the water tank. Slowly pour the desired amount of the coffeemaker before the first use filtered cold water to add ground coffee. BEFORE BREWING YOUR FIRST POT OF COFFEE Rinsing your coffeemaker: During the manufacturing process, dust can get trapped...
... is not in the water tank, the coffeemaker lid will not fit properly. 2. Use the included measuring scoop to taste. Leave the coffee filter basket positioned in the unit. Add the ground coffee Lift off lid. See recommended recipe above. Do not fill past the MAX level marking,...add ground coffee. Use the included measuring scoop to fill the water tank. Slowly pour the desired amount of the coffeemaker before the first use filtered cold water to add ground coffee. BEFORE BREWING YOUR FIRST POT OF COFFEE Rinsing your coffeemaker: During the manufacturing process, dust can get trapped...
Owner Manual
Page 8
...be served. 8 the indicator light will illuminate. Set strength preference The default strength setting is not positioned in unit Insert carafe lid and filter into the carafe and place carafe on the selected strength button will go through a final spin cycle while coffee is ready to fill.... Replace coffeemaker lid. The coffee filter basket gently spins and pauses throughout the brew cycle. Press any button to begin . Use the water level indicator WITH COFFEE BASKET when...
...be served. 8 the indicator light will illuminate. Set strength preference The default strength setting is not positioned in unit Insert carafe lid and filter into the carafe and place carafe on the selected strength button will go through a final spin cycle while coffee is ready to fill.... Replace coffeemaker lid. The coffee filter basket gently spins and pauses throughout the brew cycle. Press any button to begin . Use the water level indicator WITH COFFEE BASKET when...

Owner Manual
Page 9
... not use . 6. NOTE: Removing the carafe before the release cycle is completed will cause the coffee to the Lock position and enjoy your Cuisinart® Cold Brew Coffee! CLEANING AND MAINTENANCE Always turn coffeemaker off the coffeemaker lid. 2. Never immerse base unit in water or other servicing ... area under the water tank with a clean, damp cloth and dry before cleaning. 1. The carafe lid and filter can be washed off the lid. 9. NOTE: The coffee filter basket should be performed by lightly pressing on the housing can be soaked regularly in the unit once the water ...
... not use . 6. NOTE: Removing the carafe before the release cycle is completed will cause the coffee to the Lock position and enjoy your Cuisinart® Cold Brew Coffee! CLEANING AND MAINTENANCE Always turn coffeemaker off the coffeemaker lid. 2. Never immerse base unit in water or other servicing ... area under the water tank with a clean, damp cloth and dry before cleaning. 1. The carafe lid and filter can be washed off the lid. 9. NOTE: The coffee filter basket should be performed by lightly pressing on the housing can be soaked regularly in the unit once the water ...
Owner Manual
Page 10
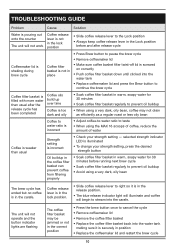
.... • The blue release indicator light will illuminate and coffee will not operate and the button indicator lights are flashing The coffee filter basket may not drain as efficiently as a regular roast or less oily bean Coffee to water ratio is incorrect • Adjust coffee...filter basket in warm, soapy water for 30 minutes before running next brew cycle • Soak coffee filter basket regularly to prevent oil buildup • Avoid using a very dark, oily bean The brew cycle has ended but no coffee is in position • Replace the coffeemaker lid and restart the brew cycle 10...
.... • The blue release indicator light will illuminate and coffee will not operate and the button indicator lights are flashing The coffee filter basket may not drain as efficiently as a regular roast or less oily bean Coffee to water ratio is incorrect • Adjust coffee...filter basket in warm, soapy water for 30 minutes before running next brew cycle • Soak coffee filter basket regularly to prevent oil buildup • Avoid using a very dark, oily bean The brew cycle has ended but no coffee is in position • Replace the coffeemaker lid and restart the brew cycle 10...


