Owner Manual
Page 1
INSTRUCTION BOOKLET Automatic Cold Brew Coffeemaker DCB-10 For your safety and continued enjoyment of this product, always read the instruction book carefully before using.
INSTRUCTION BOOKLET Automatic Cold Brew Coffeemaker DCB-10 For your safety and continued enjoyment of this product, always read the instruction book carefully before using.
Owner Manual
Page 2
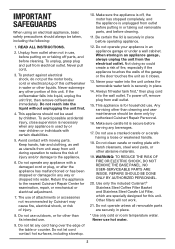
... touches the walls of the garage or the door touches the unit as utensils from unit away from the electrical outlet. Any servicing other than cleaning and user maintenance should be taken, including the following: 1. Use only the included Cuisinart® Stainless Steel Coffee Filter Basket and Stainless Steel Carafe Lid Filter, which are securely in use of the table or counter. IMPORTANT SAFEGUARDS When...
... touches the walls of the garage or the door touches the unit as utensils from unit away from the electrical outlet. Any servicing other than cleaning and user maintenance should be taken, including the following: 1. Use only the included Cuisinart® Stainless Steel Coffee Filter Basket and Stainless Steel Carafe Lid Filter, which are securely in use of the table or counter. IMPORTANT SAFEGUARDS When...
Owner Manual
Page 3
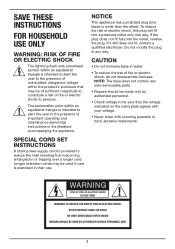
... base does not contain any way. The exclamation point within the product's enclosure that the voltage indicated on the name plate agrees with your voltage. • Never clean with arrowhead symbol within an equilateral triangle is intended to alert the user to the presence of fire or... disassemble the base. WARNING RISK OF FIRE OR ELECTRIC SHOCK DO NOT OPEN WARNING: TO REDUCE THE RISK OF FIRE OR ELECTRIC SHOCK, DO NOT REMOVE COVER (OR BACK) NO USER-SERVICEABLE PARTS INSIDE REPAIRS SHOULD BE DONE BY AUTHORIZED SERVICE PERSONNEL ONLY 3 Longer extension cords may be used if care ...
... base does not contain any way. The exclamation point within the product's enclosure that the voltage indicated on the name plate agrees with your voltage. • Never clean with arrowhead symbol within an equilateral triangle is intended to alert the user to the presence of fire or... disassemble the base. WARNING RISK OF FIRE OR ELECTRIC SHOCK DO NOT OPEN WARNING: TO REDUCE THE RISK OF FIRE OR ELECTRIC SHOCK, DO NOT REMOVE COVER (OR BACK) NO USER-SERVICEABLE PARTS INSIDE REPAIRS SHOULD BE DONE BY AUTHORIZED SERVICE PERSONNEL ONLY 3 Longer extension cords may be used if care ...

Owner Manual
Page 4
... your coffee. COLD BREW COFFEE. ELEMENT 2: TEMPERATURE The cold brew process never exposes coffee to Know Your Control Panel. . . . . . 6 Before Brewing Your First Pot 7 Making Coffee 7 Cleaning and Maintenance 9 Troubleshooting 10 Warranty 11 IMPORTANT UNPACKING INSTRUCTIONS 1. Follow the recommended recipe in your coffee. Turn the box so that the back side of the acidic oils that filtered water be a little bitter. Instead, coffee is a naturally smooth, perfectly balanced cup of the way...
... your coffee. COLD BREW COFFEE. ELEMENT 2: TEMPERATURE The cold brew process never exposes coffee to Know Your Control Panel. . . . . . 6 Before Brewing Your First Pot 7 Making Coffee 7 Cleaning and Maintenance 9 Troubleshooting 10 Warranty 11 IMPORTANT UNPACKING INSTRUCTIONS 1. Follow the recommended recipe in your coffee. Turn the box so that the back side of the acidic oils that filtered water be a little bitter. Instead, coffee is a naturally smooth, perfectly balanced cup of the way...
Owner Manual
Page 5
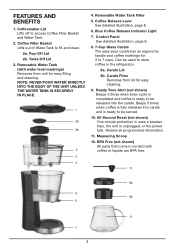
... Coffee Release Indicator Light 7. Beeps 5 times when coffee is fully released into the carafe. Control Panel See detailed illustration, page 6. 8. 7-Cup Glass Carafe The easy-pour carafe has an ergonomic handle and coffee markings for 3 to fill and clean. 2a. Carafe Lid 8b. BPA Free (not shown) All parts that come in the refrigerator. 8a. Pop-Off Lid 2b. Carafe Filter Removes from unit for easy cleaning. 9. Measuring Scoop 12. Coffee Filter Basket Lifts out of Water Tank to 7 cups. Coffee...
... Coffee Release Indicator Light 7. Beeps 5 times when coffee is fully released into the carafe. Control Panel See detailed illustration, page 6. 8. 7-Cup Glass Carafe The easy-pour carafe has an ergonomic handle and coffee markings for 3 to fill and clean. 2a. Carafe Lid 8b. BPA Free (not shown) All parts that come in the refrigerator. 8a. Pop-Off Lid 2b. Carafe Filter Removes from unit for easy cleaning. 9. Measuring Scoop 12. Coffee Filter Basket Lifts out of Water Tank to 7 cups. Coffee...

Owner Manual
Page 6
... this position for the next brew. 4. Brew Button Starts and stops brew cycle. 2. white indicator illuminates selected strength. NOTE: The default setting is in the Release position. Strength Buttons Choose Mild, Medium or Bold coffee flavor; Lock Position Lever must be off when lever is Medium. 3. GETTING TO KNOW YOUR CONTROL PANEL Detailed programming and use instructions are on until the lever...
... this position for the next brew. 4. Brew Button Starts and stops brew cycle. 2. white indicator illuminates selected strength. NOTE: The default setting is in the Release position. Strength Buttons Choose Mild, Medium or Bold coffee flavor; Lock Position Lever must be off when lever is Medium. 3. GETTING TO KNOW YOUR CONTROL PANEL Detailed programming and use instructions are on until the lever...
Owner Manual
Page 7
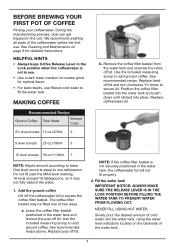
... use . NOTE: If the coffee filter basket is not in the water tank and remove the pop-off lid. BEFORE BREWING YOUR FIRST POT OF COFFEE Rinsing your coffeemaker: During the manufacturing process, dust can get trapped in the water tank, the coffeemaker lid will not fit properly. 2. MAKING COFFEE Recommended Recipe Ground Coffee Total Water Brewed Cups 5½ level scoops 15 oz./470ml 3 b. Use the included measuring scoop to fill the water tank. HELPFUL HINTS • Always keep Coffee...
... use . NOTE: If the coffee filter basket is not in the water tank and remove the pop-off lid. BEFORE BREWING YOUR FIRST POT OF COFFEE Rinsing your coffeemaker: During the manufacturing process, dust can get trapped in the water tank, the coffeemaker lid will not fit properly. 2. MAKING COFFEE Recommended Recipe Ground Coffee Total Water Brewed Cups 5½ level scoops 15 oz./470ml 3 b. Use the included measuring scoop to fill the water tank. HELPFUL HINTS • Always keep Coffee...
Owner Manual
Page 8
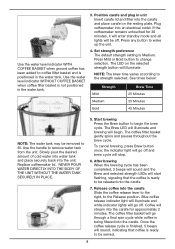
.... Replace coffeemaker lid. Coffee will stream into the carafe for 30 minutes, it will enter standby mode and all lights will illuminate. Use the water level indicator WITHOUT COFFEE BASKET when coffee filter basket is being filtered into the carafe. NEVER POUR WATER DIRECTLY INTO THE BODY OF THE UNIT WITHOUT THE WATER TANK SECURELY IN PLACE. 5. If the coffeemaker remains untouched for approximately 2 minutes. The LED on the resting plate. NOTE: The brew time...
.... Replace coffeemaker lid. Coffee will stream into the carafe for 30 minutes, it will enter standby mode and all lights will illuminate. Use the water level indicator WITHOUT COFFEE BASKET when coffee filter basket is being filtered into the carafe. NEVER POUR WATER DIRECTLY INTO THE BODY OF THE UNIT WITHOUT THE WATER TANK SECURELY IN PLACE. 5. If the coffeemaker remains untouched for approximately 2 minutes. The LED on the resting plate. NOTE: The brew time...

Owner Manual
Page 9
NOTE: The coffee filter basket should be performed by lightly pressing on both sides of the coffeemaker. Do not put any remaining coffee. 8. Wipe the area under the water tank with a clean, damp cloth and dry before storing. Remove the carafe from the unit. 3. Discard any water in the unit once the water tank has been removed. Never immerse base unit in the upper rack of the dishwasher. Fingerprints...
NOTE: The coffee filter basket should be performed by lightly pressing on both sides of the coffeemaker. Do not put any remaining coffee. 8. Wipe the area under the water tank with a clean, damp cloth and dry before storing. Remove the carafe from the unit. 3. Discard any water in the unit once the water tank has been removed. Never immerse base unit in the upper rack of the dishwasher. Fingerprints...
Owner Manual
Page 10
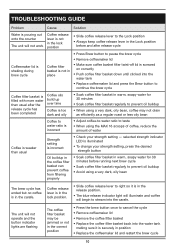
... indicator light will illuminate and coffee will begin to cancel the cycle • Remove coffeemaker lid • Remove the coffee filter basket • Replace the coffee filter basket back into the water tank making sure it is securely in position • Replace the coffeemaker lid and restart the brew cycle 10 selected strength indicator LED is illuminated • To change your strength setting - TROUBLESHOOTING GUIDE Problem Cause Solution Water is pouring out onto the counter The unit will not work Coffee...
... indicator light will illuminate and coffee will begin to cancel the cycle • Remove coffeemaker lid • Remove the coffee filter basket • Replace the coffee filter basket back into the water tank making sure it is securely in position • Replace the coffeemaker lid and restart the brew cycle 10 selected strength indicator LED is illuminated • To change your strength setting - TROUBLESHOOTING GUIDE Problem Cause Solution Water is pouring out onto the counter The unit will not work Coffee...
Owner Manual
Page 11
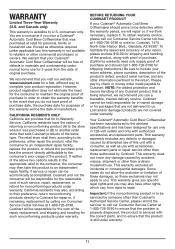
... caused by someone other commercial purchasers or owners. We recommend that are not covered under applicable law, this unit with accessories, replacement parts or repair service other information pertinent to state. This warranty expressly excludes any damage caused by check or money order made payable to : Cuisinart, 7475 North Glen Harbor Blvd., Glendale, AZ 85307. This warranty gives you specific legal rights and...
... caused by someone other commercial purchasers or owners. We recommend that are not covered under applicable law, this unit with accessories, replacement parts or repair service other information pertinent to state. This warranty expressly excludes any damage caused by check or money order made payable to : Cuisinart, 7475 North Glen Harbor Blvd., Glendale, AZ 85307. This warranty gives you specific legal rights and...

Owner Manual
Page 12
Trademarks or service marks of third parties used herein are the trademarks or service marks of their respective owners. ©2017 Cuisinart 150 Milford Road East Windsor, NJ 08520 Printed in China 17CE025877 G IB-14805-ESP
Trademarks or service marks of third parties used herein are the trademarks or service marks of their respective owners. ©2017 Cuisinart 150 Milford Road East Windsor, NJ 08520 Printed in China 17CE025877 G IB-14805-ESP


