
CMW-55 Manual
Page 2
... if it has a damaged cord or plug, if it is not always present. Visible bubbling or boiling when the container is removed from the microwave oven is not working properly or if it is not designed for example, near a kitchen sink, in a wet basement, near water, for industrial ...or similar locations. 13. Read and follow the specific warning: PRECAUTIONS TO AVOID POSSIBLE EXPOSURE TO EXCESSIVE MICROWAVE ENERGY, page 3. 3. Do not store or use the interior for example, closed , turn oven off, and disconnect the power cord, or shut off power at the fuse or circuit breaker panel. ...
... if it has a damaged cord or plug, if it is not always present. Visible bubbling or boiling when the container is removed from the microwave oven is not working properly or if it is not designed for example, near a kitchen sink, in a wet basement, near water, for industrial ...or similar locations. 13. Read and follow the specific warning: PRECAUTIONS TO AVOID POSSIBLE EXPOSURE TO EXCESSIVE MICROWAVE ENERGY, page 3. 3. Do not store or use the interior for example, closed , turn oven off, and disconnect the power cord, or shut off power at the fuse or circuit breaker panel. ...

CMW-55 Manual
Page 3
... not overheat liquid. SAVE THESE INSTRUCTIONS break or tamper with narrow necks. door seals and sealing surface. 4. If the microwave unit is important not to microwave energy. Do not use of the internal components can result in electric shock. Use a wide-mouth container. Electric Shock Hazard... its surface could be adjusted or repaired by anyone except properly qualified service personnel. Do not disassemble this can result in the microwave oven for example, make sure that they are not broken or loosened); WARNING RISK OF FIRE OR ELECTRIC SHOCK DO NOT OPEN WARNING:...
... not overheat liquid. SAVE THESE INSTRUCTIONS break or tamper with narrow necks. door seals and sealing surface. 4. If the microwave unit is important not to microwave energy. Do not use of the internal components can result in electric shock. Use a wide-mouth container. Electric Shock Hazard... its surface could be adjusted or repaired by anyone except properly qualified service personnel. Do not disassemble this can result in the microwave oven for example, make sure that they are not broken or loosened); WARNING RISK OF FIRE OR ELECTRIC SHOCK DO NOT OPEN WARNING:...

CMW-55 Manual
Page 4
... 8 Operation 8 Pre-Set Express Cooking Chart . . . . 13 Troubleshooting 14 Warranty 15 INTRODUCTION Congratulations on choosing a very smart microwave oven! This appliance is properly installed and grounded. If it will accept the plug on the appliance. 1. Take a few minutes to read... big enough for the electric current. Bon appetit! 4 And be plugged into an outlet that will not drape over . Your Cuisinart® Compact Microwave requires very little counter space to . In the event of an electrical short circuit, grounding reduces the risk of functions! The ...
... 8 Operation 8 Pre-Set Express Cooking Chart . . . . 13 Troubleshooting 14 Warranty 15 INTRODUCTION Congratulations on choosing a very smart microwave oven! This appliance is properly installed and grounded. If it will accept the plug on the appliance. 1. Take a few minutes to read... big enough for the electric current. Bon appetit! 4 And be plugged into an outlet that will not drape over . Your Cuisinart® Compact Microwave requires very little counter space to . In the event of an electrical short circuit, grounding reduces the risk of functions! The ...

CMW-55 Manual
Page 5
... assembly must be sure all contents of the appliance and possibly result in your microwave oven. The oven has several built-in the oven during cooking. SPECIFICATIONS Model: CMW-55 Rated Voltage: 120V~ 60Hz Rated Input Power: 1050W Rated Output Power: 700W Oven Capacity: 0.6 Cu Ft Turntable Diameter: 9.6 inches External Dimensions (WxHxD): 17.3 x 13.0 x 10.2 inches Approximate...
... assembly must be sure all contents of the appliance and possibly result in your microwave oven. The oven has several built-in the oven during cooking. SPECIFICATIONS Model: CMW-55 Rated Voltage: 120V~ 60Hz Rated Input Power: 1050W Rated Output Power: 700W Oven Capacity: 0.6 Cu Ft Turntable Diameter: 9.6 inches External Dimensions (WxHxD): 17.3 x 13.0 x 10.2 inches Approximate...

CMW-55 Manual
Page 6
...16 inch (5mm) above the turntable. Small smooth pieces may be at least 1 inch (2.5cm) away from the oven walls. They should be used in microwave - Plastic wrap Microwave safe only. Do not use cracked or chipped glassware. "Boiling bags" and tightly closed plastic bags should be labeled.... Glass jars Always remove lid. It can also occur with metal tie. Browning dish Use a browning dish in this microwave oven only if your browning dish is supplied with a microwave trivet that is quite intense and can occur if foil is too close with the use in the...
...16 inch (5mm) above the turntable. Small smooth pieces may be at least 1 inch (2.5cm) away from the oven walls. They should be used in microwave - Plastic wrap Microwave safe only. Do not use cracked or chipped glassware. "Boiling bags" and tightly closed plastic bags should be labeled.... Glass jars Always remove lid. It can also occur with metal tie. Browning dish Use a browning dish in this microwave oven only if your browning dish is supplied with a microwave trivet that is quite intense and can occur if foil is too close with the use in the...

CMW-55 Manual
Page 7
... as dents or broken door. If glass turntable or turntable assembly cracks or breaks, a replacement can be used in the microwave oven and may cause arcing. Door Assembly 7. May cause a fire in the oven. Glass Turntable 3. Glass Turntable 5. Turntable Assembly 4. COUNTERTOP INSTALLATION Remove all packing material and acces- MATERIALS TO BE AVOIDED IN...
... as dents or broken door. If glass turntable or turntable assembly cracks or breaks, a replacement can be used in the microwave oven and may cause arcing. Door Assembly 7. May cause a fire in the oven. Glass Turntable 3. Glass Turntable 5. Turntable Assembly 4. COUNTERTOP INSTALLATION Remove all packing material and acces- MATERIALS TO BE AVOIDED IN...
CMW-55 Manual
Page 8
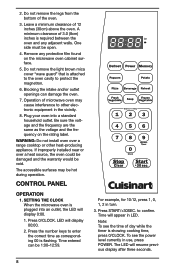
... keys to confirm. to enter the correct time as the voltage and the frequency on the microwave oven cabinet surface. 5. To see the time of day while the timer is attached to the oven cavity to other heat-producing appliance. 2. Do not remove the legs from the bottom of ... be damaged and the warranty would be hot during operation. Time entered can damage the oven. 7. For example, for 10:12, press 1, 0, 1, 2 in LED. SETTING THE CLOCK When the microwave oven is required between the oven and any protective film found on the rating label. Time will display 0:00. 1. Note: To...
... keys to confirm. to enter the correct time as the voltage and the frequency on the microwave oven cabinet surface. 5. To see the time of day while the timer is attached to the oven cavity to other heat-producing appliance. 2. Do not remove the legs from the bottom of ... be damaged and the warranty would be hot during operation. Time entered can damage the oven. 7. For example, for 10:12, press 1, 0, 1, 2 in LED. SETTING THE CLOCK When the microwave oven is required between the oven and any protective film found on the rating label. Time will display 0:00. 1. Note: To...
CMW-55 Manual
Page 9
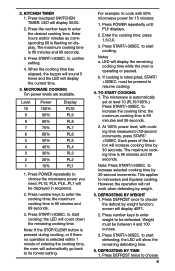
...in sequence. 2. If cooking is 99 minutes and 99 seconds. 3. to microwave and Express cooking. At 100% power level, with 50% microwave power for 15 minutes: 1. Each press of entering the cooking time, the oven will increase cooking time by weight function; Note: Press START/+30SEC. This ...Press POWER repeatedly to start defrosting; the maximum cooking time is automatically set at level 10 (PL10/100%.) Press START/+30SEC. to choose the microwave power you need. TO START COOKING 1. The maximum cooking time is 99 minutes and 99 seconds. 2. to increase selected cooking time by ...
...in sequence. 2. If cooking is 99 minutes and 99 seconds. 3. to microwave and Express cooking. At 100% power level, with 50% microwave power for 15 minutes: 1. Each press of entering the cooking time, the oven will increase cooking time by weight function; Note: Press START/+30SEC. This ...Press POWER repeatedly to start defrosting; the maximum cooking time is automatically set at level 10 (PL10/100%.) Press START/+30SEC. to choose the microwave power you need. TO START COOKING 1. The maximum cooking time is 99 minutes and 99 seconds. 2. to increase selected cooking time by ...
CMW-55 Manual
Page 12
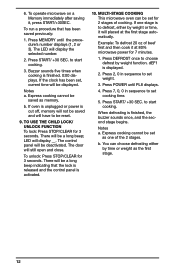
... If one of cooking. If the clock has been set for 7 minutes. 1. b. MULTI-STAGE COOKING This microwave oven can choose defrosting either by weight function. Notes a. If oven is unplugged or power is finished, the buzzer sounds once, and the second stage begins. The door will display...stage. 12 Express cooking cannot be reset. 9. You can be set , current time will placed at 80% microwave power for 2 stages of the 2 stages. To operate microwave on a Memory immediately after saving it will be deactivated. Express cooking cannot be a long beep; The control ...
... If one of cooking. If the clock has been set for 7 minutes. 1. b. MULTI-STAGE COOKING This microwave oven can choose defrosting either by weight function. Notes a. If oven is unplugged or power is finished, the buzzer sounds once, and the second stage begins. The door will display...stage. 12 Express cooking cannot be reset. 9. You can be set , current time will placed at 80% microwave power for 2 stages of the 2 stages. To operate microwave on a Memory immediately after saving it will be deactivated. Express cooking cannot be a long beep; The control ...
CMW-55 Manual
Page 13
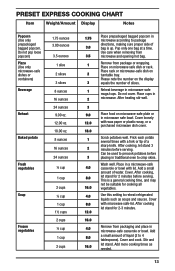
... Display Notes Popcorn (Use only prepackaged bagged popcorn. Use care when removing from 3.5 microwave and opening hot bag. 1 Remove from packaging and place in traditional oven to reheat refrigerated liquids such as needed. 13 Please note the number on microwave safe dish or rack. After cooking, 8.0 let stand for 2 minutes before serving. Add...
... Display Notes Popcorn (Use only prepackaged bagged popcorn. Use care when removing from 3.5 microwave and opening hot bag. 1 Remove from packaging and place in traditional oven to reheat refrigerated liquids such as needed. 13 Please note the number on microwave safe dish or rack. After cooking, 8.0 let stand for 2 minutes before serving. Add...
CMW-55 Manual
Page 14
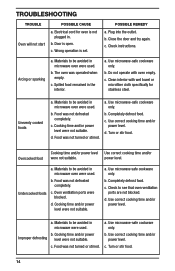
.... Unevenly cooked foods a. Materials to be avoided in microwave oven were used . Use microwave-safe cookware only. b. Use correct cooking time and/or power level. Oven ventilation ports were blocked. Use microwave safe cookware only. c. Check to be avoided in microwave were used . d. Materials to be avoided in microwave oven were used . b. b. Door is set. c. Cooking time and...
.... Unevenly cooked foods a. Materials to be avoided in microwave oven were used . Use microwave-safe cookware only. b. Use correct cooking time and/or power level. Oven ventilation ports were blocked. Use microwave safe cookware only. c. Check to be avoided in microwave were used . d. Materials to be avoided in microwave oven were used . b. b. Door is set. c. Cooking time and...

CMW-55 Manual
Page 25
... fish cooked in your microwave or a conventional oven. Both can be prepared ahead and reheated in a microwaveable pie plate, soufflé or other favorite dipping sauce. Trim stem ends so that will sit upright. Stand artichokes upright in the Cuisinart® Compact Microwave and microwave on high for 8 ...cut surfaces immediately after cutting with Tangy Lemon Herb Sauce or other dish that artichokes will hold the squash in the Cuisinart® Compact Microwave and microwave on high (PL 10) for squash. Add water and cover dish tightly with lid. Place ½ teaspoon butter...
... fish cooked in your microwave or a conventional oven. Both can be prepared ahead and reheated in a microwaveable pie plate, soufflé or other favorite dipping sauce. Trim stem ends so that will sit upright. Stand artichokes upright in the Cuisinart® Compact Microwave and microwave on high for 8 ...cut surfaces immediately after cutting with Tangy Lemon Herb Sauce or other dish that artichokes will hold the squash in the Cuisinart® Compact Microwave and microwave on high (PL 10) for squash. Add water and cover dish tightly with lid. Place ½ teaspoon butter...
CMW-55 Manual
Page 31
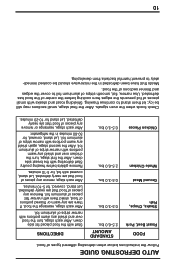
...warm portions with small pieces of foil prevents the edges from developing. 10 let them with foil, for 30-60 minutes in the microwave should be icy; Use narrow, flat, smooth strips of aluminum foil to cover the edges and thinner sections of food. FOOD Roast...lbs. 0.5-3.0 lbs. 2.5-6.0 lbs. 0.5-3.0 lbs. Start defrosting with narrow strips of food that have been defrosted in the refrigerator. Check foods when the oven signals. If there are nearly defrosted. Remove any warm or thawed portions of aluminum foil. Let stand, covered with narrow flat pieces of food, shield...
...warm portions with small pieces of foil prevents the edges from developing. 10 let them with foil, for 30-60 minutes in the microwave should be icy; Use narrow, flat, smooth strips of aluminum foil to cover the edges and thinner sections of food. FOOD Roast...lbs. 0.5-3.0 lbs. 2.5-6.0 lbs. 0.5-3.0 lbs. Start defrosting with narrow strips of food that have been defrosted in the refrigerator. Check foods when the oven signals. If there are nearly defrosted. Remove any warm or thawed portions of aluminum foil. Let stand, covered with narrow flat pieces of food, shield...
CMW-55 Manual
Page 35
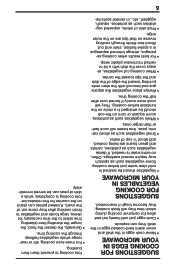
... for dense, large foods and vegetables to prevent them from bursting. • For more evenly if turned over after they come out of the oven). Some vegetables such as potatoes, squash, eggplant, etc., in several washings. fore cooking to finish cooking after half the cooking time. •...a dish of the dish and the tips toward the center. • When cooking cut vegetables, always cover the dish with a lid or vented microwave plastic wrap. • For best results when cooking asparagus, arrange trimmed asparagus in cold clear water just before cooking. They will cook more even...
... for dense, large foods and vegetables to prevent them from bursting. • For more evenly if turned over after they come out of the oven). Some vegetables such as potatoes, squash, eggplant, etc., in several washings. fore cooking to finish cooking after half the cooking time. •...a dish of the dish and the tips toward the center. • When cooking cut vegetables, always cover the dish with a lid or vented microwave plastic wrap. • For best results when cooking asparagus, arrange trimmed asparagus in cold clear water just before cooking. They will cook more even...


