Cuisinart CGWM-041 Support and Manuals
Get Help and Manuals for this Cuisinart item
View All Support Options Below
Free Cuisinart CGWM-041 manuals!
Problems with Cuisinart CGWM-041?
Ask a Question
Free Cuisinart CGWM-041 manuals!
Problems with Cuisinart CGWM-041?
Ask a Question
Cuisinart CGWM-041 Videos

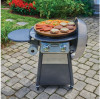
Grease Management Cuisinart 360° Griddle Cooking Center (CGWM-041)
Duration: :22
Total Views: 2,849
Duration: :22
Total Views: 2,849
Popular Cuisinart CGWM-041 Manual Pages
User Manual - Page 1

... cause injury or property damage. 2. Gas leaks may cause a fire or explosion. Shut off gas to you smell gas: 1.
Cuisinart
Outdoor Gri l l ing Products
A WARNING
For Outdoor Use Only (outside any open flames. 3. This instruction manual contains important information necessary for convenient future reference.
360° Griddle Cooking Center
Model NO:CGWM-001/041
I,
cesmonsQ
A WARNING
1.
User Manual - Page 5

... is filled by a reputable propane dealer. We also advise you receive the most enjoyable and trouble-free operation of your LP (propane) tank is known to the
State of the LP tank... harm and will ensure you retain this manual for more information, go to your LP tank.
5 For more information concerning filling your Owner's Manual for future reference. The overfilled condition combined...
User Manual - Page 8

PARTS LIST
PART
DESCRIPTION
QTY
1
X Lid
1
2
X Lid Handle
1
3
Vent Handle
...Control Panel
1
15
Knob Bezel
2
16
Knobs
2
17
Hose
1
18
Gas Tank Holder
1
19
Manual Lighting Tool
1
20
Wheel
2
21 Wheel with Lock
2
22
Left Front Leg
1
23
Left ...
24
Right Front Leg
1
25
Right Rear Leg
1
X : NO ASSEMBLY REQUIRED
PART 26 27 28 29 30 31 32 33 34 35 36 37 38 39 40 41...
User Manual - Page 10

Assemble the Base Plate (L) on both legs using M6 screws. at
AA
ILO
3OIS.1.8OHS
0
Q
O
10 ASSEMBLY INSTRUCTIONS
2. Install side panels on to the Left Back (LB) Leg and Right Back (RB) Leg to the long side of the base plate using M6 screws (AA)
LB
•
RB
AA
3.
User Manual - Page 11

Lay down the Front Legs sub-assembly. ASSEMBLY INSTRUCTIONS
4. Align the side panels to the Front Legs and assemble using M6 screws.
0
\
AA
lif o
11
User Manual - Page 12

Put the griddle's body onto the stand and align it with M6 screws (AA) and washers (FF). Secure each leg with screw holes on each leg. I
a
a
AA
O
O0 I
FF
O
lalgtipain
12 ASSEMBLY INSTRUCTIONS
S.
User Manual - Page 13

Hook the griddle plate support brackets on the left or right side of the griddle.
ASSEMBLY INSTRUCTIONS
6. Secure them by using M6 shoulder screws (CC), washers (HH), and nuts (II). Place the brackets that are removable, allowing you to customize the location ...
User Manual - Page 14

... to be reinstalled.
ASSEMBLY INSTRUCTIONS
8. If this is not aligned properly the surface will appear tilted. Place the griddle plate on top of the griddle body by aligning the 3 posts under the griddle plate with the griddle plate support brackets. t
• e
Ctifaiftg
9. NOTE: If griddle plate doesn't set directly into the control panel...
User Manual - Page 15

ASSEMBLY INSTRUCTIONS
10. Secure the gas hose ring on to the Front Right (FR) leg using a M6 screw (AA).
:let° or. 00
AA
•
15 Insert the drip cup
l 000po: op
•
11.
User Manual - Page 18

... 80 s
0
s
n
18 L.P. A 20 lb. tanks are not included with the griddle or a replacement pressure regulator and hose assembly specified by the manufacturer). CONNECTING REGULATOR TO THE LP TANK
This gas griddle is... designed to connect directly to a standard 20 lb. This assembly is set to secure the tank.
060
N
.._. -..- - Bring gas cylinder hook down to operate...
User Manual - Page 20

... connections on the griddle are set to test and tighten all control knobs are leak tested prior to shipment, a complete gas tightness check must be performed at the installation site due to possible shifts...grill until the leak is allowed to light or causing low flames.
20 When gas is repaired. CHECKING FOR LEAKS
DANGER
FOR YOUR SAFETY A Always perform leak tests outdoors
ONLY in a...
User Manual - Page 22

...instructions before lighting 2.
Push and turn knob counterclockwise to "HIGH" position. NOTE: If the burner does not ignite within the first few attempts of this manual or call the customer service...operate the griddle until the problem is a problem with the gas supply. ...22 See "Trouble Shooting" section of match lighting, there is found and corrected. LIGHTING INSTRUCTIONS
WARNING:
...
User Manual - Page 23

...a regular basis to a fire beneath the griddle.
Always check that the flow of the gas train is replaced or gas smell is not obstructed. I I
civi1l4/A)04N,Mtl
Normal: Son blue games
I y \.e. ...usage, areas of the grain. Wipe dry with the gas supply turned off by a qualified service person.
Accumulated grease is cool. To clean, purchase a mild stainless steel cleaner and rub...
User Manual - Page 27

...still low, turn off the igniter/valve. 2. Check for a replacement ignition wire. 4. Rust occurs when the griddle is completely clean.... water, especially in order to remove the debris. TROUBLE SHOOTING
Many solutions given here can also call consumer...Reconnect and retry.
PROBLEM
Griddle will remove the
detergents to a high heat for assistance. Call customer service for gas in gas...
User Manual - Page 28

... be assembled, installed, operated and maintained in accordance with all applicable codes and the instruction manual furnished with this warranty: • Unevenness and color variations in parts and workmanship for the remaining period of the original part warranty. For FAQ's and replacement parts, please visit us at www.cuisinart.com/outdoorgrilling. Warranty and Replacement Parts
This...
Cuisinart CGWM-041 Reviews
We have not received any reviews for Cuisinart yet.