
Operating Instructions
Page 2
... Program and Replacement Parts 12 2 1. READ ALL WARNINGS AND INSTRUCTIONS PRIOR TO ASSEMBLING AND OPERATING YOUR GRILL WARNINGS: m This grill is gas leak present. m This grill must be used with the Cuisinart Gas Grill must be used in a liquid propane grill is your responsibility to attach this appliance. The conversion or attempted use and installation of the U.S. m Do...
... Program and Replacement Parts 12 2 1. READ ALL WARNINGS AND INSTRUCTIONS PRIOR TO ASSEMBLING AND OPERATING YOUR GRILL WARNINGS: m This grill is gas leak present. m This grill must be used with the Cuisinart Gas Grill must be used in a liquid propane grill is your responsibility to attach this appliance. The conversion or attempted use and installation of the U.S. m Do...

Operating Instructions
Page 3
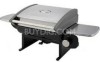
Grill Leg Assembly 1 pc C. Cooking Grate 1 pc D. left 9 Drip tray 19 10 Leg assembly 20 5 Rubber Feet Lid panel - left 11 2 Thermometer's bezel 12 3 Thermometer 13 4 ... 17 8 Front support bracket 18 - Inner Flame tamer Cooking grate Side Shelf - left 15 6 Rear support 16 bracket - Screw M6x12 2 pcs F. 2. Right Regulator and gas valve assembly Gas valve support bracket Control Panel 21 Control knob 22 Lid handle 23 Lid support panel 24 Pin 25 Bushing 26 Side shelf screw 27...
Grill Leg Assembly 1 pc C. Cooking Grate 1 pc D. left 9 Drip tray 19 10 Leg assembly 20 5 Rubber Feet Lid panel - left 11 2 Thermometer's bezel 12 3 Thermometer 13 4 ... 17 8 Front support bracket 18 - Inner Flame tamer Cooking grate Side Shelf - left 15 6 Rear support 16 bracket - Screw M6x12 2 pcs F. 2. Right Regulator and gas valve assembly Gas valve support bracket Control Panel 21 Control knob 22 Lid handle 23 Lid support panel 24 Pin 25 Bushing 26 Side shelf screw 27...

Operating Instructions
Page 4
Part numbers reference the table on the grill. 6 7 Step 4: Put the Flame Tamer, Cooking Grate and Drip Tray on page 4. Step 1: White Adhesive washer M6 (Part H) over screw M6 x 12 (Part E) and tighten ... posts. 3c: Place Black Washers M6 (Part F) over the two bolt holes on the rear corners of the grill leg assembly (Part B). Part H Step 2: Remove cooking grate and flame tamer Step 3a: Attach the Grill Leg Assembly (Part B) to assemble! 4. Assembly Instructions Remove all the contents from packaging, and make sure all...
Part numbers reference the table on the grill. 6 7 Step 4: Put the Flame Tamer, Cooking Grate and Drip Tray on page 4. Step 1: White Adhesive washer M6 (Part H) over screw M6 x 12 (Part E) and tighten ... posts. 3c: Place Black Washers M6 (Part F) over the two bolt holes on the rear corners of the grill leg assembly (Part B). Part H Step 2: Remove cooking grate and flame tamer Step 3a: Attach the Grill Leg Assembly (Part B) to assemble! 4. Assembly Instructions Remove all the contents from packaging, and make sure all...

Operating Instructions
Page 5
...nut, if present. 3. m DANGER 1. Always place your local propane gas supplier. Locate the grill away from grill when transporting and when not in the "OFF" position. 3. or 16.4 oz. • This Cuisinart grill is equipped with one hand, and turn clockwise until all direction on... leak test. 3. Read and follow all leaks have assembled your new grill, find a suitable location for use . 8 5.3 Installing the Gas Cylinder (The propane gas cylinder is required for gas application service or your grill on the cylinder. 1. Remove the protective caps from the regulator, and...
...nut, if present. 3. m DANGER 1. Always place your local propane gas supplier. Locate the grill away from grill when transporting and when not in the "OFF" position. 3. or 16.4 oz. • This Cuisinart grill is equipped with one hand, and turn clockwise until all direction on... leak test. 3. Read and follow all leaks have assembled your new grill, find a suitable location for use . 8 5.3 Installing the Gas Cylinder (The propane gas cylinder is required for gas application service or your grill on the cylinder. 1. Remove the protective caps from the regulator, and...

Operating Instructions
Page 6
... in warm soapy water - Let grill cool completely - Carefully scrape and remove debris from the bottom of grill when opening must be removed from grill and cleaned with the grill lid closed and the gas turned on this grill for the first time, operate the grill for instructions *If the burner does...TAMER IN PLACE. 11 Yellow tips on the left side of the firebox. The burner opening the grill lid. Improper assembly can even cause a fire at the gas control valve. Let grill cool to a safe temperature prior to cleaning. • Disconnect the fuel supply and remove the fuel...
... in warm soapy water - Let grill cool completely - Carefully scrape and remove debris from the bottom of grill when opening must be removed from grill and cleaned with the grill lid closed and the gas turned on this grill for the first time, operate the grill for instructions *If the burner does...TAMER IN PLACE. 11 Yellow tips on the left side of the firebox. The burner opening the grill lid. Improper assembly can even cause a fire at the gas control valve. Let grill cool to a safe temperature prior to cleaning. • Disconnect the fuel supply and remove the fuel...

Operating Instructions
Page 7
... www.thefulhamgroup. Limitations and exclusions: 1. If you can not verify the purchase date of purchase to verify the purchase date of the grill • Damage caused by improper maintenance or repairs by manufacturer. • Damage resulting from the original purchase date. Replacement or repair ...to be transferred. 2. com/CGG-200 or contact us at 1-866-994-6390 To order replacement parts or additional Cuisinart Grilling products, visit us at www.cuisinart.com or call 1-800-211-9604 Model#CGG-200 North American Distributor: The Fulham Group Newton, MA 02466 12 ...
... www.thefulhamgroup. Limitations and exclusions: 1. If you can not verify the purchase date of purchase to verify the purchase date of the grill • Damage caused by improper maintenance or repairs by manufacturer. • Damage resulting from the original purchase date. Replacement or repair ...to be transferred. 2. com/CGG-200 or contact us at 1-866-994-6390 To order replacement parts or additional Cuisinart Grilling products, visit us at www.cuisinart.com or call 1-800-211-9604 Model#CGG-200 North American Distributor: The Fulham Group Newton, MA 02466 12 ...


