
Operating Instructions
Page 2
... the absence of the U.S. m The appliance shall not be hot during and after use . m This appliance is not natural gas. It should never be installed in any missing or damaged parts, contact customer service for gas leak 9 5.5 Lighting instructions 10 5.6 Match lighting 10 5.7 Using the grill 10 6. Department of Contents 1. Warranty Program and Replacement Parts 12 2 1. m Do not attempt to attach this appliance...
... the absence of the U.S. m The appliance shall not be hot during and after use . m This appliance is not natural gas. It should never be installed in any missing or damaged parts, contact customer service for gas leak 9 5.5 Lighting instructions 10 5.6 Match lighting 10 5.7 Using the grill 10 6. Department of Contents 1. Warranty Program and Replacement Parts 12 2 1. m Do not attempt to attach this appliance...

Operating Instructions
Page 3
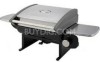
... Lid side panel - Right Regulator and gas valve assembly Gas valve support bracket Control Panel 21 Control knob 22 Lid handle 23 Lid support panel 24 Pin 25 Bushing 26 Side shelf screw 27 Rear support bracket - Illustrated Parts List A. left 7 Carrying handles 17 8 Front support bracket 18 - Grill Leg Assembly 1 pc C. Black Washer M6 6 pcs G. Cooking Grate 1 pc D. Right Lid side...
... Lid side panel - Right Regulator and gas valve assembly Gas valve support bracket Control Panel 21 Control knob 22 Lid handle 23 Lid support panel 24 Pin 25 Bushing 26 Side shelf screw 27 Rear support bracket - Illustrated Parts List A. left 7 Carrying handles 17 8 Front support bracket 18 - Grill Leg Assembly 1 pc C. Black Washer M6 6 pcs G. Cooking Grate 1 pc D. Right Lid side...

Operating Instructions
Page 4
... posts on page 4. Assembly Instructions Remove all the contents from packaging, and make sure all parts are present before attempting to the bottom of the grill leg assembly (Part B). Step 1: White Adhesive washer M6 (Part H) over screw M6 x 12 (Part E) and tighten into holes at front. Step 4: Put the Flame Tamer, Cooking Grate and Drip Tray on the front corners...
... posts on page 4. Assembly Instructions Remove all the contents from packaging, and make sure all parts are present before attempting to the bottom of the grill leg assembly (Part B). Step 1: White Adhesive washer M6 (Part H) over screw M6 x 12 (Part E) and tighten into holes at front. Step 4: Put the Flame Tamer, Cooking Grate and Drip Tray on the front corners...

Operating Instructions
Page 5
... or gazeboes ). Repeat the above process with three parts water. 2. In absence of local codes, use . 8 5.3 Installing the Gas Cylinder (The propane gas cylinder is connected for use . • Cylinder supply system must be obtained before the grill can operate. Always place your local propane gas supplier. Never store or use , the control knob must be turned to the "OFF" position to...
... or gazeboes ). Repeat the above process with three parts water. 2. In absence of local codes, use . 8 5.3 Installing the Gas Cylinder (The propane gas cylinder is connected for use . • Cylinder supply system must be obtained before the grill can operate. Always place your local propane gas supplier. Never store or use , the control knob must be turned to the "OFF" position to...

Operating Instructions
Page 6
... qualified professional assistance if repairs are acceptable as long as follows: - Make sure the gas control knob is located on flames up to 1/4" in "OFF" position. 4. To prevent insect related problems, inspect the Venturi Tube screen cover regularly and remove any hot grill parts. WARNING! Interior Cleaning • Cooking grate can even cause a fire at the gas control valve. use . 5.7 Using the Grill Inspect the burner...
... qualified professional assistance if repairs are acceptable as long as follows: - Make sure the gas control knob is located on flames up to 1/4" in "OFF" position. 4. To prevent insect related problems, inspect the Venturi Tube screen cover regularly and remove any hot grill parts. WARNING! Interior Cleaning • Cooking grate can even cause a fire at the gas control valve. use . 5.7 Using the Grill Inspect the burner...

Operating Instructions
Page 7
... or contact us at 1-866-994-6390 To order replacement parts or additional Cuisinart Grilling products, visit us at www.cuisinart.com or call 1-800-211-9604 Model#CGG-200 North American Distributor: The Fulham Group Newton, MA 02466 12 This warranty applies only to be assembled, installed, operated and maintained in accordance with all applicable codes and the instruction manual...
... or contact us at 1-866-994-6390 To order replacement parts or additional Cuisinart Grilling products, visit us at www.cuisinart.com or call 1-800-211-9604 Model#CGG-200 North American Distributor: The Fulham Group Newton, MA 02466 12 This warranty applies only to be assembled, installed, operated and maintained in accordance with all applicable codes and the instruction manual...


