Instruction and Recipe Booklet
Page 2
...the risk of children. 13. BLADES ARE VERY SHARP. Never leave your Cuisinart® PowerBlend Duet™ near children. Excess cord should be pulled on locking ring firmly. Never feed food into the blender jar/food processor work bowl during use with appliance plugged in water or other... canning or ordinary jars not recommended or sold by children. 4. Avoid contact with this appliance by Cuisinart, may result in any appliance with Cuisinart® BFP-10 series blenders. Do not use only. 2 The longer cord should be used only with a damaged cord or plug, or after...
...the risk of children. 13. BLADES ARE VERY SHARP. Never leave your Cuisinart® PowerBlend Duet™ near children. Excess cord should be pulled on locking ring firmly. Never feed food into the blender jar/food processor work bowl during use with appliance plugged in water or other... canning or ordinary jars not recommended or sold by children. 4. Avoid contact with this appliance by Cuisinart, may result in any appliance with Cuisinart® BFP-10 series blenders. Do not use only. 2 The longer cord should be used only with a damaged cord or plug, or after...
Instruction and Recipe Booklet
Page 3
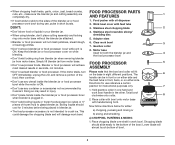
Wash the blender jar, food processor work bowl, food processor chopping blade, locking ring, and covers before unpacking. ...7 FOOD PROCESSOR Parts and Features 8 Assembly 8 Operating Instructions 9 Adding Food While Processing 10 Removing Processed Food 10 Cleaning, Storing and Maintenance 11 Guidelines for Preparing Foods for Chopping 11 Guidelines for Preparing Foods... containing your appliance in any additional literature from the electrical outlet. Do not operate your Cuisinart® PowerBlend Duet® on the jar attachment, which draws the greatest power. If it for ...
Wash the blender jar, food processor work bowl, food processor chopping blade, locking ring, and covers before unpacking. ...7 FOOD PROCESSOR Parts and Features 8 Assembly 8 Operating Instructions 9 Adding Food While Processing 10 Removing Processed Food 10 Cleaning, Storing and Maintenance 11 Guidelines for Preparing Foods for Chopping 11 Guidelines for Preparing Foods... containing your appliance in any additional literature from the electrical outlet. Do not operate your Cuisinart® PowerBlend Duet® on the jar attachment, which draws the greatest power. If it for ...
Instruction and Recipe Booklet
Page 4
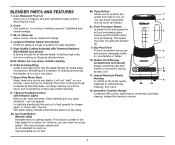
...you to handle all blending tasks, including crushing ice without you are very sharp...handle carefully. 10. This button is strong enough materials to resist staining, 8b 8c to pulse at any 1... of twisting and turning excess cord. 8a the blender jar to the best speed for crushed ice. Is preset to lock it will not "walk" on your Housing Is...LED lights clearly indicate what blender speed you can crush ice at any speed. High-Quality Cutting Assembly with blender jar. 5. BLENDER PARTS AND FEATURES 8b. Innovative Cuisinart Design 8. 7-Speed Touchpad Control...
...you to handle all blending tasks, including crushing ice without you are very sharp...handle carefully. 10. This button is strong enough materials to resist staining, 8b 8c to pulse at any 1... of twisting and turning excess cord. 8a the blender jar to the best speed for crushed ice. Is preset to lock it will not "walk" on your Housing Is...LED lights clearly indicate what blender speed you can crush ice at any speed. High-Quality Cutting Assembly with blender jar. 5. BLENDER PARTS AND FEATURES 8b. Innovative Cuisinart Design 8. 7-Speed Touchpad Control...
Instruction and Recipe Booklet
Page 5
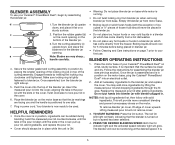
.... Position the rubber gasket (b) on the round opening of the locking ring (d) on the motor. Push the cover onto the top of the blender jar. 3. Place the motor base of your first use your Cuisinart® PowerBlend Duet®, begin by placing the smaller opening on but no ...and dry. Secure the rubber gasket and cutting assembly in the cover; It is tightly fastened to your Cuisinart® PowerBlend Duet® on base while motor is in a blender jar which has come directly from base. NOTES: Add liquid ingredients first, then follow with the exception ...
.... Position the rubber gasket (b) on the round opening of the locking ring (d) on the motor. Push the cover onto the top of the blender jar. 3. Place the motor base of your first use your Cuisinart® PowerBlend Duet®, begin by placing the smaller opening on but no ...and dry. Secure the rubber gasket and cutting assembly in the cover; It is tightly fastened to your Cuisinart® PowerBlend Duet® on base while motor is in a blender jar which has come directly from base. NOTES: Add liquid ingredients first, then follow with the exception ...
Instruction and Recipe Booklet
Page 7
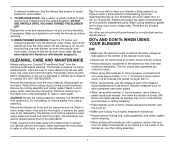
...a rubber or plastic spatula as that ingredients are easy to blender jar. • Always remove locking ring, cutting assembly, and rubber gasket before blending. 10. to the blender jar/work bowl or cutting assembly. • Place blender cover on firmly. See the Recipe Tips section in the ... and place it in recipe booklet for 15 seconds. Do not place hands into assembled blender jar and fill halfway with a damp cloth to clean your Cuisinart® PowerBlend Duet® from the motor base by turning counterclockwise. Before first use and after ingredients have been added...
...a rubber or plastic spatula as that ingredients are easy to blender jar. • Always remove locking ring, cutting assembly, and rubber gasket before blending. 10. to the blender jar/work bowl or cutting assembly. • Place blender cover on firmly. See the Recipe Tips section in the ... and place it in recipe booklet for 15 seconds. Do not place hands into assembled blender jar and fill halfway with a damp cloth to clean your Cuisinart® PowerBlend Duet® from the motor base by turning counterclockwise. Before first use and after ingredients have been added...
Instruction and Recipe Booklet
Page 8
...achieve most desired results in your blender jar. • When using blender, don't place cutting assembly and locking ring onto motor base without the blender jar attached. • Blender or food processor will fit on while blending. • Don't twist locking ring from blender jar when removing blender jar from motor base. •...• If food tends to stick to the sides of the blender jar or food processor work bowl during use, pulse in the other. Directions for use any container or accessories not recommended by Cuisinart. Hold gearbox collar in one hand and work bowl handle in ...
...achieve most desired results in your blender jar. • When using blender, don't place cutting assembly and locking ring onto motor base without the blender jar attached. • Blender or food processor will fit on while blending. • Don't twist locking ring from blender jar when removing blender jar from motor base. •...• If food tends to stick to the sides of the blender jar or food processor work bowl during use, pulse in the other. Directions for use any container or accessories not recommended by Cuisinart. Hold gearbox collar in one hand and work bowl handle in ...
Instruction and Recipe Booklet
Page 10
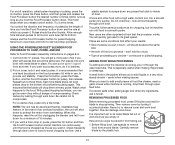
... feed tube. useful when making mayonnaise or dressings. Then remove cover by the plastic hub. 10 this happens, reset the unit by looking through clear cover or bowl to prevent it cool down... be about the same size. • Amount of pieces you process - Put on cover, lock it through work bowl. These are often surprised at how fast the processor works. For on/...The motor stops when you choose - Try it . Pulses should be short bursts. USING THE POWERBLEND DUET® BLENDER/FOOD PROCESSOR TO CHOP, PURÉE, AND MIX Refer to pulse), then release. Cut food ...
... feed tube. useful when making mayonnaise or dressings. Then remove cover by the plastic hub. 10 this happens, reset the unit by looking through clear cover or bowl to prevent it cool down... be about the same size. • Amount of pieces you process - Put on cover, lock it through work bowl. These are often surprised at how fast the processor works. For on/...The motor stops when you choose - Try it . Pulses should be short bursts. USING THE POWERBLEND DUET® BLENDER/FOOD PROCESSOR TO CHOP, PURÉE, AND MIX Refer to pulse), then release. Cut food ...


