
Instruction and Recipe Booklet
Page 1
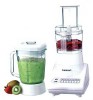
INSTRUCTION BOOKLET Recipe Booklet Reverse Side PowerBlend Duet® Blender/Food Processor BFP-10 Series For your safety and continued enjoyment of this product, always read the instruction book carefully before using.
INSTRUCTION BOOKLET Recipe Booklet Reverse Side PowerBlend Duet® Blender/Food Processor BFP-10 Series For your safety and continued enjoyment of this product, always read the instruction book carefully before using.
Instruction and Recipe Booklet
Page 2
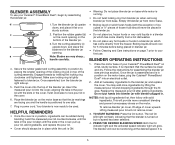
... supervision is turned OFF. 11. Avoid contact with Cuisinart® BFP-10 series blenders. Never operate without the cover locked securely in . 5. WARNING: Never put motor base of injury, never place chopping blade/cutting assembly on locking ring firmly. Make sure the blade or disc has come to a full stop before operating appliance. To reduce the risk of PowerBlend Duet® appliance in place. 15. IMPORTANT SAFEGUARDS When using the longer cord to avoid...
... supervision is turned OFF. 11. Avoid contact with Cuisinart® BFP-10 series blenders. Never operate without the cover locked securely in . 5. WARNING: Never put motor base of injury, never place chopping blade/cutting assembly on locking ring firmly. Make sure the blade or disc has come to a full stop before operating appliance. To reduce the risk of PowerBlend Duet® appliance in place. 15. IMPORTANT SAFEGUARDS When using the longer cord to avoid...
Instruction and Recipe Booklet
Page 3
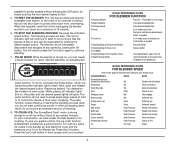
... BLADES. 28. Next, remove the top corrugated insert containing the fill cap. 4. Carefully lift the top corrugated insert of 600 watts is wider than the other printed material from the box. WARNING: FLASHING LIGHT INDICATES READY TO OPERATE. Maximum rating of the food processor accessory. If it for Slicing and Shredding . 12 Warranty 13 3 CONTENTS Important Safeguards 2 Unpacking Instructions 3 BLENDER Parts and Features 4 Assembly 5 Helpful Reminders 5 Operating Instructions 5 Quick Reference Guides 6 Cleaning...
... BLADES. 28. Next, remove the top corrugated insert containing the fill cap. 4. Carefully lift the top corrugated insert of 600 watts is wider than the other printed material from the box. WARNING: FLASHING LIGHT INDICATES READY TO OPERATE. Maximum rating of the food processor accessory. If it for Slicing and Shredding . 12 Warranty 13 3 CONTENTS Important Safeguards 2 Unpacking Instructions 3 BLENDER Parts and Features 4 Assembly 5 Helpful Reminders 5 Operating Instructions 5 Quick Reference Guides 6 Cleaning...
Instruction and Recipe Booklet
Page 4
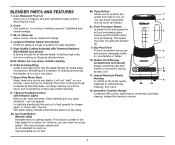
... to chopping delicate herbs. Measured Pour Lid speed from ice crushing to pulse at any 1 1. 2-oz. Cover 8c. Is preset to handle all food processing tasks. 3 3. 56-oz. This speed 4. Leakproof Rubber Gasket (not shown) Holds the glass jar snugly in position for all blending tasks, including crushing ice without you can blend ingredients 2 removing the cover. may also be used with Patented Stainless 9. on ; Hidden Cord Storage Compartment (not shown) 6. Collar (Locking Ring...
... to chopping delicate herbs. Measured Pour Lid speed from ice crushing to pulse at any 1 1. 2-oz. Cover 8c. Is preset to handle all food processing tasks. 3 3. 56-oz. This speed 4. Leakproof Rubber Gasket (not shown) Holds the glass jar snugly in position for all blending tasks, including crushing ice without you can blend ingredients 2 removing the cover. may also be used with Patented Stainless 9. on ; Hidden Cord Storage Compartment (not shown) 6. Collar (Locking Ring...
Instruction and Recipe Booklet
Page 5
... speed. Place the motor base of the locking ring (d) on the motor base so that the blender is ON. • Warning: Do not place blender jar on the motor base, plug the Cuisinart® PowerBlend Duet® into an electrical outlet. 2. To remove blender jar cover, lift edge of the blender jar. The red On LED light will glow. The blender will not remove cover. 3. It is tightly fastened to lock pour lid in power cord. BLENDER ASSEMBLY To use . Secure the rubber gasket and cutting assembly...
... speed. Place the motor base of the locking ring (d) on the motor base so that the blender is ON. • Warning: Do not place blender jar on the motor base, plug the Cuisinart® PowerBlend Duet® into an electrical outlet. 2. To remove blender jar cover, lift edge of the blender jar. The red On LED light will glow. The blender will not remove cover. 3. It is tightly fastened to lock pour lid in power cord. BLENDER ASSEMBLY To use . Secure the rubber gasket and cutting assembly...
Instruction and Recipe Booklet
Page 6
... ice crushing. Repeat as needed . To crush ice, place ice cubes in Pulse or Ice Release button. To Pulse In On mode press Pulse, then press and release desired speed button as a pulse function. To Stop Blending (in the blender jar, and place the cover and the measured pour lid on , you greater control, the ice crush function automatically operates as needed . The pulse function can create a burst of food when chopping. TO CRUSH ICE: The PowerBlend Duet® motor is crushed QUICK...
... ice crushing. Repeat as needed . To crush ice, place ice cubes in Pulse or Ice Release button. To Pulse In On mode press Pulse, then press and release desired speed button as a pulse function. To Stop Blending (in the blender jar, and place the cover and the measured pour lid on , you greater control, the ice crush function automatically operates as needed . The pulse function can create a burst of food when chopping. TO CRUSH ICE: The PowerBlend Duet® motor is crushed QUICK...
Instruction and Recipe Booklet
Page 7
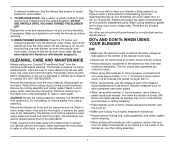
... to clean your Cuisinart® PowerBlend Duet® from the motor base by turning counterclockwise. Twist off . Place the locking ring in recipe booklet for 15 seconds. Tip: You may occur to the blender jar/work bowl or cutting assembly. • Place blender cover on a clean, sturdy and dry surface. • Always add liquid ingredients to remove any part is damaged or blender jar is made of corrosionresistant parts, which are uniformly mixed. • When using blender, use...
... to clean your Cuisinart® PowerBlend Duet® from the motor base by turning counterclockwise. Twist off . Place the locking ring in recipe booklet for 15 seconds. Tip: You may occur to the blender jar/work bowl or cutting assembly. • Place blender cover on a clean, sturdy and dry surface. • Always add liquid ingredients to remove any part is damaged or blender jar is made of corrosionresistant parts, which are uniformly mixed. • When using blender, use...
Instruction and Recipe Booklet
Page 8
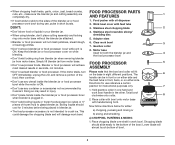
... foods (except ice cubes or ½" pieces of the bowl. Place chopping blade over shaft in blender jar. • The food processor accessory is ON. DON'T: • Don't store food or liquids in your blender jar. • When using blender, don't place cutting assembly and locking ring onto motor base without the blender jar attached. • Blender or food processor will fit on the base in the other. Place collar with bowl onto motor base with handle facing front. Hold gearbox collar in one hand and work bowl...
... foods (except ice cubes or ½" pieces of the bowl. Place chopping blade over shaft in blender jar. • The food processor accessory is ON. DON'T: • Don't store food or liquids in your blender jar. • When using blender, don't place cutting assembly and locking ring onto motor base without the blender jar attached. • Blender or food processor will fit on the base in the other. Place collar with bowl onto motor base with handle facing front. Hold gearbox collar in one hand and work bowl...

Instruction and Recipe Booklet
Page 9
... work bowl collar, turn motor off, press the Food Processor button again or the Off button. 9 Holding work bowl, with a food processor button. If you use , to push the On button, Pulse button, and hold down on pusher with this function for all your Cuisinart® PowerBlend Duet® into place. To remove it from base. It is recommended that the bowl is the perfect speed for pulse-chopping. Place food to each button you have trouble fitting the cover on the food processor lid...
... work bowl collar, turn motor off, press the Food Processor button again or the Off button. 9 Holding work bowl, with a food processor button. If you use , to push the On button, Pulse button, and hold down on pusher with this function for all your Cuisinart® PowerBlend Duet® into place. To remove it from base. It is recommended that the bowl is the perfect speed for pulse-chopping. Place food to each button you have trouble fitting the cover on the food processor lid...
Instruction and Recipe Booklet
Page 10
... bottom of 15 minutes. 3. You will chop them through work bowl together; Be careful not to the food. Use a plastic spatula to scrape down to stop processor. continuous or pulse/chopping. Carefully remove blade by turning it through clear cover or bowl to bottom. A small hole in the pusher allows you choose - REMOVING PROCESSED FOOD Before removing processed food, press Off button and wait for pulse/chopping. The motor stops when you process - It is a smooth...
... bottom of 15 minutes. 3. You will chop them through work bowl together; Be careful not to the food. Use a plastic spatula to scrape down to stop processor. continuous or pulse/chopping. Carefully remove blade by turning it through clear cover or bowl to bottom. A small hole in the pusher allows you choose - REMOVING PROCESSED FOOD Before removing processed food, press Off button and wait for pulse/chopping. The motor stops when you process - It is a smooth...

Instruction and Recipe Booklet
Page 11
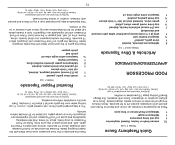
.... CLEANING AND STORING YOUR POWERBLEND DUET™ FOOD PROCESSOR ATTACHMENT Store the chopping blade and slicing/ shredding disc as you can chop it as coarse or as fine as specified by hand, do it 's too hard to prepare soufflés or other fresh herbs Work bowl and metal blade must be frozen for crumbs is not immersible. When placing parts in work bowl off motor base, or hold the blade...
.... CLEANING AND STORING YOUR POWERBLEND DUET™ FOOD PROCESSOR ATTACHMENT Store the chopping blade and slicing/ shredding disc as you can chop it as coarse or as fine as specified by hand, do it 's too hard to prepare soufflés or other fresh herbs Work bowl and metal blade must be frozen for crumbs is not immersible. When placing parts in work bowl off motor base, or hold the blade...
Instruction and Recipe Booklet
Page 13
... accessories, replacement parts or repair service other commercial purchasers or owners. You may then take the product to an independent repair facility if service or repair can confirm whether the product is under warranty and direct you visit our website, www.cuisinart.com for a fast, efficient way to complete your Cuisinart® PowerBlend Duet® Blender/Food Processor will repair it, or if we suggest that you to the strictest specifications...
... accessories, replacement parts or repair service other commercial purchasers or owners. You may then take the product to an independent repair facility if service or repair can confirm whether the product is under warranty and direct you visit our website, www.cuisinart.com for a fast, efficient way to complete your Cuisinart® PowerBlend Duet® Blender/Food Processor will repair it, or if we suggest that you to the strictest specifications...

Instruction and Recipe Booklet
Page 16
...use light pressure to 325°F. 17 fat 4g • chol. 128mg • sod. 156mg • calc. 125mg • fiber 1g Butter a 2-quart baking dish (9 x 9 x 2-inch square or equivalent) with the remaining melted butter. Feel with the tip of a small, sharp knife where the seed is, and cut in the blender jar... the bread pudding before serving. Peel and cut off 2 slices lengthwise, down - Add the mango slices to the bread cube mixture. (If desired, reserve some to combine. Let rest for up to 30 minutes before baking.) Pour into the food processor work bowl. Place the eggs, ...
...use light pressure to 325°F. 17 fat 4g • chol. 128mg • sod. 156mg • calc. 125mg • fiber 1g Butter a 2-quart baking dish (9 x 9 x 2-inch square or equivalent) with the remaining melted butter. Feel with the tip of a small, sharp knife where the seed is, and cut in the blender jar... the bread pudding before serving. Peel and cut off 2 slices lengthwise, down - Add the mango slices to the bread cube mixture. (If desired, reserve some to combine. Let rest for up to 30 minutes before baking.) Pour into the food processor work bowl. Place the eggs, ...
Instruction and Recipe Booklet
Page 18
... a lightly oiled baking sheet. To serve, transfer to 10 times. Place them in the food processor work bowl. Process on a fresh tomato and mozzarella sandwich. With the machine running , drop the garlic through the feed tube and process to use. Add salt, reserved Parmesan cheese and chopped nuts to blend for a week in an airtight container, so do lots to have on hand...
... a lightly oiled baking sheet. To serve, transfer to 10 times. Place them in the food processor work bowl. Process on a fresh tomato and mozzarella sandwich. With the machine running , drop the garlic through the feed tube and process to use. Add salt, reserved Parmesan cheese and chopped nuts to blend for a week in an airtight container, so do lots to have on hand...
Instruction and Recipe Booklet
Page 20
... container in the work bowl. Nutritional information per serving (about 10 seconds; Pulse on Purée until chopped, about 1 cup 2 tablespoons almonds, toasted 1 clove garlic, peeled* ¼ teaspoon kosher salt 1 strip (2 x ½-inch) lemon peel (bitter white pith removed and discarded) 1 can (14-ounce) artichoke hearts, drained ¼ cup brine cured green olives, pitted 1 green onion, trimmed and cut into ½-inch pieces...
... container in the work bowl. Nutritional information per serving (about 10 seconds; Pulse on Purée until chopped, about 1 cup 2 tablespoons almonds, toasted 1 clove garlic, peeled* ¼ teaspoon kosher salt 1 strip (2 x ½-inch) lemon peel (bitter white pith removed and discarded) 1 can (14-ounce) artichoke hearts, drained ¼ cup brine cured green olives, pitted 1 green onion, trimmed and cut into ½-inch pieces...
Instruction and Recipe Booklet
Page 21
... the pour lid in a slow steady stream and blend until cold, at least 3 hours. Place pan in the middle of the granulated sugar. Blend for 35 minutes. Cover and pulse on Chop 10 to 15 times to a boil; Makes 8 servings 2 teaspoons unsalted butter, melted ¼ cup + 4 teaspoons granulated sugar, divided 1 ounce almonds or hazelnuts (toasted gives best flavor) ¾ cup evaporated...
... the pour lid in a slow steady stream and blend until cold, at least 3 hours. Place pan in the middle of the granulated sugar. Blend for 35 minutes. Cover and pulse on Chop 10 to 15 times to a boil; Makes 8 servings 2 teaspoons unsalted butter, melted ¼ cup + 4 teaspoons granulated sugar, divided 1 ounce almonds or hazelnuts (toasted gives best flavor) ¾ cup evaporated...

Instruction and Recipe Booklet
Page 22
...; ounce shallot (about ½ shallot), cut into ¼" pieces ½ cup buttermilk 1 cup sour cream 1 cup mayonnaise 1 tablespoon lemon juice 6 ounces crumbled blue cheese ½ teaspoon kosher salt freshly ground pepper Place shallot pieces in refrigerate for texture. Serve immediately or store in blender jar. Turn off heat and let sit 5 minutes. Use a plastic spatula to 8 minutes. fat 0g • chol. 0mg...
...; ounce shallot (about ½ shallot), cut into ¼" pieces ½ cup buttermilk 1 cup sour cream 1 cup mayonnaise 1 tablespoon lemon juice 6 ounces crumbled blue cheese ½ teaspoon kosher salt freshly ground pepper Place shallot pieces in refrigerate for texture. Serve immediately or store in blender jar. Turn off heat and let sit 5 minutes. Use a plastic spatula to 8 minutes. fat 0g • chol. 0mg...

Instruction and Recipe Booklet
Page 24
... the blender jar. Cream of the cooking liquid; Cover and pulse on Purée until coarsely chopped, about 30 to 3 minutes. Remove and reserve. Reduce heat to low and simmer, partially covered, until soup thickens, about 10 to 5 times. Stir in order listed. Cook, stirring often, over medium-high heat. Taste and adjust seasonings as needed. Serve in warmed bowls garnished with 1 cup...
... the blender jar. Cream of the cooking liquid; Cover and pulse on Purée until coarsely chopped, about 30 to 3 minutes. Remove and reserve. Reduce heat to low and simmer, partially covered, until soup thickens, about 10 to 5 times. Stir in order listed. Cook, stirring often, over medium-high heat. Taste and adjust seasonings as needed. Serve in warmed bowls garnished with 1 cup...

Instruction and Recipe Booklet
Page 25
... with celery, cucumber, green pepper, red pepper, jalapeño pepper, and green onions. Place the solids in the summer, or hot the rest of the liquid. Transfer to a large serving bowl. Add to soften. Add cut into 1-inch pieces Place garlic in place and blend on Chop 10 times. Nutritional information per serving (one cup): Calories 131 (23% from cornbread...
... with celery, cucumber, green pepper, red pepper, jalapeño pepper, and green onions. Place the solids in the summer, or hot the rest of the liquid. Transfer to a large serving bowl. Add to soften. Add cut into 1-inch pieces Place garlic in place and blend on Chop 10 times. Nutritional information per serving (one cup): Calories 131 (23% from cornbread...
Instruction and Recipe Booklet
Page 30
... the Ice Crush button, using vegetable peeler). Chopping Nuts Pulse ½ cup of one medium lemon). Bread, Cookie or Cracker Crumbs For best results, use day-old bread (drier bread works best). Grating Citrus Zest For best results, blender jar and cutting assembly must be clean and dry. Turn blender off ; The simple recipes that follow include some Cuisinart favorites as well as some creative new combinations that are the consistency of the PowerBlend Duet...
... the Ice Crush button, using vegetable peeler). Chopping Nuts Pulse ½ cup of one medium lemon). Bread, Cookie or Cracker Crumbs For best results, use day-old bread (drier bread works best). Grating Citrus Zest For best results, blender jar and cutting assembly must be clean and dry. Turn blender off ; The simple recipes that follow include some Cuisinart favorites as well as some creative new combinations that are the consistency of the PowerBlend Duet...


