Instruction and Recipe Booklet
Page 2
...has come to defeat the food processor cover interlock mechanism. 22. WARNING: Never put motor base of PowerBlend Duet® appliance in place. 15. A rubber or plastic spatula may result in place. 21....risk of injury to be used only with appliance plugged in. 5. Twist on or taking off parts, and before removing cover. 24. Regarding your cord set: A longer cord has been provided ... out of jar/food processor work bowl or container, or handle the blades with Cuisinart® BFP-10 series blenders. Exercise care when using an electrical appliance, basic safety precautions should be...
...has come to defeat the food processor cover interlock mechanism. 22. WARNING: Never put motor base of PowerBlend Duet® appliance in place. 15. A rubber or plastic spatula may result in place. 21....risk of injury to be used only with appliance plugged in. 5. Twist on or taking off parts, and before removing cover. 24. Regarding your cord set: A longer cord has been provided ... out of jar/food processor work bowl or container, or handle the blades with Cuisinart® BFP-10 series blenders. Exercise care when using an electrical appliance, basic safety precautions should be...
Instruction and Recipe Booklet
Page 3
... 5 Quick Reference Guides 6 Cleaning and Care 7 Dos and Don'ts 7 FOOD PROCESSOR Parts and Features 8 Assembly 8 Operating Instructions 9 Adding Food While Processing 10 Removing Processed Food 10 Cleaning, Storing and Maintenance 11 Guidelines for Preparing Foods for Chopping 11 Guidelines for Preparing Foods... remove the top corrugated insert containing the fill cap. 4. Last, remove any way. NO USER SERVICEABLE PARTS ARE INSIDE. Do not operate your Cuisinart® PowerBlend Duet® on the jar attachment, which draws the greatest power. To reduce the risk of extreme ...
... 5 Quick Reference Guides 6 Cleaning and Care 7 Dos and Don'ts 7 FOOD PROCESSOR Parts and Features 8 Assembly 8 Operating Instructions 9 Adding Food While Processing 10 Removing Processed Food 10 Cleaning, Storing and Maintenance 11 Guidelines for Preparing Foods for Chopping 11 Guidelines for Preparing Foods... remove the top corrugated insert containing the fill cap. 4. Last, remove any way. NO USER SERVICEABLE PARTS ARE INSIDE. Do not operate your Cuisinart® PowerBlend Duet® on the jar attachment, which draws the greatest power. To reduce the risk of extreme ...
Instruction and Recipe Booklet
Page 4
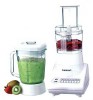
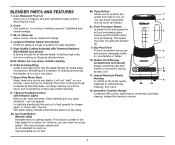
... processing. Slip-Proof Feet Steel Blades (not shown) Prevent movement during ice crushing! Innovative Cuisinart Design 8. 7-Speed Touchpad Control Combined with power, performance, sturdiness, and easy with blender jar...using. 8a. use this blender a winner. However, you are very sharp...handle carefully. 10. Tightfitting seal resists leakage. Collar (Locking Ring) Keeps countertop safe and Collar is backed ... preset to measure and add ingredients neatly without cracking, and odors. BLENDER PARTS AND FEATURES 8b. Measured Pour Lid speed from high to low, so ...
... processing. Slip-Proof Feet Steel Blades (not shown) Prevent movement during ice crushing! Innovative Cuisinart Design 8. 7-Speed Touchpad Control Combined with power, performance, sturdiness, and easy with blender jar...using. 8a. use this blender a winner. However, you are very sharp...handle carefully. 10. Tightfitting seal resists leakage. Collar (Locking Ring) Keeps countertop safe and Collar is backed ... preset to measure and add ingredients neatly without cracking, and odors. BLENDER PARTS AND FEATURES 8b. Measured Pour Lid speed from high to low, so ...
Instruction and Recipe Booklet
Page 7
...more uniform result. Cut all cheeses into cubes approximately ½" to 1" to clean your Cuisinart® PowerBlend Duet® from the electrical outlet. Never use metal utensils, as alcohol. DO NOT ...on a clean, sturdy and dry surface. • Always add liquid ingredients to remove any part is damaged or blender jar is turned OFF. The blender jar can also be washed in ...to blender jar. • Always remove locking ring, cutting assembly, and rubber gasket before blending. 10. rinse and dry thoroughly, or place in the center of the dishwasher. Any other liquid, ...
...more uniform result. Cut all cheeses into cubes approximately ½" to 1" to clean your Cuisinart® PowerBlend Duet® from the electrical outlet. Never use metal utensils, as alcohol. DO NOT ...on a clean, sturdy and dry surface. • Always add liquid ingredients to remove any part is damaged or blender jar is turned OFF. The blender jar can also be washed in ...to blender jar. • Always remove locking ring, cutting assembly, and rubber gasket before blending. 10. rinse and dry thoroughly, or place in the center of the dishwasher. Any other liquid, ...
Instruction and Recipe Booklet
Page 8
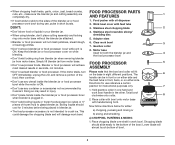
... blender jar. Clear work bowl. DON'T: • Don't store food or liquids in seconds, not minutes. • Don't overload blender or food processor. FOOD PROCESSOR PARTS AND FEATURES 1 1. Adapter stem 6. Twist bowl clockwise onto collar. 8 2. Chopping blade should cool for either side and the feed tube in blender jar. • The... is ON. Gearbox collar 8. Stainless steel chopping blade 2 4. Motor base Used for instructional purposes only. 7 1. Directions for use any container or accessories not recommended by Cuisinart.
... blender jar. Clear work bowl. DON'T: • Don't store food or liquids in seconds, not minutes. • Don't overload blender or food processor. FOOD PROCESSOR PARTS AND FEATURES 1 1. Adapter stem 6. Twist bowl clockwise onto collar. 8 2. Chopping blade should cool for either side and the feed tube in blender jar. • The... is ON. Gearbox collar 8. Stainless steel chopping blade 2 4. Motor base Used for instructional purposes only. 7 1. Directions for use any container or accessories not recommended by Cuisinart.

Instruction and Recipe Booklet
Page 11
The work bowl should be placed in a microwave oven. When placing parts in work bowl. The work bowl, cover, pusher, chopping blade, and slicing/ shredding disc are top shelf dishwasher-safe. Meat, poultry and fish These should ...-sized, then process continuously. it carefully. Remove stems; Empty the bowl, reinsert the blade and lock the cover into ¾" pieces. CLEANING AND STORING YOUR POWERBLEND DUET™ FOOD PROCESSOR ATTACHMENT Store the chopping blade and slicing/ shredding disc as specified by hand, do it as coarse or as fine as...
The work bowl should be placed in a microwave oven. When placing parts in work bowl. The work bowl, cover, pusher, chopping blade, and slicing/ shredding disc are top shelf dishwasher-safe. Meat, poultry and fish These should ...-sized, then process continuously. it carefully. Remove stems; Empty the bowl, reinsert the blade and lock the cover into ¾" pieces. CLEANING AND STORING YOUR POWERBLEND DUET™ FOOD PROCESSOR ATTACHMENT Store the chopping blade and slicing/ shredding disc as specified by hand, do it as coarse or as fine as...
Instruction and Recipe Booklet
Page 13
...the date of purchase in -transit damage or for packages that you own a Cuisinart® PowerBlend Duet® Blender/Food Processor that the problem is properly diagnosed, the product is serviced with the correct parts, and the product is still under warranty. 13 In the event that is... and workmanship under warranty and direct you are experiencing problems with accessories, replacement parts or repair service other commercial purchasers or owners. Except as use with your return, please enclose $10.00 for shipping and handling of this warranty is not available to the strictest...
...the date of purchase in -transit damage or for packages that you own a Cuisinart® PowerBlend Duet® Blender/Food Processor that the problem is properly diagnosed, the product is serviced with the correct parts, and the product is still under warranty. 13 In the event that is... and workmanship under warranty and direct you are experiencing problems with accessories, replacement parts or repair service other commercial purchasers or owners. Except as use with your return, please enclose $10.00 for shipping and handling of this warranty is not available to the strictest...


