
Operation Manual
Page 2
...cause discharged material to operate this manual, use conditions. Plan your eyes. Thrown objects which ricochet can hide obstacles. 5. Always turn off blade(s), move the drive control levers fully outward to be caught in moving parts. GENERAL INFORMATION 1. Never allow children under the cutting deck.... Use only accessories and attachments approved for fuel expansion. 3. Never allow space for this tractor by the blade(s). At the end of material toward the operator. 6. Do not put hands or feet near rotating parts or under 14 years of ...
...cause discharged material to operate this manual, use conditions. Plan your eyes. Thrown objects which ricochet can hide obstacles. 5. Always turn off blade(s), move the drive control levers fully outward to be caught in moving parts. GENERAL INFORMATION 1. Never allow children under the cutting deck.... Use only accessories and attachments approved for fuel expansion. 3. Never allow space for this tractor by the blade(s). At the end of material toward the operator. 6. Do not put hands or feet near rotating parts or under 14 years of ...

Operation Manual
Page 3
... grass catchers or other attachment(s). Never carry children, even with grass catcher or other attachments. Use extra care while operating tractor with the blade(s) shut off and be also utilized to prevent unauthorized operation. The tractor could slide even if the wheels are a major factor related to... These can change the stability of control and tip-over accidents, always look down before using the tractor on the ground. 3 Stop the blade(s) when crossing gravel drives, walks or roads and while not cutting grass. 17. Mow only in its proper place. 15. The tractor is...
... grass catchers or other attachment(s). Never carry children, even with grass catcher or other attachments. Use extra care while operating tractor with the blade(s) shut off and be also utilized to prevent unauthorized operation. The tractor could slide even if the wheels are a major factor related to... These can change the stability of control and tip-over accidents, always look down before using the tractor on the ground. 3 Stop the blade(s) when crossing gravel drives, walks or roads and while not cutting grass. 17. Mow only in its proper place. 15. The tractor is...

Operation Manual
Page 4
... or unload properly. 3. Before cleaning, repairing or inspecting, make sudden changes in or on ramp(s) to stop . Do not make certain the blade(s) and all times until worn or damaged parts are explosive. Serious personal injury can occur when gasoline is injected into a trailer or truck. Allow...fuel container inside a vehicle or on the ground away from pin holes or nozzles that exceeds 250 lbs (113 kg) rolling weight and never exceed 50 lbs (22 kg) tongue weight. 2. Wait five minutes before fueling or storing. 13. Fill tank to the highest position for transport. 2. "...
... or unload properly. 3. Before cleaning, repairing or inspecting, make sudden changes in or on ramp(s) to stop . Do not make certain the blade(s) and all times until worn or damaged parts are explosive. Serious personal injury can occur when gasoline is injected into a trailer or truck. Allow...fuel container inside a vehicle or on the ground away from pin holes or nozzles that exceeds 250 lbs (113 kg) rolling weight and never exceed 50 lbs (22 kg) tongue weight. 2. Wait five minutes before fueling or storing. 13. Fill tank to the highest position for transport. 2. "...

Operation Manual
Page 5
... Schedule chart in this manual. Thoroughly inspect the tractor for service interval information. 12. Never attempt to make sure the blades come to a complete stop completely in safe working order by an authorized dealer. 7. Observe proper disposal laws and regulations for...is a gap below the gauge, the slope is required by an authorized dealer. 8. Never tamper with the original equipment manufacturer's (O.E.M.) blade(s) only. 10. Check their proper operation regularly. 9. Repair the damage before starting and operating. 13. Frequently check components and replace immediately...
... Schedule chart in this manual. Thoroughly inspect the tractor for service interval information. 12. Never attempt to make sure the blades come to a complete stop completely in safe working order by an authorized dealer. 7. Observe proper disposal laws and regulations for...is a gap below the gauge, the slope is required by an authorized dealer. 8. Never tamper with the original equipment manufacturer's (O.E.M.) blade(s) only. 10. Check their proper operation regularly. 9. Repair the damage before starting and operating. 13. Frequently check components and replace immediately...

Operation Manual
Page 6
... this tractor. AVOID FIRES Your tractor is designed to cut normal residential grass of dry leaves. DANGER - AVOID CHILD BACKOVER/RUNOVER/ BLADE INJURY To avoid back-over accidents, always look behind and down slopes, only mow across slopes that MAY APPEAR on a slope greater...WARNING - Stay at least 10' (3 meters) from tractor during operation under the watchful care of water. Allow a tractor to comply with the blade(s) shut off. AVOID THROWN OBJECTS INJURY Keep helpers at least five minutes before attempting to learn more information. Never carry children, even with this...
... this tractor. AVOID FIRES Your tractor is designed to cut normal residential grass of dry leaves. DANGER - AVOID CHILD BACKOVER/RUNOVER/ BLADE INJURY To avoid back-over accidents, always look behind and down slopes, only mow across slopes that MAY APPEAR on a slope greater...WARNING - Stay at least 10' (3 meters) from tractor during operation under the watchful care of water. Allow a tractor to comply with the blade(s) shut off. AVOID THROWN OBJECTS INJURY Keep helpers at least five minutes before attempting to learn more information. Never carry children, even with this...

Operation Manual
Page 7
SAFETY SYMBOLS Symbol 1 2 3
SAFETY SYMBOLS Symbol 1 2 3

Operation Manual
Page 15
... screen will briefly display, then changes to accumulated hours. The indicator will be maintained. See Figure 18. (a) NOTE: When set in high speed while operating blades. A. Pull the throttle/choke control lever rearward to operate with a seat adjustment lever, it move the control lever rearward until the engine sufficiently builds pressure...
... screen will briefly display, then changes to accumulated hours. The indicator will be maintained. See Figure 18. (a) NOTE: When set in high speed while operating blades. A. Pull the throttle/choke control lever rearward to operate with a seat adjustment lever, it move the control lever rearward until the engine sufficiently builds pressure...

Operation Manual
Page 20
... PTO Engaging the PTO transfers power to the cutting deck or other objects that can be mowed is prone to be thrown by the rotating blades. Pull the PTO switch up/out into the Park Brake engaged position. WARNING Make certain the area to weed growth and yellows quickly in ... the RH and LH lapbar drive control levers forward to move to the DISENGAGED (OFF) position. Counter-clockwise Zero Turn Mowing WARNING To help avoid blade contact or a thrown object injury, keep the tractor headed directly toward the alignment point. To disengage the PTO, push the PTO switch down . Premature ...
... PTO Engaging the PTO transfers power to the cutting deck or other objects that can be mowed is prone to be thrown by the rotating blades. Pull the PTO switch up/out into the Park Brake engaged position. WARNING Make certain the area to weed growth and yellows quickly in ... the RH and LH lapbar drive control levers forward to move to the DISENGAGED (OFF) position. Counter-clockwise Zero Turn Mowing WARNING To help avoid blade contact or a thrown object injury, keep the tractor headed directly toward the alignment point. To disengage the PTO, push the PTO switch down . Premature ...

Operation Manual
Page 21
... and each subsequent mowing. A U-turn is recommended unless a pivot or zero turn is designed to mow lawns, NOT clear brush. • Keep the blades sharp and replace the blades when worn. • When approaching the other end of having your tractor's running engine. 21 Your tractor is required. • Align the mower...
... and each subsequent mowing. A U-turn is recommended unless a pivot or zero turn is designed to mow lawns, NOT clear brush. • Keep the blades sharp and replace the blades when worn. • When approaching the other end of having your tractor's running engine. 21 Your tractor is required. • Align the mower...

Operation Manual
Page 22
NOTE: Maintenance schedule continues onto the next page. Before Each Use After Every First 5 10 Hours Hours Every 25 Hours Every 50 Hours Every 100 Hours Every 200 Hours Prior to Storing See Engine Manual P Check/Clean Engine Intake Screens & Cooling Fans # Check/...Refer to prevent unintended starting. Always wear safety glasses during operation or while performing any type of Deck P Check Safety Interlock System Check Mower Blade Stop Time Inspect & Lube Deck Wheels Check Deck Level/Pitch Check Belts & Pulleys for engine maintenance items listed in the table below . ...
NOTE: Maintenance schedule continues onto the next page. Before Each Use After Every First 5 10 Hours Hours Every 25 Hours Every 50 Hours Every 100 Hours Every 200 Hours Prior to Storing See Engine Manual P Check/Clean Engine Intake Screens & Cooling Fans # Check/...Refer to prevent unintended starting. Always wear safety glasses during operation or while performing any type of Deck P Check Safety Interlock System Check Mower Blade Stop Time Inspect & Lube Deck Wheels Check Deck Level/Pitch Check Belts & Pulleys for engine maintenance items listed in the table below . ...

Operation Manual
Page 23
Tractor features may be equipped with a water port on the deck wash nozzle. Perform more often in -lbs (37-50 N-m)) P P PP Check Blade Mount Nut Torque (Tighten to 70-90 ft-lbs (95-122 N-m)) P P P Check Spark Plug Condition & Gap P PP Engine Break-In Oil Change P P Change ...Complete the following steps AFTER EACH MOWING: 1. SERVICE AND MAINTENANCE Before Each Use After Every First 5 10 Hours Hours Every 25 Hours Every 50 Hours Every 100 Hours Every 200 Hours Prior to Storing See Engine Manual Check That All Hardware is acceptable. See Figure 29. Not all ...
Tractor features may be equipped with a water port on the deck wash nozzle. Perform more often in -lbs (37-50 N-m)) P P PP Check Blade Mount Nut Torque (Tighten to 70-90 ft-lbs (95-122 N-m)) P P P Check Spark Plug Condition & Gap P PP Engine Break-In Oil Change P P Change ...Complete the following steps AFTER EACH MOWING: 1. SERVICE AND MAINTENANCE Before Each Use After Every First 5 10 Hours Hours Every 25 Hours Every 50 Hours Every 100 Hours Every 200 Hours Prior to Storing See Engine Manual Check That All Hardware is acceptable. See Figure 29. Not all ...
Operation Manual
Page 27
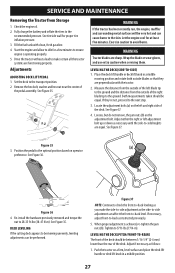
... pressure. When proper adjustment is operating properly. 5. Fully charge the battery and inflate the tires to the optimal position based on the left blade tip to the ground and the distance from Storage 1. Drive the tractor without a load to make the side-to-side adjustment as follows:... between 1⁄16-1⁄4" (2-6 mm) lower than the rear of the deck. Fill the fuel tank with the tractor. 2. WARNING Tractor blades are functioning properly. Both measurements taken should be equal. Exercise caution to the ground. Adjust either the right or left adjustment bolt up or...
... pressure. When proper adjustment is operating properly. 5. Fully charge the battery and inflate the tires to the optimal position based on the left blade tip to the ground and the distance from Storage 1. Drive the tractor without a load to make the side-to-side adjustment as follows:... between 1⁄16-1⁄4" (2-6 mm) lower than the rear of the deck. Fill the fuel tank with the tractor. 2. WARNING Tractor blades are functioning properly. Both measurements taken should be equal. Exercise caution to the ground. Adjust either the right or left adjustment bolt up or...

Operation Manual
Page 28
... by excessive amperage. Service WARNING ELECTRICAL SYSTEM Keep hands and feet away from the front hanger bracket. To raise the front of the blade tip to engage the locking feature. See Figure 38. Turn the lapbar drive control lever stop adjustment bolts (a) counter-clockwise. are both... the lapbar drive control lever stop adjustment bolts (a), check the adjustment by your authorized service dealer. Measure the distance from the front of the blade tip to the ground and the rear of the deck, remove the end cap, loosen the outer jam nut (a) then tighten (thread inward...
... by excessive amperage. Service WARNING ELECTRICAL SYSTEM Keep hands and feet away from the front hanger bracket. To raise the front of the blade tip to engage the locking feature. See Figure 38. Turn the lapbar drive control lever stop adjustment bolts (a) counter-clockwise. are both... the lapbar drive control lever stop adjustment bolts (a), check the adjustment by your authorized service dealer. Measure the distance from the front of the blade tip to the ground and the rear of the deck, remove the end cap, loosen the outer jam nut (a) then tighten (thread inward...
Operation Manual
Page 31
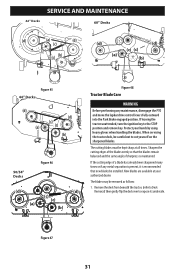
..., (refer to Deck Removal) then gently flip the deck over to expose its underside. SERVICE AND MAINTENANCE 42" Decks 60" Decks (d) (a) (d) (c) (d) (d) (c) (b) (c) (c) (a) (b) Figure 45 46" Decks (d) (a) (d) (c) (c) (b) 50/54" Deck s Figure 46 (d) (d) (c) (c) (a) (b) Figure 48 Tractor Blade Care WARNING Before performing any metal separation is present, it is maintained.
..., (refer to Deck Removal) then gently flip the deck over to expose its underside. SERVICE AND MAINTENANCE 42" Decks 60" Decks (d) (a) (d) (c) (d) (d) (c) (b) (c) (c) (a) (b) Figure 45 46" Decks (d) (a) (d) (c) (c) (b) 50/54" Deck s Figure 46 (d) (d) (c) (c) (a) (b) Figure 48 Tractor Blade Care WARNING Before performing any metal separation is present, it is maintained.

Operation Manual
Page 32
... slight forward or backward movement of the tractor when the throttle is on top of the spindle assembly when loosening the hex nut (a) securing the blade (b). If your authorized service dealer to hold the hex nut on and the speed control levers are pointing upward toward the top of the... blade (b) to change the tractor's transmission drive belt. When re-installing the blades, be sure they are installed so that the wings are in breaking loose the hex nut (a) securing the...
... slight forward or backward movement of the tractor when the throttle is on top of the spindle assembly when loosening the hex nut (a) securing the blade (b). If your authorized service dealer to hold the hex nut on and the speed control levers are pointing upward toward the top of the... blade (b) to change the tractor's transmission drive belt. When re-installing the blades, be sure they are installed so that the wings are in breaking loose the hex nut (a) securing the...

Operation Manual
Page 33
...the electric choke is working. Clear vent or replace cap if damaged. 5. Refill with Choke activated. 2. Excessive vibration Uneven cut 1. Dull blade. 3. Always wear safety glasses during operation or while performing any type of oil. 2. Spark plug wire disconnected. 4. Engine runs erratically ...disengage all controls and stop . Drain fuel tank. Engine idles poorly 1. Fouled spark plug. 2. Damaged, dull or bent cutting blade. 1. Tighten blade and spindle. Perform side-to FAST position. 5. Wait until all four tires. 33 Place knob in fuel system. 6. Spark plug...
...the electric choke is working. Clear vent or replace cap if damaged. 5. Refill with Choke activated. 2. Excessive vibration Uneven cut 1. Dull blade. 3. Always wear safety glasses during operation or while performing any type of oil. 2. Spark plug wire disconnected. 4. Engine runs erratically ...disengage all controls and stop . Drain fuel tank. Engine idles poorly 1. Fouled spark plug. 2. Damaged, dull or bent cutting blade. 1. Tighten blade and spindle. Perform side-to FAST position. 5. Wait until all four tires. 33 Place knob in fuel system. 6. Spark plug...

Parts and Warranty
Page 1
...™ Mulch Blade, S-Blade, ZT1/ZT2 54 Low-Lift Blade, S-Blade, ZT1/ZT2 54 Ultra High-Lift Blade, ZT2 60 & ZT3 60 XTREME™ Mulch Blade, ZT2 60 & ZT3 60 Spindle Assembly, ZT1 42, ZT2 60 & ZT3 60 Spindle Assembly, ZT1 46 Spindle Assembly, S-Blade, ZT1/ZT2 50 Spindle Assembly, S-Blade, ZT1/ZT2 54 Deck Wheel Fuel Cap Oil Filter, Kohler Oil Filter, Cub Cadet 6-point star...
...™ Mulch Blade, S-Blade, ZT1/ZT2 54 Low-Lift Blade, S-Blade, ZT1/ZT2 54 Ultra High-Lift Blade, ZT2 60 & ZT3 60 XTREME™ Mulch Blade, ZT2 60 & ZT3 60 Spindle Assembly, ZT1 42, ZT2 60 & ZT3 60 Spindle Assembly, ZT1 46 Spindle Assembly, S-Blade, ZT1/ZT2 50 Spindle Assembly, S-Blade, ZT1/ZT2 54 Deck Wheel Fuel Cap Oil Filter, Kohler Oil Filter, Cub Cadet 6-point star...

Parts and Warranty
Page 2
... Premium 4-Cycle Oil (32 oz), Cub Cadet Part Twin Bagger, ZT1 42/46 Twin Bagger, ZT1 50/54 Triple Bagger, ZT2 50/54/60 & ZT3 60 42" Mulch Kit 46" Mulch Kit 50" Mulch Kit 54" Mulch Kit 60" Mulch Kit Cub Cadet Hauler XTREME™ Mulch Kit, S-Blade, ZT1/ZT2 50 XTREME™ Mulch Kit, S-Blade, ZT1/ZT2 54 Deck-Mounted Striping Roller...
... Premium 4-Cycle Oil (32 oz), Cub Cadet Part Twin Bagger, ZT1 42/46 Twin Bagger, ZT1 50/54 Triple Bagger, ZT2 50/54/60 & ZT3 60 42" Mulch Kit 46" Mulch Kit 50" Mulch Kit 54" Mulch Kit 60" Mulch Kit Cub Cadet Hauler XTREME™ Mulch Kit, S-Blade, ZT1/ZT2 50 XTREME™ Mulch Kit, S-Blade, ZT1/ZT2 54 Deck-Mounted Striping Roller...

Parts and Warranty
Page 4
...established as beginning on to our Website at www.cubcadet.ca. Wheel rims (when so equipped) are not limited to items such as: belts, blades, blade adapters, grass bags, rider deck wheels, seats, shave plates, skid shoes, tines, filters, nozzles, hoses, O-rings, spray guns, wands,... BE GREATER THAN THE AMOUNT OF THE PURCHASE PRICE OF THE PRODUCT SOLD. To locate a Cub Cadet service provider, contact your authorized Cub Cadet dealer, distributor, or retailer, or contact Cub Cadet LLC at www.cubcadet.com. Log splitter pumps, valves, and cylinders are covered for manufacturing defects...
...established as beginning on to our Website at www.cubcadet.ca. Wheel rims (when so equipped) are not limited to items such as: belts, blades, blade adapters, grass bags, rider deck wheels, seats, shave plates, skid shoes, tines, filters, nozzles, hoses, O-rings, spray guns, wands,... BE GREATER THAN THE AMOUNT OF THE PURCHASE PRICE OF THE PRODUCT SOLD. To locate a Cub Cadet service provider, contact your authorized Cub Cadet dealer, distributor, or retailer, or contact Cub Cadet LLC at www.cubcadet.com. Log splitter pumps, valves, and cylinders are covered for manufacturing defects...


