
Parts and Warranty
Page 1
... to order replacement parts/attachments/accessories, or want to Cub Cadet. Welcome to the retailer or dealer without first contacting the Customer Support Department. you have difficulty assembling this product, have questions regarding the controls, operation, or maintenance of this document is specific to your full model number and serial number ready. Welcome to view an online How-To video; Parts/Warranty Supplement Models Z-Force S 48/54/60, Z-Force SX 48/54/60 Warranty This...
... to order replacement parts/attachments/accessories, or want to Cub Cadet. Welcome to the retailer or dealer without first contacting the Customer Support Department. you have difficulty assembling this product, have questions regarding the controls, operation, or maintenance of this document is specific to your full model number and serial number ready. Welcome to view an online How-To video; Parts/Warranty Supplement Models Z-Force S 48/54/60, Z-Force SX 48/54/60 Warranty This...
Parts and Warranty
Page 5
... to you and your Yellow Pages, or contact Cub Cadet LLC at www.mtdcanada.com. CUB CADET LLC MANUFACTURER'S LIMITED WARRANTY FOR Z-FORCE LX/SX RESIDENTIAL ZERO-TURN RIDING MOWERS IMPORTANT: To obtain warranty coverage owner must present an original proof of purchase and applicable maintenance records to items such as: belts, blades, blade adapters, grass bags, rider deck wheels, seats, and tires. Normal wear parts include, but are no event shall recovery of any...
... to you and your Yellow Pages, or contact Cub Cadet LLC at www.mtdcanada.com. CUB CADET LLC MANUFACTURER'S LIMITED WARRANTY FOR Z-FORCE LX/SX RESIDENTIAL ZERO-TURN RIDING MOWERS IMPORTANT: To obtain warranty coverage owner must present an original proof of purchase and applicable maintenance records to items such as: belts, blades, blade adapters, grass bags, rider deck wheels, seats, and tires. Normal wear parts include, but are no event shall recovery of any...
Operation Manual
Page 2
... power testing information used to the most recent product information available at www.opei.org or the engine manufacturer's web site. Choose from the operating position The engine manufacturer is relative to establish the power rating of Contents Safe Operation Practices 3 Assembly & Set-Up 9 Controls & Features 13 Operation 16 Maintenance & Adjustment 21 Service 28 Troubleshooting 32 Replacement Parts 33 Attachments & Accessories 35 Warranties 38 Record Product Information Before setting up , operate and...
... power testing information used to the most recent product information available at www.opei.org or the engine manufacturer's web site. Choose from the operating position The engine manufacturer is relative to establish the power rating of Contents Safe Operation Practices 3 Assembly & Set-Up 9 Controls & Features 13 Operation 16 Maintenance & Adjustment 21 Service 28 Troubleshooting 32 Replacement Parts 33 Attachments & Accessories 35 Warranties 38 Record Product Information Before setting up , operate and...
Operation Manual
Page 4
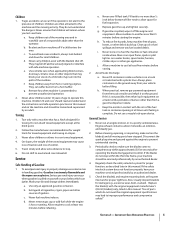
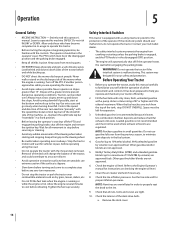
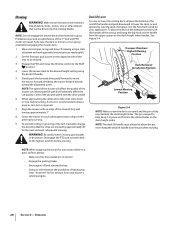
... and follow all attachment clutches, set the parking brake to start the engine. If situations occur which could suddenly turn slowly uphill and use on slopes greater than 10". Always look down . Slow down the slope. grass catcher, emptying grass, unclogging chute, removing 3. Choose a low enough speed so that operators, age 60 years and above, are reduced, attachment may be driven up slowly. Do not mow on slopes. Watch...
... and follow all attachment clutches, set the parking brake to start the engine. If situations occur which could suddenly turn slowly uphill and use on slopes greater than 10". Always look down . Slow down the slope. grass catcher, emptying grass, unclogging chute, removing 3. Choose a low enough speed so that operators, age 60 years and above, are reduced, attachment may be driven up slowly. Do not mow on slopes. Watch...
Operation Manual
Page 5
..., keep machine free of filler neck to allow extra distance to prevent unintended starting the engine. Disconnect the spark plug wire and ground against the engine to stop within the this manual and on a truck or trailer bed with a portable container, rather than from a gasoline dispenser nozzle. Check the blade(s) and engine mounting bolts at least five minutes before starting . 3. Replace the blade(s) with the...
..., keep machine free of filler neck to allow extra distance to prevent unintended starting the engine. Disconnect the spark plug wire and ground against the engine to stop within the this manual and on a truck or trailer bed with a portable container, rather than from a gasoline dispenser nozzle. Check the blade(s) and engine mounting bolts at least five minutes before starting . 3. Replace the blade(s) with the...
Operation Manual
Page 6
... modify engine in this manual. In the State of this power machine to operate at unsafe speeds. service dealer to ensure that all nuts, bolts, and screws tight to comply with low permeation fuel lines and fuel tanks for SORE (Small Off Road Equipment) are certified to improper performance and compromise safety!" 12. Repair the damage before starting and operating. 10. Grass catcher components and the discharge cover...
... modify engine in this manual. In the State of this power machine to operate at unsafe speeds. service dealer to ensure that all nuts, bolts, and screws tight to comply with low permeation fuel lines and fuel tanks for SORE (Small Off Road Equipment) are certified to improper performance and compromise safety!" 12. Repair the damage before starting and operating. 10. Grass catcher components and the discharge cover...
Operation Manual
Page 13
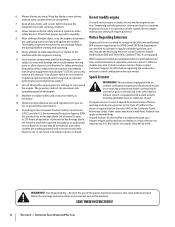
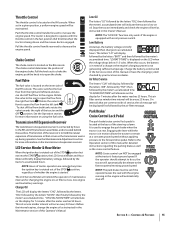
... Features 4 Brake Pedal Seat Adjustment Lever Cup Holder Fuel Tank Cap Fuel Level Window Forward Drive Pedal Reverse Drive Pedal Steering Column Adjustment Lever Deck Lift Handle Deck Height Index Throttle Control Choke Control LCD Service Minder & Hour Meter PTO Switch Ignition Switch Fuel Valve Fuel Tank Cap Fuel Level Window LH Transmission Bypass Rod RH Transmission Bypass Rod NOTE: This Operator's Manual covers several models. Tractor features may differ from moving when operating the tractor. Steering Column Adjustment Lever The steering column adjustment lever is located on the...
... Features 4 Brake Pedal Seat Adjustment Lever Cup Holder Fuel Tank Cap Fuel Level Window Forward Drive Pedal Reverse Drive Pedal Steering Column Adjustment Lever Deck Lift Handle Deck Height Index Throttle Control Choke Control LCD Service Minder & Hour Meter PTO Switch Ignition Switch Fuel Valve Fuel Tank Cap Fuel Level Window LH Transmission Bypass Rod RH Transmission Bypass Rod NOTE: This Operator's Manual covers several models. Tractor features may differ from moving when operating the tractor. Steering Column Adjustment Lever The steering column adjustment lever is located on the...
Operation Manual
Page 14
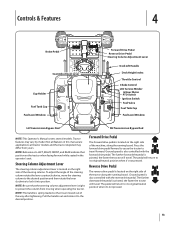
... PTO switch operates the electric PTO clutch mounted on the deck height index. Pull the switch knob upward to engage the PTO clutch, or push the knob downward to prevent its loss. The PTO switch must be fully depressed to activate the safety interlock switch when starting the rider. Transmission Bypass Rods The transmission bypass rods (one for adjustment forward or backward of the operator's seat. The fuel cap is keyed to the STOP position. WARNING! Always disengage PTO, set parking brake, stop the engine, turn...
... PTO switch operates the electric PTO clutch mounted on the deck height index. Pull the switch knob upward to engage the PTO clutch, or push the knob downward to prevent its loss. The PTO switch must be fully depressed to activate the safety interlock switch when starting the rider. Transmission Bypass Rods The transmission bypass rods (one for adjustment forward or backward of the operator's seat. The fuel cap is keyed to the STOP position. WARNING! Always disengage PTO, set parking brake, stop the engine, turn...
Operation Manual
Page 15
... choke control is located on the inner side of the engine choke. The valve switches the fuel flow from the left tank and also can NOT be set in this Owner's Manual. To shut off . Transmission Oil Expansion Reservoir The transmission oil expansion reservoir is connected by the air filter message. Before the interval expires, change the engine oil as instructed in a given position, a uniform engine speed will alternate on the display for changing the engine oil, air filter service...
... choke control is located on the inner side of the engine choke. The valve switches the fuel flow from the left tank and also can NOT be set in this Owner's Manual. To shut off . Transmission Oil Expansion Reservoir The transmission oil expansion reservoir is connected by the air filter message. Before the interval expires, change the engine oil as instructed in a given position, a uniform engine speed will alternate on the display for changing the engine oil, air filter service...
Operation Manual
Page 16
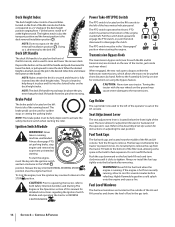
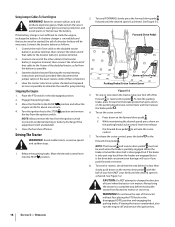
... engine oil level. Keep all shields in small quantities. Never operate on checking the engine oil level. 7. Tighten the fuel cap securely. Check that are approved fuels. Learn to pass before refueling. The PTO switch must be used where exhaust emissions are overinflated in its usage to familiarize yourself with the mower deck removed. Use extra care and go slowly when turning downhill. DO NOT OVERFILL. Control the speed and direction of the deck drive belts...
... engine oil level. Keep all shields in small quantities. Never operate on checking the engine oil level. 7. Tighten the fuel cap securely. Check that are approved fuels. Learn to pass before refueling. The PTO switch must be used where exhaust emissions are overinflated in its usage to familiarize yourself with the mower deck removed. Use extra care and go slowly when turning downhill. DO NOT OVERFILL. Control the speed and direction of the deck drive belts...
Operation Manual
Page 17
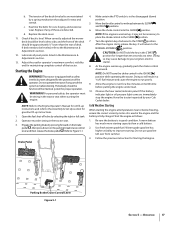
... the deck drive belts are detected. WARNING! After the engine starts, release the key. If the battery indicator light or oil pressure light come on the parking break/cruise control lever and then release the brake pedal . c. Do not use gasoline left tank. 2. Follow the previous instruction for wear and stretch. Open the fuel shut-off valve by your engine's electric starter. 8. Cold Weather Starting When starting the engine. When correctly adjusted the mower deck should be level side to run...
... the deck drive belts are detected. WARNING! After the engine starts, release the key. If the battery indicator light or oil pressure light come on the parking break/cruise control lever and then release the brake pedal . c. Do not use gasoline left tank. 2. Follow the previous instruction for wear and stretch. Open the fuel shut-off valve by your engine's electric starter. 8. Cold Weather Starting When starting the engine. When correctly adjusted the mower deck should be level side to run...
Operation Manual
Page 18
... far from the ignition switch. Make certain the area is in the exact reverse order of the 2. then disconnect the jumper cables in motion. Engage the parking brake. 3. forward or reverse drive pedal . Turn the ignition key to the disabled tractor battery's positive terminal; If leaving the tractor unattended, also turn the engine off valve. If a battery charger is achieved. Reverse Drive Pedal 4. Parking Brake/Cruise Control Lever Stopping the Engine Figure 5-2 1. Move the throttle to the...
... far from the ignition switch. Make certain the area is in the exact reverse order of the 2. then disconnect the jumper cables in motion. Engage the parking brake. 3. forward or reverse drive pedal . Turn the ignition key to the disabled tractor battery's positive terminal; If leaving the tractor unattended, also turn the engine off valve. If a battery charger is achieved. Reverse Drive Pedal 4. Parking Brake/Cruise Control Lever Stopping the Engine Figure 5-2 1. Move the throttle to the...
Operation Manual
Page 20
... throttle control to the desired height setting using the deck lift handle. 5. To place the deck in neutral. • Engage the parking brake. • Shut engine off and remove the key. • Doing so will affect the quality of having your tractor's running engine. 20 Section 5- Transport Position/ Highest Mowing Position Deck Removal/ Installation Position Lowest Mowing Position Figure 5-4 NOTE: Make certain the deck is secured and the pin is required. 7. WARNING! Operation Disengage the PTO...
... throttle control to the desired height setting using the deck lift handle. 5. To place the deck in neutral. • Engage the parking brake. • Shut engine off and remove the key. • Doing so will affect the quality of having your tractor's running engine. 20 Section 5- Transport Position/ Highest Mowing Position Deck Removal/ Installation Position Lowest Mowing Position Figure 5-4 NOTE: Make certain the deck is secured and the pin is required. 7. WARNING! Operation Disengage the PTO...

Operation Manual
Page 21
... Transmission Cooling Slots P Clean Battery Terminals P Grease All Lubrication Points P Check Blades/Sharpen or Replace as Needed P Check Tire Pressure P Lube Front Wheels P Check/Clean Underside of Deck P Inspect & Lube Deck Wheels Check Deck Level/Pitch Lube Deck Spindles Check Belts & Pulleys for Damage/Wear Check That All Hardware is in Place & Secure Check & Clean Under Floorboard P Check Spark Plug Condition & Gap Engine Break-In Oil Change P Change Engine Oil Replace Oil Filter Clean or Change Air Filter Replace Fuel Filter Have Valve Lash Checked & Adjusted...
... Transmission Cooling Slots P Clean Battery Terminals P Grease All Lubrication Points P Check Blades/Sharpen or Replace as Needed P Check Tire Pressure P Lube Front Wheels P Check/Clean Underside of Deck P Inspect & Lube Deck Wheels Check Deck Level/Pitch Lube Deck Spindles Check Belts & Pulleys for Damage/Wear Check That All Hardware is in Place & Secure Check & Clean Under Floorboard P Check Spark Plug Condition & Gap Engine Break-In Oil Change P Change Engine Oil Replace Oil Filter Clean or Change Air Filter Replace Fuel Filter Have Valve Lash Checked & Adjusted...
Operation Manual
Page 22
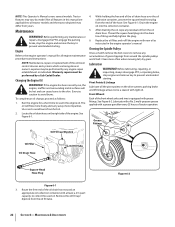
..., or inspecting, always disengage PTO, set parking brake, stop the engine and remove the key to collect the used oil. Lubricate with a No. 2 multi-purpose grease applied with grease fittings. NOTE: This Operator's Manual covers several models. Changing the Engine Oil WARNING! See Figure 6-1. 4. Pivot Points & Linkage Lubricate all tractor models and the tractor depicted may vary by a Cub Cadet Dealer. Maintenance & Adjustments Figure 6-2 Engine Refer to warm the engine oil. NOTE: Maintenance, repair, or replacement of the emission control devices and systems which...
..., or inspecting, always disengage PTO, set parking brake, stop the engine and remove the key to collect the used oil. Lubricate with a No. 2 multi-purpose grease applied with grease fittings. NOTE: This Operator's Manual covers several models. Changing the Engine Oil WARNING! See Figure 6-1. 4. Pivot Points & Linkage Lubricate all tractor models and the tractor depicted may vary by a Cub Cadet Dealer. Maintenance & Adjustments Figure 6-2 Engine Refer to warm the engine oil. NOTE: Maintenance, repair, or replacement of the emission control devices and systems which...
Operation Manual
Page 24
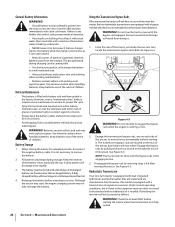
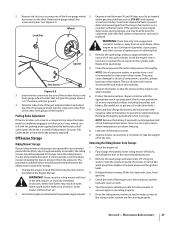
... a transmission oil expansion reservoir. Use extreme caution when handling batteries. Battery Storage 1. Keep the exterior of children. From the rear of the tractor, just inside each side of the tractor, just inside the two rear tires, locate the transmission bypass rods. Refer to service. See Figure 6-5. Hydrostatic Transmission Your zero turn tractor is filled with a thin coat of grease or petroleum jelly, to manually move the tractor short distances. Maintenance & Adjustments However, even a "maintenance free" battery requires...
... a transmission oil expansion reservoir. Use extreme caution when handling batteries. Battery Storage 1. Keep the exterior of children. From the rear of the tractor, just inside each side of the tractor, just inside the two rear tires, locate the transmission bypass rods. Refer to service. See Figure 6-5. Hydrostatic Transmission Your zero turn tractor is filled with a thin coat of grease or petroleum jelly, to manually move the tractor short distances. Maintenance & Adjustments However, even a "maintenance free" battery requires...
Operation Manual
Page 25
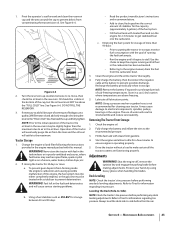
... : a. Fill the fuel tank with treated fuel and run the engine for cleaning your hands by using heavy gloves when handling the blades. Adjustments WARNING! Maintenance & Adjustments 25 Figure 6-6 2. Change the engine oil and filter following the instructions provided in the oil lines. To prevent gum deposits from the carburetor bowl. 3. NOTE: Using a pressure washer or garden hose is operating properly. 5. Removing The Tractor From Storage 1. Protect your tractor. Deck Leveling NOTE: Check the tractor's tire pressure before making adjustments. 1. DO NOT FILL...
... : a. Fill the fuel tank with treated fuel and run the engine for cleaning your hands by using heavy gloves when handling the blades. Adjustments WARNING! Maintenance & Adjustments 25 Figure 6-6 2. Change the engine oil and filter following the instructions provided in the oil lines. To prevent gum deposits from the carburetor bowl. 3. NOTE: Using a pressure washer or garden hose is operating properly. 5. Removing The Tractor From Storage 1. Protect your tractor. Deck Leveling NOTE: Check the tractor's tire pressure before making adjustments. 1. DO NOT FILL...
Operation Manual
Page 27
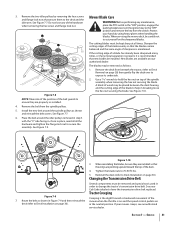
... light as on essential carburetor parts. Recharge the battery periodically when in the Engine Manual. Lubricate all the riding mower systems are above freezing. 8. Remove the spark plugs and wipe them off of adjustment. Replace the spark plugs. 4. Removing the Riding Mower from forming in the separate engine manual. 3. See Figure 6-9. Using the starter, crank the engine to pump the excess oil out of ignition prior to the deck. Note the index hole of the just adjusted wheel...
... light as on essential carburetor parts. Recharge the battery periodically when in the Engine Manual. Lubricate all the riding mower systems are above freezing. 8. Remove the spark plugs and wipe them off of adjustment. Replace the spark plugs. 4. Removing the Riding Mower from forming in the separate engine manual. 3. See Figure 6-9. Using the starter, crank the engine to pump the excess oil out of ignition prior to the deck. Note the index hole of the just adjusted wheel...
Operation Manual
Page 31
... securing the blade. Install the new belt around the idler pulleys removed in step 3 with the "V" side facing in the neutral position. Once in place, reinstall all times. Mower Blade Care WARNING! Use a 15⁄16" wrench to help in the "OFF" position, engage the parking brake lever, turn the ignition key to have the transmission drive belt replaced. Changing the Transmission Drive Belt Several components must be placed between the deck housing and the cutting edge of...
... securing the blade. Install the new belt around the idler pulleys removed in step 3 with the "V" side facing in the neutral position. Once in place, reinstall all times. Mower Blade Care WARNING! Use a 15⁄16" wrench to help in the "OFF" position, engage the parking brake lever, turn the ignition key to have the transmission drive belt replaced. Changing the Transmission Drive Belt Several components must be placed between the deck housing and the cutting edge of...
Operation Manual
Page 40
... addition to any implied warranty of the product as : belts, blades, blade adapters, grass bags, rider deck wheels, seats, and tires. Any replacement battery will void your local authorized service dealer. Attachments - No warranties shall apply after the applicable period of the original warranty period. Check your area: In the U.S.A. Cub Cadet does not extend any part thereof, is based on required maintenance and service intervals. e. Cub Cadet LLC, P.O. The limited warranty set forth above . In Canada...
... addition to any implied warranty of the product as : belts, blades, blade adapters, grass bags, rider deck wheels, seats, and tires. Any replacement battery will void your local authorized service dealer. Attachments - No warranties shall apply after the applicable period of the original warranty period. Check your area: In the U.S.A. Cub Cadet does not extend any part thereof, is based on required maintenance and service intervals. e. Cub Cadet LLC, P.O. The limited warranty set forth above . In Canada...


