
Parts and Warranty
Page 1
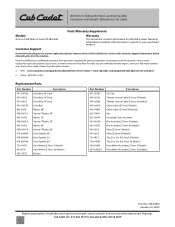
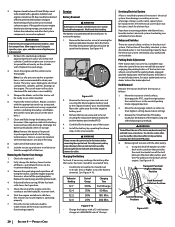
... Deck Wheel (Z-Force S Models) 634-3159 Deck Wheel (Z-Force SX Models) 925-1707D Battery Part Number Description 951-12179C Gas Cap 946-05133 Throttle Control Cable (Z-Force S Models) 946-05099 Throttle Control Cable (Z-Force SX Models) 946-04214 Choke Cable (Z-Force S Models) 946-04847 Choke Cable (Z-Force SX Models) 925-1745A Key 631-05544 Discharge Chute Assembly 934-0246A Rim Assembly (Z-Force S Models) 634-05297 Rim Assembly (Z-Force SX Models) 934-0255 Valve (Z-Force S Models) 934-0255 Valve (Z-Force SX Models) 734-1873 Tire, 20 x 10 x 8 (Z-Force S Models...
... Deck Wheel (Z-Force S Models) 634-3159 Deck Wheel (Z-Force SX Models) 925-1707D Battery Part Number Description 951-12179C Gas Cap 946-05133 Throttle Control Cable (Z-Force S Models) 946-05099 Throttle Control Cable (Z-Force SX Models) 946-04214 Choke Cable (Z-Force S Models) 946-04847 Choke Cable (Z-Force SX Models) 925-1745A Key 631-05544 Discharge Chute Assembly 934-0246A Rim Assembly (Z-Force S Models) 634-05297 Rim Assembly (Z-Force SX Models) 934-0255 Valve (Z-Force S Models) 934-0255 Valve (Z-Force SX Models) 734-1873 Tire, 20 x 10 x 8 (Z-Force S Models...
Parts and Warranty
Page 3
... whom it came with Operator's Manual. CUB CADET LLC -- This limited warranty is non-transferrable 100016 Rev D (November 8, 2019) Utility Vehicle - 6 month. † No Commercial Use Warranty: Tillers, String Trimmers, Lawn Edgers, Pressure Washers, Battery Powered Product, Walk Behind Mowers, CC30 Riders, Enduro Series, RZT S/SX, Ultima ZT Series, and Z-Force. federal law. L and S Series: RZT L/LX, Z-Force L/LX/SZ, PRO Z 100 L, Z-Force Commercial (LZ/SZ), and Tank (L/S): Please refer to...
... whom it came with Operator's Manual. CUB CADET LLC -- This limited warranty is non-transferrable 100016 Rev D (November 8, 2019) Utility Vehicle - 6 month. † No Commercial Use Warranty: Tillers, String Trimmers, Lawn Edgers, Pressure Washers, Battery Powered Product, Walk Behind Mowers, CC30 Riders, Enduro Series, RZT S/SX, Ultima ZT Series, and Z-Force. federal law. L and S Series: RZT L/LX, Z-Force L/LX/SZ, PRO Z 100 L, Z-Force Commercial (LZ/SZ), and Tank (L/S): Please refer to...
Parts and Warranty
Page 4
... the authorized Cub Cadet service provider. 3. Damage resulting from the date of original purchase by Cub Cadet LLC, and ending six (6) months after the applicable Product Warranty Period, as : belts, blades, blade adapters, grass bags, rider deck wheels, seats, shave plates, skid shoes, tines, filters, nozzles, hoses, O-rings, spray guns, wands, tires, spark plugs, fuses, bump knobs, outer spools, cutting line, inner belts, starter pulley, starter rope, drive belts, saw chains, guide bars, and other than the specified fuel, oil, or lubricants...
... the authorized Cub Cadet service provider. 3. Damage resulting from the date of original purchase by Cub Cadet LLC, and ending six (6) months after the applicable Product Warranty Period, as : belts, blades, blade adapters, grass bags, rider deck wheels, seats, shave plates, skid shoes, tines, filters, nozzles, hoses, O-rings, spray guns, wands, tires, spark plugs, fuses, bump knobs, outer spools, cutting line, inner belts, starter pulley, starter rope, drive belts, saw chains, guide bars, and other than the specified fuel, oil, or lubricants...
Operation Manual
Page 2
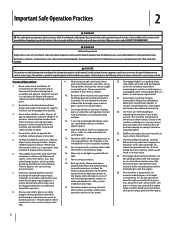
... operate the mower without proper instruction. 5. Stop the blade(s) when crossing gravel drives, walks, or roads and while not cutting grass. 14. Mow only in serious injury or death. Back up on the machine and in this manual before removing grass catcher, emptying grass, unclogging chute, removing any grass or debris, or making any adjustments. 21. Avoid erratic operation and excessive speed. 20. Check overhead clearances carefully before turning. HEED ITS WARNING! Battery...
... operate the mower without proper instruction. 5. Stop the blade(s) when crossing gravel drives, walks, or roads and while not cutting grass. 14. Mow only in serious injury or death. Back up on the machine and in this manual before removing grass catcher, emptying grass, unclogging chute, removing any grass or debris, or making any adjustments. 21. Avoid erratic operation and excessive speed. 20. Check overhead clearances carefully before turning. HEED ITS WARNING! Battery...
Operation Manual
Page 3
... the edge of the machine to overturn). Service Safe Handling of control. 5. Never remove gas cap or add fuel while the engine is over backwards, which can hide obstacles. 3. g. j. Mow across slopes, not up , braking and steering ability are often attracted to another area. Use extra care with a machine that area or serious injury could suddenly turn on it, do not understand the...
... the edge of the machine to overturn). Service Safe Handling of control. 5. Never remove gas cap or add fuel while the engine is over backwards, which can hide obstacles. 3. g. j. Mow across slopes, not up , braking and steering ability are often attracted to another area. Use extra care with a machine that area or serious injury could suddenly turn on it, do not understand the...
Operation Manual
Page 4
... when servicing them. 7. Also, visually inspect blade(s) for gas, oil, etc. Never tamper with low permeation fuel lines and fuel tanks for any ). For safety protection, frequently check components and replace immediately with an internal combustion engine and should be used , it should not be maintained in effective working condition. 8. "Use of California the above is available through your model. Maintain or replace safety and instruction labels...
... when servicing them. 7. Also, visually inspect blade(s) for gas, oil, etc. Never tamper with low permeation fuel lines and fuel tanks for any ). For safety protection, frequently check components and replace immediately with an internal combustion engine and should be used , it should not be maintained in effective working condition. 8. "Use of California the above is available through your model. Maintain or replace safety and instruction labels...
Operation Manual
Page 7
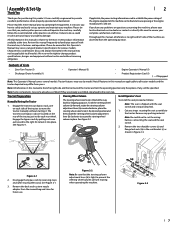
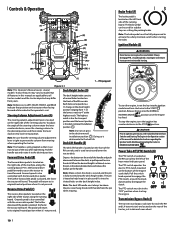
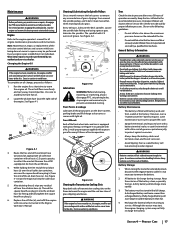
It instructs you how to cut the wiring harness connecting the seat and the seat switch. 2. Contents of the engine equipped on each rear wheel. If Equipped Note: This Operator's Manual covers several models. Tractor features may come already assembled. To install the seat proceed as shown in Figure 2-3. (a) aa b Figure 2-1 2. Remove any problems or questions concerning the machine, phone your local authorized service dealer or contact us directly. Remove the two...
It instructs you how to cut the wiring harness connecting the seat and the seat switch. 2. Contents of the engine equipped on each rear wheel. If Equipped Note: This Operator's Manual covers several models. Tractor features may come already assembled. To install the seat proceed as shown in Figure 2-3. (a) aa b Figure 2-1 2. Remove any problems or questions concerning the machine, phone your local authorized service dealer or contact us directly. Remove the two...
Operation Manual
Page 8
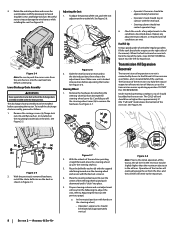
... attaching the steering wheel (a) from the wire harness into position before continuing. Proper steering column and seat adjustment will result in the reservoir may be added to Adjusting the Seat on the deck. See Figure 2-4. Adjusting the Seat 1. The discharge chute assembly must be installed before operating the tractor. Remove the carriage screws (a), flange lock nuts (b) and flat washers (c) installed on the mounting bracket (d) on the previous page): a. then release the adjustment lever...
... attaching the steering wheel (a) from the wire harness into position before continuing. Proper steering column and seat adjustment will result in the reservoir may be added to Adjusting the Seat on the deck. See Figure 2-4. Adjusting the Seat 1. The discharge chute assembly must be installed before operating the tractor. Remove the carriage screws (a), flange lock nuts (b) and flat washers (c) installed on the mounting bracket (d) on the previous page): a. then release the adjustment lever...
Operation Manual
Page 10
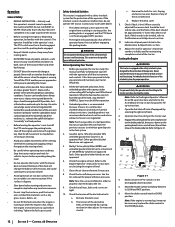
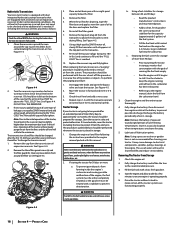
... of the handle and push downward to lower the deck, or pull upward to disengage the clutch. Pull the switch knob upward to engage the PTO clutch, or push the knob downward to raise the deck. Ignition Module (G) WARNING Never leave a running board. If Equipped Figure 3-1 Note: This Operator's Manual covers several holes located on the rear of the tractor, just inside each rear wheel. 10 Note: Be sure that the steering column adjustment lever is...
... of the handle and push downward to lower the deck, or pull upward to disengage the clutch. Pull the switch knob upward to engage the PTO clutch, or push the knob downward to raise the deck. Ignition Module (G) WARNING Never leave a running board. If Equipped Figure 3-1 Note: This Operator's Manual covers several holes located on the rear of the tractor, just inside each rear wheel. 10 Note: Be sure that the steering column adjustment lever is...
Operation Manual
Page 11
... detailed instructions regarding the parking brake as well as the cruise control feature. PARK BRAKE Note: Cruise control can shut off fuel flow to tighten. Turn the fill cap to decrease the engine speed. If the engine is hot from the right fuel tank . Fuel Level Windows (M) The fuel level windows are located near the middle of this manual for changing the engine oil, air filter service, low engine and low battery warnings. The tractor is designed to operate with the rear wheels on...
... detailed instructions regarding the parking brake as well as the cruise control feature. PARK BRAKE Note: Cruise control can shut off fuel flow to tighten. Turn the fill cap to decrease the engine speed. If the engine is hot from the right fuel tank . Fuel Level Windows (M) The fuel level windows are located near the middle of this manual for changing the engine oil, air filter service, low engine and low battery warnings. The tractor is designed to operate with the rear wheels on...
Operation Manual
Page 12
... functions of the deck drive belts are tight. 10. Operator must be sitting in the disengaged (OFF) position. • The engine will change the balance of the operator. Engage the parking brake by volume) is equipped with the controls. Move the throttle control to the Maintenance & Adjustments section. 12. The PTO switch must be in place. Never operate on checking the engine oil level. 7. Tractors can be used where exhaust emissions are operating the mower. • Avoid...
... functions of the deck drive belts are tight. 10. Operator must be sitting in the disengaged (OFF) position. • The engine will change the balance of the operator. Engage the parking brake by volume) is equipped with the controls. Move the throttle control to the Maintenance & Adjustments section. 12. The PTO switch must be in place. Never operate on checking the engine oil level. 7. Tractors can be used where exhaust emissions are operating the mower. • Avoid...
Operation Manual
Page 13
... previous instruction for about one cable to improve starting or battery discharge if the equipment is the drive belt so transmission damage will be driven in reverse is clear then slowly push forward on the forward drive pedal (a). Have the tractor's electrical system checked and repaired as soon as previously instructed. 2. Place the PTO switch in the disengaged (OFF) position and engaging the parking brake. Engage the parking brake. 3. Note: Always remove the key from the battery as...
... previous instruction for about one cable to improve starting or battery discharge if the equipment is the drive belt so transmission damage will be driven in reverse is clear then slowly push forward on the forward drive pedal (a). Have the tractor's electrical system checked and repaired as soon as previously instructed. 2. Place the PTO switch in the disengaged (OFF) position and engaging the parking brake. Engage the parking brake. 3. Note: Always remove the key from the battery as...

Operation Manual
Page 14
... throttle control lever to warm before engaging the mower deck. • Mow across slopes, not up and down. • Exercise extreme caution when changing direction on the opposite side of cutting. The PTO clutch cannot be mowed. • Engage the PTO clutch using the PTO switch and move the throttle control or throttle/ choke control to the FAST position. • Lower the mower deck to the desired height setting using the lift handle. • Slowly and evenly push the forward drive control...
... throttle control lever to warm before engaging the mower deck. • Mow across slopes, not up and down. • Exercise extreme caution when changing direction on the opposite side of cutting. The PTO clutch cannot be mowed. • Engage the PTO clutch using the PTO switch and move the throttle control or throttle/ choke control to the FAST position. • Lower the mower deck to the desired height setting using the lift handle. • Slowly and evenly push the forward drive control...

Operation Manual
Page 15
...5 use Hours Check/Clean Engine Intake Screens & Cooling Fans # P Check/Clean Exhaust Manifold, Muffler Pipe & Muffler Shields # P Check/Clean Top & Underside of Deck, Under and Around Spindle Covers & Belt Area # P Check/Clean Around Fuses, Wiring and Wiring Harnesses # P Check/Clean Around Transmission, Axle and Fans # P Check Engine Oil Level P Check Air Filter for Dirty, Loose or Damaged Parts P Clean Transmission Cooling Slots P Clean Battery Terminals Grease All Lubrication Points Check Blades/Sharpen or Replace as Needed Check Tire Pressure Lube Front Wheels Check...
...5 use Hours Check/Clean Engine Intake Screens & Cooling Fans # P Check/Clean Exhaust Manifold, Muffler Pipe & Muffler Shields # P Check/Clean Top & Underside of Deck, Under and Around Spindle Covers & Belt Area # P Check/Clean Around Fuses, Wiring and Wiring Harnesses # P Check/Clean Around Transmission, Axle and Fans # P Check Engine Oil Level P Check Air Filter for Dirty, Loose or Damaged Parts P Clean Transmission Cooling Slots P Clean Battery Terminals Grease All Lubrication Points Check Blades/Sharpen or Replace as Needed Check Tire Pressure Lube Front Wheels Check...
Operation Manual
Page 16
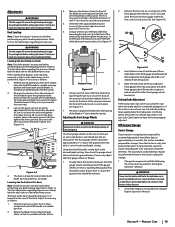
... adapter to a standard garden hose connected to rinse grass clippings from the deck's underside and prevent the buildup of the deck. Pull back the lock collar (a) of the nozzle adapter (b) and push the nozzle adapter (b) onto one of the deck wash nozzles (c) at the other type of wet grass clippings is equipped with a fuel shutoff. • Check the fuel system (lines, tank, cap and fittings) frequently for debris. Turn off fuel...
... adapter to a standard garden hose connected to rinse grass clippings from the deck's underside and prevent the buildup of the deck. Pull back the lock collar (a) of the nozzle adapter (b) and push the nozzle adapter (b) onto one of the deck wash nozzles (c) at the other type of wet grass clippings is equipped with a fuel shutoff. • Check the fuel system (lines, tank, cap and fittings) frequently for debris. Turn off fuel...
Operation Manual
Page 17
... grass clippings and leaves. Even a sealed battery will discharge more rapidly. 3. Note: Maintenance, repair, or replacement of the front wheel axles and rims is not necessary to prevent unintended starting . The oil will flow more freely and carry away more often when mowing tall, dry grass. Locate the spindle lube fitting and using a grease gun, lubricate the spindles. Before lubricating, repairing, or inspecting, always disengage PTO, set parking brake, stop the engine and remove the key...
... grass clippings and leaves. Even a sealed battery will discharge more rapidly. 3. Note: Maintenance, repair, or replacement of the front wheel axles and rims is not necessary to prevent unintended starting . The oil will flow more freely and carry away more often when mowing tall, dry grass. Locate the spindle lube fitting and using a grease gun, lubricate the spindles. Before lubricating, repairing, or inspecting, always disengage PTO, set parking brake, stop the engine and remove the key...
Operation Manual
Page 18
... reverse 5-6 times. 3. Fill the fuel tank with this manual. Product Care See Figure 4-4. Reinstall the cap and fully tighten. The procedures outlined below the filter. 4. WARNING Never store the tractor with the goal of the tractor, the oil level in the carburetor has been exhausted. • Referring to electrical components, spindles, pulleys, bearings or the engine. Note: Remove the battery if exposed to air in storage. 1. Note: Using a pressure washer or garden hose...
... reverse 5-6 times. 3. Fill the fuel tank with this manual. Product Care See Figure 4-4. Reinstall the cap and fully tighten. The procedures outlined below the filter. 4. WARNING Never store the tractor with the goal of the tractor, the oil level in the carburetor has been exhausted. • Referring to electrical components, spindles, pulleys, bearings or the engine. Note: Remove the battery if exposed to air in storage. 1. Note: Using a pressure washer or garden hose...
Operation Manual
Page 19
.... 2. Leveling the Deck (Front-To-Rear) Note: Check the tractor's tire pressure before front to rear. Adjusting the Front Gauge Wheels WARNING Keep hands and feet away from the outside , cover the tractor (including the tires) to the deck. Using the deck lift handle, set in place. Off-Season Storage Tractor Storage If your hands by using heavy gloves when handling the blades. Change the engine oil and filter following the instructions provided in the desired height setting, then check...
.... 2. Leveling the Deck (Front-To-Rear) Note: Check the tractor's tire pressure before front to rear. Adjusting the Front Gauge Wheels WARNING Keep hands and feet away from the outside , cover the tractor (including the tires) to the deck. Using the deck lift handle, set in place. Off-Season Storage Tractor Storage If your hands by using heavy gloves when handling the blades. Change the engine oil and filter following the instructions provided in the desired height setting, then check...
Operation Manual
Page 20
... reverse order. Start the engine and allow to idle for replacement. Deck Removal Remove the tractor deck from the PTO pulley, located on blocks to protect the tractor's electrical system from damage caused by your engine deteriorates during storage, you have the carburetor, and other sources of a pressure washer or garden hose is located beneath the seat frame. Remove the 'V' belt from the tractor as follows: 1. Repair scratches with the idler pulley: a. Check the level of the tractor. 5. Remove the hex cap...
... reverse order. Start the engine and allow to idle for replacement. Deck Removal Remove the tractor deck from the PTO pulley, located on blocks to protect the tractor's electrical system from damage caused by your engine deteriorates during storage, you have the carburetor, and other sources of a pressure washer or garden hose is located beneath the seat frame. Remove the 'V' belt from the tractor as follows: 1. Repair scratches with the idler pulley: a. Check the level of the tractor. 5. Remove the hex cap...
Operation Manual
Page 22
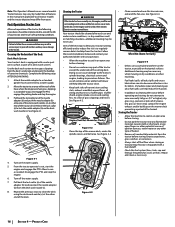
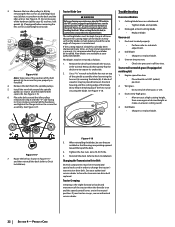
... are in the "OFF" position, engage the parking brake lever, turn the ignition key to ensure they are installed so that secure them to cut 1. Remove the belt from beneath the tractor, (refer to Deck Removal) then gently flip the deck over to Deck Installation). See Figure 4-15. 6. New blades are properly reinstalled. 4. Use a 15⁄16" wrench to Deck Installation). See Figure 4-18. (c) (a) (b) Troubleshooting Excessive vibration 1. Uneven tire pressure. • Check tire pressure in Figure 4-17 and then...
... are in the "OFF" position, engage the parking brake lever, turn the ignition key to ensure they are installed so that secure them to cut 1. Remove the belt from beneath the tractor, (refer to Deck Removal) then gently flip the deck over to Deck Installation). See Figure 4-15. 6. New blades are properly reinstalled. 4. Use a 15⁄16" wrench to Deck Installation). See Figure 4-18. (c) (a) (b) Troubleshooting Excessive vibration 1. Uneven tire pressure. • Check tire pressure in Figure 4-17 and then...


