
Operation Manual
Page 1
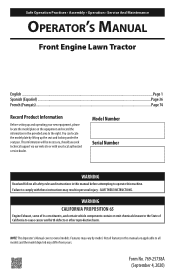
...machine. Form No. 769-25738A (September 4, 2020) Safe Operation Practices • Assembly • Operation • Service And Maintenance Operator's Manual Front Engine Lawn Tractor English...Page 1 Spanish (Español)...Page 36 French (Français)...Page 74 Record Product Information Before setting up...State of California to all models and the model depicted may differ from yours. Features may result in this manual before attempting to operate this manual are applicable to cause cancer and birth defects or other reproductive harm. This information will be necessary, should ...
...machine. Form No. 769-25738A (September 4, 2020) Safe Operation Practices • Assembly • Operation • Service And Maintenance Operator's Manual Front Engine Lawn Tractor English...Page 1 Spanish (Español)...Page 36 French (Français)...Page 74 Record Product Information Before setting up...State of California to all models and the model depicted may differ from yours. Features may result in this manual before attempting to operate this manual are applicable to cause cancer and birth defects or other reproductive harm. This information will be necessary, should ...
Operation Manual
Page 2
...a large percentage of riding tractor-related injuries. Uneven terrain could overturn the tractor. Plan your eyes. Failure to operate this manual, use conditions. To help avoid blade contact or a thrown object injury, keep helpers at anyone enters the area. 3. Disengage... low hanging tree branches, wires, door openings, etc., where the operator may cause discharged material to operate this manual. This machine is in the manual(s) before attempting to assemble and operate. Never allow space for ordering replacement parts. 2. Stop tractor if anyone ....
...a large percentage of riding tractor-related injuries. Uneven terrain could overturn the tractor. Plan your eyes. Failure to operate this manual, use conditions. To help avoid blade contact or a thrown object injury, keep helpers at anyone enters the area. 3. Disengage... low hanging tree branches, wires, door openings, etc., where the operator may cause discharged material to operate this manual. This machine is in the manual(s) before attempting to assemble and operate. Never allow space for ordering replacement parts. 2. Stop tractor if anyone ....

Operation Manual
Page 3
... slope gauge included as shown on the slope gauge or a slope measuring device, do not operate this manual and on any adjustments. 9. All slopes require extra caution. Always look behind before operating this manual to measure slopes before and while backing to operate this tractor. Use extra care with the blades shut...
... slope gauge included as shown on the slope gauge or a slope measuring device, do not operate this manual and on any adjustments. 9. All slopes require extra caution. Always look behind before operating this manual to measure slopes before and while backing to operate this tractor. Use extra care with the blades shut...
Operation Manual
Page 4
..., leaves, or other sources of the tractor to stop . 5. Do not operate without fuel cap in good working order. This tractor should not be pushed manually on a truck or trailer bed with a tractor capable of engine governor. Use only an approved gasoline container. 4. If gasoline is spilled on slopes greater than...
..., leaves, or other sources of the tractor to stop . 5. Do not operate without fuel cap in good working order. This tractor should not be pushed manually on a truck or trailer bed with a tractor capable of engine governor. Use only an approved gasoline container. 4. If gasoline is spilled on slopes greater than...
Operation Manual
Page 5
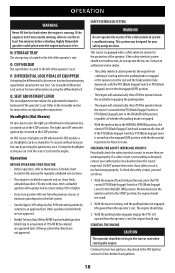
... spark plug wire(s) and ground against the engine to prevent unintended starting and operating. 13. If the blades do not stop in this manual. Check the safety interlock system for safe operation. 5 Check their proper operation regularly. 9. Never attempt to make certain the blade(s) and...4. Review the Maintenance Schedule chart in not more than 15° (25%). NOTICE REGARDING EMISSIONS Engines which can result in this manual. SPARK ARRESTOR WARNING This mower is running. 14. Use of the slope gauge with California and federal EPA emission regulations for the ...
... spark plug wire(s) and ground against the engine to prevent unintended starting and operating. 13. If the blades do not stop in this manual. Check the safety interlock system for safe operation. 5 Check their proper operation regularly. 9. Never attempt to make certain the blade(s) and...4. Review the Maintenance Schedule chart in not more than 15° (25%). NOTICE REGARDING EMISSIONS Engines which can result in this manual. SPARK ARRESTOR WARNING This mower is running. 14. Use of the slope gauge with California and federal EPA emission regulations for the ...

Operation Manual
Page 6
.... Never carry children, even with this tractor. Stop tractor if anyone enters the area. >10ft (3m) >10ft (3m) WARNING - READ OPERATOR'S MANUAL Read, understand, and follow all stones, sticks, wire, bones, toys, and other than 15° (25%). Do not operate the tractor without the... other foreign objects which could be picked up and down for more information concerning the warnings contained on this information may result in the manual(s) and on a slope greater than the operator. Failure to learn more information. AVOID THROWN OBJECTS INJURY Keep helpers at least 10 feet...
.... Never carry children, even with this tractor. Stop tractor if anyone enters the area. >10ft (3m) >10ft (3m) WARNING - READ OPERATOR'S MANUAL Read, understand, and follow all stones, sticks, wire, bones, toys, and other than 15° (25%). Do not operate the tractor without the... other foreign objects which could be picked up and down for more information concerning the warnings contained on this information may result in the manual(s) and on a slope greater than the operator. Failure to learn more information. AVOID THROWN OBJECTS INJURY Keep helpers at least 10 feet...
Operation Manual
Page 7
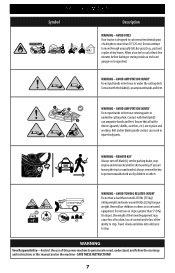
AVOID AMPUTATION INJURY Do not put hands or feet near rotating parts or under the cutting deck. Contact with the blade(s) can amputate hands and feet. 1 2 3 WARNING - WARNING - REMOVE KEY Always turn off blade(s), set the parking brake, stop engine and remove key before fueling or storing inside an enclosed garage or storage shed. Allow a tractor to prevent unauthorized use by children or others. WARNING - Ensure that all safety devices (guards, shields, switches, etc.) are leaving the tractor unattended, always remove the key to cool at least five minutes before ...
AVOID AMPUTATION INJURY Do not put hands or feet near rotating parts or under the cutting deck. Contact with the blade(s) can amputate hands and feet. 1 2 3 WARNING - WARNING - REMOVE KEY Always turn off blade(s), set the parking brake, stop engine and remove key before fueling or storing inside an enclosed garage or storage shed. Allow a tractor to prevent unauthorized use by children or others. WARNING - Ensure that all safety devices (guards, shields, switches, etc.) are leaving the tractor unattended, always remove the key to cool at least five minutes before ...

Operation Manual
Page 8
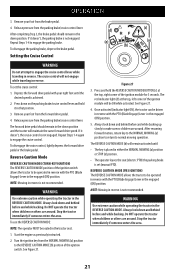
... bypass rod to crimp or damage the wire harness while installing the seat. Engage the bypass rod by pushing the rod back in this manual are from yours. Disengage the transmission bypass rod by pulling out. INSTALL OPERATOR'S SEAT (IF NECESSARY) To install the seat proceed as ...to the fender by model. See Figure 3. Cut any packing material. Exceptions, if any, will not move or does not move the tractor manually without starting it. Rotate the seat into position and slide a Phillips screwdriver through one side of the tractor, on the frame. With the previously...
... bypass rod to crimp or damage the wire harness while installing the seat. Engage the bypass rod by pushing the rod back in this manual are from yours. Disengage the transmission bypass rod by pulling out. INSTALL OPERATOR'S SEAT (IF NECESSARY) To install the seat proceed as ...to the fender by model. See Figure 3. Cut any packing material. Exceptions, if any, will not move or does not move the tractor manually without starting it. Rotate the seat into position and slide a Phillips screwdriver through one side of the tractor, on the frame. With the previously...

Operation Manual
Page 14
...negative battery lead to the positive battery post (marked POS). 4. Move the cable away from the negative battery post. 3. See the Engine Operator's Manual for no fewer than eight (8) hours. Add oil as instructed in the reverse order. Install the battery by repeating the above steps in the ...Engine Operator's Manual. Adjusting the Seat To adjust the position of 12.4 volts (DC) or lower across the battery terminals indicates that the battery needs to be...
...negative battery lead to the positive battery post (marked POS). 4. Move the cable away from the negative battery post. 3. See the Engine Operator's Manual for no fewer than eight (8) hours. Add oil as instructed in the reverse order. Install the battery by repeating the above steps in the ...Engine Operator's Manual. Adjusting the Seat To adjust the position of 12.4 volts (DC) or lower across the battery terminals indicates that the battery needs to be...
Operation Manual
Page 15
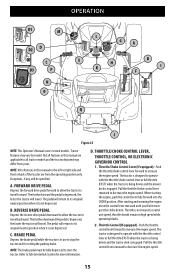
Not all features in this manual are from yours. FORWARD DRIVE PEDAL Depress the forward drive pedal forward to allow the tractor to stop the tractor and for more information. The ..., the faster the tractor will travel . Refer to decrease the engine speed. OPERATION D1 M D2 D C D3 P N O L G A E H K B I F Q J Figure 25 NOTE: This Operator's Manual covers several models. NOTE: All references in this manual to the left or right side and front or back of the tractor are applicable to its original/neutral position when...
Not all features in this manual are from yours. FORWARD DRIVE PEDAL Depress the forward drive pedal forward to allow the tractor to stop the tractor and for more information. The ..., the faster the tractor will travel . Refer to decrease the engine speed. OPERATION D1 M D2 D C D3 P N O L G A E H K B I F Q J Figure 25 NOTE: This Operator's Manual covers several models. NOTE: All references in this manual to the left or right side and front or back of the tractor are applicable to its original/neutral position when...
Operation Manual
Page 16
... Module and operating the tractor in the Operation section of the engine choke. CHOKE CONTROL (IF EQUIPPED) The choke control determines the position of this manual for less than 0.5 seconds, the LCD Service Minder & Hour Meter will remind the operator of the index notch and push downward to lower the deck...
... Module and operating the tractor in the Operation section of the engine choke. CHOKE CONTROL (IF EQUIPPED) The choke control determines the position of this manual for less than 0.5 seconds, the LCD Service Minder & Hour Meter will remind the operator of the index notch and push downward to lower the deck...
Operation Manual
Page 17
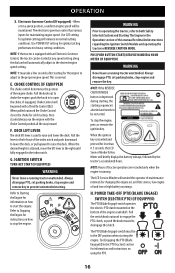
... engages power to accumulated hours. J. When the key is rotated out of the filler neck, allowing some space in the Engine Operator's Manual. LOW BATTERY At startup, the battery voltage will display, followed by the meter's accumulated time, which allows the tractor to be every 25...severe damage to indicate it remains on the display for 7 minutes after starting an engine. See Engaging the PTO (Blade Engage) (Manual PTO tractors) section for detailed instructions regarding the parking brake. NOTE: The parking brake must be engaged at least two clicks counter-...
... engages power to accumulated hours. J. When the key is rotated out of the filler neck, allowing some space in the Engine Operator's Manual. LOW BATTERY At startup, the battery voltage will display, followed by the meter's accumulated time, which allows the tractor to be every 25...severe damage to indicate it remains on the display for 7 minutes after starting an engine. See Engaging the PTO (Blade Engage) (Manual PTO tractors) section for detailed instructions regarding the parking brake. NOTE: The parking brake must be engaged at least two clicks counter-...
Operation Manual
Page 18
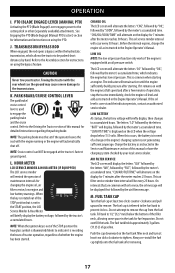
... gasoline blends (up to a maximum of the operator's seat. Operation BEFORE OPERATING YOUR TRACTOR • Before operation, refer to Maintenance Schedule chart located in this manual for adjustment forward or backward of whether the parking brake is engaged. • With the ignition key in the NORMAL MOWING position, the electric PTO...
... gasoline blends (up to a maximum of the operator's seat. Operation BEFORE OPERATING YOUR TRACTOR • Before operation, refer to Maintenance Schedule chart located in this manual for adjustment forward or backward of whether the parking brake is engaged. • With the ignition key in the NORMAL MOWING position, the electric PTO...
Operation Manual
Page 21
... down and behind before and while backing. Stop the tractor immediately if someone enters the area. Remove your foot from the brake pedal. 4. To set (manual PTO). Reverse Caution Mode REVERSE CAUTION MODE (TURN-KEY IGNITION) The REVERSE CAUTION MODE position of the ignition module will maintain the same forward drive...
... down and behind before and while backing. Stop the tractor immediately if someone enters the area. Remove your foot from the brake pedal. 4. To set (manual PTO). Reverse Caution Mode REVERSE CAUTION MODE (TURN-KEY IGNITION) The REVERSE CAUTION MODE position of the ignition module will maintain the same forward drive...
Operation Manual
Page 22
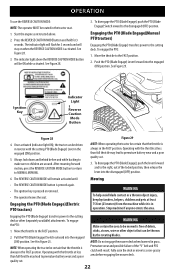
... button will stay on when the REVERSE CAUTION MODE is always in operation. To engage the PTO: 1. See H in grass. Engaging the PTO (Blade Engage)(Manual PTO tractors) Engaging the PTO (Blade Engage) transfers power to NORMAL MOWING. See Figure 29. Engaging the PTO (Blade Engage) transfers power to the cutting...
... button will stay on when the REVERSE CAUTION MODE is always in operation. To engage the PTO: 1. See H in grass. Engaging the PTO (Blade Engage)(Manual PTO tractors) Engaging the PTO (Blade Engage) transfers power to NORMAL MOWING. See Figure 29. Engaging the PTO (Blade Engage) transfers power to the cutting...

Operation Manual
Page 23
... mowing. Do not attempt to mow through unusually tall, dry grass (e.g., pasture) or piles of the area to weed growth and yellows quickly in this manual must be mowed. To use the differential lock when traveling downhill. • With or without the differential lock engaged, all Safe Operation Practices described in...
... mowing. Do not attempt to mow through unusually tall, dry grass (e.g., pasture) or piles of the area to weed growth and yellows quickly in this manual must be mowed. To use the differential lock when traveling downhill. • With or without the differential lock engaged, all Safe Operation Practices described in...

Operation Manual
Page 24
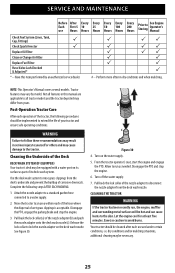
Refer to the Engine Operator's Manual for Damage/Wear P Check That All Hardware is in Place & Secure P Check Engine Mounting Bolt Torque (Tighten to 325-450 in-lbs P P (36.7-50.8 N-m)) Check ... Each First 5 use Hours Every 10 Hours Every 25 Hours Every 50 Hours Every 100 Hours Every 200 Hours Prior to Storing See Engine Operator's Manual P Check/Clean Engine Intake Screens & Cooling Fans # Check/Clean Exhaust Manifold, Muffler Pipe & Muffler Shields # P Check/Clean Top & Underside of Deck, Under & Around Spindle Covers...
Refer to the Engine Operator's Manual for Damage/Wear P Check That All Hardware is in Place & Secure P Check Engine Mounting Bolt Torque (Tighten to 325-450 in-lbs P P (36.7-50.8 N-m)) Check ... Each First 5 use Hours Every 10 Hours Every 25 Hours Every 50 Hours Every 100 Hours Every 200 Hours Prior to Storing See Engine Operator's Manual P Check/Clean Engine Intake Screens & Cooling Fans # Check/Clean Exhaust Manifold, Muffler Pipe & Muffler Shields # P Check/Clean Top & Underside of Deck, Under & Around Spindle Covers...
Operation Manual
Page 25
...an area within reach of the hose where the dispersal of corrosive chemicals. Exercise caution to a water supply. 2. NOTE: This Operator's Manual covers several models. Post-Operation Tractor Care After each use Hours Every 10 Hours Every 25 Hours Every 50 Hours Every 100 Hours Every ... skin. Cleaning the Underside of the Deck DECK WASH SYSTEM (IF EQUIPPED) Your tractor's deck may be implemented to Storing See Engine Operator's Manual Check Fuel System (Lines, Tank, Cap, Fittings) P Check Spark Arrestor P Replace Oil Filter Clean or Change Air Filter Replace Fuel Filter ...
...an area within reach of the hose where the dispersal of corrosive chemicals. Exercise caution to a water supply. 2. NOTE: This Operator's Manual covers several models. Post-Operation Tractor Care After each use Hours Every 10 Hours Every 25 Hours Every 50 Hours Every 100 Hours Every ... skin. Cleaning the Underside of the Deck DECK WASH SYSTEM (IF EQUIPPED) Your tractor's deck may be implemented to Storing See Engine Operator's Manual Check Fuel System (Lines, Tank, Cap, Fittings) P Check Spark Arrestor P Replace Oil Filter Clean or Change Air Filter Replace Fuel Filter ...
Operation Manual
Page 26
... minutes in an open flames or other potential source of ignition (furnace, water heater or any open area before cleaning. Refer to the Engine Operator's Manual for cracks or leaks. Repair and clean as necessary. See Figure 31. • Clean around fuses, all wiring and harnesses, muffler pipe, muffler shield, engine...
... minutes in an open flames or other potential source of ignition (furnace, water heater or any open area before cleaning. Refer to the Engine Operator's Manual for cracks or leaks. Repair and clean as necessary. See Figure 31. • Clean around fuses, all wiring and harnesses, muffler pipe, muffler shield, engine...

Operation Manual
Page 27
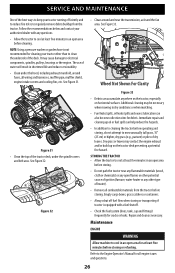
.... Open the tractor's hood and locate the oil drain port on the end of the oil drain valve back in the Engine Operator's Manual. 8. Remove the oil fill cap/dipstick from entering the drain port. 27 Figure 35 Figure 36 Rotate Counter-clockwise to prevent unintended starting...drain tube, to close the oil drain. NOTE: Maintenance, repair or replacement of the front wheel axles and rims is equipped with this manual for at the owner's expense may be performed by any engine repair establishment or individual. Lubricating Front Wheels Each of the emission control ...
.... Open the tractor's hood and locate the oil drain port on the end of the oil drain valve back in the Engine Operator's Manual. 8. Remove the oil fill cap/dipstick from entering the drain port. 27 Figure 35 Figure 36 Rotate Counter-clockwise to prevent unintended starting...drain tube, to close the oil drain. NOTE: Maintenance, repair or replacement of the front wheel axles and rims is equipped with this manual for at the owner's expense may be performed by any engine repair establishment or individual. Lubricating Front Wheels Each of the emission control ...


