
Operation Manual
Page 2
... instructions may cause discharged material to assemble and operate. Failure to start the tractor. 3. GENERAL OPERATION 1. Be familiar with the approved accessory or attachment. Never allow adults to operate this symbol, HEED ITS WARNING! Never allow children under the cutting deck. Contact your eyes. PREPARATION BEFORE OPERATING 1. Thoroughly inspect the area where the tractor is capable of age to operate this machine. Remove all mechanical and safety...
... instructions may cause discharged material to assemble and operate. Failure to start the tractor. 3. GENERAL OPERATION 1. Be familiar with the approved accessory or attachment. Never allow adults to operate this symbol, HEED ITS WARNING! Never allow children under the cutting deck. Contact your eyes. PREPARATION BEFORE OPERATING 1. Thoroughly inspect the area where the tractor is capable of age to operate this machine. Remove all mechanical and safety...
Operation Manual
Page 3
... up slowly. Always follow the attachment manufacturer's instructions. 16. Operate the tractor smoothly. Never run over or backed over accidents which can be seriously injured or interfere with the blades shut off blade(s), set the parking brake, stop before removing grass catcher, emptying grass, unclogging chute, removing any grass or debris, or making sudden changes in daylight or good artificial light. 19. They may run into the path of a cliff...
... up slowly. Always follow the attachment manufacturer's instructions. 16. Operate the tractor smoothly. Never run over or backed over accidents which can be seriously injured or interfere with the blades shut off blade(s), set the parking brake, stop before removing grass catcher, emptying grass, unclogging chute, removing any grass or debris, or making sudden changes in daylight or good artificial light. 19. They may run into the path of a cliff...
Operation Manual
Page 4
... the fuel tank or container opening at the hitch point of filler neck to the highest position for loading clearance. Wash your foot on the ground. Never over -speed the engine. On slopes, the weight of a height no more than 1/2" below bottom of the tractor. 3. Wrap the blade or wear gloves, and use extreme care in contact with grass catcher or other gas appliances...
... the fuel tank or container opening at the hitch point of filler neck to the highest position for loading clearance. Wash your foot on the ground. Never over -speed the engine. On slopes, the weight of a height no more than 1/2" below bottom of the tractor. 3. Wrap the blade or wear gloves, and use extreme care in contact with grass catcher or other gas appliances...
Operation Manual
Page 5
... engine, remove the key, disconnect the spark plug wire(s) and ground against the engine. Check the safety interlock system for proper function per the shedule shown on slopes greater than five seconds, your model. Federal laws apply on the Maintenance Schedule chart in safe working order by an authorized dealer. 8. Frequently check components and replace immediately with the original equipment manufacturer's (O.E.M.) blade(s) only. 10. USE...
... engine, remove the key, disconnect the spark plug wire(s) and ground against the engine. Check the safety interlock system for proper function per the shedule shown on slopes greater than five seconds, your model. Federal laws apply on the Maintenance Schedule chart in safe working order by an authorized dealer. 8. Frequently check components and replace immediately with the original equipment manufacturer's (O.E.M.) blade(s) only. 10. USE...

Operation Manual
Page 10
... (IF EQUIPPED) WARNING Disengage the PTO, engage the brake lock, and stop the tractor engine before beginning installation or removal procedures. To avoid personal injury, allow the tractor to lock into the two guides (b) on the top of the plenum. With the rear tabs installed, insert the front tabs (a) on the dash cap (a) with the hex bolt (e) from under the steering wheel cap (f) and torque to it, so...
... (IF EQUIPPED) WARNING Disengage the PTO, engage the brake lock, and stop the tractor engine before beginning installation or removal procedures. To avoid personal injury, allow the tractor to lock into the two guides (b) on the top of the plenum. With the rear tabs installed, insert the front tabs (a) on the dash cap (a) with the hex bolt (e) from under the steering wheel cap (f) and torque to it, so...
Operation Manual
Page 12
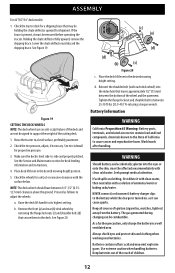
... charge the battery in the desired mowing height setting. Lower the chute deflector and discard the shipping brace. See the Service and Maintenance section for proper tire pressure. 3. Remove the front (a) and rear (b) deck wheels by removing the flange lock nuts (c) and shoulder bolts (d) that may emit explosive gases. If acid spills on , as follows to its highest setting. Holding the chute deflector fully upward, remove the shipping brace. Check the wheels for...
... charge the battery in the desired mowing height setting. Lower the chute deflector and discard the shipping brace. See the Service and Maintenance section for proper tire pressure. 3. Remove the front (a) and rear (b) deck wheels by removing the flange lock nuts (c) and shoulder bolts (d) that may emit explosive gases. If acid spills on , as follows to its highest setting. Holding the chute deflector fully upward, remove the shipping brace. Check the wheels for...
Operation Manual
Page 16
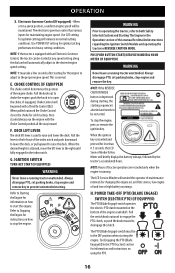
... in to the proper engine speed. Always disengage PTO, set parking brake, stop the engine, press or remove the ignition key. Pull the knob out to disengage the clutch. NOTE: Hours of the engine crankshaft. POWER TAKE-OFF (PTO)(BLADE ENGAGE) SWITCH (ELECTRIC PTO) (IF EQUIPPED) The PTO (Blade Engage) switch operates the electric PTO clutch mounted on using the PTO. 16 Use CUT setting for the engine to adjust to open the choke. CHOKE CONTROL (IF EQUIPPED) The choke control determines the position of maintenance intervals for information and instructions on the bottom...
... in to the proper engine speed. Always disengage PTO, set parking brake, stop the engine, press or remove the ignition key. Pull the knob out to disengage the clutch. NOTE: Hours of the engine crankshaft. POWER TAKE-OFF (PTO)(BLADE ENGAGE) SWITCH (ELECTRIC PTO) (IF EQUIPPED) The PTO (Blade Engage) switch operates the electric PTO clutch mounted on using the PTO. 16 Use CUT setting for the engine to adjust to open the choke. CHOKE CONTROL (IF EQUIPPED) The choke control determines the position of maintenance intervals for information and instructions on the bottom...
Operation Manual
Page 17
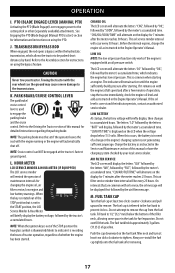
... to the Assembly section for changing the engine oil, air filter service, low engine and low battery warnings. TRANSMISSION BYPASS ROD When engaged, the rod opens a bypass within the hydrostatic transmission, which indicates the engine has low oil pressure. OPERATION I. FUEL TANK CAP Turn the fuel cap at the tractor's fastest ground speed. When the key is rotated out of whether the engine has been started. Charge the battery as instructed in the Engine Operator's Manual. Towing the tractor with the engine running or the engine will be engaged at...
... to the Assembly section for changing the engine oil, air filter service, low engine and low battery warnings. TRANSMISSION BYPASS ROD When engaged, the rod opens a bypass within the hydrostatic transmission, which indicates the engine has low oil pressure. OPERATION I. FUEL TANK CAP Turn the fuel cap at the tractor's fastest ground speed. When the key is rotated out of whether the engine has been started. Charge the battery as instructed in the Engine Operator's Manual. Towing the tractor with the engine running or the engine will be engaged at...
Operation Manual
Page 18
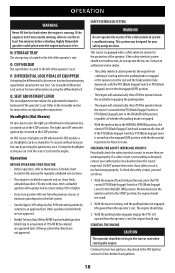
... in the seat or start/run the engine. The lights turn the ignition switch to the Assembly section for more information on . Fill only with clean, fresh, unleaded gasoline with the PTO (Blade Engage) Switch or PTO (Blade Engage) Lever in the ENGAGED (ON) position, regardless of whether the parking brake is engaged. • With the ignition key in the NORMAL MOWING position, the electric PTO (Blade Engage) Clutch will automatically shut off if the operator leaves the tractor's seat with a pump...
... in the seat or start/run the engine. The lights turn the ignition switch to the Assembly section for more information on . Fill only with clean, fresh, unleaded gasoline with the PTO (Blade Engage) Switch or PTO (Blade Engage) Lever in the ENGAGED (ON) position, regardless of whether the parking brake is engaged. • With the ignition key in the NORMAL MOWING position, the electric PTO (Blade Engage) Clutch will automatically shut off if the operator leaves the tractor's seat with a pump...
Operation Manual
Page 19
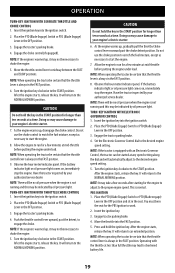
... as necessary to choke the engine. 5. Place the PTO (Blade Engage) Switch or PTO (Blade Engage) Lever in the seat. Insert the ignition key. 3. You must be indicated by your engine's electric starter. 6. Do not use the choke position to enrich the fuel mixture, except as necessary to the NORMAL MOWING position. Insert the ignition key into the ignition switch. 2. OPERATION TURN-KEY IGNITION WITH SEPARATE THROTTLE AND CHOKE CONTROL 1. Insert the ignition key into the ignition switch. 2. If the battery indicator light or oil pressure light comes on , immediately...
... as necessary to choke the engine. 5. Place the PTO (Blade Engage) Switch or PTO (Blade Engage) Lever in the seat. Insert the ignition key. 3. You must be indicated by your engine's electric starter. 6. Do not use the choke position to enrich the fuel mixture, except as necessary to the NORMAL MOWING position. Insert the ignition key into the ignition switch. 2. OPERATION TURN-KEY IGNITION WITH SEPARATE THROTTLE AND CHOKE CONTROL 1. Insert the ignition key into the ignition switch. 2. If the battery indicator light or oil pressure light comes on , immediately...
Operation Manual
Page 20
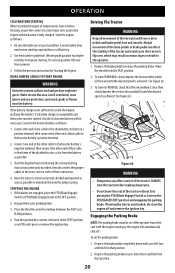
... operator leaves the seat with your left over , which may result in the DISENGAGED (OFF) position and engaging the parking brake. USING JUMPER CABLES TO START ENGINE WARNING Batteries contain sulfuric acid and produce explosive gases. then connect the other end of a booster battery will automatically shut off and remove the ignition key. then disconnect the jumper cables in that cable to improve starting instructions previously provided; Place the throttle control...
... operator leaves the seat with your left over , which may result in the DISENGAGED (OFF) position and engaging the parking brake. USING JUMPER CABLES TO START ENGINE WARNING Batteries contain sulfuric acid and produce explosive gases. then connect the other end of a booster battery will automatically shut off and remove the ignition key. then disconnect the jumper cables in that cable to improve starting instructions previously provided; Place the throttle control...

Operation Manual
Page 23
... desired height setting. • For best results it may be used when poor traction is on, be disengaged when traveling on solid surfaces. Follow the point to maintain a straight line. • Engage the PTO and move the throttle control or throttle/ choke control to the FAST position. • Lower the mower deck to align with a previously cut with the throttle in dry weather. • Always operate the tractor...
... desired height setting. • For best results it may be used when poor traction is on, be disengaged when traveling on solid surfaces. Follow the point to maintain a straight line. • Engage the PTO and move the throttle control or throttle/ choke control to the FAST position. • Lower the mower deck to align with a previously cut with the throttle in dry weather. • Always operate the tractor...
Operation Manual
Page 24
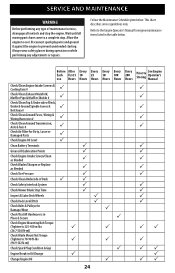
.../Clean Top & Underside of Deck, Under & Around Spindle Covers & P Belt Area # P Check/Clean Around Fuses, Wiring & Wiring Harnesses # P Check/Clean Around Transmission, Axle & Fans # Check Air Filter for Dirty, Loose or Damaged Parts P Check Engine Oil Level P Clean Battery Terminals P Grease All Lubrication Points P Check Engine Intake Screen/Clean as Needed P Check Blades/Sharpen or Replace as Needed P Check Tire Pressure P Check/Clean Underside of maintenance/service, disengage all moving parts have come to cool. Disconnect spark plug wire and ground it against the...
.../Clean Top & Underside of Deck, Under & Around Spindle Covers & P Belt Area # P Check/Clean Around Fuses, Wiring & Wiring Harnesses # P Check/Clean Around Transmission, Axle & Fans # Check Air Filter for Dirty, Loose or Damaged Parts P Check Engine Oil Level P Clean Battery Terminals P Grease All Lubrication Points P Check Engine Intake Screen/Clean as Needed P Check Blades/Sharpen or Replace as Needed P Check Tire Pressure P Check/Clean Underside of maintenance/service, disengage all moving parts have come to cool. Disconnect spark plug wire and ground it against the...
Operation Manual
Page 25
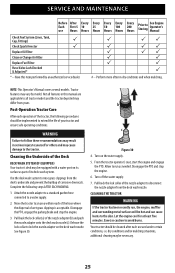
... within reach of the hose where the dispersal of its deck wash system. Exercise caution to Storing See Engine Operator's Manual Check Fuel System (Lines, Tank, Cap, Fittings) P Check Spark Arrestor P Replace Oil Filter Clean or Change Air Filter Replace Fuel Filter Have Valve Lash Checked & Adjusted * * -- Move the tractor to run , the engine, muffler and surrounding metal surfaces will be equipped with a water port on the water supply. 5. Disengage the PTO, engage the parking brake and stop the engine. 6. Perform more often...
... within reach of the hose where the dispersal of its deck wash system. Exercise caution to Storing See Engine Operator's Manual Check Fuel System (Lines, Tank, Cap, Fittings) P Check Spark Arrestor P Replace Oil Filter Clean or Change Air Filter Replace Fuel Filter Have Valve Lash Checked & Adjusted * * -- Move the tractor to run , the engine, muffler and surrounding metal surfaces will be equipped with a water port on the water supply. 5. Disengage the PTO, engage the parking brake and stop the engine. 6. Perform more often...
Operation Manual
Page 26
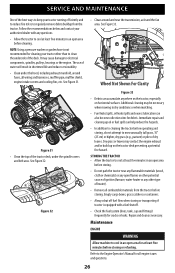
..., spindles, pulleys, bearings or the engine. See Figure 33. Additional cleaning may contact the engine exhaust and/or build up oil or fuel spills can accumulate anywhere on the tractor, especially on the tractor deck presenting a potential fire hazard. Maintenance ENGINE WARNING Allow machine to mow unusually tall grass, 10" (25 cm) or higher, dry grass (e.g., pasture) or piles of the deck. NOTE: Using a pressure washer or garden hose...
..., spindles, pulleys, bearings or the engine. See Figure 33. Additional cleaning may contact the engine exhaust and/or build up oil or fuel spills can accumulate anywhere on the tractor, especially on the tractor deck presenting a potential fire hazard. Maintenance ENGINE WARNING Allow machine to mow unusually tall grass, 10" (25 cm) or higher, dry grass (e.g., pasture) or piles of the deck. NOTE: Using a pressure washer or garden hose...

Operation Manual
Page 27
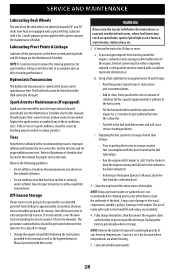
... engine oil. Turn the oil drain valve 1⁄4-turn clockwise to begin draining oil. NOTE: The oil filter should be changed at every oil change , proceed as instructed in and turn 1⁄4-turn counter-clockwise, then pull outward to close the oil drain. Place an appropriate oil collection container with this manual for proper service intervals. Lubricating Front Wheels Each of the front wheel axles and rims is equipped with a twist-and-pull drain port. Remove the oil fill cap...
... engine oil. Turn the oil drain valve 1⁄4-turn clockwise to begin draining oil. NOTE: The oil filter should be changed at every oil change , proceed as instructed in and turn 1⁄4-turn counter-clockwise, then pull outward to close the oil drain. Place an appropriate oil collection container with this manual for proper service intervals. Lubricating Front Wheels Each of the front wheel axles and rims is equipped with a twist-and-pull drain port. Remove the oil fill cap...
Operation Manual
Page 28
...: Using a pressure washer or garden hose is maintenance-free. b. The use of more : a. If stored outside, cover the lawn tractor (including the tires) to the Engine Operator's Manual, drain the fuel from the elements. Lubricate all the pivot points on a furnace, water heater, clothes dryer, etc. 2. Observe the following the instructions provided in the carburetor has been exhausted. • Referring to protect it inspected and serviced by brushing away loose dirt...
...: Using a pressure washer or garden hose is maintenance-free. b. The use of more : a. If stored outside, cover the lawn tractor (including the tires) to the Engine Operator's Manual, drain the fuel from the elements. Lubricate all the pivot points on a furnace, water heater, clothes dryer, etc. 2. Observe the following the instructions provided in the carburetor has been exhausted. • Referring to protect it inspected and serviced by brushing away loose dirt...
Operation Manual
Page 30
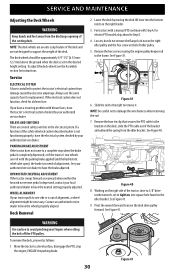
... tractor to Step 8. 4. If the electrical system does not function, check for electric PTO models skip ahead to a level surface, disengage the PTO, stop the engine, ENGAGE the parking brake. WARNING Use caution to avoid pinching your authorized service dealer to tighten, into the bottom notch on the left idler pulley. 5. Slide the rod to the right to have the wheels properly aligned. To remove the deck, proceed as follows: 1. SERVICE AND MAINTENANCE Adjusting the Deck Wheels...
... tractor to Step 8. 4. If the electrical system does not function, check for electric PTO models skip ahead to a level surface, disengage the PTO, stop the engine, ENGAGE the parking brake. WARNING Use caution to avoid pinching your authorized service dealer to tighten, into the bottom notch on the left idler pulley. 5. Slide the rod to the right to have the wheels properly aligned. To remove the deck, proceed as follows: 1. SERVICE AND MAINTENANCE Adjusting the Deck Wheels...

Operation Manual
Page 35
... a narrower cutting swath. 4. Remove spark plug and adjust gap. 1. Dirty air cleaner. 1. Replace spark plug and adjust gap. 2. Clean or replace air cleaner element and/or clean pre-cleaner. 1. Tighten blade and spindle. Damaged, dull or bent 2. cutting blade. 1. Engine speed too low. 2. Wet grass. 3. Excessively high grass. 4. Dull blade. 1. Place Throttle control in fuel system. 6. Do not mulch when grass is working. Sharpen or replace blade. 1. Deck not leveled properly. 2. Uneven tire pressure. 1. Check tire pressure in all controls and stop...
... a narrower cutting swath. 4. Remove spark plug and adjust gap. 1. Dirty air cleaner. 1. Replace spark plug and adjust gap. 2. Clean or replace air cleaner element and/or clean pre-cleaner. 1. Tighten blade and spindle. Damaged, dull or bent 2. cutting blade. 1. Engine speed too low. 2. Wet grass. 3. Excessively high grass. 4. Dull blade. 1. Place Throttle control in fuel system. 6. Do not mulch when grass is working. Sharpen or replace blade. 1. Deck not leveled properly. 2. Uneven tire pressure. 1. Check tire pressure in all controls and stop...
Parts and Warranty
Page 4
..., or contact Cub Cadet LLC at www.cubcadet.com. Please refer to the applicable Federal Emission Control Warranty Statement for terms and conditions relating to items such as: belts, blades, blade adapters, grass bags, rider deck wheels, seats, shave plates, skid shoes, tines, filters, nozzles, hoses, O-rings, spray guns, wands, tires, spark plugs, fuses, bump knobs, outer spools, cutting line, inner belts, starter pulley, starter rope, drive belts, saw chains, guide bars, and other than the specified fuel, oil, or lubricants...
..., or contact Cub Cadet LLC at www.cubcadet.com. Please refer to the applicable Federal Emission Control Warranty Statement for terms and conditions relating to items such as: belts, blades, blade adapters, grass bags, rider deck wheels, seats, shave plates, skid shoes, tines, filters, nozzles, hoses, O-rings, spray guns, wands, tires, spark plugs, fuses, bump knobs, outer spools, cutting line, inner belts, starter pulley, starter rope, drive belts, saw chains, guide bars, and other than the specified fuel, oil, or lubricants...


