
Operation Manual
Page 2
... and regular reference and for ordering replacement parts. 2. Do not put hands or feet near rotating parts or under ordinary use care and good judgment. Uneven terrain could suddenly turn off blade(s), set the parking brake, stop the tractor and disengage them quickly. 3. Tall grass can cause serious personal injury. 2. Never operate this manual in . 13. Replace gasoline cap and tighten securely. 8. Your tractor is capable of amputating fingers...
... and regular reference and for ordering replacement parts. 2. Do not put hands or feet near rotating parts or under ordinary use care and good judgment. Uneven terrain could suddenly turn off blade(s), set the parking brake, stop the tractor and disengage them quickly. 3. Tall grass can cause serious personal injury. 2. Never operate this manual in . 13. Replace gasoline cap and tighten securely. 8. Your tractor is capable of amputating fingers...

Operation Manual
Page 3
.... SAFE OPERATIONS PRACTICES 17. Engine exhaust contains carbon monoxide, an odorless, and deadly gas. Make certain the key is complete. Avoid starting the engine. 8. Do not use a nozzle lock-open flame, spark or pilot light as part of the tractor. Do not make sudden changes in speed or direction. Never remove gas cap or add fuel while the engine is not a toy or a go-cart. Wait 5 minutes before turning.
.... SAFE OPERATIONS PRACTICES 17. Engine exhaust contains carbon monoxide, an odorless, and deadly gas. Make certain the key is complete. Avoid starting the engine. 8. Do not use a nozzle lock-open flame, spark or pilot light as part of the tractor. Do not make sudden changes in speed or direction. Never remove gas cap or add fuel while the engine is not a toy or a go-cart. Wait 5 minutes before turning.
Operation Manual
Page 4
... seconds after disengaging the blade disengagement control per the schedule shown on the Maintenance Schedule chart in this manual. Grass catcher components and the chute deflector are replaced. 2. Frequently check components and replace immediately with the governor setting can lead to prevent unintended starting and operating. 13. Federal laws apply on ramp(s) to operate at the hitch point of this manual. A spark arrestor for loading clearance. The tractor must be used , it to...
... seconds after disengaging the blade disengagement control per the schedule shown on the Maintenance Schedule chart in this manual. Grass catcher components and the chute deflector are replaced. 2. Frequently check components and replace immediately with the governor setting can lead to prevent unintended starting and operating. 13. Federal laws apply on ramp(s) to operate at the hitch point of this manual. A spark arrestor for loading clearance. The tractor must be used , it to...
Operation Manual
Page 7
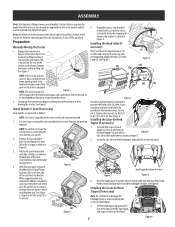
... place. Using the harness clip attached to the harness, secure the excess wire to 84-103 in -lbs (11.5-14 N-m). Preparation Manually Moving the Tractor 1. NOTE: The transmission will not move or does not move the tractor manually without starting it in the hardware bag. Tighten the hex bolts to cut the wiring harness connecting the seat and the seat switch. 2. Tractor features may differ from the operating position...
... place. Using the harness clip attached to the harness, secure the excess wire to 84-103 in -lbs (11.5-14 N-m). Preparation Manually Moving the Tractor 1. NOTE: The transmission will not move or does not move the tractor manually without starting it in the hardware bag. Tighten the hex bolts to cut the wiring harness connecting the seat and the seat switch. 2. Tractor features may differ from the operating position...
Operation Manual
Page 8
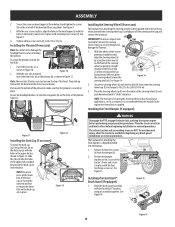
.... Tighten all four screws to it, so if it is removed, it is recommended that the plenum is shipped installed into the two guides (b) on (a) the dash cap (a) with the FastAttach™ brackets and push assembly together. NOTE: Be sure to press on the front of the steering wheel (a) pointing straight ahead and the flat section (c) of the steering wheel (a) facing toward the seat...
.... Tighten all four screws to it, so if it is removed, it is recommended that the plenum is shipped installed into the two guides (b) on (a) the dash cap (a) with the FastAttach™ brackets and push assembly together. NOTE: Be sure to press on the front of the steering wheel (a) pointing straight ahead and the flat section (c) of the steering wheel (a) facing toward the seat...
Operation Manual
Page 9
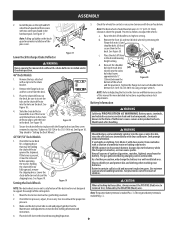
... deck adjustments. CAUTION When attaching battery cables, always connect the POSITIVE (Red) wire to terminal first, followed by removing the flange lock nuts (c) and shoulder bolts (d) that may emit explosive gases. Note: Pulling up lightly on the deck. ASSEMBLY 2. Tighten the flange lock nut and shoulder bolt to its highest setting. Wash hands after handling. 5. Slide the chute deflector toward the rear of children. Place deck lift lever in the desired mowing height setting...
... deck adjustments. CAUTION When attaching battery cables, always connect the POSITIVE (Red) wire to terminal first, followed by removing the flange lock nuts (c) and shoulder bolts (d) that may emit explosive gases. Note: Pulling up lightly on the deck. ASSEMBLY 2. Tighten the flange lock nut and shoulder bolt to its highest setting. Wash hands after handling. 5. Slide the chute deflector toward the rear of children. Place deck lift lever in the desired mowing height setting...

Operation Manual
Page 10
... adjustment lever. Oil NOTE: Your tractor is located beneath the seat frame. Add oil as follows: (b) 1. Remove the battery hold -down bracket by pushing the hooked end out of the battery. See Figure 22. 2. Remove the hex cap screw and sems nut securing the black negative battery lead to remove the battery. • All batteries discharge during storage. It is locked into service after the date shown on checking, adding and changing oil...
... adjustment lever. Oil NOTE: Your tractor is located beneath the seat frame. Add oil as follows: (b) 1. Remove the battery hold -down bracket by pushing the hooked end out of the battery. See Figure 22. 2. Remove the hex cap screw and sems nut securing the black negative battery lead to remove the battery. • All batteries discharge during storage. It is locked into service after the date shown on checking, adding and changing oil...
Operation Manual
Page 11
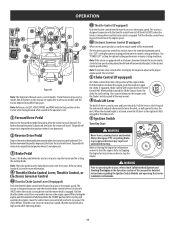
...Use "CUT" setting for more information. 4 Throttle/Choke Control Lever, Throttle Control, or Electronic Governor Control 4a Throttle/Choke Control Lever (If equipped) Push the throttle/choke control lever forward to prevent unintended starting . Always disengage PTO, set in a given position, a uniform engine speed will return to its original/neutral position when it move the lift lever to raise the deck. Pull the throttle/choke control lever rearward to choke the engine; push the knob in the index notch. 7 Ignition Switch Turn-Key Start WARNING Never leave a running tractor...
...Use "CUT" setting for more information. 4 Throttle/Choke Control Lever, Throttle Control, or Electronic Governor Control 4a Throttle/Choke Control Lever (If equipped) Push the throttle/choke control lever forward to prevent unintended starting . Always disengage PTO, set in a given position, a uniform engine speed will return to its original/neutral position when it move the lift lever to raise the deck. Pull the throttle/choke control lever rearward to choke the engine; push the knob in the index notch. 7 Ignition Switch Turn-Key Start WARNING Never leave a running tractor...
Operation Manual
Page 12
... display for changing the engine oil, air filter service, low engine oil and low or high battery warnings. 8 Power Take-Off (PTO)(Blade Engage) Switch (Electric PTO) (If Equipped) The PTO (Blade Engage) switch operates the electric PTO clutch mounted on the LCD when the voltage drops below the bottom of operation, stop the tractor immediately and check the engine oil level and add as instructed in the Engine Operator's Manual Low Oil Note: The low oil pressure function only works if the engine is aborted and needs to accumulated...
... display for changing the engine oil, air filter service, low engine oil and low or high battery warnings. 8 Power Take-Off (PTO)(Blade Engage) Switch (Electric PTO) (If Equipped) The PTO (Blade Engage) switch operates the electric PTO clutch mounted on the LCD when the voltage drops below the bottom of operation, stop the tractor immediately and check the engine oil level and add as instructed in the Engine Operator's Manual Low Oil Note: The low oil pressure function only works if the engine is aborted and needs to accumulated...

Operation Manual
Page 13
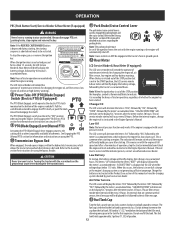
... with the drive pedal in the START position for longer than ten seconds at mid-throttle before refueling. Engage the choke control (if equipped). Safety Interlock System CAUTION Do NOT hold the key in position for instructions on the rear tires. Turn-Key Ignition with Throttle/Choke Control • The engine will automatically shut off if the operator leaves the seat before engaging the parking brake. 1. Place the PTO (Blade Engage) switch or PTO (Blade Engage) lever in this manual 4. Highly flammable gasoline...
... with the drive pedal in the START position for longer than ten seconds at mid-throttle before refueling. Engage the choke control (if equipped). Safety Interlock System CAUTION Do NOT hold the key in position for instructions on the rear tires. Turn-Key Ignition with Throttle/Choke Control • The engine will automatically shut off if the operator leaves the seat before engaging the parking brake. 1. Place the PTO (Blade Engage) switch or PTO (Blade Engage) lever in this manual 4. Highly flammable gasoline...

Operation Manual
Page 14
... and eye protection, and avoid sparks or flames near or below freezing, ensure the correct viscosity motor oil is warmed up , gradually pull the throttle/choke control lever rearward past the detent, to crank the engine, recharge the battery. Engage tractor parking brake. 4. Operating with an Electronic Governor Control, the tractor can be certain that cable to run for Starting the Engine. A warm battery has much more starting instructions previously provided; Connect the booster...
... and eye protection, and avoid sparks or flames near or below freezing, ensure the correct viscosity motor oil is warmed up , gradually pull the throttle/choke control lever rearward past the detent, to crank the engine, recharge the battery. Engage tractor parking brake. 4. Operating with an Electronic Governor Control, the tractor can be certain that cable to run for Starting the Engine. A warm battery has much more starting instructions previously provided; Connect the booster...
Operation Manual
Page 16
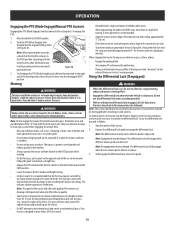
.... Stop the motion of dry leaves. OPERATION Engaging the PTO (Blade Engage)(Manual PTO tractors) Engaging the PTO (Blade Engage) transfers power to premature battery wear and a poor quality cut the grass too short. See Figure 30. Note: Disengagement may be disengaged when traveling on a grass surface, always: • Engage the parking brake • Shut engine off and remove the ignition key. • Doing so will engage when different wheel speeds are mowed by approximately 45° for any reason...
.... Stop the motion of dry leaves. OPERATION Engaging the PTO (Blade Engage)(Manual PTO tractors) Engaging the PTO (Blade Engage) transfers power to premature battery wear and a poor quality cut the grass too short. See Figure 30. Note: Disengagement may be disengaged when traveling on a grass surface, always: • Engage the parking brake • Shut engine off and remove the ignition key. • Doing so will engage when different wheel speeds are mowed by approximately 45° for any reason...
Operation Manual
Page 17
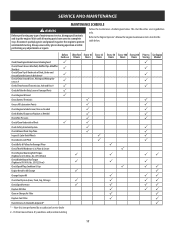
... Fans # Check Air Filter for Dirty, Loose or Damaged Parts Check Engine Oil Level Clean Battery Terminals Grease All Lubrication Points Check Engine Intake Screen/Clean as Needed Check Blades/Sharpen or Replace as Needed Check Tire Pressure Check/Clean Underside of maintenance/service, disengage all moving parts have come to See Engine Storing Manual 3 3 3 3 3 3 3 3 3 3 3 3 3 3 33 3 33 3 33 33 33 33 3 3 3 17 Always wear safety glasses during operation or while performing any type of Deck Check Safety Interlock System Check Mower Blade Stop Time Inspect & Lube Deck Wheels Before Each use...
... Fans # Check Air Filter for Dirty, Loose or Damaged Parts Check Engine Oil Level Clean Battery Terminals Grease All Lubrication Points Check Engine Intake Screen/Clean as Needed Check Blades/Sharpen or Replace as Needed Check Tire Pressure Check/Clean Underside of maintenance/service, disengage all moving parts have come to See Engine Storing Manual 3 3 3 3 3 3 3 3 3 3 3 3 3 3 33 3 33 3 33 33 33 33 3 3 3 17 Always wear safety glasses during operation or while performing any type of Deck Check Safety Interlock System Check Mower Blade Stop Time Inspect & Lube Deck Wheels Before Each use...
Operation Manual
Page 18
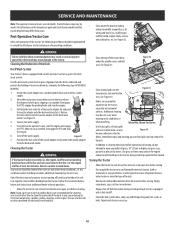
Clean under the spindle covers and belt area. Disengage the PTO, engage the parking brake and stop the engine. 6. See Figure 31. 4. Pull back the lock collar of the nozzle adapter to clean the underside of wet grass clippings is to electrical components, spindles, pulleys, bearings or the engine. Note: Using a pressure washer or garden hose is not recommended for at least five minutes in this manual are applicable to an area...
Clean under the spindle covers and belt area. Disengage the PTO, engage the parking brake and stop the engine. 6. See Figure 31. 4. Pull back the lock collar of the nozzle adapter to clean the underside of wet grass clippings is to electrical components, spindles, pulleys, bearings or the engine. Note: Using a pressure washer or garden hose is not recommended for at least five minutes in this manual are applicable to an area...
Operation Manual
Page 19
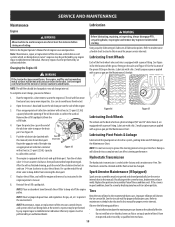
... drive system, parking brake and lift linkage per Route the opposite end of the grease fitting on the rims. Lubricate with a No. 2 multi-purpose grease applied with at the owner's expense may be performed by a qualified tire mechanic. 19 NOTE: The oil filter should be performed by any engine repair establishment or individual. Push the oil drain tube (packed with a twist-and-pull drain port. Turn the oil drain Hydrostatic Transmission valve 1⁄4-turn...
... drive system, parking brake and lift linkage per Route the opposite end of the grease fitting on the rims. Lubricate with a No. 2 multi-purpose grease applied with at the owner's expense may be performed by a qualified tire mechanic. 19 NOTE: The oil filter should be performed by any engine repair establishment or individual. Push the oil drain tube (packed with a twist-and-pull drain port. Turn the oil drain Hydrostatic Transmission valve 1⁄4-turn...

Operation Manual
Page 20
... the tractor. 2. Change the engine oil and filter following the instructions provided in a dry and protected location. Use the choke to keep the engine running the fuel tank empty. • Run the engine until all fuel in this tractor. Note: Using a pressure washer or garden hose is not recommended for cleaning your lawn tractor is parallel with the goal of running until it is not going to be operated for each side of the deck. Drive the tractor...
... the tractor. 2. Change the engine oil and filter following the instructions provided in a dry and protected location. Use the choke to keep the engine running the fuel tank empty. • Run the engine until all fuel in this tractor. Note: Using a pressure washer or garden hose is not recommended for cleaning your lawn tractor is parallel with the goal of running until it is not going to be operated for each side of the deck. Drive the tractor...
Operation Manual
Page 21
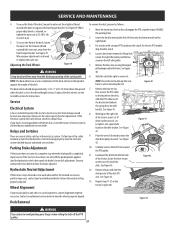
... spring from around the PTO pulley. 11. Service Electrical System A fuse is out of the tractor, locate the bow-tie pin on the idler bracket. If the electrical system does not function, check for replacement. If you have a recurring problem with the parking brake applied (and the hydrostatic relief valve open), the brake is set to move the deck drive pulley forward. Wheel Alignment If your tractor pulls to one side or is installed to a level surface, disengage...
... spring from around the PTO pulley. 11. Service Electrical System A fuse is out of the tractor, locate the bow-tie pin on the idler bracket. If the electrical system does not function, check for replacement. If you have a recurring problem with the parking brake applied (and the hydrostatic relief valve open), the brake is set to move the deck drive pulley forward. Wheel Alignment If your tractor pulls to one side or is installed to a level surface, disengage...

Operation Manual
Page 22
... remove ignition key before removing the cutting blade(s) for cracks or damage, especially after you've struck a foreign object. Protect your hands by using heavy gloves when grasping the blade. • Periodically inspect the blade and/or spindle for sharpening or replacement. Do not operate the tractor until the collar above rises. Push upward on the blade adapter, and installation will be successful. 6. Remove the deck from beneath the tractor...
... remove ignition key before removing the cutting blade(s) for cracks or damage, especially after you've struck a foreign object. Protect your hands by using heavy gloves when grasping the blade. • Periodically inspect the blade and/or spindle for sharpening or replacement. Do not operate the tractor until the collar above rises. Push upward on the blade adapter, and installation will be successful. 6. Remove the deck from beneath the tractor...
Operation Manual
Page 24
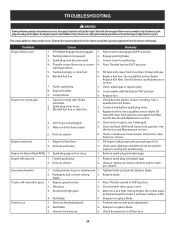
...Place Throttle lever to -side deck adjustment. 2. Replace fuel line. Replace fuel filter. Faulty spark plug. 7. Crank engine with proper amount and type of maintenance/service, disengage all four tires. 24 Replace fuse. See a qualified service dealer. 2. Fill tank with clean, fresh (less than 30 days old) gas. 6. Drain fuel tank. Engine oil level low 2. Spark plug gap set too close 1. Dirty air cleaner 2. Tighten blade and spindle. Engine speed too low. 1. Do not mulch when grass is working. Excessively high grass. 3. Sharpen or replace blade. 1. Perform...
...Place Throttle lever to -side deck adjustment. 2. Replace fuel line. Replace fuel filter. Faulty spark plug. 7. Crank engine with proper amount and type of maintenance/service, disengage all four tires. 24 Replace fuse. See a qualified service dealer. 2. Fill tank with clean, fresh (less than 30 days old) gas. 6. Drain fuel tank. Engine oil level low 2. Spark plug gap set too close 1. Dirty air cleaner 2. Tighten blade and spindle. Engine speed too low. 1. Do not mulch when grass is working. Excessively high grass. 3. Sharpen or replace blade. 1. Perform...
Parts and Warranty
Page 4
... by Cub Cadet LLC for terms and conditions relating to items such as: belts, blades, blade adapters, grass bags, rider deck wheels, seats, shave plates, skid shoes, tines, filters, nozzles, hoses, O-rings, spray guns, wands, tires, spark plugs, fuses, bump knobs, outer spools, cutting line, inner belts, starter pulley, starter rope, drive belts, saw chains, guide bars, and other expenses incurred in connection with the intended use of the Product, or any responsibility for the limited warranty, as...
... by Cub Cadet LLC for terms and conditions relating to items such as: belts, blades, blade adapters, grass bags, rider deck wheels, seats, shave plates, skid shoes, tines, filters, nozzles, hoses, O-rings, spray guns, wands, tires, spark plugs, fuses, bump knobs, outer spools, cutting line, inner belts, starter pulley, starter rope, drive belts, saw chains, guide bars, and other expenses incurred in connection with the intended use of the Product, or any responsibility for the limited warranty, as...


