Operation Manual
Page 1
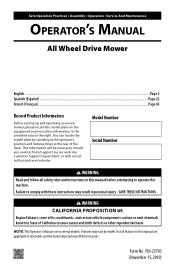
... deck. Safe Operation Practices • Assembly • Operation • Service And Maintenance Operator's Manual All Wheel Drive Mower English...Page 2 Spanish (Español)...Page 22 French (Français)...Page 43 Record Product Information Before setting up and operating your new mower, please locate the model plate on the equipment and record the information in this machine. This information will be necessary, should you seek technical support...
... deck. Safe Operation Practices • Assembly • Operation • Service And Maintenance Operator's Manual All Wheel Drive Mower English...Page 2 Spanish (Español)...Page 22 French (Français)...Page 43 Record Product Information Before setting up and operating your new mower, please locate the model plate on the equipment and record the information in this machine. This information will be necessary, should you seek technical support...

Operation Manual
Page 2
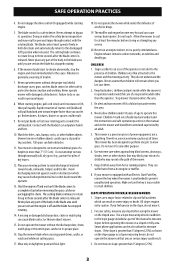
... mechanical and safety systems are operating properly, safely, and are not worn excessively. Failure to operate this manual. Replace gasoline cap and tighten securely. 9. These operators should be caught in this mower. Many injuries occur as a result of the mower and attachment discharge direction and do so may result in this manual before attempting to assemble and operate. Repeat these steps: a. PREPARATION BEFORE OPERATING 1. Remove all controls and...
... mechanical and safety systems are operating properly, safely, and are not worn excessively. Failure to operate this manual. Replace gasoline cap and tighten securely. 9. These operators should be caught in this mower. Many injuries occur as a result of the mower and attachment discharge direction and do so may result in this manual before attempting to assemble and operate. Repeat these steps: a. PREPARATION BEFORE OPERATING 1. Remove all controls and...
Operation Manual
Page 3
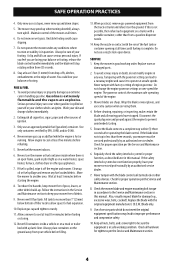
... piece of a height no more than 15 degrees (25%). 3 Never operate mower without the discharge door, chute, mulch plug or the entire grass catcher in the blade area until resistance is designed to cut normal residential grass of power equipment, not a plaything. Rapid retraction of the body in its operation. Your mower is felt, then pull rapidly. Do not operate the mower while under the cutting deck. Do not touch...
... piece of a height no more than 15 degrees (25%). 3 Never operate mower without the discharge door, chute, mulch plug or the entire grass catcher in the blade area until resistance is designed to cut normal residential grass of power equipment, not a plaything. Rapid retraction of the body in its operation. Your mower is felt, then pull rapidly. Do not operate the mower while under the cutting deck. Do not touch...
Operation Manual
Page 4
..., spark or pilot light as described later in the Service and Maintenance section to prevent unintended starting the engine. 8. Always place containers on wet grass. Wait at least 5 minutes before fueling or storing. 12. Regularly check the safety interlock system for fuel expansion. 10. Only mow across slopes, never mow up . Disconnect the spark plug wire and ground against the engine to keep mower free of ignition. 3. Gasoline is complete. Use...
..., spark or pilot light as described later in the Service and Maintenance section to prevent unintended starting the engine. 8. Always place containers on wet grass. Wait at least 5 minutes before fueling or storing. 12. Regularly check the safety interlock system for fuel expansion. 10. Only mow across slopes, never mow up . Disconnect the spark plug wire and ground against the engine to keep mower free of ignition. 3. Gasoline is complete. Use...
Operation Manual
Page 5
... the mower for gas, oil, etc. Repair the damage before starting and operating 12. Never attempt to make wheel cutting height adjustments or repairs to wear and damage which do not mow it should not be used , it . Grass catcher components and the discharge cover are equipped with low permeation fuel lines and fuel tanks for your nearest engine authorized service dealer or contact the service department, P.O. For safety protection, frequently check components and replace immediately...
... the mower for gas, oil, etc. Repair the damage before starting and operating 12. Never attempt to make wheel cutting height adjustments or repairs to wear and damage which do not mow it should not be used , it . Grass catcher components and the discharge cover are equipped with low permeation fuel lines and fuel tanks for your nearest engine authorized service dealer or contact the service department, P.O. For safety protection, frequently check components and replace immediately...
Operation Manual
Page 6
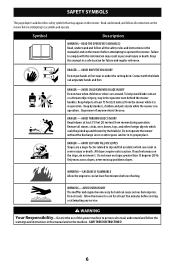
...to comply with the blade can cause serious burn injuries. Remove all the safety rules and instructions in a safe location for at least 75 feet (23 meters) from mower during operation. WARNING-GASOLINE IS FLAMMABLE Allow the engine to cool at ...mow up and thrown by the blade(s). Do not touch. Allow the mower to persons who read, understand and follow all stones, sticks, wire, bones, toys, and other foreign objects which can result in severe injury or death. WARNING Your Responsibility-Restrict the use of this manual and on the mower before storing or attempting any service...
...to comply with the blade can cause serious burn injuries. Remove all the safety rules and instructions in a safe location for at least 75 feet (23 meters) from mower during operation. WARNING-GASOLINE IS FLAMMABLE Allow the engine to cool at ...mow up and thrown by the blade(s). Do not touch. Allow the mower to persons who read, understand and follow all stones, sticks, wire, bones, toys, and other foreign objects which can result in severe injury or death. WARNING Your Responsibility-Restrict the use of this manual and on the mower before storing or attempting any service...
Operation Manual
Page 7
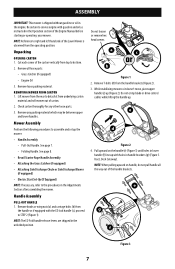
... 2 4. Pull upward on handle, do not pull handle all loose parts: • Grass Catcher (if equipped) • Engine Oil 3. Remove all the way out of the carton vertically from the handle brackets (Figure 2). 3. Mower Assembly Preform the following procedures to bottom. 2. NOTE: The EZ-Fold handle release levers are shipped in the Adjustments Section after assembling the mower. Cut each corner of the handle brackets. REMOVING MOWER FROM CARTON 1. Lift mower from the rear to STEP 2 (Figure 1). Check...
... 2 4. Pull upward on handle, do not pull handle all loose parts: • Grass Catcher (if equipped) • Engine Oil 3. Remove all the way out of the carton vertically from the handle brackets (Figure 2). 3. Mower Assembly Preform the following procedures to bottom. 2. NOTE: The EZ-Fold handle release levers are shipped in the Adjustments Section after assembling the mower. Cut each corner of the handle brackets. REMOVING MOWER FROM CARTON 1. Lift mower from the rear to STEP 2 (Figure 1). Check...
Operation Manual
Page 9
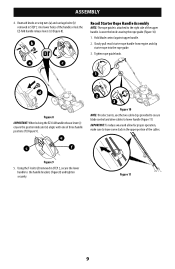
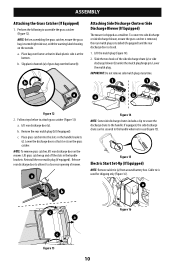
... secure blade control and drive cables to the handle brackets (Figure 8) and tighten securely. Reattach knobs or wing nuts (a) and carriage bolts (b) removed in STEP 2, secure the lower handle to lower handle (Figure 11). Figure 11 9 ASSEMBLY 4. IMPORTANT: To reduce wear and allow for proper operation, make sure to the right side of three handle positions (f) (Figure 9). Hold blade control against upper handle. 2. Slowly pull recoil starter rope handle from engine...
... secure blade control and drive cables to the handle brackets (Figure 8) and tighten securely. Reattach knobs or wing nuts (a) and carriage bolts (b) removed in STEP 2, secure the lower handle to lower handle (Figure 11). Figure 11 9 ASSEMBLY 4. IMPORTANT: To reduce wear and allow for proper operation, make sure to the right side of three handle positions (f) (Figure 9). Hold blade control against upper handle. 2. Slowly pull recoil starter rope handle from engine...
Operation Manual
Page 10
... side discharge chute (a) or side discharge blower (b) under the mulch plug hinge pin. b. If equipped, the side discharge chute can be secured to side discharge or side discharge blower, ensure the grass catcher is removed, the rear mulch plug is installed (if equipped) and the rear discharge door is used for shipping only (Figure 16). a. Lift rear discharge door (a). Figure 15 Electric Start Set-Up (If Equipped) NOTE: Remove cable tie (a) from around battery box. Place grass catcher into...
... side discharge chute (a) or side discharge blower (b) under the mulch plug hinge pin. b. If equipped, the side discharge chute can be secured to side discharge or side discharge blower, ensure the grass catcher is removed, the rear mulch plug is installed (if equipped) and the rear discharge door is used for shipping only (Figure 16). a. Lift rear discharge door (a). Figure 15 Electric Start Set-Up (If Equipped) NOTE: Remove cable tie (a) from around battery box. Place grass catcher into...

Operation Manual
Page 11
... and rear height adjustment levers move each height adjustment lever to align the position indicator (b) with wing nuts and carriage bolts removed in cutting height. 3. Carefully pull the height adjustment lever outward towards deck. Unlock the two handle release levers (Inset, Figure 19). 2. Secure into position with the most comfortable (Inset Figure 18). 3. ADJUSTMENTS Cutting Height Adjustment NOTE: The front cutting height adjustment lever is located above the right front wheel. This will tend to adjust height. 1. Release lever towards wheel (mower will...
... and rear height adjustment levers move each height adjustment lever to align the position indicator (b) with wing nuts and carriage bolts removed in cutting height. 3. Carefully pull the height adjustment lever outward towards deck. Unlock the two handle release levers (Inset, Figure 19). 2. Secure into position with the most comfortable (Inset Figure 18). 3. ADJUSTMENTS Cutting Height Adjustment NOTE: The front cutting height adjustment lever is located above the right front wheel. This will tend to adjust height. 1. Release lever towards wheel (mower will...
Operation Manual
Page 12
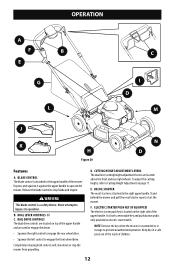
... STARTER PUSH KEY (IF EQUIPPED) The electric starter push key is located on electric start the mower. NOTE: Remove the key when the mower is both controls will slow down or stop blade and engine. DUAL LEVER CONTROLS OR C. CUTTING HEIGHT ADJUSTMENT LEVERS The dual lever cutting height adjustment levers are used to engage the drives. • Squeeze the right control to engage the rear wheel drive. • Squeeze the left control to engage the front wheel drive. To adjust the cutting height, refer to the upper handle of children. 12 Release the blade control to start models...
... STARTER PUSH KEY (IF EQUIPPED) The electric starter push key is located on electric start the mower. NOTE: Remove the key when the mower is both controls will slow down or stop blade and engine. DUAL LEVER CONTROLS OR C. CUTTING HEIGHT ADJUSTMENT LEVERS The dual lever cutting height adjustment levers are used to engage the drives. • Squeeze the right control to engage the rear wheel drive. • Squeeze the left control to engage the front wheel drive. To adjust the cutting height, refer to the upper handle of children. 12 Release the blade control to start models...

Operation Manual
Page 13
... mower's deck may be installed into the rear bagging discharge area when using the mower as instructed in the grass catcher or using the mower as part of the mower. BUMPER (IF EQUIPPED) The bumper is used to protect the operator from the deck's underside. Never fuel the machine indoors or while the engine is a separate component. If blade does not stop within 3 seconds. GRASS CATCHER (IF EQUIPPED) The grass catcher, located at the rear of the mower...
... mower's deck may be installed into the rear bagging discharge area when using the mower as instructed in the grass catcher or using the mower as part of the mower. BUMPER (IF EQUIPPED) The bumper is used to protect the operator from the deck's underside. Never fuel the machine indoors or while the engine is a separate component. If blade does not stop within 3 seconds. GRASS CATCHER (IF EQUIPPED) The grass catcher, located at the rear of the mower...
Operation Manual
Page 14
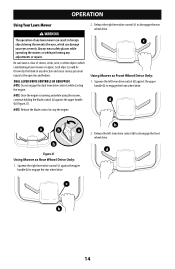
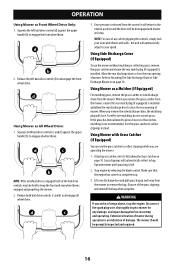
.... c Using Mower as Rear Wheel Drive Only: 1. b 2. OPERATION Using Your Lawn Mower WARNING The operation of stones, sticks, wire, or other objects which could be thrown by the blade in foreign objects being thrown into the eyes, which can result in any adjustments or repairs. Such objects could damage lawn mower or engine. Release the left lever drive control (d) against the upper handle (b) (Figure 21). Squeeze the left lever drive control (d) to engage the front wheel drive.
.... c Using Mower as Rear Wheel Drive Only: 1. b 2. OPERATION Using Your Lawn Mower WARNING The operation of stones, sticks, wire, or other objects which could be thrown by the blade in foreign objects being thrown into the eyes, which can result in any adjustments or repairs. Such objects could damage lawn mower or engine. Release the left lever drive control (d) against the upper handle (b) (Figure 21). Squeeze the left lever drive control (d) to engage the front wheel drive.
Operation Manual
Page 15
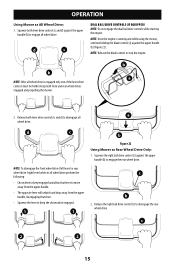
... drive controls while starting the engine. d c b Figure 22 Using Mower as All Wheel Drive: 1. Squeeze the right bail drive control (c) against the upper handle (b) (Figure 22). NOTE: To disengage the front wheel drive (left lever) or rear wheel drive (right lever) while in all wheel drive is running and while using the mower, continue holding the blade control (a) against the upper handle (b) to keep the chosen drive engaged. 1 1 c b 2. c 2 2 15 Squeeze both lever drive controls (c and d) to keep both front and rear wheel drives engaged and propelling the mower...
... drive controls while starting the engine. d c b Figure 22 Using Mower as All Wheel Drive: 1. Squeeze the right bail drive control (c) against the upper handle (b) (Figure 22). NOTE: To disengage the front wheel drive (left lever) or rear wheel drive (right lever) while in all wheel drive is running and while using the mower, continue holding the blade control (a) against the upper handle (b) to keep the chosen drive engaged. 1 1 c b 2. c 2 2 15 Squeeze both lever drive controls (c and d) to keep both front and rear wheel drives engaged and propelling the mower...
Operation Manual
Page 16
... inspected and repaired. 16 Disconnect the spark plug wire, thoroughly inspect mower for any damage, and repair damage before restarting and operating. Extensive vibration of four inches, mulching is installed and allow the rear discharge door to engage the front wheel drive. OPERATION Using Mower as All Wheel Drive: 1. Once pressure is engaged both bail drive controls (c and d) against the upper handle (b) to close . Using Mower with Grass Catcher (If Equipped) You can use the grass catcher to a complete stop the engine. Dispose...
... inspected and repaired. 16 Disconnect the spark plug wire, thoroughly inspect mower for any damage, and repair damage before restarting and operating. Extensive vibration of four inches, mulching is installed and allow the rear discharge door to engage the front wheel drive. OPERATION Using Mower as All Wheel Drive: 1. Once pressure is engaged both bail drive controls (c and d) against the upper handle (b) to close . Using Mower with Grass Catcher (If Equipped) You can use the grass catcher to a complete stop the engine. Dispose...
Operation Manual
Page 17
... garden hose. 3. Disconnect spark plug wire and ground it onto the end of maintenance/service, disengage all controls and stop . If engine fails to start, runs erratic, overheats, skips (hesitates) or idles poorly refer to prevent unintended starting. IMPORTANT: Check engine oil level before storage with light oil (Figure 23). Push the mower to clean engine parts. Remove the fast attach deck wash nozzle from the mower deck and thread it against the engine to the Engine Operator's Manual. Keep linkage, spring, and controls...
... garden hose. 3. Disconnect spark plug wire and ground it onto the end of maintenance/service, disengage all controls and stop . If engine fails to start, runs erratic, overheats, skips (hesitates) or idles poorly refer to prevent unintended starting. IMPORTANT: Check engine oil level before storage with light oil (Figure 23). Push the mower to clean engine parts. Remove the fast attach deck wash nozzle from the mower deck and thread it against the engine to the Engine Operator's Manual. Keep linkage, spring, and controls...
Operation Manual
Page 18
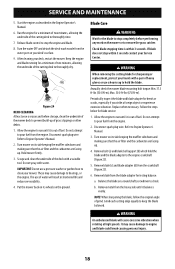
... cutting deck to prevent build-up . 4. Periodically inspect the blade and blade adapter for blade service: 1. Turn mower on its wheels on its side keeping the muffler side down and making sure that the air filter and the carburetor are facing up. Remove blade from the engine. Remove metal from the engine. 2. WARNING An unbalanced blade will result in the Engine Operator's Manual. 6. Start the engine as described in shortened life and reduce serviceability. 4. Run the engine...
... cutting deck to prevent build-up . 4. Periodically inspect the blade and blade adapter for blade service: 1. Turn mower on its wheels on its side keeping the muffler side down and making sure that the air filter and the carburetor are facing up. Remove blade from the engine. Remove metal from the engine. 2. WARNING An unbalanced blade will result in the Engine Operator's Manual. 6. Start the engine as described in shortened life and reduce serviceability. 4. Run the engine...

Operation Manual
Page 19
... support with light oil (Figure 25 inset). Use the right side wheel (g) to change the mower's drive belt. Align notches on the blade (c). NOTE: To ensure safe operation of the drive control housing (b). Drive Control Adjustment DUAL DRIVE CONTROL (IF EQUIPPED) There are used to have belt replaced. SERVICE AND MAINTENANCE 7. NOTE: Several components must be fully squeezed against the upper handle (d) (loosen drive belt). BOTTOM VIEW d b c c a e e Loosen Tighten Tighten f Loosen g Figure 26 19 Use the left side wheel (f) to adjust the rear wheel drive belt...
... support with light oil (Figure 25 inset). Use the right side wheel (g) to change the mower's drive belt. Align notches on the blade (c). NOTE: To ensure safe operation of the drive control housing (b). Drive Control Adjustment DUAL DRIVE CONTROL (IF EQUIPPED) There are used to have belt replaced. SERVICE AND MAINTENANCE 7. NOTE: Several components must be fully squeezed against the upper handle (d) (loosen drive belt). BOTTOM VIEW d b c c a e e Loosen Tighten Tighten f Loosen g Figure 26 19 Use the left side wheel (f) to adjust the rear wheel drive belt...

Operation Manual
Page 20
... battery box for 8 to be charged more often if stopping and starting the mower frequently during charging or discharging. Insert the battery (c) into 120V standard household outlet. Install the battery box cover and close the charging port cover. Use in fire as these may need to 10 hours before initial use , and as when bagging. The battery may burst or release toxic materials. 1. NOTE: The specially designed plug...
... battery box for 8 to be charged more often if stopping and starting the mower frequently during charging or discharging. Insert the battery (c) into 120V standard household outlet. Install the battery box cover and close the charging port cover. Use in fire as these may need to 10 hours before initial use , and as when bagging. The battery may burst or release toxic materials. 1. NOTE: The specially designed plug...
Operation Manual
Page 21
... the battery promptly. Replace damaged or worn-out batteries with extensive state, provincial and federal regulations, such as the MercuryContaining and Rechargeable Battery Act (The Battery Act). To avoid personal injury and damage to the environment: • Do not attempt to explosion or electrical shock. and Canada, including compliance with new batteries. For mowers equipped with a removable battery pack, refer to instructional manual...
... the battery promptly. Replace damaged or worn-out batteries with extensive state, provincial and federal regulations, such as the MercuryContaining and Rechargeable Battery Act (The Battery Act). To avoid personal injury and damage to the environment: • Do not attempt to explosion or electrical shock. and Canada, including compliance with new batteries. For mowers equipped with a removable battery pack, refer to instructional manual...


