Operation Manual
Page 3
... emit chemicals known to State of all times until the cap ratchets. 9. Move the machine to stop the engine and disengage them quickly. 3. Clean up oil or fuel spillage and remove any adjustments while the engine is spilled on the ground. This engine was built to cause cancer and birth defects...
... emit chemicals known to State of all times until the cap ratchets. 9. Move the machine to stop the engine and disengage them quickly. 3. Clean up oil or fuel spillage and remove any adjustments while the engine is spilled on the ground. This engine was built to cause cancer and birth defects...
Operation Manual
Page 4
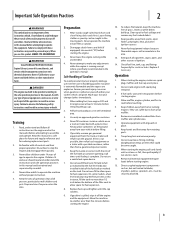
Never tamper with factory setting of engine governor. Check bolts and screws for gas, oil, etc. Observe proper disposal laws and regulations for proper tightness at unsafe speeds. Do not modify engine To avoid serious injury or death, do this ...
Never tamper with factory setting of engine governor. Check bolts and screws for gas, oil, etc. Observe proper disposal laws and regulations for proper tightness at unsafe speeds. Do not modify engine To avoid serious injury or death, do this ...
Operation Manual
Page 5
...shorten the engine's service life. Upper Level Figure 3-2 3. WARNING! Use a 4-stroke, or an equivalent high detergent, premium quality motor oil certified to check the oil level. 4. If any source of ignition until fuel reaches 1⁄2 inch below . 30 Synthetic 5W-30 10W-30 5W-30 (º...º 30º 50º 70º 85º 105º Figure 3-1 CAUTION: Do not use non-detergent oil or 2-stroke engine oil. Set-Up 3 Gas & Oil NOTE: The engine is used, select the appropriate viscosity for the average temperature in your engine's carburetor. Remove dipstick to meet...
...shorten the engine's service life. Upper Level Figure 3-2 3. WARNING! Use a 4-stroke, or an equivalent high detergent, premium quality motor oil certified to check the oil level. 4. If any source of ignition until fuel reaches 1⁄2 inch below . 30 Synthetic 5W-30 10W-30 5W-30 (º...º 30º 50º 70º 85º 105º Figure 3-1 CAUTION: Do not use non-detergent oil or 2-stroke engine oil. Set-Up 3 Gas & Oil NOTE: The engine is used, select the appropriate viscosity for the average temperature in your engine's carburetor. Remove dipstick to meet...
Operation Manual
Page 6
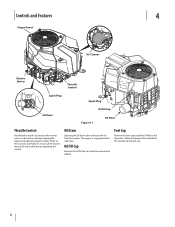
... add fuel. Fuel Cap Remove the fuel cap to check the oil level and add oil. Refer to aid in starting/stopping the engine and adjusting engine speeds. Oil Drain Opening the oil drain valve will drain the oil from the engine. Refer to the Operator's Manual shipped with a... of the fuel cap. 6 Controls and Features 4 Finger Guard Air Cleaner Electric Starter Throttle Control Spark Plug Spark Plug Oil Drain Oil Fill Cap Figure 4-1 Oil Filter Throttle Control The throttle control is located on the mower and is equipped with machine for more information regarding this control...
... add fuel. Fuel Cap Remove the fuel cap to check the oil level and add oil. Refer to aid in starting/stopping the engine and adjusting engine speeds. Oil Drain Opening the oil drain valve will drain the oil from the engine. Refer to the Operator's Manual shipped with a... of the fuel cap. 6 Controls and Features 4 Finger Guard Air Cleaner Electric Starter Throttle Control Spark Plug Spark Plug Oil Drain Oil Fill Cap Figure 4-1 Oil Filter Throttle Control The throttle control is located on the mower and is equipped with machine for more information regarding this control...
Operation Manual
Page 7
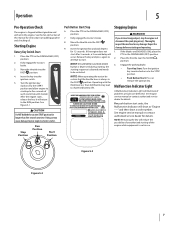
... service dealer for details. See Figure 5-1. CAUTION Do NOT hold the key in the START position for instructions on adding gasoline and checking oil. Place the throttle near the SLOW position. 3. See engine service manual or contact authorized service dealer for details. Figure 5-3 Figure 5-2 ...7 Turn the ignition key clockwise to the START position and allow engine to crank up to the RUN position. Operating with oil in the DISENGAGED (OFF) position. 2. If you strike a foreign object, stop the engine and disconnect the spark plug wire(s). Engage the ...
... service dealer for details. See Figure 5-1. CAUTION Do NOT hold the key in the START position for instructions on adding gasoline and checking oil. Place the throttle near the SLOW position. 3. See engine service manual or contact authorized service dealer for details. Figure 5-3 Figure 5-2 ...7 Turn the ignition key clockwise to the START position and allow engine to crank up to the RUN position. Operating with oil in the DISENGAGED (OFF) position. 2. If you strike a foreign object, stop the engine and disconnect the spark plug wire(s). Engage the ...
Operation Manual
Page 8
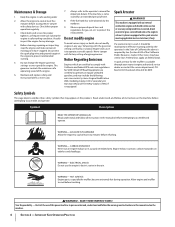
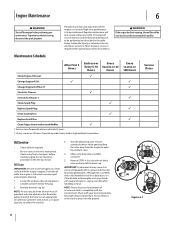
...the plug. 2. Maintenance Schedule After First 5 Hours Each use or Every 5-10 Hours Every Season or 25 Hours Check Engine Oil Level Change Engine Oil †† Change Engine Oil FIlter †† P P Check Air Cleaner P Service Air Cleaner † Check Spark Plug P Replace Spark Plug Clean... Cooling Fins P Replace Fuel Filter Clean Finger Guard and around Muffler P † Service more frequently when used oil. 3. Drain the oil while the engine is required when operating in the trash or pour it on a level surface with soap and water as soon ...
...the plug. 2. Maintenance Schedule After First 5 Hours Each use or Every 5-10 Hours Every Season or 25 Hours Check Engine Oil Level Change Engine Oil †† Change Engine Oil FIlter †† P P Check Air Cleaner P Service Air Cleaner † Check Spark Plug P Replace Spark Plug Clean... Cooling Fins P Replace Fuel Filter Clean Finger Guard and around Muffler P † Service more frequently when used oil. 3. Drain the oil while the engine is required when operating in the trash or pour it on a level surface with soap and water as soon ...
Operation Manual
Page 9
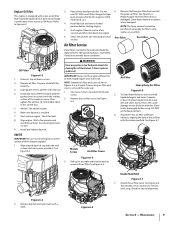
...and then shut down the engine. 6. Figure 6-4 3. Check for leaks. 1 8. Remove dipstick and wipe clean with the intake manifold. With an oil filter change is only sold as an assembly. Air Filter Service Paper filters cannot be cleaned and should be replaced each time an... before starting engine. 5. See Figure 6-5. Figure 6-3 2. Refer to rinse out dirt and water. Install dipstick and turn . 5. See Checking Oil Level section. more often if used in a mild liquid detergent and water. Air filter is performed, every season or 100 hours. Figure 6-2 1. Remove...
...and then shut down the engine. 6. Figure 6-4 3. Check for leaks. 1 8. Remove dipstick and wipe clean with the intake manifold. With an oil filter change is only sold as an assembly. Air Filter Service Paper filters cannot be cleaned and should be replaced each time an... before starting engine. 5. See Figure 6-5. Figure 6-3 2. Refer to rinse out dirt and water. Install dipstick and turn . 5. See Checking Oil Level section. more often if used in a mild liquid detergent and water. Air filter is performed, every season or 100 hours. Figure 6-2 1. Remove...
Operation Manual
Page 10
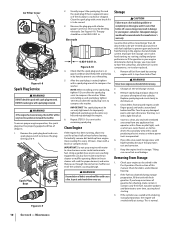
...of this manual. Using a garden hose or pressure washing equipment can become very hot and may result in the Pre-Operation Check section of oil. 5. Replace spark plug and crank slowly to remove the plug. Removing From Storage 1. Maintenance See Figure 6-9. See Figure 6-10. When ...motor, or where power tools are operated. 6. This is cracked or chipped. WARNING! Figure 6-10 4. WARNING! If the gasoline in . Change oil. If possible, also avoid storage areas with a brush or compressed air. Clean with high humidity, because that may need to compress the washer. ...
...of this manual. Using a garden hose or pressure washing equipment can become very hot and may result in the Pre-Operation Check section of oil. 5. Replace spark plug and crank slowly to remove the plug. Removing From Storage 1. Maintenance See Figure 6-9. See Figure 6-10. When ...motor, or where power tools are operated. 6. This is cracked or chipped. WARNING! Figure 6-10 4. WARNING! If the gasoline in . Change oil. If possible, also avoid storage areas with a brush or compressed air. Clean with high humidity, because that may need to compress the washer. ...
Operation Manual
Page 11
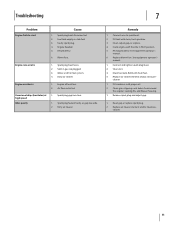
Engine flooded. 5. Vent in fuel system. 4. Dirty air cleaner. Fill tank with proper oil. 2. Clear vent. 3. Fill crankcase with clean, fresh gasoline. 3. cleaner. 11 Fuel tank empty or stale fuel. 3. Blown ... adjust gap. 1. Spark plug boot disconnected. 2. Dead battery. 6. Spark plug boot loose. 2. high speed Idles poorly 1. Remedy 1. Drain fuel tank. Engine oil level low. 2. Crank engine with fresh fuel. 4. Faulty spark plug. 4. Troubleshooting 7 Problem Engine Fails to spark boot. 2. Engine runs erratic 1. Engine overheats...
Engine flooded. 5. Vent in fuel system. 4. Dirty air cleaner. Fill tank with proper oil. 2. Clear vent. 3. Fill crankcase with clean, fresh gasoline. 3. cleaner. 11 Fuel tank empty or stale fuel. 3. Blown ... adjust gap. 1. Spark plug boot disconnected. 2. Dead battery. 6. Spark plug boot loose. 2. high speed Idles poorly 1. Remedy 1. Drain fuel tank. Engine oil level low. 2. Crank engine with fresh fuel. 4. Faulty spark plug. 4. Troubleshooting 7 Problem Engine Fails to spark boot. 2. Engine runs erratic 1. Engine overheats...
Operation Manual
Page 12
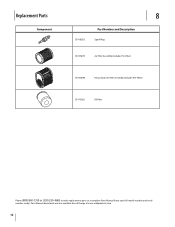
Replacement Parts Component 8 951-10292 Part Number and Description Spark Plug 937-05075 Air Filter Assembly (Includes Pre-Filter) 937-05094 Heavy Duty Air Filter Assembly (Includes Pre-Filter) 951-15362 Oil Filter Phone (800) 800-7310 or (330) 220-4683 to order replacement parts or a complete Parts Manual (have your full model number and serial number ready). Parts Manual downloads are also available free of charge at www.mtdproducts.com. 12
Replacement Parts Component 8 951-10292 Part Number and Description Spark Plug 937-05075 Air Filter Assembly (Includes Pre-Filter) 937-05094 Heavy Duty Air Filter Assembly (Includes Pre-Filter) 951-15362 Oil Filter Phone (800) 800-7310 or (330) 220-4683 to order replacement parts or a complete Parts Manual (have your full model number and serial number ready). Parts Manual downloads are also available free of charge at www.mtdproducts.com. 12
Parts and Warranty
Page 2
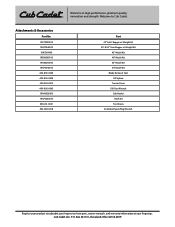
... Bagger w/ Weight Kit 42" Mulch Kit 46" Mulch Kit 50" Mulch Kit 54" Mulch Kit Blade Removal Tool Oil Siphon Tractor Cover Oil Filter Wrench Cub Hauler Hitch Kit Tire Chains Extended Spark Plug Wrench Cub Cadet LLC, P.O. Attachments & Accessories Part No. 19C70020100 19A70043100 19A7004100 19B30005100 19A30016100 19A70042100 490-850-0005 490-850-0008 490-290...
... Bagger w/ Weight Kit 42" Mulch Kit 46" Mulch Kit 50" Mulch Kit 54" Mulch Kit Blade Removal Tool Oil Siphon Tractor Cover Oil Filter Wrench Cub Hauler Hitch Kit Tire Chains Extended Spark Plug Wrench Cub Cadet LLC, P.O. Attachments & Accessories Part No. 19C70020100 19A70043100 19A7004100 19B30005100 19A30016100 19A70042100 490-850-0005 490-850-0008 490-290...
Parts and Warranty
Page 5
... the date of original purchase by the Initial Purchaser. Scope of the Limited Warranty Cub Cadet LLC offers the following (the "Exclusions"): TEMPORARILY REPLACE A WARRANTED PRODUCT. (SOME STATES 1. Loss of time or loss of use of the RZT. specified fuel, oil or lubricants as : belts, blades, blade adapters, grass bags, rider deck wheels, seats...
... the date of original purchase by the Initial Purchaser. Scope of the Limited Warranty Cub Cadet LLC offers the following (the "Exclusions"): TEMPORARILY REPLACE A WARRANTED PRODUCT. (SOME STATES 1. Loss of time or loss of use of the RZT. specified fuel, oil or lubricants as : belts, blades, blade adapters, grass bags, rider deck wheels, seats...


