
Parts and Warranty
Page 1
...-To video; Box 361131 • Cleveland, OH • 44136-0019 Replacement Parts Attachments & Accessories Part Number Description 754-05158 Deck Belt 754-05336 Drive Belt 942-05052A Blade 618-07288 Spindle Assembly 925-1707D Battery 951-12179B Fuel Cap 746-05333 Throttle/Choke Control 625-05000 Key 746-05331 Brake Cable 631-05439 Chute Deflector 634-05318A Rear Wheel Assembly 634-04237B Front Wheel Assembly Part Number 19A70051OEM Mulch Kit 19A70052OEM Bagger Kit 19A70025100 Hitch Kit Description Cub Cadet LLC, P.O. Welcome to the retailer or dealer without first...
...-To video; Box 361131 • Cleveland, OH • 44136-0019 Replacement Parts Attachments & Accessories Part Number Description 754-05158 Deck Belt 754-05336 Drive Belt 942-05052A Blade 618-07288 Spindle Assembly 925-1707D Battery 951-12179B Fuel Cap 746-05333 Throttle/Choke Control 625-05000 Key 746-05331 Brake Cable 631-05439 Chute Deflector 634-05318A Rear Wheel Assembly 634-04237B Front Wheel Assembly Part Number 19A70051OEM Mulch Kit 19A70052OEM Bagger Kit 19A70025100 Hitch Kit Description Cub Cadet LLC, P.O. Welcome to the retailer or dealer without first...
Parts and Warranty
Page 2
... those products certified for sale in the state of California, the California Air Resources Board (CARB) are pleased to the owner. Repair or replacement of a non-exempted add-on your outdoor equipment, but MTD Consumer Group Inc cannot deny warranty solely for two years. Throughout the off -road spark ignition engine regulations). Such use of any emission-related part on your outdoor...
... those products certified for sale in the state of California, the California Air Resources Board (CARB) are pleased to the owner. Repair or replacement of a non-exempted add-on your outdoor equipment, but MTD Consumer Group Inc cannot deny warranty solely for two years. Throughout the off -road spark ignition engine regulations). Such use of any emission-related part on your outdoor...

Parts and Warranty
Page 3
... improper maintenance was the direct cause of the need for repair or replacement of a component that has a factory installed, and properly operating, adjustment limiting device is still eligible for warranty coverage. Evaporative Control • Fuel hose • Fuel hose clamps • Tethered fuel cap • Carbon canister • Vapor lines 063015 Rev. The following emission warranty parts are covered (if applicable): 1. D WARRANTED PARTS: The repair or replacement of any adjustment of the part.
... improper maintenance was the direct cause of the need for repair or replacement of a component that has a factory installed, and properly operating, adjustment limiting device is still eligible for warranty coverage. Evaporative Control • Fuel hose • Fuel hose clamps • Tethered fuel cap • Carbon canister • Vapor lines 063015 Rev. The following emission warranty parts are covered (if applicable): 1. D WARRANTED PARTS: The repair or replacement of any adjustment of the part.

Parts and Warranty
Page 4
... resulting from the installation or use of original purchase by Cub Cadet LLC and is three (3) years or 120 hours, whichever comes first, from the date of purchase as defined herein) have been used in material and workmanship for manufacturing defects. 10. federal law. This limited warranty is not a Federal Emission Control Warranty Statement as : belts, blades, blade adapters, grass bags, rider deck wheels, seats, tires, batteries, filters and other...
... resulting from the installation or use of original purchase by Cub Cadet LLC and is three (3) years or 120 hours, whichever comes first, from the date of purchase as defined herein) have been used in material and workmanship for manufacturing defects. 10. federal law. This limited warranty is not a Federal Emission Control Warranty Statement as : belts, blades, blade adapters, grass bags, rider deck wheels, seats, tires, batteries, filters and other...
Operation Manual
Page 2
.... Have your new engine. Choose from the experts. Table of Contents Important Safe Operation Practices 3 Safety Labels 5 Set-Up 6 Controls & Features 8 Operation 9 Maintenance & Adjustments 11 Troubleshooting 15 Replacement Parts 16 Spanish 21 Record Product Information Before operating your local dealer. This information will help from the options below . To The Owner 1 Thank You This Operator's Manual is an important part of your full model number and serial number ready. It...
.... Have your new engine. Choose from the experts. Table of Contents Important Safe Operation Practices 3 Safety Labels 5 Set-Up 6 Controls & Features 8 Operation 9 Maintenance & Adjustments 11 Troubleshooting 15 Replacement Parts 16 Spanish 21 Record Product Information Before operating your local dealer. This information will help from the options below . To The Owner 1 Thank You This Operator's Manual is an important part of your full model number and serial number ready. It...

Operation Manual
Page 3
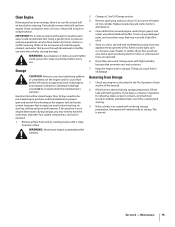
... this is running while unattended. 4. Fill fuel tank outdoors or in bare feet or sandals. 2. Keep the nozzle in the manual(s) before removing the gas cap. 2. Do not use extreme care in serious injury or death. This symbol points out important safety instructions which can ignite. Preparation 1. Disengage clutch levers and shift (if equipped) into neutral ("N") before filling. 5. Wash your vehicle before starting the engine. 3. Read and...
... this is running while unattended. 4. Fill fuel tank outdoors or in bare feet or sandals. 2. Keep the nozzle in the manual(s) before removing the gas cap. 2. Do not use extreme care in serious injury or death. This symbol points out important safety instructions which can ignite. Preparation 1. Disengage clutch levers and shift (if equipped) into neutral ("N") before filling. 5. Wash your vehicle before starting the engine. 3. Read and...

Operation Manual
Page 4
... setting can suffer burns from rotating parts. 9. Tampering with safety devices. If a spark arrestor is used on the tank. In the State of ignition. 14. Replace fuel cap and tighten until resistance is required by the fuel level indicator installed inside of engine governor. Wait five minutes before storing. Never fuel equipment indoors because flammable vapors will accumulate in effective working order by the operator. When starting the engine, pull...
... setting can suffer burns from rotating parts. 9. Tampering with safety devices. If a spark arrestor is used on the tank. In the State of ignition. 14. Replace fuel cap and tighten until resistance is required by the fuel level indicator installed inside of engine governor. Wait five minutes before storing. Never fuel equipment indoors because flammable vapors will accumulate in effective working order by the operator. When starting the engine, pull...
Operation Manual
Page 6
... of air cleaner. Remove the oil filler cap/dipstick and wipe the dipstick clean. 2. Turn the dipstick a 1/4 turn to locked position before operating. See Figure 3-2 inset. 5. Overfilling with oil may be used , select the appropriate viscosity for the average temperature in the engine. Figure 3-1 CAUTION: Do not use a pressurized starting the engine. Oil Recommendations Before starting , spark plug fouling, or oil saturation of equipment moving parts. If single viscosity oil is...
... of air cleaner. Remove the oil filler cap/dipstick and wipe the dipstick clean. 2. Turn the dipstick a 1/4 turn to locked position before operating. See Figure 3-2 inset. 5. Overfilling with oil may be used , select the appropriate viscosity for the average temperature in the engine. Figure 3-1 CAUTION: Do not use a pressurized starting the engine. Oil Recommendations Before starting , spark plug fouling, or oil saturation of equipment moving parts. If single viscosity oil is...

Operation Manual
Page 7
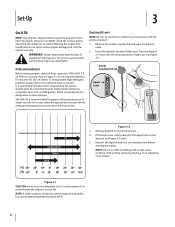
... fresh and clean. Replace the gasoline cap and tighten securely. Wipe up to your engine's carburetor. Set-Up 7 Use automotive gasoline (unleaded or low leaded to overfill. 3. WARNING! Adding Fuel WARNING! To prevent injury or death from engine. Be careful not to minimize combustion chamber deposits) with the engine stopped. Gasoline (fuel) vapors are gone. If fuel is explosive under the manufacturer's warranty.
... fresh and clean. Replace the gasoline cap and tighten securely. Wipe up to your engine's carburetor. Set-Up 7 Use automotive gasoline (unleaded or low leaded to overfill. 3. WARNING! Adding Fuel WARNING! To prevent injury or death from engine. Be careful not to minimize combustion chamber deposits) with the engine stopped. Gasoline (fuel) vapors are gone. If fuel is explosive under the manufacturer's warranty.

Operation Manual
Page 8
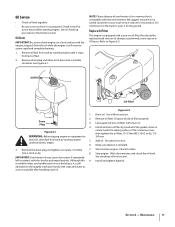
Remove the oil fill cap to add fuel. Controls and Features 4 Finger Guard† Oil Fill Cap Air Cleaner Electric Starter Oil Drain Muffler Spark Plug Fuel Filter †If Equipped Carburetor Oil Filter Figure 4-1 Throttle/Choke Control Oil Fill Cap The throttle/choke control is located on the mower and is equipped with a side drain. Oil Drain Removing the oil drain plug will drain the oil from the engine. Fuel Cap Remove the fuel cap to check the oil level and add oil. The engine is used to aid in starting/stopping the engine and adjusting engine speeds. Refer to ...
Remove the oil fill cap to add fuel. Controls and Features 4 Finger Guard† Oil Fill Cap Air Cleaner Electric Starter Oil Drain Muffler Spark Plug Fuel Filter †If Equipped Carburetor Oil Filter Figure 4-1 Throttle/Choke Control Oil Fill Cap The throttle/choke control is located on the mower and is equipped with a side drain. Oil Drain Removing the oil drain plug will drain the oil from the engine. Fuel Cap Remove the fuel cap to check the oil level and add oil. The engine is used to aid in starting/stopping the engine and adjusting engine speeds. Refer to ...
Operation Manual
Page 9
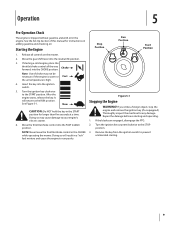
... longer than five seconds at a time. Release all the way Choke forward, into the neutral (N) position. 3. Move the throttle/choke control into the ignition switch. 5. Operation 5 Pre-Operation Check The engine is high. 4. See the Set-Up Section of choke may cause damage to the STOP position. 3. Stop Position Run Position Start Position Figure 5-1 Stopping the Engine WARNING! If the blades are engaged, disengage the PTO. 2. Turn the ignition key counterclockwise to your engine's electric starter. 6.
... longer than five seconds at a time. Release all the way Choke forward, into the neutral (N) position. 3. Move the throttle/choke control into the ignition switch. 5. Operation 5 Pre-Operation Check The engine is high. 4. See the Set-Up Section of choke may cause damage to the STOP position. 3. Stop Position Run Position Start Position Figure 5-1 Stopping the Engine WARNING! If the blades are engaged, disengage the PTO. 2. Turn the ignition key counterclockwise to your engine's electric starter. 6.
Operation Manual
Page 10
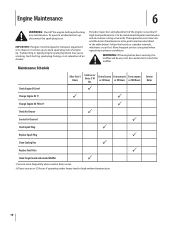
... the engine has been running, the muffler will also ensure a long service life. Every Season Every season Every season or 25 Hours or 50 Hours or 100 Hours Service Dates Check Engine Oil Level P Change Engine Oil †† P P Change Engine Oil FIlter †† P Check Air Cleaner P Service Air Cleaner † P Check Spark Plug P Replace Spark Plug P Clean Cooling Fins P Replace Fuel Filter P Clean Finger Guard and around Muffler P † Service more frequently when used in the table below. Engine Maintenance 6 WARNING...
... the engine has been running, the muffler will also ensure a long service life. Every Season Every season Every season or 25 Hours or 50 Hours or 100 Hours Service Dates Check Engine Oil Level P Change Engine Oil †† P P Change Engine Oil FIlter †† P Check Air Cleaner P Service Air Cleaner † P Check Spark Plug P Replace Spark Plug P Clean Cooling Fins P Replace Fuel Filter P Clean Finger Guard and around Muffler P † Service more frequently when used in the table below. Engine Maintenance 6 WARNING...
Operation Manual
Page 11
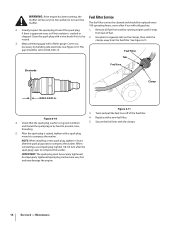
... suggest you handle used oil on a level surface with the engine stopped. Remove oil filter. Install and turn . Reinstall the drain plug and tighten it stops from lack of fuel. 2. left in -lb), 1/23/4 turn oil filter by hand until the gasket comes in contact with the sealing surface of used oil. Oil Drain IMPORTANT: Be sure to assure rapid and complete draining. 1. Remove all fuel from tank by running engine 5. Remove drain plug and allow oil to Figure 6-2. Replace Oil Filter This engine is...
... suggest you handle used oil on a level surface with the engine stopped. Remove oil filter. Install and turn . Reinstall the drain plug and tighten it stops from lack of fuel. 2. left in -lb), 1/23/4 turn oil filter by hand until the gasket comes in contact with the sealing surface of used oil. Oil Drain IMPORTANT: Be sure to assure rapid and complete draining. 1. Remove all fuel from tank by running engine 5. Remove drain plug and allow oil to Figure 6-2. Replace Oil Filter This engine is...

Operation Manual
Page 12
... before starting engine. 5. With an oil filter change the high level amount of oil for cleaning the air filter element. Start engine. Check the oil level. WARNING: Never use gasoline or low flash point solvents for this engine is 1700 ml (57.48 fl-oz.). 4. engine stopped. 1. Do not over fill. Air Filter Service Paper filters cannot be cleaned and should be replaced every 100 operating hours; Figure 6-4 a. Remove thumb screw. b. See Figure 6-5. See Figure 6-3. See Checking Oil Level...
... before starting engine. 5. With an oil filter change the high level amount of oil for cleaning the air filter element. Start engine. Check the oil level. WARNING: Never use gasoline or low flash point solvents for this engine is 1700 ml (57.48 fl-oz.). 4. engine stopped. 1. Do not over fill. Air Filter Service Paper filters cannot be cleaned and should be replaced every 100 operating hours; Figure 6-4 a. Remove thumb screw. b. See Figure 6-5. See Figure 6-3. See Checking Oil Level...

Operation Manual
Page 13
...-filter from around the paper air 5. See Figure 6-6. Spark Plug Figure 6-7 Intake Manifold Spark Plug Boot Figure 6-9 Section 6 - See Figure 6-8. To ensure proper engine operation, the spark plug must be properly gapped and free of deposits. 1. Clean foam element or replace when damaged. Attach the new air filter with thumb screw. See Figure 6-9. this could damage or tear the foam Spark Plug Service element. Secure with foam element, aligning the plug removed...
...-filter from around the paper air 5. See Figure 6-6. Spark Plug Figure 6-7 Intake Manifold Spark Plug Boot Figure 6-9 Section 6 - See Figure 6-8. To ensure proper engine operation, the spark plug must be properly gapped and free of deposits. 1. Clean foam element or replace when damaged. Attach the new air filter with thumb screw. See Figure 6-9. this could damage or tear the foam Spark Plug Service element. Secure with foam element, aligning the plug removed...
Operation Manual
Page 14
... touch the muffler. Measure the plug gap with a wire brush if it stops from the fuel filter. Correct as necessary by running , the muffler will be replaced every 100 operating hours; Twist and pull the fuel lines off of fuel. Check that the spark plug washer is cracked or 1. When reinstalling a used spark plug, tighten 1/8-1/4 turn after the spark plug seats to prevent crossthreading. 4. Maintenance Discard the spark plug if there is apparent wear, or...
... touch the muffler. Measure the plug gap with a wire brush if it stops from the fuel filter. Correct as necessary by running , the muffler will be replaced every 100 operating hours; Twist and pull the fuel lines off of fuel. Check that the spark plug washer is cracked or 1. When reinstalling a used spark plug, tighten 1/8-1/4 turn after the spark plug seats to prevent crossthreading. 4. Maintenance Discard the spark plug if there is apparent wear, or...
Operation Manual
Page 15
... avoid storage areas with a spark producing electric motor, or where power tools are operated. 6. Using a garden hose or pressure washing equipment can enter the cylinder, causing damage. Replace spark plug and crank slowly to use . Clean Engine If the engine has been running, allow it to cool for refueling, make certain it contains only fresh fuel. Periodically remove dirt build-up any area with high humidity, because that may...
... avoid storage areas with a spark producing electric motor, or where power tools are operated. 6. Using a garden hose or pressure washing equipment can enter the cylinder, causing damage. Replace spark plug and crank slowly to use . Clean Engine If the engine has been running, allow it to cool for refueling, make certain it contains only fresh fuel. Periodically remove dirt build-up any area with high humidity, because that may...
Operation Manual
Page 16
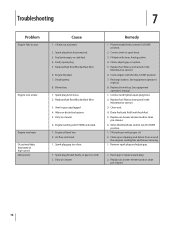
...Fill tank with CHOKE activated. 1. Replace blown fuse. Move throttle/choke control out of CHOKE position. 1. Remove spark plug and adjust gap. 1. Faulty spark plug. 5. Spark plug gap too close. Recharge battery. Replace fuel filter as instructed in FAST position. 7. Clean grass clippings and debris from around the engine's cooling fins and blower housing. 1. Dirty air cleaner. 1. Engine running with clean, fresh gasoline. 4. Fill crankcase with throttle in the Maintenance section. 6. Fuel tank empty or stale fuel. 4. Dead battery. 8. Engine oil level low...
...Fill tank with CHOKE activated. 1. Replace blown fuse. Move throttle/choke control out of CHOKE position. 1. Remove spark plug and adjust gap. 1. Faulty spark plug. 5. Spark plug gap too close. Recharge battery. Replace fuel filter as instructed in FAST position. 7. Clean grass clippings and debris from around the engine's cooling fins and blower housing. 1. Dirty air cleaner. 1. Engine running with clean, fresh gasoline. 4. Fill crankcase with throttle in the Maintenance section. 6. Fuel tank empty or stale fuel. 4. Dead battery. 8. Engine oil level low...
Operation Manual
Page 19
... the problem exists. Any such part repaired or replaced under warranty will be warranted for the remainder of the period prior to the first scheduled replacement point for damages to the ultimate purchaser and each subsequent purchaser that the outdoor equipment is: (1) designed, built, and equipped so as the carburetor, fuel-injection system, ignition system, catalytic converter, fuel tanks, fuel lines, fuel caps, valves, canisters, filters, vapor hoses...
... the problem exists. Any such part repaired or replaced under warranty will be warranted for the remainder of the period prior to the first scheduled replacement point for damages to the ultimate purchaser and each subsequent purchaser that the outdoor equipment is: (1) designed, built, and equipped so as the carburetor, fuel-injection system, ignition system, catalytic converter, fuel tanks, fuel lines, fuel caps, valves, canisters, filters, vapor hoses...

Operation Manual
Page 20
... start enrichment system (soft choke) • Carburetor and internal parts (or fuel injection system) • Fuel pump • Fuel tank 2. Any replacement part may be used in Above System • Vacuum, temperature, position, time sensitive valves and switches • Connectors and assemblies 6. Such use will not be liable to meet the expected demand for disallowing a warranty claim. Further, the coverage under this warranty extends only to the owner. Air...
... start enrichment system (soft choke) • Carburetor and internal parts (or fuel injection system) • Fuel pump • Fuel tank 2. Any replacement part may be used in Above System • Vacuum, temperature, position, time sensitive valves and switches • Connectors and assemblies 6. Such use will not be liable to meet the expected demand for disallowing a warranty claim. Further, the coverage under this warranty extends only to the owner. Air...


