

RZT Brochure
Page 1
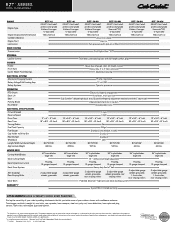
...the neighborhood. Combined with optimal airflow, blade overlap and floating deck for the perfect cut. cubcadet.com locate A DEALER AT CUBCADET.COM Innovations no one else can handle some of any residential zero-turn. Cub Cadet's RZT™ Series offers the most legroom of the toughest terrain... to mow. zero-turn riders RZT™ SERIES RZT™ 42 RZT™ 46 RZT™ 50-kH RZT™ 50-kW RZT™ 54-kH RZT™ 54-kW designed for Homeowner use with a test drive. FEATURES 42", 46" TWIN-BLADE AND 50", 54" TRIPLE-BLADE DECKS heavy-duty steel frame ANTI-SCALPING...
...the neighborhood. Combined with optimal airflow, blade overlap and floating deck for the perfect cut. cubcadet.com locate A DEALER AT CUBCADET.COM Innovations no one else can handle some of any residential zero-turn. Cub Cadet's RZT™ Series offers the most legroom of the toughest terrain... to mow. zero-turn riders RZT™ SERIES RZT™ 42 RZT™ 46 RZT™ 50-kH RZT™ 50-kW RZT™ 54-kH RZT™ 54-kW designed for Homeowner use with a test drive. FEATURES 42", 46" TWIN-BLADE AND 50", 54" TRIPLE-BLADE DECKS heavy-duty steel frame ANTI-SCALPING...
RZT Brochure
Page 2
... system Anti Scalping/ Rear Striping Roller Deck wash WARRANTY † RZT™ 42 22 HP* Cub Cadet® professional-grade Kohler® Courage® V-Twin OHV 725cc/vertical RZT™ 46 22 HP* Cub Cadet® professional-grade Kohler® Courage® V-Twin OHV 725cc/vertical RZT™ 50-kh RZT™ 50-kw 23 HP* Cub Cadet® professional-grade Kohler® Courage...
... system Anti Scalping/ Rear Striping Roller Deck wash WARRANTY † RZT™ 42 22 HP* Cub Cadet® professional-grade Kohler® Courage® V-Twin OHV 725cc/vertical RZT™ 46 22 HP* Cub Cadet® professional-grade Kohler® Courage® V-Twin OHV 725cc/vertical RZT™ 50-kh RZT™ 50-kw 23 HP* Cub Cadet® professional-grade Kohler® Courage...
RZT Warranty Information
Page 1
...authorized service dealer. This warranty is in material and workmanship for whom it was purchased as : belts, blades, blade adapters, grass bags, rider deck wheels, seats, and tires. Box 361131, Cleveland, Ohio 44136-0019, call 1-800668-1238 or log on to items such as a gift. No... or replacement lawn care services or for information on how long an implied warranty lasts, so the above . CUB CADET LLC MANUFACTURER'S LIMITED WARRANTY FOR RESIDENTIAL ZERO-TURN ("RZT") MOWERS IMPORTANT: To obtain warranty coverage owner must present an original proof of original sale or lease. Without ...
...authorized service dealer. This warranty is in material and workmanship for whom it was purchased as : belts, blades, blade adapters, grass bags, rider deck wheels, seats, and tires. Box 361131, Cleveland, Ohio 44136-0019, call 1-800668-1238 or log on to items such as a gift. No... or replacement lawn care services or for information on how long an implied warranty lasts, so the above . CUB CADET LLC MANUFACTURER'S LIMITED WARRANTY FOR RESIDENTIAL ZERO-TURN ("RZT") MOWERS IMPORTANT: To obtain warranty coverage owner must present an original proof of original sale or lease. Without ...
RZT 42 Operator's Manual
Page 3
.... Never allow adults to operate this machine in serious injury. Always wear safety glasses or safety goggles during machine. Never allow children under the cutting deck. Loose fitting clothes and jewelry can result in 5. caught in operation. Never operate this 8. keep bystanders, helpers, children and pets at anyone enters the area...
.... Never allow adults to operate this machine in serious injury. Always wear safety glasses or safety goggles during machine. Never allow children under the cutting deck. Loose fitting clothes and jewelry can result in 5. caught in operation. Never operate this 8. keep bystanders, helpers, children and pets at anyone enters the area...

RZT 42 Operator's Manual
Page 4
... if an edge caves in reverse. If the tires are involved in serious injury. 1. The mower could overturn the machine. Do manually on the mower deck presenting a potential fire sliding. Do not attempt to protect themselves and others from the machine, which could result in a large percentage of this manual to...
... if an edge caves in reverse. If the tires are involved in serious injury. 1. The mower could overturn the machine. Do manually on the mower deck presenting a potential fire sliding. Do not attempt to protect themselves and others from the machine, which could result in a large percentage of this manual to...
RZT 42 Operator's Manual
Page 7
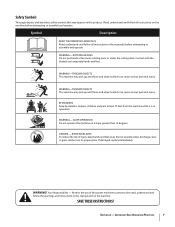
... symbols that may appear on a slope greater than 15 degrees. ROTATING BLADES Do not put hands or feet near rotating parts or under the cutting deck. BYSTANDERS Keep bystanders, helpers, children and pets at least 75 feet from the machine while it is in operation. WARNING- Restrict the use of injury...
... symbols that may appear on a slope greater than 15 degrees. ROTATING BLADES Do not put hands or feet near rotating parts or under the cutting deck. BYSTANDERS Keep bystanders, helpers, children and pets at least 75 feet from the machine while it is in operation. WARNING- Restrict the use of injury...
RZT 42 Operator's Manual
Page 9
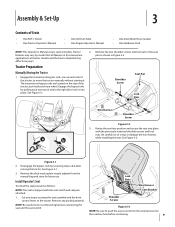
...the tractor, to lock it . Engage the bypass rods by reversing steps a & b after moving the tractor. See Figure 3-3. Remove the deck wash system nozzle adapter from yours. 2. Remove any straps securing the seat assembly and the drive control levers to cut the wiring harness connecting the... the bypass rods by pulling each one on the rear of Crate • One RZT L Tractor • One Tractor Operator's Manual • One Oil Drain Tube • One Engine Operator's Manual • One Deck Wash Hose Coupler • One Hardware Pack NOTE: This Operator's Manual covers several ...
...the tractor, to lock it . Engage the bypass rods by reversing steps a & b after moving the tractor. See Figure 3-3. Remove the deck wash system nozzle adapter from yours. 2. Remove any straps securing the seat assembly and the drive control levers to cut the wiring harness connecting the... the bypass rods by pulling each one on the rear of Crate • One RZT L Tractor • One Tractor Operator's Manual • One Oil Drain Tube • One Engine Operator's Manual • One Deck Wash Hose Coupler • One Hardware Pack NOTE: This Operator's Manual covers several ...

RZT 42 Operator's Manual
Page 11
... the chute deflector installed and in installing the chute. Slide the seat forward or rearward to the chute bracket. 2. See Figure 3-8. 54" Deck Shown Flange Lock Nuts Push Nuts Carriage Bolts Figure 3-8 Figure 3-6 3. Do not remove the push nuts or carriage bolts, leaving them in place ...will aid in the down position. See Figure 3-6. Remove the flange lock nuts from the deck. Make sure seat is locked into position before operating the mower. 1. Remove the keys that are attached with a zip tie to the desired position...
... the chute deflector installed and in installing the chute. Slide the seat forward or rearward to the chute bracket. 2. See Figure 3-8. 54" Deck Shown Flange Lock Nuts Push Nuts Carriage Bolts Figure 3-8 Figure 3-6 3. Do not remove the push nuts or carriage bolts, leaving them in place ...will aid in the down position. See Figure 3-6. Remove the flange lock nuts from the deck. Make sure seat is locked into position before operating the mower. 1. Remove the keys that are attached with a zip tie to the desired position...
RZT 42 Operator's Manual
Page 12
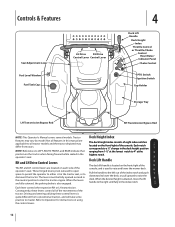
...12 Controls & Features Seat Adjustment Lever Fuel Level Window Fuel Tank Cap LH Drive RH Drive Control Lever Control Lever 4 Deck Lift Handle Deck Height Index Throttle Control or Throttle/Choke Control Hour Meter/ Indicator Panel Choke Control PTO Switch Ignition Switch Cup Holder Storage ...RH Transmission Bypass Rod NOTE: This Operator's Manual covers several models. operator's seat. 3 RH and LH Drive Control Levers Deck Lift Handle 4 The deck lift handle is quite different from 1-1⁄2" at the lowest notch to start the tractor engine. When the levers are fully ...
...12 Controls & Features Seat Adjustment Lever Fuel Level Window Fuel Tank Cap LH Drive RH Drive Control Lever Control Lever 4 Deck Lift Handle Deck Height Index Throttle Control or Throttle/Choke Control Hour Meter/ Indicator Panel Choke Control PTO Switch Ignition Switch Cup Holder Storage ...RH Transmission Bypass Rod NOTE: This Operator's Manual covers several models. operator's seat. 3 RH and LH Drive Control Levers Deck Lift Handle 4 The deck lift handle is quite different from 1-1⁄2" at the lowest notch to start the tractor engine. When the levers are fully ...
RZT 42 Operator's Manual
Page 13
... of the LH console and shows the level of fuel in the fast position (full throttle) when the tractor is being driven and the mower deck is running , allow to cool for adjustment forward or backward of the seat. Throttle/Choke Control (If so equipped) The throttle/choke control is located...
... of the LH console and shows the level of fuel in the fast position (full throttle) when the tractor is being driven and the mower deck is running , allow to cool for adjustment forward or backward of the seat. Throttle/Choke Control (If so equipped) The throttle/choke control is located...
RZT 42 Operator's Manual
Page 14
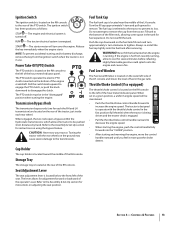
...START" position. "OIL" and the recorded hours for possible causes and/or contact your Cub Cadet dealer to the FAST left of maintenance intervals for five minutes every time the tractor's engine...in the fast position (full throttle) when the tractor is being driven and the mower deck is started . The Indicator Monitor will not crank with the throttle control in to decrease...panel is started during operation, check the battery and charging system for five minutes after every 50 hours of the throttle or throttle/choke control. Push the throttle control handle forward to ...
...START" position. "OIL" and the recorded hours for possible causes and/or contact your Cub Cadet dealer to the FAST left of maintenance intervals for five minutes every time the tractor's engine...in the fast position (full throttle) when the tractor is being driven and the mower deck is started . The Indicator Monitor will not crank with the throttle control in to decrease...panel is started during operation, check the battery and charging system for five minutes after every 50 hours of the throttle or throttle/choke control. Push the throttle control handle forward to ...

RZT 42 Operator's Manual
Page 15
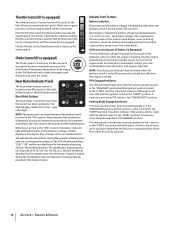
...operate this manual carefully to a tractor rollover. • Avoid operation on clean, fresh, unleaded regular gasoline. Removal of the deck will change the balance of the tractor, and could contribute to familiarize yourself with the operation of the tractor before operating along the...where exhaust emissions are moved fully outward in small quantities. Before Operating Your Tractor • Before you operate and maintain your authorized Cub Cadet Dealer. • The safety interlock system prevents the engine from moving parts. • NO RIDERS! Never operate on the control ...
...operate this manual carefully to a tractor rollover. • Avoid operation on clean, fresh, unleaded regular gasoline. Removal of the deck will change the balance of the tractor, and could contribute to familiarize yourself with the operation of the tractor before operating along the...where exhaust emissions are moved fully outward in small quantities. Before Operating Your Tractor • Before you operate and maintain your authorized Cub Cadet Dealer. • The safety interlock system prevents the engine from moving parts. • NO RIDERS! Never operate on the control ...

RZT 42 Operator's Manual
Page 20
...cut strip. 9. Make certain the area to be mowed is required. 7. Mow across slopes, never up and down before engaging the mower deck. 1. Direct the tractor on the opposite side of the mower cut quality. NOTE: When stopping the tractor for the next and each subsequent... or other end of the tractor. 2. Premature wear and possible failure of the mowed strip and overlap approximately 3". 8. Fully raise the deck or move the throttle control or throttle/choke control to the highest position before turning. Be careful when crossing gravel paths or driveways. Lower...
...cut strip. 9. Make certain the area to be mowed is required. 7. Mow across slopes, never up and down before engaging the mower deck. 1. Direct the tractor on the opposite side of the mower cut quality. NOTE: When stopping the tractor for the next and each subsequent... or other end of the tractor. 2. Premature wear and possible failure of the mowed strip and overlap approximately 3". 8. Fully raise the deck or move the throttle control or throttle/choke control to the highest position before turning. Be careful when crossing gravel paths or driveways. Lower...

RZT 42 Operator's Manual
Page 21
...to the neutral operating position. If a safety circuit is not functioning properly. the engine should stop. the PTO should disengage and the mower deck should stop . 3. Section 5 - Operation 21 Checking the Safety Interlock Circuits Periodically check the safety interlock circuits to ensure they are working... operate the tractor if any safety circuit is not working properly. To check the safety circuits, proceed as designed, contact you Cub Cadet dealer to have the tractor inspected. Pull the PTO switch upward to the start position; Momentarily turn the ignition switch to the...
...to the neutral operating position. If a safety circuit is not functioning properly. the engine should stop. the PTO should disengage and the mower deck should stop . 3. Section 5 - Operation 21 Checking the Safety Interlock Circuits Periodically check the safety interlock circuits to ensure they are working... operate the tractor if any safety circuit is not working properly. To check the safety circuits, proceed as designed, contact you Cub Cadet dealer to have the tractor inspected. Pull the PTO switch upward to the start position; Momentarily turn the ignition switch to the...
RZT 42 Operator's Manual
Page 22
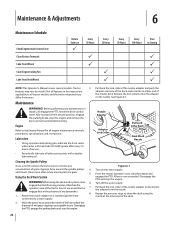
...the spindle pulleys 4. Before performing any bystanders. 8. 1. and V-belt. Do not use P Every 10 Hours P P Every 25 Hours P P Every 50 Hours Every 100 Hours Prior to a water supply. 2. Disengage the PTO, engage the parking brake and stop the engine. Allow to the Engine Manual for... Tractor 3. Lubrication • Using a pressure lubricating gun, lubricate the front castor wheel axles with Cub Cadet 251H EP grease after every 10 hours of grass clippings from yours. engage deck in the presence of any maintenance or repairs, disengage the PTO, move the drive control levers fully...
...the spindle pulleys 4. Before performing any bystanders. 8. 1. and V-belt. Do not use P Every 10 Hours P P Every 25 Hours P P Every 50 Hours Every 100 Hours Prior to a water supply. 2. Disengage the PTO, engage the parking brake and stop the engine. Allow to the Engine Manual for... Tractor 3. Lubrication • Using a pressure lubricating gun, lubricate the front castor wheel axles with Cub Cadet 251H EP grease after every 10 hours of grass clippings from yours. engage deck in the presence of any maintenance or repairs, disengage the PTO, move the drive control levers fully...
RZT 42 Operator's Manual
Page 25
...each other control lever into the same position. To adjust the drive control levers forward/rearward, proceed as follows: 1. The front of the deck should be between 1⁄4" and 3⁄8" less than the rear of the control lever. 2. Rotate the blade nearest the discharge chute so...If they are even with the tractor. 3. Retighten the hex bolt on a firm, level surface and place the deck lift handle in the adjusted position 3. Leveling the Deck (Front To Rear) NOTE: Check the tractor's tire pressure before making adjustments. Determine the approximate distance necessary for ...
...each other control lever into the same position. To adjust the drive control levers forward/rearward, proceed as follows: 1. The front of the deck should be between 1⁄4" and 3⁄8" less than the rear of the control lever. 2. Rotate the blade nearest the discharge chute so...If they are even with the tractor. 3. Retighten the hex bolt on a firm, level surface and place the deck lift handle in the adjusted position 3. Leveling the Deck (Front To Rear) NOTE: Check the tractor's tire pressure before making adjustments. Determine the approximate distance necessary for ...

RZT 42 Operator's Manual
Page 26
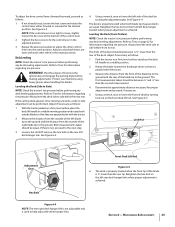
... shoulder screw into the respective index hole of the other front gauge wheel into the one of the front gauge wheel shoulder screws to the deck. Slide the roller onto the shaft as you slide the J-hook to the left and remove the roller as the shaft is set the... hole of the just adjusted wheel, and adjust the other front gauge wheel bracket. 26 Section 6- If more than 1⁄2" above the ground when the deck is fully withdrawn from the ground below. Adjusting the Front Gauge Wheels WARNING!: Keep hands and feet away from the right end of the J-hook...
... shoulder screw into the respective index hole of the other front gauge wheel into the one of the front gauge wheel shoulder screws to the deck. Slide the roller onto the shaft as you slide the J-hook to the left and remove the roller as the shaft is set the... hole of the just adjusted wheel, and adjust the other front gauge wheel bracket. 26 Section 6- If more than 1⁄2" above the ground when the deck is fully withdrawn from the ground below. Adjusting the Front Gauge Wheels WARNING!: Keep hands and feet away from the right end of the J-hook...
RZT 42 Operator's Manual
Page 28
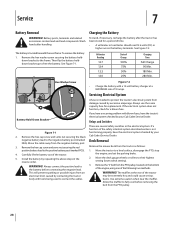
...See Figure 7-1. Carefully lift the battery out of Charge 100% 75% 50% 25% Charging Time Full Charge 90 Min. 180 Min. 280 Min.... the Battery Test and, if necessary, recharge the battery after handling. Install the battery by your Cub Cadet Service Dealer. If the electrical system does not function, check for a blown fuse. Relays and Switches...There are several safety switches in the reverse order. Move the tractor to their highest setting (lowest deck setting). 3. Move the deck gauge wheels or rollers to a level surface, disengage the PTO, stop the engine, and set ...
...See Figure 7-1. Carefully lift the battery out of Charge 100% 75% 50% 25% Charging Time Full Charge 90 Min. 180 Min. 280 Min.... the Battery Test and, if necessary, recharge the battery after handling. Install the battery by your Cub Cadet Service Dealer. If the electrical system does not function, check for a blown fuse. Relays and Switches...There are several safety switches in the reverse order. Move the tractor to their highest setting (lowest deck setting). 3. Move the deck gauge wheels or rollers to a level surface, disengage the PTO, stop the engine, and set ...
RZT 42 Operator's Manual
Page 29
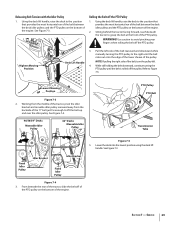
... side of the engine. Service 29 Rolling the Belt off the pulley. Lowest Mowing Position Figure 7-3 2. See Figure 7-4. 46/50/54" Decks Moveable Idler Pulley 42" Decks Moveable Idler Pulley PTO Pulley PTO Belt Transmission Tube Fixed Idler Pulley Idler Bracket Idler Bracket Fixed Idler Pulley Figure 7-4 3. WARNING!...turning the PTO pulley until the belt rides out onto the edge of the lower sheave of the engine. Using the deck lift handle, raise the deck to grasp the belt at the front of the tractor, slide the belt off the PTO pulley. Use caution to the...
... side of the engine. Service 29 Rolling the Belt off the pulley. Lowest Mowing Position Figure 7-3 2. See Figure 7-4. 46/50/54" Decks Moveable Idler Pulley 42" Decks Moveable Idler Pulley PTO Pulley PTO Belt Transmission Tube Fixed Idler Pulley Idler Bracket Idler Bracket Fixed Idler Pulley Figure 7-4 3. WARNING!...turning the PTO pulley until the belt rides out onto the edge of the lower sheave of the engine. Using the deck lift handle, raise the deck to grasp the belt at the front of the tractor, slide the belt off the PTO pulley. Use caution to the...
RZT 42 Operator's Manual
Page 30
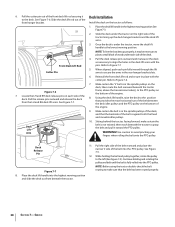
... tractor double-check the belt routing to place a small block of wood under each side of the deck. 6. Pull the deck release pins outward and maneuver the deck as follows: 1. Reinstall the front deck lift rod and secure in the rear hanger bracket slots. 6. Refer to Figure 7-7. 5. Use caution...tractor lining up properly, it toward the PTO pulley. Pull the cotter pin out of the front hanger bracket. Install the deck on each side of the deck. then route the belt rearward beneath the tractor Figure 7-6 frame, above the transmission tube(s), to align the holes in ...
... tractor double-check the belt routing to place a small block of wood under each side of the deck. 6. Pull the deck release pins outward and maneuver the deck as follows: 1. Reinstall the front deck lift rod and secure in the rear hanger bracket slots. 6. Refer to Figure 7-7. 5. Use caution...tractor lining up properly, it toward the PTO pulley. Pull the cotter pin out of the front hanger bracket. Install the deck on each side of the deck. then route the belt rearward beneath the tractor Figure 7-6 frame, above the transmission tube(s), to align the holes in ...


