
Operation Manual
Page 1
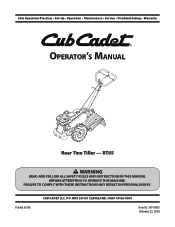
BOX 361131 CLEVELAND, OHIO 44136-0019 Form No. 769-05933 (February 22, 2010) FAILURE TO COMPLY WITH THESE INSTRUCTIONS MAY RESULT IN PERSONAL INJURY. RT65 WARNING READ AND FOLLOW ALL SAFETY RULES AND INSTRUCTIONS IN THIS MANUAL BEFORE ATTEMPTING TO OPERATE THIS MACHINE. Safe Operation Practices • Set-Up • Operation • Maintenance • Service • Troubleshooting • Warranty Operator's Manual Rear Tine Tiller - Printed In USA CUB CADET LLC, P.O.
BOX 361131 CLEVELAND, OHIO 44136-0019 Form No. 769-05933 (February 22, 2010) FAILURE TO COMPLY WITH THESE INSTRUCTIONS MAY RESULT IN PERSONAL INJURY. RT65 WARNING READ AND FOLLOW ALL SAFETY RULES AND INSTRUCTIONS IN THIS MANUAL BEFORE ATTEMPTING TO OPERATE THIS MACHINE. Safe Operation Practices • Set-Up • Operation • Maintenance • Service • Troubleshooting • Warranty Operator's Manual Rear Tine Tiller - Printed In USA CUB CADET LLC, P.O.
Operation Manual
Page 2
...equipment, please locate the model plate on this manual is relative to the right. All information in the provided area to the most recent product information available at the front right corner of printing. Cub Cadet's Customer Support telephone numbers, website address and ...mailing address can locate the model plate by Cub Cadet LLC. We want to familiarize yourself with a local authorized service dealer. Throughout this manual frequently to ensure your machine. You ...
...equipment, please locate the model plate on this manual is relative to the right. All information in the provided area to the most recent product information available at the front right corner of printing. Cub Cadet's Customer Support telephone numbers, website address and ...mailing address can locate the model plate by Cub Cadet LLC. We want to familiarize yourself with a local authorized service dealer. Throughout this manual frequently to ensure your machine. You ...
Operation Manual
Page 3
...When you see this manual. California Proposition 65 WARNING! Failure to observe the following safety instructions could be tripped over should read and understand the instructions and safe operation practices in this manual and on the machine and in the manual(s) before attempting to ... specifically recommended in serious injury or death. This symbol points out important safety instructions which could result in the operator's manual. HEED ITS WARNING! WARNING! This machine is extremely flammable and the vapors are explosive. Know how to assemble and operate...
...When you see this manual. California Proposition 65 WARNING! Failure to observe the following safety instructions could be tripped over should read and understand the instructions and safe operation practices in this manual and on the machine and in the manual(s) before attempting to ... specifically recommended in serious injury or death. This symbol points out important safety instructions which could result in the operator's manual. HEED ITS WARNING! WARNING! This machine is extremely flammable and the vapors are explosive. Know how to assemble and operate...
Operation Manual
Page 4
... covered in personal injury. 21. Allow a machine to do so can amputate hands and feet. 2. Always refer to the operator's manual for an extended period. 4 Section 2 - Wait 5 minutes before starting the engine. Do not operate machine while under the influence of...Exercise extreme caution when operating on the ground. Never tamper with a portable container, rather than ½ inch below bottom of this manual for any damage before you . 10. Maintenance & Storage 1. Check their proper operation regularly. 3. The governor controls the maximum safe...
... covered in personal injury. 21. Allow a machine to do so can amputate hands and feet. 2. Always refer to the operator's manual for an extended period. 4 Section 2 - Wait 5 minutes before starting the engine. Do not operate machine while under the influence of...Exercise extreme caution when operating on the ground. Never tamper with a portable container, rather than ½ inch below bottom of this manual for any damage before you . 10. Maintenance & Storage 1. Check their proper operation regularly. 3. The governor controls the maximum safe...
Operation Manual
Page 6
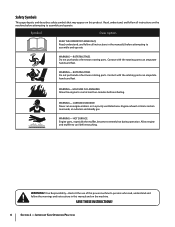
.... Important Safe Operation Practices Allow engine and muffler to cool before refueling. Symbol Description READ THE OPERATOR'S MANUAL(S) Read, understand, and follow all instructions on this power machine to persons who read, understand and follow all instructions in this.... warning! Your Responsibility-Restrict the use of this product. WARNING- Read, understand, and follow the warnings and instructions in the manual(s) before attempting to assemble and operate WARNING- ROTATING TINES Do not put hands or feet near rotating parts. WARNING- CARBON MONOXIDE ...
.... Important Safe Operation Practices Allow engine and muffler to cool before refueling. Symbol Description READ THE OPERATOR'S MANUAL(S) Read, understand, and follow all instructions on this power machine to persons who read, understand and follow all instructions in this.... warning! Your Responsibility-Restrict the use of this product. WARNING- Read, understand, and follow the warnings and instructions in the manual(s) before attempting to assemble and operate WARNING- ROTATING TINES Do not put hands or feet near rotating parts. WARNING- CARBON MONOXIDE ...
Operation Manual
Page 7
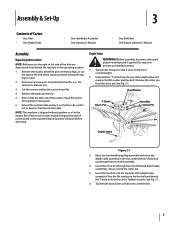
.... 5. Depth Stake WARNING! Before assembly, disconnect the spark plug wire and ground it with the tiller (i.e., the Operator's Manual, etc.). 3. Assembly & Set-Up 3 Contents of Carton • One Tiller • One Depth Stake • One Handlebar Assembly • One ...Operator's Manual • One Shift Rod • One Engine Operator's Manual Assembly Unpacking Instructions NOTE: References to the right or left side of the tiller are determined from behind the machine in ...
.... 5. Depth Stake WARNING! Before assembly, disconnect the spark plug wire and ground it with the tiller (i.e., the Operator's Manual, etc.). 3. Assembly & Set-Up 3 Contents of Carton • One Tiller • One Depth Stake • One Handlebar Assembly • One ...Operator's Manual • One Shift Rod • One Engine Operator's Manual Assembly Unpacking Instructions NOTE: References to the right or left side of the tiller are determined from behind the machine in ...
Operation Manual
Page 9
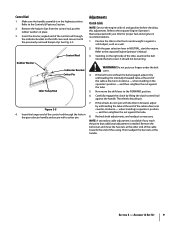
...control bail against a solid object, such as necessary. Remove the belt cover and move the shift lever to the separate Engine Operator's Manual packed with a cotter pin. Section 3 - Make sure the handle assembly is against the handle. Refer to the FORWARD position. ...NOTE: A secondary cable adjustment is available if you reach the point that additional adjustment is needed. Refer to the separate Engine Operator's Manual. 3. The wheels should not be turning. Rubber Washer Control Rod Indicator Bracket Cotter Pin Idler Pulley Rod Figure 3-5 4. when standing in...
...control bail against a solid object, such as necessary. Remove the belt cover and move the shift lever to the separate Engine Operator's Manual packed with a cotter pin. Section 3 - Make sure the handle assembly is against the handle. Refer to the FORWARD position. ...NOTE: A secondary cable adjustment is available if you reach the point that additional adjustment is needed. Refer to the separate Engine Operator's Manual. 3. The wheels should not be turning. Rubber Washer Control Rod Indicator Bracket Cotter Pin Idler Pulley Rod Figure 3-5 4. when standing in...

Operation Manual
Page 10
... care when handling gasoline. Gasoline is 30 p.s.i. WARNING! Gas & Oil Fill-Up Service the engine with gasoline and oil as instructed in the separate engine manual packed with your tiller may be maintained on your tiller. Assembly & Set-Up Reduce the tire pressure before operating the tiller. Maximum tire pressure under...
... care when handling gasoline. Gasoline is 30 p.s.i. WARNING! Gas & Oil Fill-Up Service the engine with gasoline and oil as instructed in the separate engine manual packed with your tiller may be maintained on your tiller. Assembly & Set-Up Reduce the tire pressure before operating the tiller. Maximum tire pressure under...
Operation Manual
Page 11
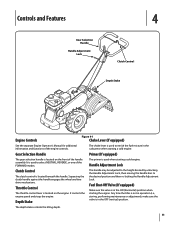
.... Controls and Features Gear Selection Handle Handle Adjustment Lock 4 Clutch Control Depth Stake Engine Controls Figure 4-1 Choke Lever (If equipped) See the separate Engine Operator's Manual for additional information and functions of the FORWARD modes.
.... Controls and Features Gear Selection Handle Handle Adjustment Lock 4 Clutch Control Depth Stake Engine Controls Figure 4-1 Choke Lever (If equipped) See the separate Engine Operator's Manual for additional information and functions of the FORWARD modes.
Operation Manual
Page 12
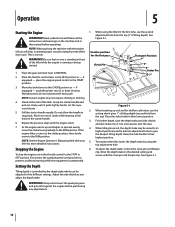
... Allow it to prevent accidental starting while the equipment is controlled by using the tiller for more passes over the area. 4. Use this manual before performing any adjustments. 1. When tilling loose soil, the depth stake may not require choking or priming. 4. See Figure 5-1. 12 ...hole) to five different settings. This is running or being started. 1. Let the rope recoil slowly. 5. NOTE: See the Engine Operator's Manual packed with the clevis pin and hairpin clip. Stopping the Engine To stop the engine, move the choke lever gradually to the CHOKE position ...
... Allow it to prevent accidental starting while the equipment is controlled by using the tiller for more passes over the area. 4. Use this manual before performing any adjustments. 1. When tilling loose soil, the depth stake may not require choking or priming. 4. See Figure 5-1. 12 ...hole) to five different settings. This is running or being started. 1. Let the rope recoil slowly. 5. NOTE: See the Engine Operator's Manual packed with the clevis pin and hairpin clip. Stopping the Engine To stop the engine, move the choke lever gradually to the CHOKE position ...
Operation Manual
Page 13
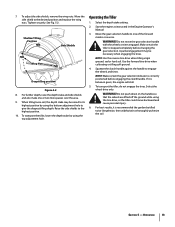
..., lower the depth stake by using the bottom adjustment hole to give the deepest tilling depth. Start the engine as instructed in the Engine Operator's Manual. 3. Squeeze the clutch handle against the handle to the desired position and replace the wing nuts. To transport the tiller, do not engage the tines...
..., lower the depth stake by using the bottom adjustment hole to give the deepest tilling depth. Start the engine as instructed in the Engine Operator's Manual. 3. Squeeze the clutch handle against the handle to the desired position and replace the wing nuts. To transport the tiller, do not engage the tines...
Operation Manual
Page 14
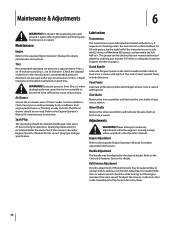
...tension on the clutch handle and the cable at least once a season with force sufficient to the Engine Operator's Manual for engine maintenance instructions. Tires Recommended operating tire pressure is disassembled. Refer to cause serious injury. Lubrication Transmission The.... Adjustments WARNING! Maximum tire pressure under normal conditions. This grease can be required due to the separate Engine Operator's Manual for the manufacturer's recommended pressure). on both directions. Equal tire pressure should be serviced. Maintenance & Adjustments 6 WARNING!...
...tension on the clutch handle and the cable at least once a season with force sufficient to the Engine Operator's Manual for engine maintenance instructions. Tires Recommended operating tire pressure is disassembled. Refer to cause serious injury. Lubrication Transmission The.... Adjustments WARNING! Maximum tire pressure under normal conditions. This grease can be required due to the separate Engine Operator's Manual for the manufacturer's recommended pressure). on both directions. Equal tire pressure should be serviced. Maintenance & Adjustments 6 WARNING!...
Operation Manual
Page 20
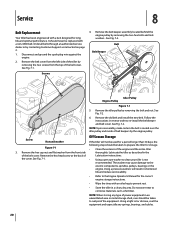
... engine. Off-Season Storage Screw Nut and washer If the tiller will result in shortened life and reduce serviceability. • Refer to the Engine Operator's Manual for the correct engine storage instructions. • Wipe the tines with a belt designed for storage. Remove the hex cap nut and flat washer from the...
... engine. Off-Season Storage Screw Nut and washer If the tiller will result in shortened life and reduce serviceability. • Refer to the Engine Operator's Manual for the correct engine storage instructions. • Wipe the tines with a belt designed for storage. Remove the hex cap nut and flat washer from the...
Operation Manual
Page 21
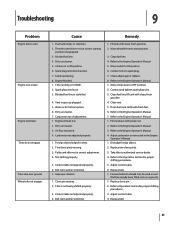
...already been tilled, not on CHOKE. 2. Replace belt. 21 Dirty air cleaner. 5. Engine flooded. 1. Vent in the Engine Operator's Manual 1. Dirty air cleaner. 3. Refer to Operation Section for proper shifting procedures. 5. fill tank with fresh fuel. 6. Refill with clean..., fresh gasoline. 4. Fill crankcase with clean, fresh gasoline. 2. Dislodge foreign object. 2. Refer to the Engine Operator's Manual 5. Adjust control cable 4. Blocked fuel line or stale fuel. 4. Carburetor out of adjustment. 1. Belt worn and/or stretched. Move throttle ...
...already been tilled, not on CHOKE. 2. Replace belt. 21 Dirty air cleaner. 5. Engine flooded. 1. Vent in the Engine Operator's Manual 1. Dirty air cleaner. 3. Refer to Operation Section for proper shifting procedures. 5. fill tank with fresh fuel. 6. Refill with clean..., fresh gasoline. 4. Fill crankcase with clean, fresh gasoline. 2. Dislodge foreign object. 2. Refer to the Engine Operator's Manual 5. Adjust control cable 4. Blocked fuel line or stale fuel. 4. Carburetor out of adjustment. 1. Belt worn and/or stretched. Move throttle ...
Operation Manual
Page 22
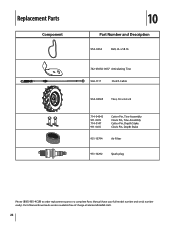
Parts Manual downloads are also available free of charge at www.cubcadet.com. 22 Replacement Parts Component 10 Part Number and Description 954-0434 Belt, 4L x 58.16 742-0305A-0637 Articulating Tine 946-1117 Clutch Cable 934-04365 Tires, 16 x 4.6 x 8 714-04043 911-0415 714-0147 911-0415 Cotter Pin, Tine Assembly Clevis Pin, Tine Assembly Cotter Pin, Depth Stake Clevis Pin, Depth Stake 951-10794 Air Filter 951-10292 Spark plug Phone (800) 965-4CUB to order replacement parts or a complete Parts Manual (have your full model number and serial number ready).
Parts Manual downloads are also available free of charge at www.cubcadet.com. 22 Replacement Parts Component 10 Part Number and Description 954-0434 Belt, 4L x 58.16 742-0305A-0637 Articulating Tine 946-1117 Clutch Cable 934-04365 Tires, 16 x 4.6 x 8 714-04043 911-0415 714-0147 911-0415 Cotter Pin, Tine Assembly Clevis Pin, Tine Assembly Cotter Pin, Depth Stake Clevis Pin, Depth Stake 951-10794 Air Filter 951-10292 Spark plug Phone (800) 965-4CUB to order replacement parts or a complete Parts Manual (have your full model number and serial number ready).
Operation Manual
Page 24
...expenses to our Web site at www.cubcadet. Phone: 1-877-282-8684 MTD Canada Limited - "Cub Cadet" warrants this product has been operated and maintained in accordance with the Operator's Manual furnished with the product, and has not been subject to applicable manufacturer's warranty for terms and conditions... with respect to new merchandise purchased and used in the United States, its possessions and territories, and by this manual will , at P.O. com. Cub Cadet shall not be defective in materials or workmanship. In Canada Contact MTD Products Limited, Kitchener, ON N2G 4J1, or call ...
...expenses to our Web site at www.cubcadet. Phone: 1-877-282-8684 MTD Canada Limited - "Cub Cadet" warrants this product has been operated and maintained in accordance with the Operator's Manual furnished with the product, and has not been subject to applicable manufacturer's warranty for terms and conditions... with respect to new merchandise purchased and used in the United States, its possessions and territories, and by this manual will , at P.O. com. Cub Cadet shall not be defective in materials or workmanship. In Canada Contact MTD Products Limited, Kitchener, ON N2G 4J1, or call ...

Parts Catalog
Page 1
Illustrated Parts Manual Cub Cadet Tillers - BOX 361131 CLEVELAND, OHIO 44136-0019 Form No. 769-03793 (January 10, 2008) RT 65 & FT 24 Printed In USA CUB CADET LLC, P.O.
Illustrated Parts Manual Cub Cadet Tillers - BOX 361131 CLEVELAND, OHIO 44136-0019 Form No. 769-03793 (January 10, 2008) RT 65 & FT 24 Printed In USA CUB CADET LLC, P.O.


