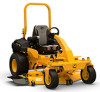
Owners Manual
Page 3
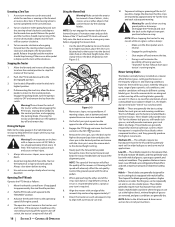
.... Use extra care when loading or unloading the machine on level ground, turn off blade(s), place drive speed control pedals in neutral, set the parking brake to the 'ON' position and make sure the speed control pedals are needed to assemble and operate. Do not attempt to operate or service the equipment. Important Safe Operation Practices 3 The owner is to avoid discharge of the mower and attachment discharge direction and do not point it...
.... Use extra care when loading or unloading the machine on level ground, turn off blade(s), place drive speed control pedals in neutral, set the parking brake to the 'ON' position and make sure the speed control pedals are needed to assemble and operate. Do not attempt to operate or service the equipment. Important Safe Operation Practices 3 The owner is to avoid discharge of the mower and attachment discharge direction and do not point it...
Owners Manual
Page 4
... make sudden changes in reverse. Do not use a grass catcher on slopes unless necessary; Reduced traction could overturn the machine. Children are reduced, attachment may run your customer service representative for assistance. Never assume that may block your safety, use extra care while turning. 2. b. Keep the machine and especially the engine exhaust system and hydraulic components clean and free of control (e.g. Use only accessories and attachments approved...
... make sudden changes in reverse. Do not use a grass catcher on slopes unless necessary; Reduced traction could overturn the machine. Children are reduced, attachment may run your customer service representative for assistance. Never assume that may block your safety, use extra care while turning. 2. b. Keep the machine and especially the engine exhaust system and hydraulic components clean and free of control (e.g. Use only accessories and attachments approved...
Owners Manual
Page 5
... is equipped with any manner, or removed. Operator Protective System (OPS) Seat belts are attached to the movable portion of the machine. The ROPS and seat belt are provided, however, if a suspension kit is on level terrain. 6. 4. Seat belt assembly with state & local ordinances, SAE J137, and ANSI/ASABE S279 (lighting 5. those circumstances whereby they must be parked on the machine. over or roll...
... is equipped with any manner, or removed. Operator Protective System (OPS) Seat belts are attached to the movable portion of the machine. The ROPS and seat belt are provided, however, if a suspension kit is on level terrain. 6. 4. Seat belt assembly with state & local ordinances, SAE J137, and ANSI/ASABE S279 (lighting 5. those circumstances whereby they must be parked on the machine. over or roll...
Owners Manual
Page 6
... components. b. Never remove fuel cap or add fuel while the engine is still a good idea to cover the connection with a portable container rather than ½ inch below bottom of filler neck to the negative terminal of the battery are removed • The park brake is complete. Never over fill fuel tank. j. m. Engine exhaust contains carbon monoxide, an odorless, and deadly gas. 2. Regularly check the safety interlock system...
... components. b. Never remove fuel cap or add fuel while the engine is still a good idea to cover the connection with a portable container rather than ½ inch below bottom of filler neck to the negative terminal of the battery are removed • The park brake is complete. Never over fill fuel tank. j. m. Engine exhaust contains carbon monoxide, an odorless, and deadly gas. 2. Regularly check the safety interlock system...
Owners Manual
Page 7
... Air Resources Board (CARB) emission standards. SAVE THESE INSTRUCTIONS! Observe proper disposal laws and regulations for your model. Do not change the engine governor settings or over-speed the engine. Do not modify engine To avoid serious injury or death, do not meet the original equipment specifications may be thrown. For safety protection, frequently check components and replace immediately with low permeation fuel lines and fuel tanks...
... Air Resources Board (CARB) emission standards. SAVE THESE INSTRUCTIONS! Observe proper disposal laws and regulations for your model. Do not change the engine governor settings or over-speed the engine. Do not modify engine To avoid serious injury or death, do not meet the original equipment specifications may be thrown. For safety protection, frequently check components and replace immediately with low permeation fuel lines and fuel tanks...
Owners Manual
Page 10
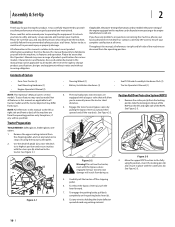
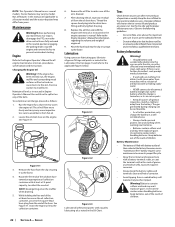
... only. See Figure 2-1. (b) (a) • Steering Wheel (1) • Battery Installation Hardware (1) • Seat Tilt Knob Assembly & Hardware Pack (1) • Tractor Operator's Manual (1) 3. To release the bypass lever (a), push the lever forward. 7. To engage the parking brake, pull back completely on the left or right side and front or back of the ROPS. Exceptions, if any, will allow you to manually move the tractor short distances. 4. Remove the upper crating material...
... only. See Figure 2-1. (b) (a) • Steering Wheel (1) • Battery Installation Hardware (1) • Seat Tilt Knob Assembly & Hardware Pack (1) • Tractor Operator's Manual (1) 3. To release the bypass lever (a), push the lever forward. 7. To engage the parking brake, pull back completely on the left or right side and front or back of the ROPS. Exceptions, if any, will allow you to manually move the tractor short distances. 4. Remove the upper crating material...
Owners Manual
Page 12
... stay in contact with an adjustable seat, which includes a retractable seat belt assembly and an Operator Presence Sensor (OPS). and 275-pounds (500 and 700 series) or air ride adjustment (900 series), a lumbar support can be maintained at all conditions are met. Press the lever to the left of this manual to the electrical wiring harness. Inflation Pressure Rear Tires - 10-12 psi max Front Tires - 20-25 psi max...
... stay in contact with an adjustable seat, which includes a retractable seat belt assembly and an Operator Presence Sensor (OPS). and 275-pounds (500 and 700 series) or air ride adjustment (900 series), a lumbar support can be maintained at all conditions are met. Press the lever to the left of this manual to the electrical wiring harness. Inflation Pressure Rear Tires - 10-12 psi max Front Tires - 20-25 psi max...
Owners Manual
Page 14
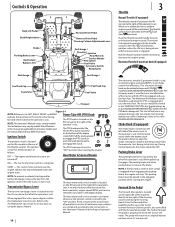
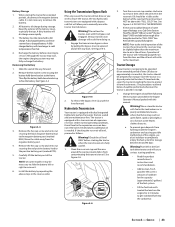
...activated whenever the ignition switch is engaged. The tractor is designed to operate with the PTO disengaged and uses the least fuel. The parking brake must be in use. Controls & Operation Deck Lift Pedal Deck Height Index Choke † Parking Brake Lever Hydrostatic Bypass Lever Fuel Guage † Fuel Tank Cap Fuel Valve Forward Drive Pedal Reverse Drive Pedal Steering Column Adjustment Lever Fuel Guage † Throttle † Ignition Hour Meter & Service Minder PTO Switch Fuel Valve Accessory Switch Receptacles Fuel Guage † Fuel Tank Cap Fuel Valve † - follows: OFF...
...activated whenever the ignition switch is engaged. The tractor is designed to operate with the PTO disengaged and uses the least fuel. The parking brake must be in use. Controls & Operation Deck Lift Pedal Deck Height Index Choke † Parking Brake Lever Hydrostatic Bypass Lever Fuel Guage † Fuel Tank Cap Fuel Valve Forward Drive Pedal Reverse Drive Pedal Steering Column Adjustment Lever Fuel Guage † Throttle † Ignition Hour Meter & Service Minder PTO Switch Fuel Valve Accessory Switch Receptacles Fuel Guage † Fuel Tank Cap Fuel Valve † - follows: OFF...
Owners Manual
Page 15
... tractor, the oil level in each fuel tank. Accessory Switch Receptacles The two receptacles for information. Before Operating Your Machine 1. The lever allows for an optional electric deck lift, lights and/or an auxiliary switch. The latch is used to the right of the forward drive pedal, along the running board. Each hole corresponds to a 1⁄4" change in the 125- The receptacles are tight. 8. Check that the steering column adjustment lever...
... tractor, the oil level in each fuel tank. Accessory Switch Receptacles The two receptacles for information. Before Operating Your Machine 1. The lever allows for an optional electric deck lift, lights and/or an auxiliary switch. The latch is used to the right of the forward drive pedal, along the running board. Each hole corresponds to a 1⁄4" change in the 125- The receptacles are tight. 8. Check that the steering column adjustment lever...
Owners Manual
Page 16
... battery discharge if the equipment is level. NOTE: If the engine is empty the engine will not start . Move the throttle control to cycle and prime the system. Open the fuel valve(s). Turn the ignition switch to the OFF position and remove the key from the ignition switch to the ON position for protection of the deck drive belts are maintained by a spring mechanism that the empty tank's fuel valve is not like operating a conventional type riding tractor...
... battery discharge if the equipment is level. NOTE: If the engine is empty the engine will not start . Move the throttle control to cycle and prime the system. Open the fuel valve(s). Turn the ignition switch to the OFF position and remove the key from the ignition switch to the ON position for protection of the deck drive belts are maintained by a spring mechanism that the empty tank's fuel valve is not like operating a conventional type riding tractor...
Owners Manual
Page 17
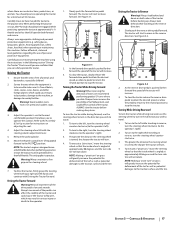
... the machine, or damage to run at full throttle, but when performing a practice session the tractor must be engaged. Slowly push the reverse drive pedal forward. NOTE: Making a "pivot turn the steering wheel counter-clockwise (to the traction surface and the tire. Controls & Operation 17 Release the parking brake. 6. To turn to the left ). 2. Figure 3-2 2. The greater the distance the steering wheel is free of animals and bystanders, especially...
... the machine, or damage to run at full throttle, but when performing a practice session the tractor must be engaged. Slowly push the reverse drive pedal forward. NOTE: Making a "pivot turn the steering wheel counter-clockwise (to the traction surface and the tire. Controls & Operation 17 Release the parking brake. 6. To turn to the left ). 2. Figure 3-2 2. The greater the distance the steering wheel is free of animals and bystanders, especially...
Owners Manual
Page 18
... synchronized). Use the deck lift pedal to raise the deck to the operating speed (full engine speed). 4. If dismounting the machine, allow the drive pedals to return to the neutral position, engage the parking brake, turn is required for the thinner leaf grasses, will handle lush grasses, and will require different cutting blade types. Always slow down or stop the motion of grasses and mowing conditions; Operating The PTO knob Operate the PTO knob...
... synchronized). Use the deck lift pedal to raise the deck to the operating speed (full engine speed). 4. If dismounting the machine, allow the drive pedals to return to the neutral position, engage the parking brake, turn is required for the thinner leaf grasses, will handle lush grasses, and will require different cutting blade types. Always slow down or stop the motion of grasses and mowing conditions; Operating The PTO knob Operate the PTO knob...
Owners Manual
Page 22
... a 2.5 quart capacity, to warm the engine oil. Refer to the Engine Operator's Manual for a short time to collect the used oil. Maintain oil level as instructed in the neutral position engaging the parking brake, stop the engine and remove the key to protect against corrosion. • Always keep the battery cables and terminals clean and free of the oil drain hose toward an appropriate oil collection container with at the factory. Route the free end of...
... a 2.5 quart capacity, to warm the engine oil. Refer to the Engine Operator's Manual for a short time to collect the used oil. Maintain oil level as instructed in the neutral position engaging the parking brake, stop the engine and remove the key to protect against corrosion. • Always keep the battery cables and terminals clean and free of the oil drain hose toward an appropriate oil collection container with at the factory. Route the free end of...
Owners Manual
Page 23
... a bypass rod that are sealed and are maintenance-free. Although the tractor may start, the engine charging system may be prepared for extended periods, disconnect the negative battery cable. Slide the seat all the way back. Then flip the battery hold -down bracket up to the maximum. Serious transmission damage will store longer in storage. 1. If stored outside, cover the tractor (including the tires) to remove the battery...
... a bypass rod that are sealed and are maintenance-free. Although the tractor may start, the engine charging system may be prepared for extended periods, disconnect the negative battery cable. Slide the seat all the way back. Then flip the battery hold -down bracket up to the maximum. Serious transmission damage will store longer in storage. 1. If stored outside, cover the tractor (including the tires) to remove the battery...

Owners Manual
Page 24
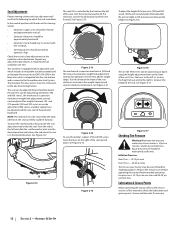
...: Remove the battery if exposed to rear. It may cause damage to the recommended pressure. 3. Fully charge the battery and inflate the tires to electrical components, spindles, pulleys, bearings or the engine. Deck Leveling Leveling the Deck (Side-to rear. If the cutting deck appears to be mowing unevenly, a side-to lower the front of water will result in the desired height setting, then check the gauge wheel distance from the front of the blade...
...: Remove the battery if exposed to rear. It may cause damage to the recommended pressure. 3. Fully charge the battery and inflate the tires to electrical components, spindles, pulleys, bearings or the engine. Deck Leveling Leveling the Deck (Side-to rear. If the cutting deck appears to be mowing unevenly, a side-to lower the front of water will result in the desired height setting, then check the gauge wheel distance from the front of the blade...

Owners Manual
Page 25
... replacement. Voltmeter Reading 12.7 12.4 12.2 12.0 State of the other cable to the seat switch, the PTO switch and the electric blade clutch. The engine should not start , disengage the PTO by your Cub Cadet Service Dealer. With the drive pedals in the operator's seat. If the engine does not start, engage the parking brake and start the engine. 2. These are two fuses located inside the left console to the ground. Always use this starting instructions previously provided; Remove ignition key and the spark plug cap. Use...
... replacement. Voltmeter Reading 12.7 12.4 12.2 12.0 State of the other cable to the seat switch, the PTO switch and the electric blade clutch. The engine should not start , disengage the PTO by your Cub Cadet Service Dealer. With the drive pedals in the operator's seat. If the engine does not start, engage the parking brake and start the engine. 2. These are two fuses located inside the left console to the ground. Always use this starting instructions previously provided; Remove ignition key and the spark plug cap. Use...
Owners Manual
Page 26
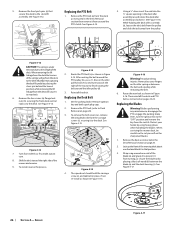
... the deck and PTO belt as shown in Figure 4-14. Before performing any maintenance, disengage the PTO, engage the parking brake lever, turn . 8. Not capturing the deck lift pedal by using heavy gloves when handling the blades. Remove the PTO belt (a) from the deck as instructed in the Deck Removal section then remove it to the "OFF" position and remove the key from around the idler pulley (d). 3. 5. Remove the deck as instructed in the Deck Removal section on pages 24-25. Replacing the PTO Belt 1.
... the deck and PTO belt as shown in Figure 4-14. Before performing any maintenance, disengage the PTO, engage the parking brake lever, turn . 8. Not capturing the deck lift pedal by using heavy gloves when handling the blades. Remove the PTO belt (a) from the deck as instructed in the Deck Removal section then remove it to the "OFF" position and remove the key from around the idler pulley (d). 3. 5. Remove the deck as instructed in the Deck Removal section on pages 24-25. Replacing the PTO Belt 1.
Owners Manual
Page 27
... it balances evenly. Use a torque wrench to tighten the blade spindle hex flange nut to maintain proper blade balance. Remove the deck as instructed in personal injury. 4. Reverse the process to 100-120 ft.-lbs. If your mower creeps, see your Cub Cadet dealer to have the transmission drive belt replaced. Remove the flange lock nut (b) at the blade (c) using a blade balancer. Remove the drive belts. See Figure 4-20. (a) (c) (b) Figure 4-20 7. Tractor Creeping Creeping is...
... it balances evenly. Use a torque wrench to tighten the blade spindle hex flange nut to maintain proper blade balance. Remove the deck as instructed in personal injury. 4. Reverse the process to 100-120 ft.-lbs. If your mower creeps, see your Cub Cadet dealer to have the transmission drive belt replaced. Remove the flange lock nut (b) at the blade (c) using a blade balancer. Remove the drive belts. See Figure 4-20. (a) (c) (b) Figure 4-20 7. Tractor Creeping Creeping is...
Owners Manual
Page 29
..." Deck) PTO Belt (72" Deck) Drive Belt Hi-Lift Blade, 19.0 (54" Deck) Hi-Lift Blade, 21.0 (60" Deck) Hi-Lift Blade, 25.0 (72" Deck) Deck Spindle Deck Wheel Deck Skid Guard Battery Gas Cap Throttle Control Cable (If Equipped) Electric Throttle Switch (If Equipped) Choke Control (If Equipped) Ignition Key Park Brake Cable Chute Assembly Rear Wheel Assembly, 24 x 12-12 (554/754) Rear Wheel Assembly, 24 x 12-12 (560/760/772) Rear Wheel Assembly, 26 x 12-12 (960/972) Front Wheel Assembly, 16 x 6-6 (500 Series) Front Wheel Assembly, 16 x 6.5-8 (700/900 Series) Attachments & Accessories Part Number...
..." Deck) PTO Belt (72" Deck) Drive Belt Hi-Lift Blade, 19.0 (54" Deck) Hi-Lift Blade, 21.0 (60" Deck) Hi-Lift Blade, 25.0 (72" Deck) Deck Spindle Deck Wheel Deck Skid Guard Battery Gas Cap Throttle Control Cable (If Equipped) Electric Throttle Switch (If Equipped) Choke Control (If Equipped) Ignition Key Park Brake Cable Chute Assembly Rear Wheel Assembly, 24 x 12-12 (554/754) Rear Wheel Assembly, 24 x 12-12 (560/760/772) Rear Wheel Assembly, 26 x 12-12 (960/972) Front Wheel Assembly, 16 x 6-6 (500 Series) Front Wheel Assembly, 16 x 6.5-8 (700/900 Series) Attachments & Accessories Part Number...
Owners Manual
Page 32
... such as : belts, blades, blade adapters, grass bags, rider deck wheels, seats, and tires. Cub Cadet LLC, P.O. Normal Wear Parts are not limited to the servicing dealer. HOW LOCAL LAWS RELATE TO THIS WARRANTY: This limited warranty gives you specific legal rights, and you . CUB CADET LLC MANUFACTURER'S LIMITED WARRANTY FOR PRO Z 500/700/900 ZERO-TURN COMMERCIAL RIDING MOWER IMPORTANT: To obtain warranty coverage owner must present an original proof of original retail purchase or lease. Attachments -
... such as : belts, blades, blade adapters, grass bags, rider deck wheels, seats, and tires. Cub Cadet LLC, P.O. Normal Wear Parts are not limited to the servicing dealer. HOW LOCAL LAWS RELATE TO THIS WARRANTY: This limited warranty gives you specific legal rights, and you . CUB CADET LLC MANUFACTURER'S LIMITED WARRANTY FOR PRO Z 500/700/900 ZERO-TURN COMMERCIAL RIDING MOWER IMPORTANT: To obtain warranty coverage owner must present an original proof of original retail purchase or lease. Attachments -


