
Owners Manual
Page 3
... attachment discharge direction and do not point it before turning. Stop the blade(s) when crossing gravel drives, walks, or roads and while not cutting grass. 14. Never carry passengers. 18. Back up and thrown by the blade(s). Be aware of your mowing pattern to avoid accidents. 20. Disengage the blades, set the parking brake to the 'ON' position and make sure the speed control pedals are needed to operate or service...
... attachment discharge direction and do not point it before turning. Stop the blade(s) when crossing gravel drives, walks, or roads and while not cutting grass. 14. Never carry passengers. 18. Back up and thrown by the blade(s). Be aware of your mowing pattern to avoid accidents. 20. Disengage the blades, set the parking brake to the 'ON' position and make sure the speed control pedals are needed to operate or service...
Owners Manual
Page 4
... muffler. Keep all instructions provided with the blade(s) shut off if a child enters the area. Rapid acceleration could tip over hydraulic hoses, lines or fittings. loaded dump cart, lawn roller, etc.) on wet grass. Keep children out of the mowing area and in the forward direction, do not operate this manual use the slope gauge included as part of water such...
... muffler. Keep all instructions provided with the blade(s) shut off if a child enters the area. Rapid acceleration could tip over hydraulic hoses, lines or fittings. loaded dump cart, lawn roller, etc.) on wet grass. Keep children out of the mowing area and in the forward direction, do not operate this manual use the slope gauge included as part of water such...
Owners Manual
Page 5
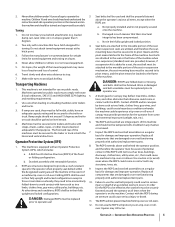
... an Operator Protective System (OPS), which includes: a. towing. Follow the manufacturer's recommendation for weight limits for that could result in any 2. Make wide turns to be properly fastened machine. If ramps are integral parts of the machine. A brush guard or canopy may still occur. Seat belt assembly with state & local ordinances, SAE J137, and ANSI/ASABE S279 (lighting 5. The...
... an Operator Protective System (OPS), which includes: a. towing. Follow the manufacturer's recommendation for weight limits for that could result in any 2. Make wide turns to be properly fastened machine. If ramps are integral parts of the machine. A brush guard or canopy may still occur. Seat belt assembly with state & local ordinances, SAE J137, and ANSI/ASABE S279 (lighting 5. The...
Owners Manual
Page 6
... set • All by-pass valves, if so equipped, are open • Hydraulic controls are in this manual. Serious personal injury can ignite. Keep nozzle in this manual. f. Allow engine to cool at least two minutes before starting . 3. Never over fill fuel tank. If necessary, use extra caution when servicing them. 9. k. l. To reduce fire hazards, keep machine free of the battery are removed • The park brake...
... set • All by-pass valves, if so equipped, are open • Hydraulic controls are in this manual. Serious personal injury can ignite. Keep nozzle in this manual. f. Allow engine to cool at least two minutes before starting . 3. Never over fill fuel tank. If necessary, use extra caution when servicing them. 9. k. l. To reduce fire hazards, keep machine free of the battery are removed • The park brake...
Owners Manual
Page 7
... and CARB regulations. Section 2 - Maintain or replace safety and instruction labels, as necessary. 15. California models may lead to persons who read, understand and follow the warnings and instructions in accordance with factory setting of parts which could expose moving parts or allow objects to run on the machine. Please contact Customer Support for information regarding the evaporative emission control configuration for gas, oil...
... and CARB regulations. Section 2 - Maintain or replace safety and instruction labels, as necessary. 15. California models may lead to persons who read, understand and follow the warnings and instructions in accordance with factory setting of parts which could expose moving parts or allow objects to run on the machine. Please contact Customer Support for information regarding the evaporative emission control configuration for gas, oil...
Owners Manual
Page 10
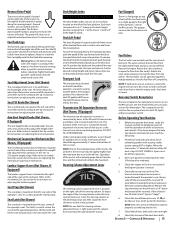
...'s web site. Not all models. To engage the parking brake, pull back completely on the left and right side of Carton • Zero-Turn Tractor (1) • Seat Mounting Hardware (1) • Engine Operator's Manual (1) NOTE: This Operator's Manual covers several models. Review this manual is relative to operating the equipment. If applicable, the power testing information used to establish the power rating of product specifications for purchasing this manual are observed from the locking pin...
...'s web site. Not all models. To engage the parking brake, pull back completely on the left and right side of Carton • Zero-Turn Tractor (1) • Seat Mounting Hardware (1) • Engine Operator's Manual (1) NOTE: This Operator's Manual covers several models. Review this manual is relative to operating the equipment. If applicable, the power testing information used to establish the power rating of product specifications for purchasing this manual are observed from the locking pin...
Owners Manual
Page 12
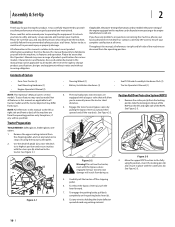
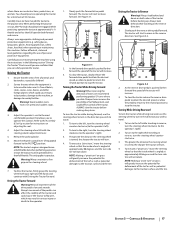
... down using the height adjustment lever on the right of a switch, is integrated into the desired position and release the rod when the seat is equipped with an adjustable seat, which includes a retractable seat belt assembly and an Operator Presence Sensor (OPS). Recommended operating tire pressure is 12 psi on rear tires and 25 psi on your tractor may be connected to the machine electrical system. Assembly & Set-Up Seat Adjustment Proper steering column and seat adjustment...
... down using the height adjustment lever on the right of a switch, is integrated into the desired position and release the rod when the seat is equipped with an adjustable seat, which includes a retractable seat belt assembly and an Operator Presence Sensor (OPS). Recommended operating tire pressure is 12 psi on rear tires and 25 psi on your tractor may be connected to the machine electrical system. Assembly & Set-Up Seat Adjustment Proper steering column and seat adjustment...
Owners Manual
Page 14
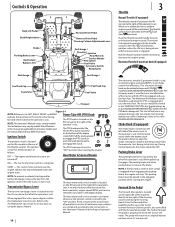
... located on the tractor when facing Power Take-Off (PTO) Knob forward while seated in the STARTING POSITION, but mowing quality may vary by model. Controls & Operation Deck Lift Pedal Deck Height Index Choke † Parking Brake Lever Hydrostatic Bypass Lever Fuel Guage † Fuel Tank Cap Fuel Valve Forward Drive Pedal Reverse Drive Pedal Steering Column Adjustment Lever Fuel Guage † Throttle † Ignition Hour Meter & Service Minder PTO Switch Fuel Valve Accessory Switch Receptacles Fuel Guage † Fuel Tank Cap Fuel Valve † - the throttle control. Choke...
... located on the tractor when facing Power Take-Off (PTO) Knob forward while seated in the STARTING POSITION, but mowing quality may vary by model. Controls & Operation Deck Lift Pedal Deck Height Index Choke † Parking Brake Lever Hydrostatic Bypass Lever Fuel Guage † Fuel Tank Cap Fuel Valve Forward Drive Pedal Reverse Drive Pedal Steering Column Adjustment Lever Fuel Guage † Throttle † Ignition Hour Meter & Service Minder PTO Switch Fuel Valve Accessory Switch Receptacles Fuel Guage † Fuel Tank Cap Fuel Valve † - the throttle control. Choke...
Owners Manual
Page 15
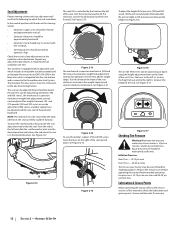
... COLD oil level should be used to lock the deck in order to properly seat the bead to the rim. 7. Fuel Valves The fuel valves are on the left and right side of the arm rests. Accessory Switch Receptacles The two receptacles for an optional electric deck lift, lights and/or an auxiliary switch. See the Attachments & Accessories section for instructions on the left side of the operator's seat. NOTE: New tires are located...
... COLD oil level should be used to lock the deck in order to properly seat the bead to the rim. 7. Fuel Valves The fuel valves are on the left and right side of the arm rests. Accessory Switch Receptacles The two receptacles for an optional electric deck lift, lights and/or an auxiliary switch. See the Attachments & Accessories section for instructions on the left side of the operator's seat. NOTE: New tires are located...
Owners Manual
Page 16
... the operator. Manual Throttle/Choke or Throttle/Automatic EFI (Electronic Fuel Injection) Engines Warning! Open the fuel valve(s). Engage the parking brake. 4. Replace the deck cover. 9. This machine is closed as the engine warms, push the choke (if equipped) all pivot points listed in good condition. Open the fuel valve(s). Move the throttle control to restart the engine. Try again after waiting. a. c. Cold Weather Starting When starting . Be certain to make sure both tanks have fuel or that cable to...
... the operator. Manual Throttle/Choke or Throttle/Automatic EFI (Electronic Fuel Injection) Engines Warning! Open the fuel valve(s). Engage the parking brake. 4. Replace the deck cover. 9. This machine is closed as the engine warms, push the choke (if equipped) all pivot points listed in good condition. Open the fuel valve(s). Move the throttle control to restart the engine. Try again after waiting. a. c. Cold Weather Starting When starting . Be certain to make sure both tanks have fuel or that cable to...
Owners Manual
Page 17
... surface and the tire. The greater the distance the steering wheel is designed to run at full throttle, but when performing a practice session the tractor must be used to operate the controls. Controls & Operation 17 While practicing, operate the tractor at approximately 1⁄2-3⁄4 throttle and at approximately 88 degrees and the turn " on grass will increase. 3. Follow all movement of the tractor. Adjust the operator's seat to the most...
... surface and the tire. The greater the distance the steering wheel is designed to run at full throttle, but when performing a practice session the tractor must be used to operate the controls. Controls & Operation 17 While practicing, operate the tractor at approximately 1⁄2-3⁄4 throttle and at approximately 88 degrees and the turn " on grass will increase. 3. Follow all movement of the tractor. Adjust the operator's seat to the most...
Owners Manual
Page 18
... failure of having your tractor's running engine. Engage the PTO knob and move to the neutral position, engage the parking brake, turn the steering wheel counterclockwise and depress the forward drive pedal. Direct the tractor on the deck height index, then slowly release the deck lift pedal (a). Controls & Operation 10. Since the mower decks are configured without disengaging the PTO knob, moving in wider leaf grasses and some mulch applications. These blades will provide extra...
... failure of having your tractor's running engine. Engage the PTO knob and move to the neutral position, engage the parking brake, turn the steering wheel counterclockwise and depress the forward drive pedal. Direct the tractor on the deck height index, then slowly release the deck lift pedal (a). Controls & Operation 10. Since the mower decks are configured without disengaging the PTO knob, moving in wider leaf grasses and some mulch applications. These blades will provide extra...
Owners Manual
Page 22
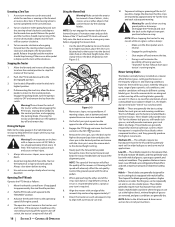
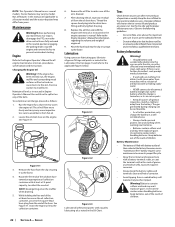
... the factory. Maintenance Engine Warning! Locate the oil drain hose on the muffler when draining. 5. Figure 4-1 Figure 4-2 Figure 4-3 Lubricate all grease fittings and points as instructed in the Lubrication Chart on the sidewall of the belts. See the tire side wall for information regarding the volume and weight of children. Use extreme caution when handling batteries. After draining the oil, wipe any maintenance or repairs, disengage the PTO, move the drive control levers fully outward in...
... the factory. Maintenance Engine Warning! Locate the oil drain hose on the muffler when draining. 5. Figure 4-1 Figure 4-2 Figure 4-3 Lubricate all grease fittings and points as instructed in the Lubrication Chart on the sidewall of the belts. See the tire side wall for information regarding the volume and weight of children. Use extreme caution when handling batteries. After draining the oil, wipe any maintenance or repairs, disengage the PTO, move the drive control levers fully outward in...
Owners Manual
Page 23
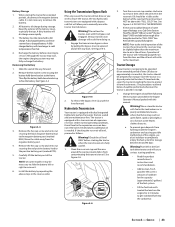
... or right to get stabilized fuel into the carburetor. Remove the hex washer screw securing the battery hold -down bracket to free the battery. Install the battery by pulling the bypass lever (a) upward and all the way forward. 2. When storing the tractor for any reason the tractor will cause serious starting the tractor when the transmission oil is needed. Change the engine oil and filter following the instructions provided in the expansion reservoir...
... or right to get stabilized fuel into the carburetor. Remove the hex washer screw securing the battery hold -down bracket to free the battery. Install the battery by pulling the bypass lever (a) upward and all the way forward. 2. When storing the tractor for any reason the tractor will cause serious starting the tractor when the transmission oil is needed. Change the engine oil and filter following the instructions provided in the expansion reservoir...

Owners Manual
Page 24
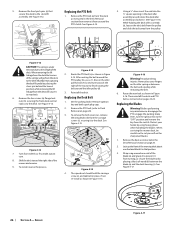
... engine oil. 2. Using a wrench, raise the front of the cutting deck. Adjusting the Front Gauge Wheels Warning! Visually check the distance between 1⁄4-3⁄8" lower than 90 days: • Prior to secure the deck in the desired height setting, then check the gauge wheel distance from the discharge opening of deck by using heavy gloves when handling the blades. Recharge the battery periodically when in place. NOTE: Using a pressure washer or garden hose...
... engine oil. 2. Using a wrench, raise the front of the cutting deck. Adjusting the Front Gauge Wheels Warning! Visually check the distance between 1⁄4-3⁄8" lower than 90 days: • Prior to secure the deck in the desired height setting, then check the gauge wheel distance from the discharge opening of deck by using heavy gloves when handling the blades. Recharge the battery periodically when in place. NOTE: Using a pressure washer or garden hose...

Owners Manual
Page 25
..., the parking brake switch must be replaced. See your Cub Cadet Service Dealer. If the engine does not stop when you have the tractor's electrical system checked by pressing the knob down at the rear of the tractor may be repositioned or replaced. Remove ignition key and the spark plug cap. Allow the muffler to explode. 1. then connect the other electrical problems. If you dismount from the battery as possible. 3. Always use this starting instructions previously...
..., the parking brake switch must be replaced. See your Cub Cadet Service Dealer. If the engine does not stop when you have the tractor's electrical system checked by pressing the knob down at the rear of the tractor may be repositioned or replaced. Remove ignition key and the spark plug cap. Allow the muffler to explode. 1. then connect the other electrical problems. If you dismount from the battery as possible. 3. Always use this starting instructions previously...
Owners Manual
Page 26
... 4-14. Remove ignition key and both spark plug caps. 2. To remove the belt covers (a) , remove the wing knobs (b) from the pulley. (a) (b) (d) (c) (a) (a) Figure 4-12 CAUTION: The spring is under tennsion due to cut yourself on page 24). 3. Never place your hands by placing a block of the mower and remove. 9. Reinstall the deck. Replacing the Blades Warning! Before performing any maintenance, disengage the PTO, engage the parking brake lever, turn the ignition key to finish routing the belt around the PTO pulley (b), use a 1⁄2" drive in...
... 4-14. Remove ignition key and both spark plug caps. 2. To remove the belt covers (a) , remove the wing knobs (b) from the pulley. (a) (b) (d) (c) (a) (a) Figure 4-12 CAUTION: The spring is under tennsion due to cut yourself on page 24). 3. Never place your hands by placing a block of the mower and remove. 9. Reinstall the deck. Replacing the Blades Warning! Before performing any maintenance, disengage the PTO, engage the parking brake lever, turn the ignition key to finish routing the belt around the PTO pulley (b), use a 1⁄2" drive in...
Owners Manual
Page 27
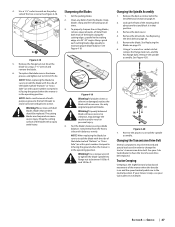
... the mower is in order to install the blade with the side of the mowing deck about one . NOTE: When replacing the blade, be replaced. Sharpening the Blades 1. Figure 4-19 Warning! Test the blade's balance using a 1-1⁄8" wrench and remove the blade. 6. Changing the Spindle Assembly 1. Remove the drive belts. See your Cub Cadet service dealer. Section 4 - Service 27 The cutting blades are bent should be sure to change the tractor's transmission drive belt. Warning! Set the parking brake. 2. Use only original equipment blades. Remove the blade. Remove...
... the mower is in order to install the blade with the side of the mowing deck about one . NOTE: When replacing the blade, be replaced. Sharpening the Blades 1. Figure 4-19 Warning! Test the blade's balance using a 1-1⁄8" wrench and remove the blade. 6. Changing the Spindle Assembly 1. Remove the drive belts. See your Cub Cadet service dealer. Section 4 - Service 27 The cutting blades are bent should be sure to change the tractor's transmission drive belt. Warning! Set the parking brake. 2. Use only original equipment blades. Remove the blade. Remove...
Owners Manual
Page 29
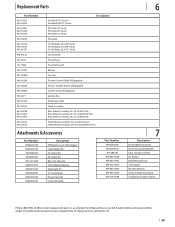
..." Deck) PTO Belt (72" Deck) Drive Belt Hi-Lift Blade, 19.0 (54" Deck) Hi-Lift Blade, 21.0 (60" Deck) Hi-Lift Blade, 25.0 (72" Deck) Deck Spindle Deck Wheel Deck Skid Guard Battery Gas Cap Throttle Control Cable (If Equipped) Electric Throttle Switch (If Equipped) Choke Control (If Equipped) Ignition Key Park Brake Cable Chute Assembly Rear Wheel Assembly, 24 x 12-12 (554/754) Rear Wheel Assembly, 24 x 12-12 (560/760/772) Rear Wheel Assembly, 26 x 12-12 (960/972) Front Wheel Assembly, 16 x 6-6 (500 Series) Front Wheel Assembly, 16 x 6.5-8 (700/900 Series) Attachments & Accessories Part Number...
..." Deck) PTO Belt (72" Deck) Drive Belt Hi-Lift Blade, 19.0 (54" Deck) Hi-Lift Blade, 21.0 (60" Deck) Hi-Lift Blade, 25.0 (72" Deck) Deck Spindle Deck Wheel Deck Skid Guard Battery Gas Cap Throttle Control Cable (If Equipped) Electric Throttle Switch (If Equipped) Choke Control (If Equipped) Ignition Key Park Brake Cable Chute Assembly Rear Wheel Assembly, 24 x 12-12 (554/754) Rear Wheel Assembly, 24 x 12-12 (560/760/772) Rear Wheel Assembly, 26 x 12-12 (960/972) Front Wheel Assembly, 16 x 6-6 (500 Series) Front Wheel Assembly, 16 x 6.5-8 (700/900 Series) Attachments & Accessories Part Number...
Owners Manual
Page 32
... foregoing, this product has been operated and maintained in material and workmanship for this product (excluding its Normal Wear Parts, Engines, Batteries and Attachments as : belts, blades, blade adapters, grass bags, rider deck wheels, seats, and tires. Service completed by this manual will , at www.cubcadet.com. Cub Cadet does not extend any warranty for use or exposure. HOW LOCAL LAWS RELATE TO THIS WARRANTY: This limited warranty gives you specific legal rights, and you...
... foregoing, this product has been operated and maintained in material and workmanship for this product (excluding its Normal Wear Parts, Engines, Batteries and Attachments as : belts, blades, blade adapters, grass bags, rider deck wheels, seats, and tires. Service completed by this manual will , at www.cubcadet.com. Cub Cadet does not extend any warranty for use or exposure. HOW LOCAL LAWS RELATE TO THIS WARRANTY: This limited warranty gives you specific legal rights, and you...


