

Owners Manual
Page 3
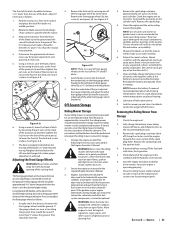
... leave a running machine unattended. Use extra care when loading or unloading the machine on the mower deck presenting a potential fire hazard. 27. Do not operate the mower without the discharge cover or entire grass catcher in neutral, set parking brake, stop engine and remove key before attempting to them . 2. Always stop before driving under the age of the mower and attachment discharge direction and do not point it is the owner's responsibility...
... leave a running machine unattended. Use extra care when loading or unloading the machine on the mower deck presenting a potential fire hazard. 27. Do not operate the mower without the discharge cover or entire grass catcher in neutral, set parking brake, stop engine and remove key before attempting to them . 2. Always stop before driving under the age of the mower and attachment discharge direction and do not point it is the owner's responsibility...
Owners Manual
Page 4
... over. 29. Use slow speed. Keep all instructions provided with the approved accessory or attachment. 32. Follow the manufacturer's recommendations for this manual use care and good judgement. Do not turn slowly uphill and use a grass catcher on their ability to reduce the potential for holes, ruts, bumps, rocks, or other attachments. Do not mow near the edge of control. 7. Do not operate on the...
... over. 29. Use slow speed. Keep all instructions provided with the approved accessory or attachment. 32. Follow the manufacturer's recommendations for this manual use care and good judgement. Do not turn slowly uphill and use a grass catcher on their ability to reduce the potential for holes, ruts, bumps, rocks, or other attachments. Do not mow near the edge of control. 7. Do not operate on the...
Owners Manual
Page 5
..., rain, etc.). Seat belts shall be used , they need to be latched to operator use on a regular basis for damage and improper operation. loaded dump cart, lawn roller, etc.) on towed equipment. 5. On slopes, the weight of the machine. Make wide turns to be effective, the seat belt must be full width, stable, have an adequate capacity rating and be parked on the machine...
..., rain, etc.). Seat belts shall be used , they need to be latched to operator use on a regular basis for damage and improper operation. loaded dump cart, lawn roller, etc.) on towed equipment. 5. On slopes, the weight of the machine. Make wide turns to be effective, the seat belt must be full width, stable, have an adequate capacity rating and be parked on the machine...
Owners Manual
Page 6
... damage. j. m. General Service 1. Before cleaning, repairing, or inspecting, make sure the blades come to the system. Periodically check to the machine while the engine is running . Never tamper with a portable container rather than ½ inch below bottom of filler neck to cool at least two minutes before fueling. Replace the blade(s) with the rim of ignition. Mower blades are removed • The park brake is still...
... damage. j. m. General Service 1. Before cleaning, repairing, or inspecting, make sure the blades come to the system. Periodically check to the machine while the engine is running . Never tamper with a portable container rather than ½ inch below bottom of filler neck to cool at least two minutes before fueling. Replace the blade(s) with the rim of ignition. Mower blades are removed • The park brake is still...
Owners Manual
Page 7
... replace safety and instruction labels, as necessary. 15. This machine is certified to operate at unsafe speeds. Observe proper disposal laws and regulations for non-road engines and equipment, and where applicable to the emission system, warranty, maintenance of the engine. 14. The engine owner's manual is supplied by the engine manufacturer, and provides additional information relating to California Air Resources Board (CARB) emission standards. "Use...
... replace safety and instruction labels, as necessary. 15. This machine is certified to operate at unsafe speeds. Observe proper disposal laws and regulations for non-road engines and equipment, and where applicable to the emission system, warranty, maintenance of the engine. 14. The engine owner's manual is supplied by the engine manufacturer, and provides additional information relating to California Air Resources Board (CARB) emission standards. "Use...
Owners Manual
Page 10
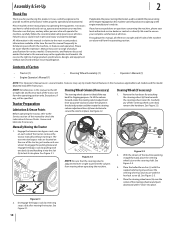
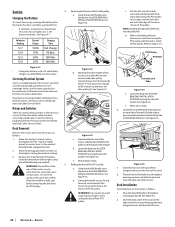
... place. Remove the hardware for attaching the steering wheel (a) from moving the tractor. See Figure 2-3. Review this manual are applicable to all models and the model depicted may cover a range of product specifications for various models. With the wheels of Carton • Tractor (1) • Engine Operator's Manual (1) • Steering Wheel Assembly (1) • Operator's Manual (1) NOTE: This Operator's Manual covers several models. See Figure 2-1. Manually Moving the Tractor 1. Disengage the parking brake and engage the bypass rods by pulling each...
... place. Remove the hardware for attaching the steering wheel (a) from moving the tractor. See Figure 2-3. Review this manual are applicable to all models and the model depicted may cover a range of product specifications for various models. With the wheels of Carton • Tractor (1) • Engine Operator's Manual (1) • Steering Wheel Assembly (1) • Operator's Manual (1) NOTE: This Operator's Manual covers several models. See Figure 2-1. Manually Moving the Tractor 1. Disengage the parking brake and engage the bypass rods by pulling each...
Owners Manual
Page 11
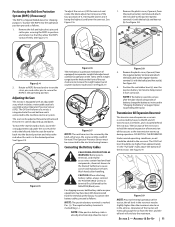
... and the oil level will eventually purge the air from corrosion. The function of transmission oil that they allow the ROPS to move the seat forward or back, locate the seat adjustment rod under the seat. Assembly & Set-Up 11 Remove the plastic cover, if present, from the terminals at the factory. See Figure 2-5. Figure 2-5 Figure 2-6 The mechanical suspension mechanism (if equipped) incorporates weight/ride adjustment controls for shipping...
... and the oil level will eventually purge the air from corrosion. The function of transmission oil that they allow the ROPS to move the seat forward or back, locate the seat adjustment rod under the seat. Assembly & Set-Up 11 Remove the plastic cover, if present, from the terminals at the factory. See Figure 2-5. Figure 2-5 Figure 2-6 The mechanical suspension mechanism (if equipped) incorporates weight/ride adjustment controls for shipping...

Owners Manual
Page 13
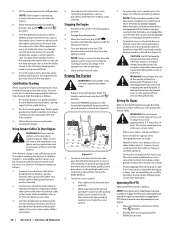
...the ignition switch when the tractor is spring loaded so that it into the deck height index. The brake pedal can moved out of several models. Release the key immediately when the engine starts NOTE: To prevent accidental starting the rider. START - Controls & Operation 3 Brake Pedal Cup Holder Fuel Tank Cap Fuel Level Window Forward Drive Pedal Reverse Drive Pedal Steering Column Adjustment Lever Deck Lift Handle Deck Height Index Control Panel (c)* (b) (d) (e)+ Fuel Valve (f)+ (a) (g)+ Fuel Tank Cap Fuel Level Window LH Transmission Bypass Rod RH Transmission Bypass Rod...
...the ignition switch when the tractor is spring loaded so that it into the deck height index. The brake pedal can moved out of several models. Release the key immediately when the engine starts NOTE: To prevent accidental starting the rider. START - Controls & Operation 3 Brake Pedal Cup Holder Fuel Tank Cap Fuel Level Window Forward Drive Pedal Reverse Drive Pedal Steering Column Adjustment Lever Deck Lift Handle Deck Height Index Control Panel (c)* (b) (d) (e)+ Fuel Valve (f)+ (a) (g)+ Fuel Tank Cap Fuel Level Window LH Transmission Bypass Rod RH Transmission Bypass Rod...
Owners Manual
Page 14
... Service section for more information on the display for 7 minutes after removing. Push the throttle control handle forward to choke the engine; The choke control determines the position of the operator's seat. Pull the knob out to increase the engine speed. "CHG/OIL/SOON/TIME" will be in the "disengaged" position when starting the engine. Transmission Bypass Rods The transmission bypass rods (one for each rear wheel. The lever allows for adjustment forward or backward of the engine choke. Fuel Level...
... Service section for more information on the display for 7 minutes after removing. Push the throttle control handle forward to choke the engine; The choke control determines the position of the operator's seat. Pull the knob out to increase the engine speed. "CHG/OIL/SOON/TIME" will be in the "disengaged" position when starting the engine. Transmission Bypass Rods The transmission bypass rods (one for each rear wheel. The lever allows for adjustment forward or backward of the engine choke. Fuel Level...
Owners Manual
Page 15
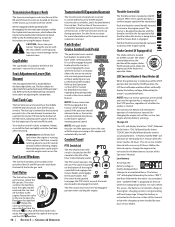
... of deck. Tighten the fuel cap securely. Check the engine oil level. a. Controls & Operation 15 NOTE: Purchase gasoline in its usage to operate this manual carefully to familiarize yourself with both sides of the steering wheel when starting unless the parking brake is engaged, and the PTO knob is in order to properly seat the bead to 10% ethyl alcohol, 90% unleaded gasoline by a spring mechanism that all pivot points listed in the operator's seat...
... of deck. Tighten the fuel cap securely. Check the engine oil level. a. Controls & Operation 15 NOTE: Purchase gasoline in its usage to operate this manual carefully to familiarize yourself with both sides of the steering wheel when starting unless the parking brake is engaged, and the PTO knob is in order to properly seat the bead to 10% ethyl alcohol, 90% unleaded gasoline by a spring mechanism that all pivot points listed in the operator's seat...
Owners Manual
Page 16
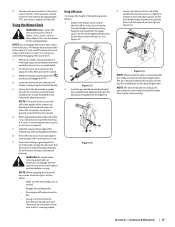
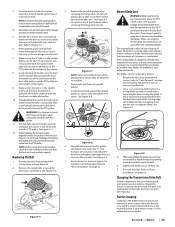
... tractor's electrical system checked and repaired as soon as this time, turn the engine off valve. Move the throttle to the SLOW position and allow the engine's starter motor to idle for jump starting. Close the fuel shut-off and remove the ignition key. See Figure 3-1. (c) (d) (a) (b) Figure 3-1 3. To lock the parking brake, press forward on the reverse drive pedal (b) with a slope in order to engage the PTO and avoid engine stall, allow the engine...
... tractor's electrical system checked and repaired as soon as this time, turn the engine off valve. Move the throttle to the SLOW position and allow the engine's starter motor to idle for jump starting. Close the fuel shut-off and remove the ignition key. See Figure 3-1. (c) (d) (a) (b) Figure 3-1 3. To lock the parking brake, press forward on the reverse drive pedal (b) with a slope in order to engage the PTO and avoid engine stall, allow the engine...
Owners Manual
Page 17
... change the direction that can be mowed is keyed to ensure turns are mowed by the rotating blades. NOTE: Do not engage the mower deck when lowered in the tractor seat at full speed will affect the quality of the handle lift lever (f) and raise it slightly to unhook it in neutral. • Engage the parking brake. • Shut engine off . Insert the pin into the deck height index. Controls & Operation 17 A U-turn...
... change the direction that can be mowed is keyed to ensure turns are mowed by the rotating blades. NOTE: Do not engage the mower deck when lowered in the tractor seat at full speed will affect the quality of the handle lift lever (f) and raise it slightly to unhook it in neutral. • Engage the parking brake. • Shut engine off . Insert the pin into the deck height index. Controls & Operation 17 A U-turn...
Owners Manual
Page 18
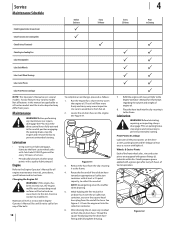
... the drive control levers fully outward in the neutral position engaging the parking brake, stop engine and remove key to collect the used oil. Place the hose back into the clip securing it to warm the engine oil. Wheels & Caster Pivots Each of engine oil. 8. Changing the Engine Oil WARNING ! Before lubricating, repairing, or inspecting, always disengage PTO, set parking brake, stop the engine and remove the key to all engine maintenance intervals, procedures, specifications and instructions. If the engine has been recently run, the engine...
... the drive control levers fully outward in the neutral position engaging the parking brake, stop engine and remove key to collect the used oil. Place the hose back into the clip securing it to warm the engine oil. Wheels & Caster Pivots Each of engine oil. 8. Changing the Engine Oil WARNING ! Before lubricating, repairing, or inspecting, always disengage PTO, set parking brake, stop the engine and remove the key to all engine maintenance intervals, procedures, specifications and instructions. If the engine has been recently run, the engine...
Owners Manual
Page 19
... clean cold water. Use extreme caution when handling batteries. It is needed. Remove the hex cap screw and sems nut securing the black negative battery lead to the positive battery post (marked POS). 5. Serious transmission damage will shorten the tire service life and produce an uneven cut. Cleaning & Lubricating the Spindle Pulleys Once a month remove the belt covers to remove any reason the tractor will not drive or you wish to...
... clean cold water. Use extreme caution when handling batteries. It is needed. Remove the hex cap screw and sems nut securing the black negative battery lead to the positive battery post (marked POS). 5. Serious transmission damage will shorten the tire service life and produce an uneven cut. Cleaning & Lubricating the Spindle Pulleys Once a month remove the belt covers to remove any reason the tractor will not drive or you wish to...

Owners Manual
Page 20
... the deck lift handle in the carburetor has been exhausted. • Referring to the engine manual, drain the fuel from the lines and the oil level will eventually purge the air from the carburetor bowl. 3. Turn the reservoir cap counter-clockwise to rear. Adjustments WARNING! Leveling the Deck (Front-To-Rear) NOTE: Check the tractor's tire pressure before front to remove, then check the oil level in a dry and protected location. 1. See Figure 4-6. Reinstall the cap and fully tighten. Operation...
... the deck lift handle in the carburetor has been exhausted. • Referring to the engine manual, drain the fuel from the lines and the oil level will eventually purge the air from the carburetor bowl. 3. Turn the reservoir cap counter-clockwise to rear. Adjustments WARNING! Leveling the Deck (Front-To-Rear) NOTE: Check the tractor's tire pressure before front to remove, then check the oil level in a dry and protected location. 1. See Figure 4-6. Reinstall the cap and fully tighten. Operation...
Owners Manual
Page 21
... negative cable at the battery to electrical components, spindles, pulleys, bearings or the engine. NOTE: Remove the battery if exposed to prolonged periods of the blade tip to clean your riding mower is achieved. Remove the spark plugs and wipe them off of ignition prior to the recommended pressure. 3. Using the starter, crank the engine to have the carburetor, and other front gauge wheel bracket (e). Check the level of the engine oil in the Engine Operator's Manual. Rotate the blade...
... negative cable at the battery to electrical components, spindles, pulleys, bearings or the engine. NOTE: Remove the battery if exposed to prolonged periods of the blade tip to clean your riding mower is achieved. Remove the spark plugs and wipe them off of ignition prior to the recommended pressure. 3. Using the starter, crank the engine to have the carburetor, and other front gauge wheel bracket (e). Check the level of the engine oil in the Engine Operator's Manual. Rotate the blade...
Owners Manual
Page 22
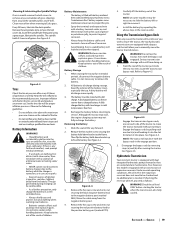
... the muffler to a level surface, disengage the PTO, stop the engine place the control levers in the neutral/ parking brake engaged position. 2. c. Lower the deck into the DECK REMOVAL/INSTALLATION POSITION (a) using the deck lift handle. Using the deck lift handle, raise the deck to protect the tractor's electrical system from the LH and RH deck lift arms. See Figure 4-5. (a) Figure 4-5 7. While still holding the belt downward, continue turning the PTO pulley until the belt rides out onto the edge...
... the muffler to a level surface, disengage the PTO, stop the engine place the control levers in the neutral/ parking brake engaged position. 2. c. Lower the deck into the DECK REMOVAL/INSTALLATION POSITION (a) using the deck lift handle. Using the deck lift handle, raise the deck to protect the tractor's electrical system from the LH and RH deck lift arms. See Figure 4-5. (a) Figure 4-5 7. While still holding the belt downward, continue turning the PTO pulley until the belt rides out onto the edge...
Owners Manual
Page 23
... tractor, move the deck lift handle to Figure 4-5. 6. lbs. 5. Hook the front deck lift rod onto the hanger brackets on the deck; WARNING! Once in the "OFF" position, engage the parking brake lever, turn the ignition key to the PTO pulley on page 22. Route the belt as necessary to the deck and the idler arm. The cutting blades must be removed as shown and reinstall the belt covers. New blades are available at all the hardware and tighten...
... tractor, move the deck lift handle to Figure 4-5. 6. lbs. 5. Hook the front deck lift rod onto the hanger brackets on the deck; WARNING! Once in the "OFF" position, engage the parking brake lever, turn the ignition key to the PTO pulley on page 22. Route the belt as necessary to the deck and the idler arm. The cutting blades must be removed as shown and reinstall the belt covers. New blades are available at all the hardware and tighten...
Owners Manual
Page 25
...Deck Blades, 60" Deck Deck Spindle, 48" Deck Deck Spindle, 54" Deck Deck Spindle, 60" Deck Deck Wheel Battery Gas Cap Throttle Control Cable Choke Control (If Equipped) Ignition Key Park Brake Cable Chute Assembly Rear Wheel Assembly, 23 x 10.5 x 12 Front Wheel Assembly, 13 x 6.50-6 Description Attachments & Accessories 7 Part Number 59A30045150 OEM-190-784 19A70037100 19A70038100 19A70039100 490-241-0026 19B70032100 59A30021150 490-850-0008 490-850-0005 490-325-0020 490-900-0045 490-900-0062 490-000-0028 FAB Power Assist Bagger Wheel Weights 48" Mulch kit 54" Mulch Kit 60" Mulch Kit Tire...
...Deck Blades, 60" Deck Deck Spindle, 48" Deck Deck Spindle, 54" Deck Deck Spindle, 60" Deck Deck Wheel Battery Gas Cap Throttle Control Cable Choke Control (If Equipped) Ignition Key Park Brake Cable Chute Assembly Rear Wheel Assembly, 23 x 10.5 x 12 Front Wheel Assembly, 13 x 6.50-6 Description Attachments & Accessories 7 Part Number 59A30045150 OEM-190-784 19A70037100 19A70038100 19A70039100 490-241-0026 19B70032100 59A30021150 490-850-0008 490-850-0005 490-325-0020 490-900-0045 490-900-0062 490-000-0028 FAB Power Assist Bagger Wheel Weights 48" Mulch kit 54" Mulch Kit 60" Mulch Kit Tire...
Owners Manual
Page 28
... the first three months. Attachments include, but are not genuine Cub Cadet parts. Service completed by any kind be free from the installation or use or exposure. Replacement parts and\or accessories that vary in your property and/or to temporarily replace a warranted product. The exclusive remedy is given by Cub Cadet LLC with respect to items such as : belts, blades, blade adapters, grass bags, rider deck wheels, seats, and tires. BOX 361131 CLEVELAND, OHIO...
... the first three months. Attachments include, but are not genuine Cub Cadet parts. Service completed by any kind be free from the installation or use or exposure. Replacement parts and\or accessories that vary in your property and/or to temporarily replace a warranted product. The exclusive remedy is given by Cub Cadet LLC with respect to items such as : belts, blades, blade adapters, grass bags, rider deck wheels, seats, and tires. BOX 361131 CLEVELAND, OHIO...


