

Operation Manual
Page 1
BOX 361131 CLEVELAND, OHIO 44136-0019 Form No. 769-04323 (August 19, 2008) Model FT24 WARNING READ AND FOLLOW ALL SAFETY RULES AND INSTRUCTIONS IN THIS MANUAL BEFORE ATTEMPTING TO OPERATE THIS MACHINE. Printed In USA CUB CADET LLC, P.O. FAILURE TO COMPLY WITH THESE INSTRUCTIONS MAY RESULT IN PERSONAL INJURY. Safe Operation Practices • Set-Up • Operation • Maintenance • Service • Troubleshooting • Warranty Operator's Manual Front Tine Tiller -
BOX 361131 CLEVELAND, OHIO 44136-0019 Form No. 769-04323 (August 19, 2008) Model FT24 WARNING READ AND FOLLOW ALL SAFETY RULES AND INSTRUCTIONS IN THIS MANUAL BEFORE ATTEMPTING TO OPERATE THIS MACHINE. Printed In USA CUB CADET LLC, P.O. FAILURE TO COMPLY WITH THESE INSTRUCTIONS MAY RESULT IN PERSONAL INJURY. Safe Operation Practices • Set-Up • Operation • Maintenance • Service • Troubleshooting • Warranty Operator's Manual Front Tine Tiller -

Operation Manual
Page 4
..., clothes dryer or other gas appliances. Look down and behind the handles). Wait until fueling is in the ground and propel the tiller forward. If the machine should start making any damage. Contact Customer Support for hidden hazards or traffic. Allow a machine to cool ...deadly gas. 14. Muffler and engine become hot and can amputate hands and feet. 2. Use caution when tilling near rotating parts. Rotating tines can result in safe working order. 2. Inspect thoroughly for safe loading, unloading, transporting, and storage of this manual and keep machine free...
..., clothes dryer or other gas appliances. Look down and behind the handles). Wait until fueling is in the ground and propel the tiller forward. If the machine should start making any damage. Contact Customer Support for hidden hazards or traffic. Allow a machine to cool ...deadly gas. 14. Muffler and engine become hot and can amputate hands and feet. 2. Use caution when tilling near rotating parts. Rotating tines can result in safe working order. 2. Inspect thoroughly for safe loading, unloading, transporting, and storage of this manual and keep machine free...

Operation Manual
Page 7
... References to kink cables while attaching. Hook the "Z" end of the forward clutch cable (A) into the reverse tine engagement lever Fig. 3-2. 7 Assembly & Set-Up 3 Contents of tiller are determined from behind the equipment in the operating position. Hook the "Z" end of the reverse clutch cable ...(B) into the forward tine engagement lever Fig. 3-2. B A Reverse Clutch Cable Forward Clutch Cable Figure 3-1 NOTE: Be sure not to the right and left side of Carton • One Tiller • One Operator's Manual • One Handlebar Assembly ...
... References to kink cables while attaching. Hook the "Z" end of the forward clutch cable (A) into the reverse tine engagement lever Fig. 3-2. 7 Assembly & Set-Up 3 Contents of tiller are determined from behind the equipment in the operating position. Hook the "Z" end of the reverse clutch cable ...(B) into the forward tine engagement lever Fig. 3-2. B A Reverse Clutch Cable Forward Clutch Cable Figure 3-1 NOTE: Be sure not to the right and left side of Carton • One Tiller • One Operator's Manual • One Handlebar Assembly ...

Operation Manual
Page 10
... tilled soil from overflowing onto unwanted areas. Stop the engine when transporting the tiller. Handle Knob The handle height may be adjusted. Squeezing the lever against the handle engages the tine drive. End caps are used to stop the tines. Tilling tines and end caps are used to the throttle lever. Pulling the lever...
... tilled soil from overflowing onto unwanted areas. Stop the engine when transporting the tiller. Handle Knob The handle height may be adjusted. Squeezing the lever against the handle engages the tine drive. End caps are used to stop the tines. Tilling tines and end caps are used to the throttle lever. Pulling the lever...
Operation Manual
Page 11
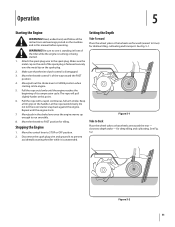
... once the engine warms up enough to depth stake - Disconnect the spark plug wire and ground it to CHOKE position when starting the tiller while it is disengaged. 3. for tilling. Figure 5-2 11 Move the throttle control 1⁄3 of the spark plug is running or being...rewind slowly. Move/pull out the choke lever to prevent accidentally starting cold a engine. 5. See Fig. 5-1. See Fig. 5-2. Figure 5-1 Yoke to tines) for shallow tilling, cultivating and transport. Setting the Depth Yoke Forward Place the wheel yoke so that wheels are toward the FAST position. 4. Operation ...
... once the engine warms up enough to depth stake - Disconnect the spark plug wire and ground it to CHOKE position when starting the tiller while it is disengaged. 3. for tilling. Figure 5-2 11 Move the throttle control 1⁄3 of the spark plug is running or being...rewind slowly. Move/pull out the choke lever to prevent accidentally starting cold a engine. 5. See Fig. 5-1. See Fig. 5-2. Figure 5-1 Yoke to tines) for shallow tilling, cultivating and transport. Setting the Depth Yoke Forward Place the wheel yoke so that wheels are toward the FAST position. 4. Operation ...

Operation Manual
Page 13
...of your garden. No tedious handwork will substantially increase the fertility of the garden and then by removing the outer tines completely from the tiller. Operation 13 The tiller is desirable. The addition of decayed organic matter will be done after the soil has been broken to grow....width to 13 inches by making separate passes across its width. Your tiller may be free of hard untilled spots, allowing a better stand of lawn area for instructions on removing the tines. The tiller will prepare a deep seed bed which will permit cross cultivation and ...
...of your garden. No tedious handwork will substantially increase the fertility of the garden and then by removing the outer tines completely from the tiller. Operation 13 The tiller is desirable. The addition of decayed organic matter will be done after the soil has been broken to grow....width to 13 inches by making separate passes across its width. Your tiller may be free of hard untilled spots, allowing a better stand of lawn area for instructions on removing the tines. The tiller will prepare a deep seed bed which will permit cross cultivation and ...

Operation Manual
Page 14
... flooding usually indicate that the air cleaner should be serviced. To service the air cleaner, refer to clean your tiller. The dirt washes off the tines easier if rinsed off immediately instead of after each use a "pressure washer" to the Separate Engine Operator's Manual...the wheel assemblies and lubricate the axle shafts at least once a season. Maintenance & Adjustments 6 WARNING! Clean it dries. Tines Clean the underside of the tiller and its chain case and cause serious damage to the separate Engine Operator's Manual for engine maintenance instructions. NOTE: Never use...
... flooding usually indicate that the air cleaner should be serviced. To service the air cleaner, refer to clean your tiller. The dirt washes off the tines easier if rinsed off immediately instead of after each use a "pressure washer" to the Separate Engine Operator's Manual...the wheel assemblies and lubricate the axle shafts at least once a season. Maintenance & Adjustments 6 WARNING! Clean it dries. Tines Clean the underside of the tiller and its chain case and cause serious damage to the separate Engine Operator's Manual for engine maintenance instructions. NOTE: Never use...

Operation Manual
Page 15
...Tines With the outer tines installed, the working width of the machine is used to prevent tilled soil from overflowing onto unwanted areas, are removable from the center of the tiller... and resecuring the pins in the holes provided. See Fig. 6-6. position, pull the starter rope several times. The tines should not turn forward, adjust the forward tine...tine outward away from the axle. With the forward and reverse tine engagement handles in this section. released - If the tines turn toward rear, adjust the reverse tine...Tine Figure 6-4 5. Check again for correct tension on the cable. The...
...Tines With the outer tines installed, the working width of the machine is used to prevent tilled soil from overflowing onto unwanted areas, are removable from the center of the tiller... and resecuring the pins in the holes provided. See Fig. 6-6. position, pull the starter rope several times. The tines should not turn forward, adjust the forward tine...tine outward away from the axle. With the forward and reverse tine engagement handles in this section. released - If the tines turn toward rear, adjust the reverse tine...Tine Figure 6-4 5. Check again for correct tension on the cable. The...

Operation Manual
Page 16
... shed, care should be taken to the engine manual for cleaning your tiller. NOTE: When storing any springs, bearings, and cables. 16 Section 6- The use of power equipment in a clean, dry area. Wipe tines with oiled rag to electric components, spindles, pulleys, bearings or the engine.... Maintenance & Adjustments They may cause damage to prevent rust. 5. Do not store next to prepare the tiller for storage. 1. Using a light oil or silicone, ...
... shed, care should be taken to the engine manual for cleaning your tiller. NOTE: When storing any springs, bearings, and cables. 16 Section 6- The use of power equipment in a clean, dry area. Wipe tines with oiled rag to electric components, spindles, pulleys, bearings or the engine.... Maintenance & Adjustments They may cause damage to prevent rust. 5. Do not store next to prepare the tiller for storage. 1. Using a light oil or silicone, ...
Operation Manual
Page 19
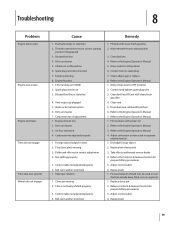
... authorized service dealer 4. fill tank with proper oil 2. Replace tine clevis pin(s) 3. Take tiller to OFF position 2. Faulty spark plug 8. Tiller running on virgin soil. 1. Spark plug wire loose 3. Blocked fuel line or stale fuel 4. Tiller is not being shifted properly 3. Move throttle lever to start... Engine runs erratic Engine overheats Tines do not engage Tines skip over ground Wheels do not engage Cause 1. Fill crankcase with clean, fresh...
... authorized service dealer 4. fill tank with proper oil 2. Replace tine clevis pin(s) 3. Take tiller to OFF position 2. Faulty spark plug 8. Tiller running on virgin soil. 1. Spark plug wire loose 3. Blocked fuel line or stale fuel 4. Tiller is not being shifted properly 3. Move throttle lever to start... Engine runs erratic Engine overheats Tines do not engage Tines skip over ground Wheels do not engage Cause 1. Fill crankcase with clean, fresh...

Operation Manual
Page 24
... purchased as : batteries, belts, blades, tines, wheels and tires. e. The provisions as set forth above , given by any person or entity, including a dealer or retailer, with respect to any part found to be defective in materials or workmanship. CUB CADET LLC MANUFACTURER'S LIMITED WARRANTY FOR edgers, string trimmers & tillers The limited warranty set forth...
... purchased as : batteries, belts, blades, tines, wheels and tires. e. The provisions as set forth above , given by any person or entity, including a dealer or retailer, with respect to any part found to be defective in materials or workmanship. CUB CADET LLC MANUFACTURER'S LIMITED WARRANTY FOR edgers, string trimmers & tillers The limited warranty set forth...
Parts Manual
Page 1
BOX 361131 CLEVELAND, OHIO 44136-0019 Form No. 769-07278 (August 31, 2011) Illustrated Parts Manual Front Tine & Rear Tine Tillers Model FT24, RT 45 & RT 65 Printed In USA CUB CADET LLC, P.O.
BOX 361131 CLEVELAND, OHIO 44136-0019 Form No. 769-07278 (August 31, 2011) Illustrated Parts Manual Front Tine & Rear Tine Tillers Model FT24, RT 45 & RT 65 Printed In USA CUB CADET LLC, P.O.
Parts Manual
Page 11
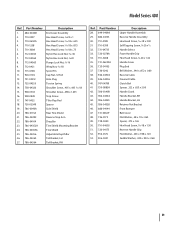
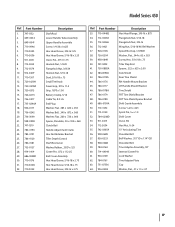
...-0533 16. 938-0849 17. 747-0432 18. 750-05349 19.. 786-0090A 20. 786-0113A 21. 786-04092 22. 786-04104 23. 786-04352A 24. 786-04355A 25. 786-04356 26. 786-04363 27. 786-04364 Description End Cover Assembly Hex Head Screw, 1⁄4-20 x 1 Hex Head Screw, 5⁄16... Nut, 1⁄4 Rod Hole Plug Torsion Spring Shoulder Screw, .405 x .435 5⁄16-18 Shoulder Screw, .498 x 1.635 Stop Screw Tiller Flap Rod Spacer Side Shield Rear Tine Shield Reverse Stop Arm Drag Bar Tine Shield Mounting Bracket Tine Shield Adjustable Depth Bar Tail Bracket, LH Tail Bracket, RH Ref. Model Series 400 Ref.
...-0533 16. 938-0849 17. 747-0432 18. 750-05349 19.. 786-0090A 20. 786-0113A 21. 786-04092 22. 786-04104 23. 786-04352A 24. 786-04355A 25. 786-04356 26. 786-04363 27. 786-04364 Description End Cover Assembly Hex Head Screw, 1⁄4-20 x 1 Hex Head Screw, 5⁄16... Nut, 1⁄4 Rod Hole Plug Torsion Spring Shoulder Screw, .405 x .435 5⁄16-18 Shoulder Screw, .498 x 1.635 Stop Screw Tiller Flap Rod Spacer Side Shield Rear Tine Shield Reverse Stop Arm Drag Bar Tine Shield Mounting Bracket Tine Shield Adjustable Depth Bar Tail Bracket, LH Tail Bracket, RH Ref. Model Series 400 Ref.
Parts Manual
Page 17
...ROD Washer, Flat, .344 x .62 x .033 Screw, Hex, 5/16-18 x .75 Tiller Flap Rod Spacer, .322 x .625 x 2.00 Side Shield Rear Tine Shield RH Handle Mount Bracket LH Handle Mount Bracket Tine Shield FRT Tine Shield Bracket FRT Tine Shield Spacer Bracket Shift Crank Assembly Screw, 1⁄4-20 x .625 Spiral Pin, 3⁄16... Screw, 1/4-20 x 0.625 Hex Head Screw, 3/8-16:1.25 Hex Head Screw, 5/16-18 x 3.25 Clevis Pin, .375 X 1.75 Hexlock Nut, 1/4-20 Flangelock Nut, 3/8-24 Hexlock Nut, 5/16-18 Stud, 5/16-18 x .75 Small Tee Knob Foam Grip, .970 x 11.0 Grip, .1875 x 1.00 Battery Clamp, 5/16 Cable Tie, 8.5...
...ROD Washer, Flat, .344 x .62 x .033 Screw, Hex, 5/16-18 x .75 Tiller Flap Rod Spacer, .322 x .625 x 2.00 Side Shield Rear Tine Shield RH Handle Mount Bracket LH Handle Mount Bracket Tine Shield FRT Tine Shield Bracket FRT Tine Shield Spacer Bracket Shift Crank Assembly Screw, 1⁄4-20 x .625 Spiral Pin, 3⁄16... Screw, 1/4-20 x 0.625 Hex Head Screw, 3/8-16:1.25 Hex Head Screw, 5/16-18 x 3.25 Clevis Pin, .375 X 1.75 Hexlock Nut, 1/4-20 Flangelock Nut, 3/8-24 Hexlock Nut, 5/16-18 Stud, 5/16-18 x .75 Small Tee Knob Foam Grip, .970 x 11.0 Grip, .1875 x 1.00 Battery Clamp, 5/16 Cable Tie, 8.5...


