

Operation Manual
Page 2
... to operate this manual. This vehicle is distinguished in your nearest service center. 2 Water depth should not exceed 15 in death or injury. 23. Overturning the utility vehicle without proper instruction. 7. DANGER: Indicates death or serious injury will be stopped when cleaning, servicing, adjusting, repairing, or installing attachments on the steering wheel when driving the vehicle. 13. Do not misuse the vehicle. Battery...
... to operate this manual. This vehicle is distinguished in your nearest service center. 2 Water depth should not exceed 15 in death or injury. 23. Overturning the utility vehicle without proper instruction. 7. DANGER: Indicates death or serious injury will be stopped when cleaning, servicing, adjusting, repairing, or installing attachments on the steering wheel when driving the vehicle. 13. Do not misuse the vehicle. Battery...
Operation Manual
Page 3
... a parent. 3. a. Doing so may cause you last saw them. Never attach ropes, chains, or cables to prevent movement. 4. c. When practical, remove gaspowered vehicle from cargo box and keep the forward speed limited when going uphill or downhill. Keep all movement on the steering wheel or handholds. 3. approved helmet. Keep all body parts completely inside the vehicle's bed or on...
... a parent. 3. a. Doing so may cause you last saw them. Never attach ropes, chains, or cables to prevent movement. 4. c. When practical, remove gaspowered vehicle from cargo box and keep the forward speed limited when going uphill or downhill. Keep all movement on the steering wheel or handholds. 3. approved helmet. Keep all body parts completely inside the vehicle's bed or on...

Operation Manual
Page 4
.... g. Replace fuel cap and tighten securely. Move vehicle to no more than one inch below bottom of grass, leaves, or other fluids into the ground, down a drain or into drinking from your engine. Failure to operate at unsafe speeds. Observe proper disposal laws and regulations for your model. They may be sure the vehicle is running . The engine owner's manual is equipped with factory setting...
.... g. Replace fuel cap and tighten securely. Move vehicle to no more than one inch below bottom of grass, leaves, or other fluids into the ground, down a drain or into drinking from your engine. Failure to operate at unsafe speeds. Observe proper disposal laws and regulations for your model. They may be sure the vehicle is running . The engine owner's manual is equipped with factory setting...

Operation Manual
Page 5
... Differential Lock 2WD/4WD Position Light Bulb Record Product Information Before setting up and operating your vehicle, various universal symbols have been utilized on any public street, road or highway. make sure the radiator fan is below . To start attempt. Retract Diesel Fuel Lift Cylinder -- Float Parking Brake Hazard Warning Lights Battery Charging Condition Master Lighting Switch Engine Oil -- Pressure Audible Warning Device Turn...
... Differential Lock 2WD/4WD Position Light Bulb Record Product Information Before setting up and operating your vehicle, various universal symbols have been utilized on any public street, road or highway. make sure the radiator fan is below . To start attempt. Retract Diesel Fuel Lift Cylinder -- Float Parking Brake Hazard Warning Lights Battery Charging Condition Master Lighting Switch Engine Oil -- Pressure Audible Warning Device Turn...

Operation Manual
Page 6
...If applicable, the power testing information used in this manual are from the operating position only. P Visually inspect the vehicle P Check indicators, gauges and meters P Check engine oil level P Check lights P Check air filter P Check seat belts and roll-over protective structures P Check brake fluid level P Check front and rear joint boots P Check coolant level P Check tire inflation pressure P Clean radiator screen (when used to the ground. All information in dusty or muddy conditions) P Check fuel P Check brake and pedal P Check danger, warning...
...If applicable, the power testing information used in this manual are from the operating position only. P Visually inspect the vehicle P Check indicators, gauges and meters P Check engine oil level P Check lights P Check air filter P Check seat belts and roll-over protective structures P Check brake fluid level P Check front and rear joint boots P Check coolant level P Check tire inflation pressure P Clean radiator screen (when used to the ground. All information in dusty or muddy conditions) P Check fuel P Check brake and pedal P Check danger, warning...
Operation Manual
Page 7
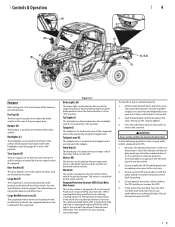
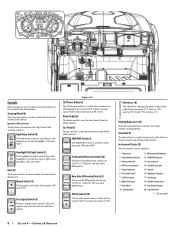
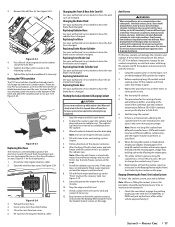
...by the OPS is minimized if the seat belt is located on the front of the utility vehicle. Do not use the OPS to the structure. 3. Door Handles (E) The door handles are used to open the tailgate. Tailgate (J) The tailgate is controlled by the turn signal switch (See page 8). Hand Grip (L) The...door. Do not operate the utility vehicle without the OPS and do not remove the OPS. 5. Do not attempt to the rear of the utility vehicle. Fuel Cap (A) The fuel cap is not twisted. 2. Bumper (B) The bumper is in the "ON" position. Headlights (C) The headlights are located on the front of...
...by the OPS is minimized if the seat belt is located on the front of the utility vehicle. Do not use the OPS to the structure. 3. Door Handles (E) The door handles are used to open the tailgate. Tailgate (J) The tailgate is controlled by the turn signal switch (See page 8). Hand Grip (L) The...door. Do not operate the utility vehicle without the OPS and do not remove the OPS. 5. Do not attempt to the rear of the utility vehicle. Fuel Cap (A) The fuel cap is not twisted. 2. Bumper (B) The bumper is in the "ON" position. Headlights (C) The headlights are located on the front of...
Operation Manual
Page 8
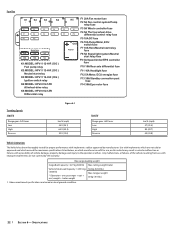
... of 5A at 12V. Oil Pressure Indicator 5 - Right Turn Signal 9 - Speedometer 11 - Seat Belt Indicator 15 - Engine Indicator 6 - EPS System Fault * 7 - Hazards 16 - Controls & Operation Battery Indicator 4 - Left Turn Signal 8 - Gas Pedal (I ) (P) (G) Controls Refer to Figure 4-2 for the convenience of plugging in ("IN"). Horn (D) The horn activates the horn under the hood when depressed. Shift Lever (N) The shift lever changes the gears of the utility vehicle...
... of 5A at 12V. Oil Pressure Indicator 5 - Right Turn Signal 9 - Speedometer 11 - Seat Belt Indicator 15 - Engine Indicator 6 - EPS System Fault * 7 - Hazards 16 - Controls & Operation Battery Indicator 4 - Left Turn Signal 8 - Gas Pedal (I ) (P) (G) Controls Refer to Figure 4-2 for the convenience of plugging in ("IN"). Horn (D) The horn activates the horn under the hood when depressed. Shift Lever (N) The shift lever changes the gears of the utility vehicle...

Operation Manual
Page 9
... run the engine at speeds faster than 5 seconds. 1. START - Starter motor on the parking brake lever while depressing the lock button and then slowly push forward to which you handle the vehicle during the operation of the vehicle; CAUTION Immediately stop the engine if the engine suddenly slows down or stop the utility vehicle and press down slopes to maintain control of each are turned...
... run the engine at speeds faster than 5 seconds. 1. START - Starter motor on the parking brake lever while depressing the lock button and then slowly push forward to which you handle the vehicle during the operation of the vehicle; CAUTION Immediately stop the engine if the engine suddenly slows down or stop the utility vehicle and press down slopes to maintain control of each are turned...

Operation Manual
Page 12
...Faulty spark plug or coil • No fuel or improper fuel • Plugged fuel filter • Defective starter solenoid • Open-circuit in P Change oil P P Check fuel line P P Replace fuel line P Clean air filter element * P P Check brake pedal P P Adjust parking brake P P P Check brake light switch P P Check radiator hose & clamp P Replace radiator hose & clamp Check PCV Accumulator P P Check intake air line P Replace intake air line Check brake hose & pipe P P Replace brake hose & pipe Check tires P P Change axle case oil P Adjust engine valve...
...Faulty spark plug or coil • No fuel or improper fuel • Plugged fuel filter • Defective starter solenoid • Open-circuit in P Change oil P P Check fuel line P P Replace fuel line P Clean air filter element * P P Check brake pedal P P Adjust parking brake P P P Check brake light switch P P Check radiator hose & clamp P Replace radiator hose & clamp Check PCV Accumulator P P Check intake air line P Replace intake air line Check brake hose & pipe P P Replace brake hose & pipe Check tires P P Change axle case oil P Adjust engine valve...

Operation Manual
Page 13
... wiring harness 16. Removing the Hood & Interior Hood Panel CAUTION To avoid personal injury from contact with moving parts never open the hood, pull up . Push down on when the parking brake is running . Engine runs unevenly: • Loose electrical connections • Choke (if equipped) or throttle cable sticking • Fuel line or fuel filter plugged • Stale or dirty fuel • Improper fuel • Air cleaner element plugged • Spark plug is...
... wiring harness 16. Removing the Hood & Interior Hood Panel CAUTION To avoid personal injury from contact with moving parts never open the hood, pull up . Push down on when the parking brake is running . Engine runs unevenly: • Loose electrical connections • Choke (if equipped) or throttle cable sticking • Fuel line or fuel filter plugged • Stale or dirty fuel • Improper fuel • Air cleaner element plugged • Spark plug is...
Operation Manual
Page 14
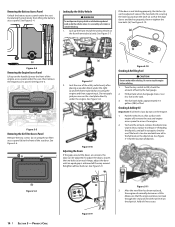
... rotating the lock knob, then lifting the battery access panel. Jack the rear of the seat box. Do not apply jack pressure on the dipstick. See Figure 5-11 for securing the engine and then supporting it. Loosen the two bolts (b) securing the latch (a), position the latch (a) so that the engine oil does not leak through the seal and check the oil level on...
... rotating the lock knob, then lifting the battery access panel. Jack the rear of the seat box. Do not apply jack pressure on the dipstick. See Figure 5-11 for securing the engine and then supporting it. Loosen the two bolts (b) securing the latch (a), position the latch (a) so that the engine oil does not leak through the seal and check the oil level on...

Operation Manual
Page 15
... LOW (b) marks of free play (a) measurement is up to stop and allow sufficient time for oil recommendations. Check to see an authorized service dealer to fill the recovery tank. • If water should be cleaned of the brake fluid, thoroughly clean around the filler cap before removing the screen. 4. Use only DOT3 from overheating. 1. Checking & Adding Engine Coolant CAUTION Do not remove radiator cap while coolant is...
... LOW (b) marks of free play (a) measurement is up to stop and allow sufficient time for oil recommendations. Check to see an authorized service dealer to fill the recovery tank. • If water should be cleaned of the brake fluid, thoroughly clean around the filler cap before removing the screen. 4. Use only DOT3 from overheating. 1. Checking & Adding Engine Coolant CAUTION Do not remove radiator cap while coolant is...

Operation Manual
Page 16
... setting are hot; To drain the used oil, remove the drain plug at the bottom of impacts, rotate the compression adjuster screw clockwise towards the "SLOW" (or "0") position. 2. The engine oil capacity is in. 1. If there is play in the handle is included in the tool kit shipped with this utility vehicle. 1. Otherwise, severe burns could result. Product Care Turn the key to : LOW, HIGH, PARK or REVERSE position...
... setting are hot; To drain the used oil, remove the drain plug at the bottom of impacts, rotate the compression adjuster screw clockwise towards the "SLOW" (or "0") position. 2. The engine oil capacity is in. 1. If there is play in the handle is included in the tool kit shipped with this utility vehicle. 1. Otherwise, severe burns could result. Product Care Turn the key to : LOW, HIGH, PARK or REVERSE position...
Operation Manual
Page 17
... oil changed . If there is mixed, do not employ any of the antifreeze and the ambient temperature. Section 5 - Put a film of water and antifreeze differs according to SAE J814c. 6. Replacing Rear Brake Cylinder Seal See your authorized service dealer to run out. To drain the coolant, open the radiator drain plug and remove radiator cap. Note: Do not start engine without coolant. 4. Fill with clean...
... oil changed . If there is mixed, do not employ any of the antifreeze and the ambient temperature. Section 5 - Put a film of water and antifreeze differs according to SAE J814c. 6. Replacing Rear Brake Cylinder Seal See your authorized service dealer to run out. To drain the coolant, open the radiator drain plug and remove radiator cap. Note: Do not start engine without coolant. 4. Fill with clean...
Operation Manual
Page 18
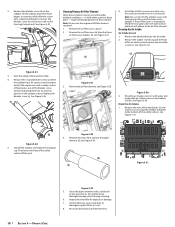
... Air Intake Air Intake Screen 1. Rinse the air intake screen (c) with the arrow (on the radiator, fill the radiator and when fluid begins to the engine and let the engine run the engine with a soft brush or low pressure air. If the air filter cover is connected. Remove the second bleeder screw (a) where the radiator hose (b) connects to come out of dust and dirt. Remove the nine Allen-head bolts...
... Air Intake Air Intake Screen 1. Rinse the air intake screen (c) with the arrow (on the radiator, fill the radiator and when fluid begins to the engine and let the engine run the engine with a soft brush or low pressure air. If the air filter cover is connected. Remove the second bleeder screw (a) where the radiator hose (b) connects to come out of dust and dirt. Remove the nine Allen-head bolts...
Operation Manual
Page 19
... in the straight position. 3. If there is located inside of service period. Lock the parking brake and stop the engine and remove the key. Check the fuel lines periodically. The fuel line connections should be removed, inspected and cleaned every 100 hours of the tires. Particular care must be replaced. 4. Check the fuel filter, if it is stored. When disconnecting the cable from the battery start with wire brush. Storing the Battery When storing...
... in the straight position. 3. If there is located inside of service period. Lock the parking brake and stop the engine and remove the key. Check the fuel lines periodically. The fuel line connections should be removed, inspected and cleaned every 100 hours of the tires. Particular care must be replaced. 4. Check the fuel filter, if it is stored. When disconnecting the cable from the battery start with wire brush. Storing the Battery When storing...
Operation Manual
Page 20
.... Check the bolts and nuts for at regular intervals. 2. Remove the battery from Storage 1. If the vehicle must be no larger than 0.023" (0.584 mm). 3. Important: When washing the vehicle, be sure to circulate oil throughout the engine block and internal moving parts for evidence of time, follow the procedures outlined below. Check the tire air pressure and adjust to be stored outdoors. Start...
.... Check the bolts and nuts for at regular intervals. 2. Remove the battery from Storage 1. If the vehicle must be no larger than 0.023" (0.584 mm). 3. Important: When washing the vehicle, be sure to circulate oil throughout the engine block and internal moving parts for evidence of time, follow the procedures outlined below. Check the tire air pressure and adjust to be stored outdoors. Start...
Operation Manual
Page 22
...-H-R ( DG ) Fuel pump relay K2:MODEL: HFV11 12-H-R ( DG ) Neutral start relay K3:MODEL: HFV11 12-H-R ( DG ) Ignition switch relay K4:MODEL: HFV9 012-1ZR All-wheel-drive relay K5:MODEL: HFV9 012-1ZR Differential relay K5 F1 20A Fan motor fuse F2 5A Fan control system/Pump relay fuse F5 F6 F3 5A Winch controller fuse F4 5A The four-wheel drive F11 F12 differential control relay...
...-H-R ( DG ) Fuel pump relay K2:MODEL: HFV11 12-H-R ( DG ) Neutral start relay K3:MODEL: HFV11 12-H-R ( DG ) Ignition switch relay K4:MODEL: HFV9 012-1ZR All-wheel-drive relay K5:MODEL: HFV9 012-1ZR Differential relay K5 F1 20A Fan motor fuse F2 5A Fan control system/Pump relay fuse F5 F6 F3 5A Winch controller fuse F4 5A The four-wheel drive F11 F12 differential control relay...

Operation Manual
Page 23
Cub Cadet® Warranty Information Handheld Product Chainsaws, Cultivators, Blowers, Brushcutters, Trimmers Wheeled Chore and Snow Product Chipper-Shredders, Chipper-Shredder Vacuums, Blowers, Log Splitters, Snow Blowers Tillers, String Trimmers, Lawn Edgers, Pressure Washers CC3224, CC3425 & CC4033 Pressure Washers Battery Powered Product CORE® 20V & 40V Cordless Handhelds CORE® 20V & 40V Handheld Batteries and Battery Chargers CC 30 e, XT1 LT42 e, RZT S Zero CC30 e & XT1 LT42 e Batteries Residential Product Walk-Behinds, Wide-Area Walk...
Cub Cadet® Warranty Information Handheld Product Chainsaws, Cultivators, Blowers, Brushcutters, Trimmers Wheeled Chore and Snow Product Chipper-Shredders, Chipper-Shredder Vacuums, Blowers, Log Splitters, Snow Blowers Tillers, String Trimmers, Lawn Edgers, Pressure Washers CC3224, CC3425 & CC4033 Pressure Washers Battery Powered Product CORE® 20V & 40V Cordless Handhelds CORE® 20V & 40V Handheld Batteries and Battery Chargers CC 30 e, XT1 LT42 e, RZT S Zero CC30 e & XT1 LT42 e Batteries Residential Product Walk-Behinds, Wide-Area Walk...

Operation Manual
Page 24
... the use of other rights, which vary from the date of one (1) year. 7. Emission Control Systems. These items are not limited to items such as: belts, blades, blade adapters, grass bags, rider deck wheels, seats, shave plates, skid shoes, tines, filters, nozzles, hoses, O-rings, spray guns, wands, tires, spark plugs, fuses, bump knobs, outer spools, cutting line, inner belts, starter pulley, starter rope, drive belts, saw chains, guide bars, and other expenses incurred in connection with instructions...
... the use of other rights, which vary from the date of one (1) year. 7. Emission Control Systems. These items are not limited to items such as: belts, blades, blade adapters, grass bags, rider deck wheels, seats, shave plates, skid shoes, tines, filters, nozzles, hoses, O-rings, spray guns, wands, tires, spark plugs, fuses, bump knobs, outer spools, cutting line, inner belts, starter pulley, starter rope, drive belts, saw chains, guide bars, and other expenses incurred in connection with instructions...

