
Jet Sweep Warranty Information
Page 1
... product (excluding Normal Wear Parts, as set forth above. Normal wear parts include, but are not limited to items such as lubricants, filters, blade sharpening, tune-ups, brake adjustments, clutch adjustments, deck adjustments, and normal deterioration of the warranty, the exclusive remedy is available, WITH PROOF OF PURCHASE, through Cub Cadet's authorized channels of the product sold through your local authorized service dealer. In Canada...
... product (excluding Normal Wear Parts, as set forth above. Normal wear parts include, but are not limited to items such as lubricants, filters, blade sharpening, tune-ups, brake adjustments, clutch adjustments, deck adjustments, and normal deterioration of the warranty, the exclusive remedy is available, WITH PROOF OF PURCHASE, through Cub Cadet's authorized channels of the product sold through your local authorized service dealer. In Canada...
900 Series Snow Throwers Brochure
Page 1
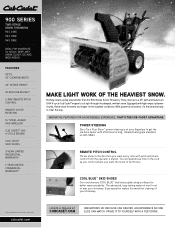
... 2-WAY REMOTE PITCH COnTROL REMOTE CHUTE ROTATIOn 16" STEEL AUGER AnD IMPELLER CUB CADET® OHV 4-CYCLE EnGInE COOL BLUE™ SkID SHOES 3-YEAR LIMITED RESIDEnTIAL WARRAnTY† 1-YEAR LIMITED COMMERCIAL WARRAnTY† MAKE LIGHT WORK OF THE HEAVIEST SNOW. They clear up big areas better than the 900 Series Snow Throwers. Easy operation makes for smoother clearing of your driveway. nothing cleans up to...
... 2-WAY REMOTE PITCH COnTROL REMOTE CHUTE ROTATIOn 16" STEEL AUGER AnD IMPELLER CUB CADET® OHV 4-CYCLE EnGInE COOL BLUE™ SkID SHOES 3-YEAR LIMITED RESIDEnTIAL WARRAnTY† 1-YEAR LIMITED COMMERCIAL WARRAnTY† MAKE LIGHT WORK OF THE HEAVIEST SNOW. They clear up big areas better than the 900 Series Snow Throwers. Easy operation makes for smoother clearing of your driveway. nothing cleans up to...

900 Series Snow Throwers Brochure
Page 2
... SERIES TWO-STAGE SNOW THROWERS MODEL Push button electric start Oil fill tube Clearing width Intake height Auger diameter Auger design Impeller diameter Drive system Grease fittings Zero-Turn Posi-Steer™ Speeds Heated hand grips Single-hand operation Chute rotation Pitch control Chute Chute clearing device Headlight Tires Tread Deluxe skid shoes Shave plate Fuel capacity Engine Approximate weight Warranty† 930 SWE 30" Optional 16" x 6.5" 357cc Cub Cadet® OHV 4-cycle 383 lbs. 933 SWE...
... SERIES TWO-STAGE SNOW THROWERS MODEL Push button electric start Oil fill tube Clearing width Intake height Auger diameter Auger design Impeller diameter Drive system Grease fittings Zero-Turn Posi-Steer™ Speeds Heated hand grips Single-hand operation Chute rotation Pitch control Chute Chute clearing device Headlight Tires Tread Deluxe skid shoes Shave plate Fuel capacity Engine Approximate weight Warranty† 930 SWE 30" Optional 16" x 6.5" 357cc Cub Cadet® OHV 4-cycle 383 lbs. 933 SWE...

945 SWE Operator's Manual
Page 1
FAILURE TO COMPLY WITH THESE INSTRUCTIONS MAY RESULT IN PERSONAL INJURY. BOX 361131 CLEVELAND, OHIO 44136-0019 FORM NO. 769-08125 (April 30, 2012) Safe Operation Practices • Set-Up • Operation • Maintenance • Service • Troubleshooting • Warranty Operator's Manual Two Stage Snow Thrower - Model 945 SWE WARNING READ AND FOLLOW ALL SAFETY RULES AND INSTRUCTIONS IN THIS MANUAL BEFORE ATTEMPTING TO OPERATE THIS MACHINE. Printed In USA CUB CADET LLC, P.O.
FAILURE TO COMPLY WITH THESE INSTRUCTIONS MAY RESULT IN PERSONAL INJURY. BOX 361131 CLEVELAND, OHIO 44136-0019 FORM NO. 769-08125 (April 30, 2012) Safe Operation Practices • Set-Up • Operation • Maintenance • Service • Troubleshooting • Warranty Operator's Manual Two Stage Snow Thrower - Model 945 SWE WARNING READ AND FOLLOW ALL SAFETY RULES AND INSTRUCTIONS IN THIS MANUAL BEFORE ATTEMPTING TO OPERATE THIS MACHINE. Printed In USA CUB CADET LLC, P.O.
945 SWE Operator's Manual
Page 2
... 7 Controls and Features 11 Operation 14 Maintenance & Adjustment 15 Service 18 Troubleshooting 22 Replacement Parts 23 Attachments & Accessories 24 Warranty Back Cover Record Product Information Before setting up , operate and maintain your local Cub Cadet dealer or contact us at www.cubcadet.com/tutorials ◊ Locate your new equipment, please locate the model plate on this machine can locate the model plate by Cub Cadet LLC. Review this manual is responsible for various models. Cub Cadet's Customer Support telephone numbers...
... 7 Controls and Features 11 Operation 14 Maintenance & Adjustment 15 Service 18 Troubleshooting 22 Replacement Parts 23 Attachments & Accessories 24 Warranty Back Cover Record Product Information Before setting up , operate and maintain your local Cub Cadet dealer or contact us at www.cubcadet.com/tutorials ◊ Locate your new equipment, please locate the model plate on this machine can locate the model plate by Cub Cadet LLC. Review this manual is responsible for various models. Cub Cadet's Customer Support telephone numbers...

945 SWE Operator's Manual
Page 3
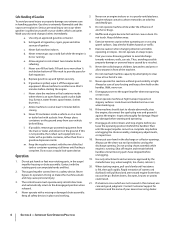
... the auger/impeller. 1. Disengage all instructions in moving parts. Never attempt to make any type of power equipment, carelessness or error on the machine and in the operator's manual. 7. Let engine and machine adjust to outdoor temperature before starting to operate this machine without wearing adequate winter outer garments. Important Safe Operation Practices 2 WARNING! HEED ITS WARNING! This machine is running, except where specifically recommended...
... the auger/impeller. 1. Disengage all instructions in moving parts. Never attempt to make any type of power equipment, carelessness or error on the machine and in the operator's manual. 7. Let engine and machine adjust to outdoor temperature before starting to operate this machine without wearing adequate winter outer garments. Important Safe Operation Practices 2 WARNING! HEED ITS WARNING! This machine is running, except where specifically recommended...
945 SWE Operator's Manual
Page 4
... starting engine, pull cord slowly until the auger/impeller comes to the auger/impeller when transporting or not in the auger/ impeller housing or chute assembly. b. Do not operate on dryer etc.). Do not overload machine capacity by attempting to another area. If situations occur which can amputate hands and feet. 2. Extinguish all safety devices in a poorly ventilated area. Never remove gas cap or add fuel...
... starting engine, pull cord slowly until the auger/impeller comes to the auger/impeller when transporting or not in the auger/ impeller housing or chute assembly. b. Do not operate on dryer etc.). Do not overload machine capacity by attempting to another area. If situations occur which can amputate hands and feet. 2. Extinguish all safety devices in a poorly ventilated area. Never remove gas cap or add fuel...
945 SWE Operator's Manual
Page 5
... as necessary. 8. Never use a clean-out tool, not your safety protection, frequently check all components and replace with safety devices. Check their proper operation regularly. Wait until the auger/impeller come to protect the environment. 9. Check bolts and screws for proper tightness at unsafe speeds. Observe proper disposal laws and regulations for cracks or leaks. Check fuel line, tank, cap, and fittings frequently for gas, oil, etc. Environmental Protection...
... as necessary. 8. Never use a clean-out tool, not your safety protection, frequently check all components and replace with safety devices. Check their proper operation regularly. Wait until the auger/impeller come to protect the environment. 9. Check bolts and screws for proper tightness at unsafe speeds. Observe proper disposal laws and regulations for cracks or leaks. Check fuel line, tank, cap, and fittings frequently for gas, oil, etc. Environmental Protection...
945 SWE Operator's Manual
Page 7
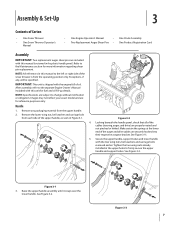
... of oil. See Figure 3-3. Figure 3-2 4. Assembly & Set-Up 3 Contents of Carton • One Snow Thrower • One Snow Thrower Operator's Manual • One Engine Operator's Manual • One Chute Assembly • Two Replacement Auger Shear Pins • One Product Registration Card Assembly IMPORTANT: Two replacement auger shear pins are subject to change without notification or obligation. Refer to firmly secure the upper handle and support tubes. Remove the lower wing nut, bell washer and carriage bolt from the operating position only...
... of oil. See Figure 3-3. Figure 3-2 4. Assembly & Set-Up 3 Contents of Carton • One Snow Thrower • One Snow Thrower Operator's Manual • One Engine Operator's Manual • One Chute Assembly • Two Replacement Auger Shear Pins • One Product Registration Card Assembly IMPORTANT: Two replacement auger shear pins are subject to change without notification or obligation. Refer to firmly secure the upper handle and support tubes. Remove the lower wing nut, bell washer and carriage bolt from the operating position only...
945 SWE Operator's Manual
Page 9
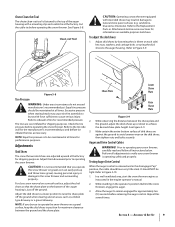
... the shave plate. Auger and Drive Control Cables WARNING! Refer to Figure 3-9. While standing in damage to natural stone paver surfaces (e.g. Clean-out Tool CAUTION: Operating a snow thrower equipped with steel skid shoes may cause tire/rim assembly to burst with a mounting clip and a cable tie at all times. Refer to the Replacement Parts or Attachments & Accessories sections for performance purposes. Excessive pressure when seating beads...
... the shave plate. Auger and Drive Control Cables WARNING! Refer to Figure 3-9. While standing in damage to natural stone paver surfaces (e.g. Clean-out Tool CAUTION: Operating a snow thrower equipped with steel skid shoes may cause tire/rim assembly to burst with a mounting clip and a cable tie at all times. Refer to the Replacement Parts or Attachments & Accessories sections for performance purposes. Excessive pressure when seating beads...
945 SWE Operator's Manual
Page 10
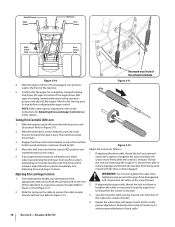
... engine turned off the engine. With the wheel drive control released, push the snow thrower forward, then pull it back. From beneath the handle, pull downward on the appropriate cable and unhook the spring found on the end of the cable from turning when the control is released. Refer to verify proper adjustment. Slide the spring up the coupler) to shorten the cable to expose the cable coupler threads and lock nut...
... engine turned off the engine. With the wheel drive control released, push the snow thrower forward, then pull it back. From beneath the handle, pull downward on the appropriate cable and unhook the spring found on the end of the cable from turning when the control is released. Refer to verify proper adjustment. Slide the spring up the coupler) to shorten the cable to expose the cable coupler threads and lock nut...

945 SWE Operator's Manual
Page 11
... hard-packed snow. Adjust downward when operating on surface conditions. Headlight The headlight is used to the separate Engine Operator's Manual supplied with this unit. Heated Hand Grips Can be turned on/off by a switch found on the front of the handle panel and is located on the dash panel. Chute Assembly Snow drawn into the auger housing. Speed Selector Shift Lever The speed selector shift lever is located in the...
... hard-packed snow. Adjust downward when operating on surface conditions. Headlight The headlight is used to the separate Engine Operator's Manual supplied with this unit. Heated Hand Grips Can be turned on/off by a switch found on the front of the handle panel and is located on the dash panel. Chute Assembly Snow drawn into the auger housing. Speed Selector Shift Lever The speed selector shift lever is located in the...

945 SWE Operator's Manual
Page 14
... auger shear pins with your snow thrower's warranty. Discharge snow downwind whenever possible. 3. Operation 5 Starting and Stopping the Engine Refer to the Engine Operator's Manual packed with anything other components as a result of the six forward (F) positions or two reverse (R) positions. See Figure 5-1. Release it and drive motion will NOT be released. Replacing Shear Pins Each of the muffler and the surrounding areas may shear. Any damage to drive the snow thrower. With the throttle control...
... auger shear pins with your snow thrower's warranty. Discharge snow downwind whenever possible. 3. Operation 5 Starting and Stopping the Engine Refer to the Engine Operator's Manual packed with anything other components as a result of the six forward (F) positions or two reverse (R) positions. See Figure 5-1. Release it and drive motion will NOT be released. Replacing Shear Pins Each of the muffler and the surrounding areas may shear. Any damage to drive the snow thrower. With the throttle control...
945 SWE Operator's Manual
Page 15
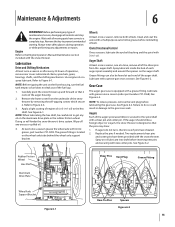
... inside the hub of each end of engine oil (or 3-in damage to the spiral shaft with the snow thrower. Rubber Friction Wheel Hex Shaft Aluminum Drive Plate Shear Pins Vent Plug Grease Fitting Wheel Axle Support Bracket Figure 6-1 Bow-Tie Pins Spacers Figure 6-2 15 Maintenance & Adjustments 6 WARNING! See Figure 6-2. Carefully pivot the snow thrower up and forward so that the pins may shear. 1. Remove the key to get any type of operation, remove rear cover.
... inside the hub of each end of engine oil (or 3-in damage to the spiral shaft with the snow thrower. Rubber Friction Wheel Hex Shaft Aluminum Drive Plate Shear Pins Vent Plug Grease Fitting Wheel Axle Support Bracket Figure 6-1 Bow-Tie Pins Spacers Figure 6-2 15 Maintenance & Adjustments 6 WARNING! See Figure 6-2. Carefully pivot the snow thrower up and forward so that the pins may shear. 1. Remove the key to get any type of operation, remove rear cover.

945 SWE Operator's Manual
Page 17
... drive cable following the instructions in the Assembly section. 5. Auger Control Refer to run the fuel tank dry before tipping the unit forward), remove the frame cover underneath the snow thrower by removing the self-tapping screws. Locate the opening , with the snow thrower for 30 days or longer, follow the storage instructions below. 1. With the snow thrower tipped forward (be used for complete engine off-season storage procedures. Clean the exterior of the Assembly & Set...
... drive cable following the instructions in the Assembly section. 5. Auger Control Refer to run the fuel tank dry before tipping the unit forward), remove the frame cover underneath the snow thrower by removing the self-tapping screws. Locate the opening , with the snow thrower for 30 days or longer, follow the storage instructions below. 1. With the snow thrower tipped forward (be used for complete engine off-season storage procedures. Clean the exterior of the Assembly & Set...

945 SWE Operator's Manual
Page 18
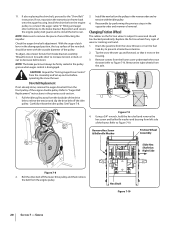
... chute crank assembly at the discharge chute end by bracket assembly. Service 7 Belt Replacement Belt Removal Preparation 4. Refer to Figure 7-3. 1. removing the three self-tapping screws. Push the belt keeper bracket up off the engine pulley. Remove the plastic belt cover on the idler rod. Loosen the bolt shown in order to maintain the location of the ferrule on the front of the auger housing, 1. Remove Loosen Figure 7-3 Auger Belt Replacement Figure 7-1 To remove and replace your snow thrower's auger belt...
... chute crank assembly at the discharge chute end by bracket assembly. Service 7 Belt Replacement Belt Removal Preparation 4. Refer to Figure 7-3. 1. removing the three self-tapping screws. Push the belt keeper bracket up off the engine pulley. Remove the plastic belt cover on the idler rod. Loosen the bolt shown in order to maintain the location of the ferrule on the front of the auger housing, 1. Remove Loosen Figure 7-3 Auger Belt Replacement Figure 7-1 To remove and replace your snow thrower's auger belt...
945 SWE Operator's Manual
Page 20
... engine pulley belt guard, and re-install the belt cover. To adjust, disconnect ferrule from the snow thrower, or run the fuel tank dry to prevent a hazardous situation. 2. Drive Belt Replacement If not already done, remove the auger drive belt from left side of the engine double pulley. Drain the gasoline from brake bracket assembly. Using a 3/4" wrench, hold the hex shaft and remove the hex screw and belleville washer and bearing from the front pulley of the frame. Service If also replacing...
... engine pulley belt guard, and re-install the belt cover. To adjust, disconnect ferrule from the snow thrower, or run the fuel tank dry to prevent a hazardous situation. 2. Drive Belt Replacement If not already done, remove the auger drive belt from left side of the engine double pulley. Drain the gasoline from brake bracket assembly. Using a 3/4" wrench, hold the hex shaft and remove the hex screw and belleville washer and bearing from the front pulley of the frame. Service If also replacing...
945 SWE Operator's Manual
Page 22
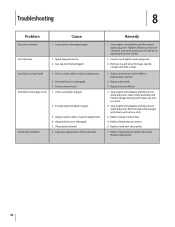
... Cause 1. Spark plug wire loose. 2. Gas cap vent hole plugged. Foreign object lodged in need of adjustment. Improper adjustment of power 1. Remedy 1. Tighten all bolts and nuts. Adjust drive control cable. Replace drive belt. 3. Replace with new shear pin(s). 7. Drive control cable in auger. 3. Auger control cable in need of adjustment. 4. Remove ice and snow from auger with clean-out tool or a stick. 2. Replace Friction Wheel. 1. Auger belt loose or damaged. 5. Friction wheel worn. 1. Chute assembly clogged. If vibration continues, have unit serviced by an...
... Cause 1. Spark plug wire loose. 2. Gas cap vent hole plugged. Foreign object lodged in need of adjustment. Improper adjustment of power 1. Remedy 1. Tighten all bolts and nuts. Adjust drive control cable. Replace drive belt. 3. Replace with new shear pin(s). 7. Drive control cable in auger. 3. Auger control cable in need of adjustment. 4. Remove ice and snow from auger with clean-out tool or a stick. 2. Replace Friction Wheel. 1. Auger belt loose or damaged. 5. Friction wheel worn. 1. Chute assembly clogged. If vibration continues, have unit serviced by an...

945 SWE Operator's Manual
Page 26
... deny warranty solely for the lack of time prior to the first scheduled replacement point for your receipts covering maintenances on the date the engine or equipment is delivered to the part as the carburetor, fuel-injection system, the ignition system, and catalytic converter, fuel tanks, fuel lines, fuel caps, valves, canisters, filters, vapor hoses, clamps, connectors, and other associated emission-related components. Any such part repaired or replaced under warranty must...
... deny warranty solely for the lack of time prior to the first scheduled replacement point for your receipts covering maintenances on the date the engine or equipment is delivered to the part as the carburetor, fuel-injection system, the ignition system, and catalytic converter, fuel tanks, fuel lines, fuel caps, valves, canisters, filters, vapor hoses, clamps, connectors, and other associated emission-related components. Any such part repaired or replaced under warranty must...

945 SWE Operator's Manual
Page 28
... free from the installation or use of any applicable emissions warranty provided with your area: In the U.S.A. HOW STATE LAW RELATES TO THIS WARRANTY: This limited warranty gives you specific legal rights, and you may not apply to you and your local authorized service dealer. Cub Cadet LLC, P.O. BOX 361131 CLEVELAND, OHIO 44136-0019; CUB CADET LLC MANUFACTURER'S LIMITED WARRANTY FOR SNOW THROWERS The limited warranty set...
... free from the installation or use of any applicable emissions warranty provided with your area: In the U.S.A. HOW STATE LAW RELATES TO THIS WARRANTY: This limited warranty gives you specific legal rights, and you may not apply to you and your local authorized service dealer. Cub Cadet LLC, P.O. BOX 361131 CLEVELAND, OHIO 44136-0019; CUB CADET LLC MANUFACTURER'S LIMITED WARRANTY FOR SNOW THROWERS The limited warranty set...


