
524 WE Operator's Manual
Page 5
... Public Resources Code). Check fuel line, tank, cap, and fittings frequently for gas, oil, etc. Do not crank engine with snow throwers. Federal laws apply on regular unleaded gasoline, and may lead to clean out the discharge chute. A spark arrestor for proper instructions ... the spark plug wire and ground against the engine to wear and damage. Check bolts and screws for instructions. 7. Also, visually inspect machine for SORE (Small Off Road Equipment) are working condition. Snow thrower shave plates and skid shoes are certified to a complete stop the engine. "Use...
... Public Resources Code). Check fuel line, tank, cap, and fittings frequently for gas, oil, etc. Do not crank engine with snow throwers. Federal laws apply on regular unleaded gasoline, and may lead to clean out the discharge chute. A spark arrestor for proper instructions ... the spark plug wire and ground against the engine to wear and damage. Check bolts and screws for instructions. 7. Also, visually inspect machine for SORE (Small Off Road Equipment) are working condition. Snow thrower shave plates and skid shoes are certified to a complete stop the engine. "Use...
524 WE Operator's Manual
Page 10
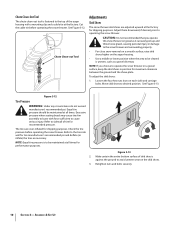
... the four hex nuts (two on a gravel surface, keep the skid shoes in position for performance purposes. The tires are adjusted upward at all times for maximum clearance between the ground and the shave plate. Check the tire pressure before operating the snow thrower. See Figure 3-13. ...clip and a cable tie at all times. Excessive pressure when seating beads may cause tire/rim assembly to operate the snow thrower on each side) and carriage bolts. Assembly & Set-Up Refer to cause serious injury. Refer to sidewall of the auger housing with force sufficient to ...
... the four hex nuts (two on a gravel surface, keep the skid shoes in position for performance purposes. The tires are adjusted upward at all times for maximum clearance between the ground and the shave plate. Check the tire pressure before operating the snow thrower. See Figure 3-13. ...clip and a cable tie at all times. Excessive pressure when seating beads may cause tire/rim assembly to operate the snow thrower on each side) and carriage bolts. Assembly & Set-Up Refer to cause serious injury. Refer to sidewall of the auger housing with force sufficient to ...
524 WE Operator's Manual
Page 16
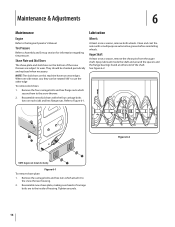
...replaced when necessary. Remove the four carriage bolts and hex flange nuts which attach it to wear. Refer to the Engine Operator's Manual. Reassemble new shave plate, making sure heads of housing. They should be rotated 180° to the snow thrower. 2. Lubrication Wheels At least once ...multipurpose automotive grease before reinstalling wheels. See Figure 6-2. Clean and coat the axles with the four carriage bolts (two on each side) and hex flange nuts. Remove the carriage bolts and hex nuts which secure them to use the other edge To remove skid shoes: 1. Tire ...
...replaced when necessary. Remove the four carriage bolts and hex flange nuts which attach it to wear. Refer to the Engine Operator's Manual. Reassemble new shave plate, making sure heads of housing. They should be rotated 180° to the snow thrower. 2. Lubrication Wheels At least once ...multipurpose automotive grease before reinstalling wheels. See Figure 6-2. Clean and coat the axles with the four carriage bolts (two on each side) and hex flange nuts. Remove the carriage bolts and hex nuts which secure them to use the other edge To remove skid shoes: 1. Tire ...
524 WE Operator's Manual
Page 19
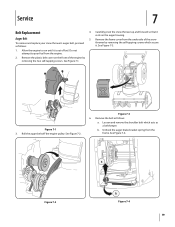
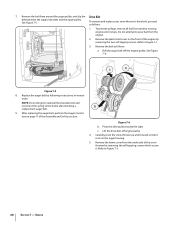
Remove the frame cover from the underside of the snow thrower by removing the two self-tapping screws. Figure 7-3 6. Remove the belt as follows: 4. Roll the auger belt off the engine pulley. b. Figure 7-2 Figure 7-4 19 See Figure 7-3. 1. ...the self-tapping screws which acts as a belt keeper. Figure 7-1 3. See Figure 7-2. Carefully pivot the snow thrower up and forward so that it . Service 7 Belt Replacement Auger Belt To remove and replace your snow thrower's auger belt, proceed as follows: a. Allow the engine to pour fuel from the frame. Loosen and ...
Remove the frame cover from the underside of the snow thrower by removing the two self-tapping screws. Figure 7-3 6. Remove the belt as follows: 4. Roll the auger belt off the engine pulley. b. Figure 7-2 Figure 7-4 19 See Figure 7-3. 1. ...the self-tapping screws which acts as a belt keeper. Figure 7-1 3. See Figure 7-2. Carefully pivot the snow thrower up and forward so that it . Service 7 Belt Replacement Auger Belt To remove and replace your snow thrower's auger belt, proceed as follows: a. Allow the engine to pour fuel from the frame. Loosen and ...
524 WE Operator's Manual
Page 20
...belt between the support bracket and the auger pulley. Replace the auger belt by removing the two self-tapping screws. Pivot the idler pulley toward the right. Service Refer to Figure 7-1. 3. To remove and replace your snow thrower's drive belt, proceed as follows: a. After replacing the auger belt, perform the Auger Control...Figure 7-3. 20 Section 7 - Remove the belt as follows: 1. Lift the drive belt off the engine pulley. NOTE: Do not forget to reinstall the shoulder bolt and reconnect the spring to pour fuel from tank by removing the self-tapping screws which secure it.
...belt between the support bracket and the auger pulley. Replace the auger belt by removing the two self-tapping screws. Pivot the idler pulley toward the right. Service Refer to Figure 7-1. 3. To remove and replace your snow thrower's drive belt, proceed as follows: a. After replacing the auger belt, perform the Auger Control...Figure 7-3. 20 Section 7 - Remove the belt as follows: 1. Lift the drive belt off the engine pulley. NOTE: Do not forget to reinstall the shoulder bolt and reconnect the spring to pour fuel from tank by removing the self-tapping screws which secure it.
524 WE Operator's Manual
Page 21
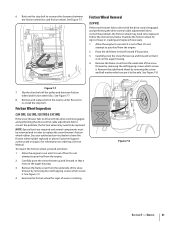
...the friction wheel disc and friction wheel. See your authorized service dealer to run until it to re-install the stop bolt to be replaced. Carefully pivot the snow thrower up and forward so that it rests on the auger housing. 3. See Figure 7-3. 4. Figure 7-8 Section 7 ...inspect the friction wheel, proceed as instructed on page 2 for information on the auger housing. 4. Friction Wheel Inspection (524 SWE, 526 SWE, 528 SWE & 530 SWE) If the snow thrower fails to drive with the drive control engaged, and performing the drive control cable adjustment fails to correct the problem, ...
...the friction wheel disc and friction wheel. See your authorized service dealer to run until it to re-install the stop bolt to be replaced. Carefully pivot the snow thrower up and forward so that it rests on the auger housing. 3. See Figure 7-3. 4. Figure 7-8 Section 7 ...inspect the friction wheel, proceed as instructed on page 2 for information on the auger housing. 4. Friction Wheel Inspection (524 SWE, 526 SWE, 528 SWE & 530 SWE) If the snow thrower fails to drive with the drive control engaged, and performing the drive control cable adjustment fails to correct the problem, ...


