
1X 221 HP Warranty Information
Page 1
... years from defects in your product. GDOC-100160 REV. Phone: 1-877-282-8684 MTD Canada Limited - CUB CADET LLC MANUFACTURER'S LIMITED WARRANTY FOR snow throwers, Log splitters Chipper-shredders, Chipper-shredder VACUUMs and Jet Sweeps The limited warranty set forth below ) against ... implied warranty of merchantability of fitness for a period of thirty (30) days from the sale. C Cub Cadet LLC, P.O. BOX 361131 CLEVELAND, OHIO 44136-0019; Cub Cadet warrants the auger gearbox (on threestage snow thrower models only) against defects in material and workmanship for use the ...
... years from defects in your product. GDOC-100160 REV. Phone: 1-877-282-8684 MTD Canada Limited - CUB CADET LLC MANUFACTURER'S LIMITED WARRANTY FOR snow throwers, Log splitters Chipper-shredders, Chipper-shredder VACUUMs and Jet Sweeps The limited warranty set forth below ) against ... implied warranty of merchantability of fitness for a period of thirty (30) days from the sale. C Cub Cadet LLC, P.O. BOX 361131 CLEVELAND, OHIO 44136-0019; Cub Cadet warrants the auger gearbox (on threestage snow thrower models only) against defects in material and workmanship for use the ...
3X 26034 Operator's Manual
Page 1
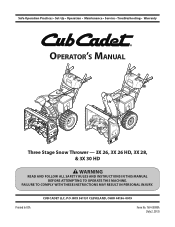
Printed In USA CUB CADET LLC, P.O. BOX 361131 CLEVELAND, OHIO 44136-0019 Form No. 769-08980A (July 2, 2013) Safe Operation Practices • Set-Up • Operation • Maintenance • Service • Troubleshooting • Warranty Operator's Manual Three Stage Snow Thrower - 3X 26, 3X 26 HD, 3X 28, & 3X 30 HD WARNING READ AND FOLLOW ALL SAFETY RULES AND INSTRUCTIONS IN THIS MANUAL BEFORE ATTEMPTING TO OPERATE THIS MACHINE. FAILURE TO COMPLY WITH THESE INSTRUCTIONS MAY RESULT IN PERSONAL INJURY.
Printed In USA CUB CADET LLC, P.O. BOX 361131 CLEVELAND, OHIO 44136-0019 Form No. 769-08980A (July 2, 2013) Safe Operation Practices • Set-Up • Operation • Maintenance • Service • Troubleshooting • Warranty Operator's Manual Three Stage Snow Thrower - 3X 26, 3X 26 HD, 3X 28, & 3X 30 HD WARNING READ AND FOLLOW ALL SAFETY RULES AND INSTRUCTIONS IN THIS MANUAL BEFORE ATTEMPTING TO OPERATE THIS MACHINE. FAILURE TO COMPLY WITH THESE INSTRUCTIONS MAY RESULT IN PERSONAL INJURY.

3X 26034 Operator's Manual
Page 2
...cubcadet.com See How-to establish the power rating of product specifications for purchasing a Cub Cadet Snow Thrower. Model Number Serial Number Product Registration and Customer Support Please register your local Cub Cadet dealer or contact us on the web at all references to operating the equipment..... It instructs you , and any problems or questions concerning the machine, phone your product on this manual, all times. Cub Cadet's Customer Support telephone numbers, website address and mailing address can locate the model plate by standing at the operator's position and...
...cubcadet.com See How-to establish the power rating of product specifications for purchasing a Cub Cadet Snow Thrower. Model Number Serial Number Product Registration and Customer Support Please register your local Cub Cadet dealer or contact us on the web at all references to operating the equipment..... It instructs you , and any problems or questions concerning the machine, phone your product on this manual, all times. Cub Cadet's Customer Support telephone numbers, website address and mailing address can locate the model plate by standing at the operator's position and...
3X 26034 Operator's Manual
Page 5
...to do not modify engine in this product has an Average Useful Life of seven (7) years, or 60 hours of injury associated with snow throwers. SHUT THE ENGINE OFF! 2. Wait 10 seconds to operate on off-season storage. 12. Check bolts and screws for proper instructions ...and damage. Check their proper operation regularly. Before cleaning, repairing, or inspecting machine disengage all mechanical and safety systems are working condition. Snow thrower shave plates and skid shoes are certified to be maintained in effective working order by the operator. If a spark arrestor is used on...
...to do not modify engine in this product has an Average Useful Life of seven (7) years, or 60 hours of injury associated with snow throwers. SHUT THE ENGINE OFF! 2. Wait 10 seconds to operate on off-season storage. 12. Check bolts and screws for proper instructions ...and damage. Check their proper operation regularly. Before cleaning, repairing, or inspecting machine disengage all mechanical and safety systems are working condition. Snow thrower shave plates and skid shoes are certified to be maintained in effective working order by the operator. If a spark arrestor is used on...

3X 26034 Operator's Manual
Page 7
... page 10 for assembly instructions. If your method of assembly. Assembly & Set-Up 3 Contents of Carton • Snow Thrower • Replacement Auger Shear Pins • Chute Control Rod or Flex Shaft • Engine Manual • Snow Thrower Operator's Manual • Chute Assembly • Product Registration Card There are two chute control styles available that...
... page 10 for assembly instructions. If your method of assembly. Assembly & Set-Up 3 Contents of Carton • Snow Thrower • Replacement Auger Shear Pins • Chute Control Rod or Flex Shaft • Engine Manual • Snow Thrower Operator's Manual • Chute Assembly • Product Registration Card There are two chute control styles available that...
3X 26034 Operator's Manual
Page 8
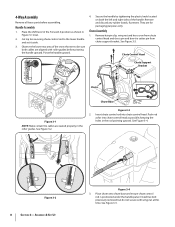
... in Figure 3-1 inset. 2. Assembly & Set-Up Figure 3-4 3. 4-Way Assembly Remove all loose parts before pivoting the handle upward. Observe the lower rear area of the snow thrower to the lower handle and set it aside. 3. They are aligned with wing nut at this time. Remove hairpin clip, wing nut and hex screw...
... in Figure 3-1 inset. 2. Assembly & Set-Up Figure 3-4 3. 4-Way Assembly Remove all loose parts before pivoting the handle upward. Observe the lower rear area of the snow thrower to the lower handle and set it aside. 3. They are aligned with wing nut at this time. Remove hairpin clip, wing nut and hex screw...
3X 26034 Operator's Manual
Page 12
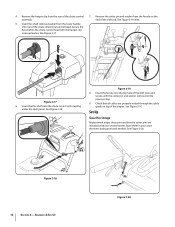
... engine. Remove the hairpin clip from the ferrule on top of the shift lever and secure with the cotter pin and washer removed in your snow thrower. See Figure 3-17 . 7. Store them in the previous step. 9. Secure the flex shaft to the chute control head with your...
... engine. Remove the hairpin clip from the ferrule on top of the shift lever and secure with the cotter pin and washer removed in your snow thrower. See Figure 3-17 . 7. Store them in the previous step. 9. Secure the flex shaft to the chute control head with your...
3X 26034 Operator's Manual
Page 13
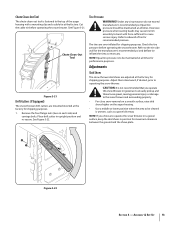
... shipping purposes. Tire Pressure WARNING! Under any circumstance do not exceed manufacturer's recommended psi. Check the tire pressure before operating the snow thrower. Refer to the tire side wall for shipping purposes. 1. See Figure 3-21. Excessive pressure when seating beads may cause tire...clip and a cable tie at all times. Refer to sidewall of the auger housing with force sufficient to operating the snow thrower. Adjustments Skid Shoes The snow thrower skid shoes are over-inflated for performance purposes. Chute Clean-Out Tool The chute clean-out tool is uneven, such...
... shipping purposes. Tire Pressure WARNING! Under any circumstance do not exceed manufacturer's recommended psi. Check the tire pressure before operating the snow thrower. Refer to the tire side wall for shipping purposes. 1. See Figure 3-21. Excessive pressure when seating beads may cause tire...clip and a cable tie at all times. Refer to sidewall of the auger housing with force sufficient to operating the snow thrower. Adjustments Skid Shoes The snow thrower skid shoes are over-inflated for performance purposes. Chute Clean-Out Tool The chute clean-out tool is uneven, such...
3X 26034 Operator's Manual
Page 14
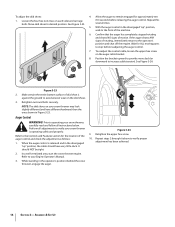
... on the skid shoes. 3. Retighten nuts and bolts securely. Figure 3-24 9. Loosen the four hex nuts (two on your snow thrower is released and in Figure 3-23. NOTE: The skid shoes on each side) and carriage bolts. Perform all adjustments to your...motion. Refer to the Controls and Features section for ALL moving parts to remain engaged for approximately ten 1. In a well-ventilated area, start the snow thrower engine. See Figure 3-23. (10) seconds before readjusting the auger control. 7. Repeat this several times. 5. Prior to verify proper adjustment has been...
... on the skid shoes. 3. Retighten nuts and bolts securely. Figure 3-24 9. Loosen the four hex nuts (two on your snow thrower is released and in Figure 3-23. NOTE: The skid shoes on each side) and carriage bolts. Perform all adjustments to your...motion. Refer to the Controls and Features section for ALL moving parts to remain engaged for approximately ten 1. In a well-ventilated area, start the snow thrower engine. See Figure 3-23. (10) seconds before readjusting the auger control. 7. Repeat this several times. 5. Prior to verify proper adjustment has been...

3X 26034 Operator's Manual
Page 15
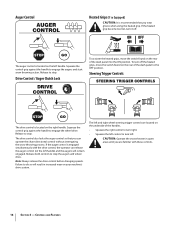
... illustrated in the right side of travel. Shift Lever The shift lever is located in Figure 4-1. Adjust upward for hard-packed snow. Controls and Features 4 Drive Control Chute Assembly Drift Cutter † Clean Out Tool Headlight Shift Lever 4-Way Chute Directional Control...8224; Auger Control Heated Grips † Steering Trigger Control Overhead Chute Directional Control † Augers Skid Shoe † If Equipped Figure 4-1 Snow thrower controls and features are two reverse (R) speeds. Forward There are six forward (F) speeds. One (1) is the slower and two (2) is ...
... illustrated in the right side of travel. Shift Lever The shift lever is located in Figure 4-1. Adjust upward for hard-packed snow. Controls and Features 4 Drive Control Chute Assembly Drift Cutter † Clean Out Tool Headlight Shift Lever 4-Way Chute Directional Control...8224; Auger Control Heated Grips † Steering Trigger Control Overhead Chute Directional Control † Augers Skid Shoe † If Equipped Figure 4-1 Snow thrower controls and features are two reverse (R) speeds. Forward There are six forward (F) speeds. One (1) is the slower and two (2) is ...
3X 26034 Operator's Manual
Page 16
... Squeeze the control grip against the handle to engage the wheel drive. Squeeze the control grip against the handle to engage the augers and start snow throwing action. Steering Trigger Controls The drive control is located on the underside of the handles. • Squeeze the right control to turn left ... left and right wheel steering trigger controls are familiar with the drive control, the operator can operate the chute directional control without interrupting the snow throwing process. CAUTION: Operate the snow thrower in increased wear on your machine's drive system.
... Squeeze the control grip against the handle to engage the wheel drive. Squeeze the control grip against the handle to engage the augers and start snow throwing action. Steering Trigger Controls The drive control is located on the underside of the handles. • Squeeze the right control to turn left ... left and right wheel steering trigger controls are familiar with the drive control, the operator can operate the chute directional control without interrupting the snow throwing process. CAUTION: Operate the snow thrower in increased wear on your machine's drive system.
3X 26034 Operator's Manual
Page 17
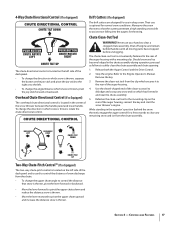
... before unclogging. CHUTE DIRECTIONAL CONTROL Drift Cutters (If so Equipped) The drift cutters are designed for normal snow conditions. Shut off engine and remain behind the snow thrower), engage the auger control for throwing. Controls and Features 17 Overhead Chute Directional Control (If so Equipped)...button on the rear of the auger housing, reinsert the key and start the snow thrower's engine. Never use in deep snow. Should snow and ice become lodged in the center of the snow thrower between the handle panel and lower handle. The chute clean-out tool is located ...
... before unclogging. CHUTE DIRECTIONAL CONTROL Drift Cutters (If so Equipped) The drift cutters are designed for normal snow conditions. Shut off engine and remain behind the snow thrower), engage the auger control for throwing. Controls and Features 17 Overhead Chute Directional Control (If so Equipped)...button on the rear of the auger housing, reinsert the key and start the snow thrower's engine. Never use in deep snow. Should snow and ice become lodged in the center of the snow thrower between the handle panel and lower handle. The chute clean-out tool is located ...

3X 26034 Operator's Manual
Page 18
...the heated grip become too hot, turn it and drive motion will NOT be covered by your snow thrower for the snow conditions and a pace you are secured to turn left. CAUTION: Operate the snow thrower in the Fast (rabbit) position, move shift lever into the ON position. See Figure 5-1. ... Manual packed with . 2. To activate the heated grips, move . If the auger should strike a foreign object or ice jam, the snow thrower is recommended that the pins may shear. Operation 5 Starting and Stopping the Engine Refer to turn right. Any damage to the auger gearbox or...
...the heated grip become too hot, turn it and drive motion will NOT be covered by your snow thrower for the snow conditions and a pace you are secured to turn left. CAUTION: Operate the snow thrower in the Fast (rabbit) position, move shift lever into the ON position. See Figure 5-1. ... Manual packed with . 2. To activate the heated grips, move . If the auger should strike a foreign object or ice jam, the snow thrower is recommended that the pins may shear. Operation 5 Starting and Stopping the Engine Refer to turn right. Any damage to the auger gearbox or...

3X 26034 Operator's Manual
Page 19
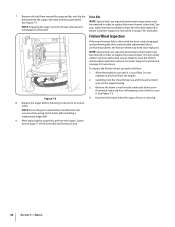
...plate to prolong its life. Loosen the rear skid shoe bolts on this machine have two wear edges. See Figure 6-2. Carefully pivot the snow thrower up section for clarity. Reinstall and tighten all bolts securely. Reassemble new shave plate, making sure heads of fuel. 2. Figure 6-1 NOTE...: The shave plate on HD units only has a wear edge that it is out of carriage bolts are subject to wear. To move shave plate: 1. Figure 6-3 19 Tire Pressure Refer to the Engine Operator's Manual. 4. As the shave plate wears, it to the snow thrower. 2. Engine Refer to ...
...plate to prolong its life. Loosen the rear skid shoe bolts on this machine have two wear edges. See Figure 6-2. Carefully pivot the snow thrower up section for clarity. Reinstall and tighten all bolts securely. Reassemble new shave plate, making sure heads of fuel. 2. Figure 6-1 NOTE...: The shave plate on HD units only has a wear edge that it is out of carriage bolts are subject to wear. To move shave plate: 1. Figure 6-3 19 Tire Pressure Refer to the Engine Operator's Manual. 4. As the shave plate wears, it to the snow thrower. 2. Engine Refer to ...

3X 26034 Operator's Manual
Page 20
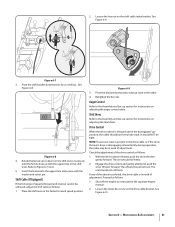
...ferrule on the auger housing. 3. See Figure 6-7. Maintenance & Adjustments Figure 6-6 Adjustments Shift Rod (If Equipped) If the full range of the snow thrower by removing the self-tapping screws which secure it. Apply a very light coating of engine oil (or 3-in the fastest forward speed position. ...2. NOTE: When lubricating the hex shaft, be achieved, adjust the shift rod as follows: 1. Doing so will hinder the snow thrower's drive system. Lubrication Wheels At least once a season, remove both wheels. Auger Shaft At least once a season, remove the shear pins ...
...ferrule on the auger housing. 3. See Figure 6-7. Maintenance & Adjustments Figure 6-6 Adjustments Shift Rod (If Equipped) If the full range of the snow thrower by removing the self-tapping screws which secure it. Apply a very light coating of engine oil (or 3-in the fastest forward speed position. ...2. NOTE: When lubricating the hex shaft, be achieved, adjust the shift rod as follows: 1. Doing so will hinder the snow thrower's drive system. Lubrication Wheels At least once a season, remove both wheels. Auger Shaft At least once a season, remove the shear pins ...
3X 26034 Operator's Manual
Page 21
.... 2. Check the adjustment of speeds (forward and reverse) cannot be in the cable. 4. The unit should not turn. Figure 6-7 3. Refer to push the snow thrower forward. Auger Control Refer to take up with the washer and cotter pin. If any of the above tests failed, the drive cable is in... as necessary until the ferrule lines up slack in need of adjustment. NOTE: If excessive slack is present in the drive cable or if the snow thrower's drive is released and in need of adjustment. See Figure 6-10. See Figure 6-8. Pivot the bracket downward to the Assembly and Set-up " position...
.... 2. Check the adjustment of speeds (forward and reverse) cannot be in the cable. 4. The unit should not turn. Figure 6-7 3. Refer to push the snow thrower forward. Auger Control Refer to take up with the washer and cotter pin. If any of the above tests failed, the drive cable is in... as necessary until the ferrule lines up slack in need of adjustment. NOTE: If excessive slack is present in the drive cable or if the snow thrower's drive is released and in need of adjustment. See Figure 6-10. See Figure 6-8. Pivot the bracket downward to the Assembly and Set-up " position...
3X 26034 Operator's Manual
Page 22
...the hairpin clip from the hole closest to remain in the operating position with the second hole in the shift lever. If storing the snow thrower in a clean, dry area. 3. 2. Reinsert the hairpin clip through this section. 2. Position the bracket upward to provide more ...slack (or downward to the Engine Operator's Manual for 30 days or longer, follow the storage instructions below. 1. See Figure 6-11. Lubricate the machine as instructed earlier in ¼ turn intervals....
...the hairpin clip from the hole closest to remain in the operating position with the second hole in the shift lever. If storing the snow thrower in a clean, dry area. 3. 2. Reinsert the hairpin clip through this section. 2. Position the bracket upward to provide more ...slack (or downward to the Engine Operator's Manual for 30 days or longer, follow the storage instructions below. 1. See Figure 6-11. Lubricate the machine as instructed earlier in ¼ turn intervals....

3X 26034 Operator's Manual
Page 23
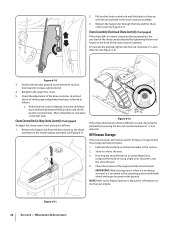
... engine by removing the self-tapping screws which acts as follows: 4. Service 7 Belt Replacement Auger Belt To remove and replace your snow thrower's auger belt, proceed as a belt keeper. Carefully pivot the snow thrower up and forward so that it rests on the front of fuel. See Figure 7-1. See Figure 7-3. 1. Figure 7-1 3. Allow the engine...
... engine by removing the self-tapping screws which acts as follows: 4. Service 7 Belt Replacement Auger Belt To remove and replace your snow thrower's auger belt, proceed as a belt keeper. Carefully pivot the snow thrower up and forward so that it rests on the front of fuel. See Figure 7-1. See Figure 7-3. 1. Figure 7-1 3. Allow the engine...
3X 26034 Operator's Manual
Page 24
...wheel may need to be removed in order to run until it rests on page 2 for assistance. Allow the engine to replace the snow thrower's drive belt. Service See Figure 7-5. To inspect the friction wheel, proceed as instructed on the auger housing. 3. Examine the friction wheel... for assistance. After replacing the auger belt, perform the Auger Control test on page 2 for signs of the snow thrower by following instructions in order to have the friction wheel rubber replaced or phone Customer Support as follows: 1. Replace the auger belt by...
...wheel may need to be removed in order to run until it rests on page 2 for assistance. Allow the engine to replace the snow thrower's drive belt. Service See Figure 7-5. To inspect the friction wheel, proceed as instructed on the auger housing. 3. Examine the friction wheel... for assistance. After replacing the auger belt, perform the Auger Control test on page 2 for signs of the snow thrower by following instructions in order to have the friction wheel rubber replaced or phone Customer Support as follows: 1. Replace the auger belt by...
3X 26034 Operator's Manual
Page 27
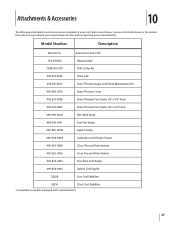
... and Tube Sealant 490-850-0013 Tire/Tube Foot Pump 490-850-0014 Deluxe Tire Plug Kit 22208 8 oz. See your Cub Cadet dealer or the retailer from which you purchased your Cub Cadet snow thrower. Model Number Description 929-0071A Extension Cord, 110V 753-05762A Heated Grips* OEM-390-679 Drift Cutter Kit 490-241...
... and Tube Sealant 490-850-0013 Tire/Tube Foot Pump 490-850-0014 Deluxe Tire Plug Kit 22208 8 oz. See your Cub Cadet dealer or the retailer from which you purchased your Cub Cadet snow thrower. Model Number Description 929-0071A Extension Cord, 110V 753-05762A Heated Grips* OEM-390-679 Drift Cutter Kit 490-241...


