Jet Sweep Warranty Information
Page 1
... for a particular purpose, applies after the applicable period of fitness for loss, damage, or injury to you and your warranty as identified. CUB CADET LLC MANUFACTURER'S LIMITED WARRANTY FOR SNOW THROWERS, LOG SPLITTERS, CHIPPER-SHREDDERS, CHIPPER-SHREDDER VACUUMS AND JET SWEEPS The limited warranty set forth above. Damage resulting from the sale. These items...
... for a particular purpose, applies after the applicable period of fitness for loss, damage, or injury to you and your warranty as identified. CUB CADET LLC MANUFACTURER'S LIMITED WARRANTY FOR SNOW THROWERS, LOG SPLITTERS, CHIPPER-SHREDDERS, CHIPPER-SHREDDER VACUUMS AND JET SWEEPS The limited warranty set forth above. Damage resulting from the sale. These items...
221 LHP Operator's Manual
Page 1
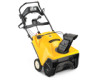
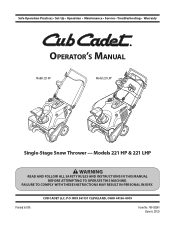
Printed In USA CUB CADET LLC, P.O. Safe Operation Practices • Set-Up • Operation • Maintenance • Service • Troubleshooting • Warranty Operator's Manual Model 221 HP Model 221 LHP Single-Stage Snow Thrower - FAILURE TO COMPLY WITH THESE INSTRUCTIONS MAY RESULT IN PERSONAL INJURY. BOX 361131 CLEVELAND, OHIO 44136-0019 Form No. 769-08241 (June 6, 2012) Models 221 HP & 221 LHP WARNING READ AND FOLLOW ALL SAFETY RULES AND INSTRUCTIONS IN THIS MANUAL BEFORE ATTEMPTING TO OPERATE THIS MACHINE.
Printed In USA CUB CADET LLC, P.O. Safe Operation Practices • Set-Up • Operation • Maintenance • Service • Troubleshooting • Warranty Operator's Manual Model 221 HP Model 221 LHP Single-Stage Snow Thrower - FAILURE TO COMPLY WITH THESE INSTRUCTIONS MAY RESULT IN PERSONAL INJURY. BOX 361131 CLEVELAND, OHIO 44136-0019 Form No. 769-08241 (June 6, 2012) Models 221 HP & 221 LHP WARNING READ AND FOLLOW ALL SAFETY RULES AND INSTRUCTIONS IN THIS MANUAL BEFORE ATTEMPTING TO OPERATE THIS MACHINE.
221 LHP Operator's Manual
Page 2
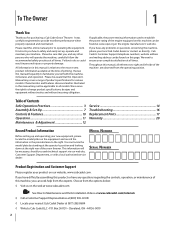
...manual is relative to safely and easily set up and operating your complete satisfaction at the right rear of product specifications for purchasing a Cub Cadet Snow Thrower. It instructs you how to the most recent product information available at www.opei.org or the engine manufacturer's web site. We reserve...side of printing. Box 361131 • Cleveland, OH • 44136-0019 2 All information in this manual may cover a range of the snow thrower. We want to ensure your new equipment, please locate the model plate on the web at www.cubcadet.com See How-to Maintenance and ...
...manual is relative to safely and easily set up and operating your complete satisfaction at the right rear of product specifications for purchasing a Cub Cadet Snow Thrower. It instructs you how to the most recent product information available at www.opei.org or the engine manufacturer's web site. We reserve...side of printing. Box 361131 • Cleveland, OH • 44136-0019 2 All information in this manual may cover a range of the snow thrower. We want to ensure your new equipment, please locate the model plate on the web at www.cubcadet.com See How-to Maintenance and ...
221 LHP Operator's Manual
Page 5
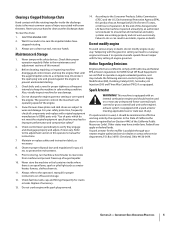
...at unsafe speeds. At the end of the California Public Resources Code). Box 361131 Cleveland, Ohio 44136-0019. Never tamper with snow throwers. "Use of California the above is used on off-season storage. 12. Notice Regarding Emissions Engines which do not meet ... machine a few minutes to operate on federal lands. Refer to comply with original equipment manufacturer's (OEM) parts only. Section 2 - Snow thrower shave plates and skid shoes are certified to the adjustment section in safe working properly and not worn excessively. Replace if necessary. 13. ...
...at unsafe speeds. At the end of the California Public Resources Code). Box 361131 Cleveland, Ohio 44136-0019. Never tamper with snow throwers. "Use of California the above is used on off-season storage. 12. Notice Regarding Emissions Engines which do not meet ... machine a few minutes to operate on federal lands. Refer to comply with original equipment manufacturer's (OEM) parts only. Section 2 - Snow thrower shave plates and skid shoes are certified to the adjustment section in safe working properly and not worn excessively. Replace if necessary. 13. ...
221 LHP Operator's Manual
Page 7
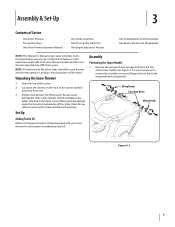
... 3-1 7 Some of these parts are shipped under the shroud on the backside of the carton. It is not necessary to the chute. Snow thrower features may differ from the top of the lower handle. Cut down the corners on adding fuel and oil. Check for information on the ...chute and remove if necessary. Set-Up Adding Fuel & Oil Refer to the left or right side of Carton • One Snow Thrower • • Two Ignition Keys • • One Snow Thrower Operator's Manual • One Chute Assembly One 20 oz. Any exceptions will be noted. See Figure 3-1. Unpacking the...
... 3-1 7 Some of these parts are shipped under the shroud on the backside of the carton. It is not necessary to the chute. Snow thrower features may differ from the top of the lower handle. Cut down the corners on adding fuel and oil. Check for information on the ...chute and remove if necessary. Set-Up Adding Fuel & Oil Refer to the left or right side of Carton • One Snow Thrower • • Two Ignition Keys • • One Snow Thrower Operator's Manual • One Chute Assembly One 20 oz. Any exceptions will be noted. See Figure 3-1. Unpacking the...

221 LHP Operator's Manual
Page 10
Slide the rubber bellow over the universal joint. Remove the eye bolt and handle knob from the back of the snow thrower. 3. Assembly & Set-Up Do not fully tighten the hardware until instructed to do so. Slip the recoil starter rope into the eye bolt from the .... 10 Section 3- Recoil Starter Handle Eye Bolt Handle Knob Figure 3-11 NOTE: The opening of the eye bolt should face toward the back of the snow thrower. See Figure 3-11. 5. Slowly pull the recoil starter handle up towards the eye bolt. 4. 6.
Slide the rubber bellow over the universal joint. Remove the eye bolt and handle knob from the back of the snow thrower. 3. Assembly & Set-Up Do not fully tighten the hardware until instructed to do so. Slip the recoil starter rope into the eye bolt from the .... 10 Section 3- Recoil Starter Handle Eye Bolt Handle Knob Figure 3-11 NOTE: The opening of the eye bolt should face toward the back of the snow thrower. See Figure 3-11. 5. Slowly pull the recoil starter handle up towards the eye bolt. 4. 6.
221 LHP Operator's Manual
Page 11
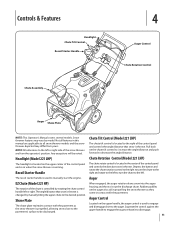
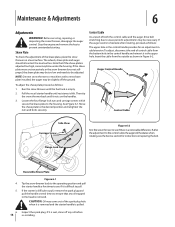
... (Model 221 LHP) Chute Rotation Control (Model 221 LHP) The headlight is located on the upper center of the chute is thrown. Rubber paddles on when the snow thrower is propelled, allowing snow close to the pavement's surface to all features in the center of the snow thrower are applicable to be noted. Not all snow thrower models and the snow thrower depicted...
... (Model 221 LHP) Chute Rotation Control (Model 221 LHP) The headlight is located on the upper center of the chute is thrown. Rubber paddles on when the snow thrower is propelled, allowing snow close to the pavement's surface to all features in the center of the snow thrower are applicable to be noted. Not all snow thrower models and the snow thrower depicted...
221 LHP Operator's Manual
Page 12
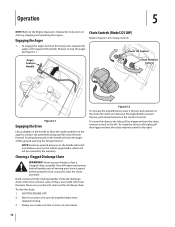
... rotating. 3. To clear the chute: 1. Always use your hand to clean out the discharge chute. Hand contact with snow throwers. To decrease the angle/distance snow is the most common cause of injury associated with the rotating impeller inside the discharge chute is thrown, push down/forward ...wear on starting, stopping and operating the engine. Wait 10 seconds to be covered by the warranty. See Figure 5-1. Chute Controls (Model 221 LHP) Refer to the right. NOTE: Excessive upward pressure on the handle will not be sure the impeller blades have stopped before using the...
... rotating. 3. To clear the chute: 1. Always use your hand to clean out the discharge chute. Hand contact with snow throwers. To decrease the angle/distance snow is the most common cause of injury associated with the rotating impeller inside the discharge chute is thrown, push down/forward ...wear on starting, stopping and operating the engine. Wait 10 seconds to be covered by the warranty. See Figure 5-1. Chute Controls (Model 221 LHP) Refer to the right. NOTE: Excessive upward pressure on the handle will not be sure the impeller blades have stopped before using the...
221 LHP Operator's Manual
Page 14
...6-1. Insert the cable from the bottom hole in cable tension. Inspect the spark plug. If the shave plate wears out excessively, or the snow thrower does not selfpropel, the shave plate may be adjusted. Control Cable As a result of both the control cable and the auger drive belt stretching... position and retighten the nuts and bolts securely. Auger Control Handle Control Cable Side View Carriage Screw Flange Lock Nut Figure 6-2 Test the snow thrower to be necessary. If the starter is difficult to pull, remove the spark plug and pull the handle several times to pull. 5. ...
...6-1. Insert the cable from the bottom hole in cable tension. Inspect the spark plug. If the shave plate wears out excessively, or the snow thrower does not selfpropel, the shave plate may be adjusted. Control Cable As a result of both the control cable and the auger drive belt stretching... position and retighten the nuts and bolts securely. Auger Control Handle Control Cable Side View Carriage Screw Flange Lock Nut Figure 6-2 Test the snow thrower to be necessary. If the starter is difficult to pull, remove the spark plug and pull the handle several times to pull. 5. ...
221 LHP Operator's Manual
Page 15
... available separately. If storing the snow thrower in a clean, dry area. 2. Clean the exterior of control cable with a light oil. Engine Refer to the Engine Operators manual packed separately with the three screws removed in your local Cub Cadet dealer or contact Cub Cadet's Customer Support for 30 days or... longer, follow pull the handle several times to pull, remove the spark plug and If the snow thrower will not be used for kit #753-06684. 3. ...
... available separately. If storing the snow thrower in a clean, dry area. 2. Clean the exterior of control cable with a light oil. Engine Refer to the Engine Operators manual packed separately with the three screws removed in your local Cub Cadet dealer or contact Cub Cadet's Customer Support for 30 days or... longer, follow pull the handle several times to pull, remove the spark plug and If the snow thrower will not be used for kit #753-06684. 3. ...

221 LHP Operator's Manual
Page 16
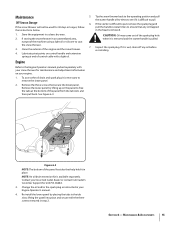
... from the auger and chute. 6. Auger Shaft Auger Pulley Flange Nut 6. 16 Figure 7-2 Remove the auger pulley and the belt. Tip the snow thrower back to the operating position and pull the starter handle a few times to see if it to get the auger pulley under the idler pulley... and slide the pulley back on the idler pulley to the frame. Reinstall the belt cover removed earlier. 5. Inspect the spark plug. Run the snow thrower until resistance is pulled. 8. auger shaft. See Figure 7-2. 4. CAUTION: Oil may come out of the belt around the drive pulley and under ...
... from the auger and chute. 6. Auger Shaft Auger Pulley Flange Nut 6. 16 Figure 7-2 Remove the auger pulley and the belt. Tip the snow thrower back to the operating position and pull the starter handle a few times to see if it to get the auger pulley under the idler pulley... and slide the pulley back on the idler pulley to the frame. Reinstall the belt cover removed earlier. 5. Inspect the spark plug. Run the snow thrower until resistance is pulled. 8. auger shaft. See Figure 7-2. 4. CAUTION: Oil may come out of the belt around the drive pulley and under ...

221 LHP Operator's Manual
Page 17
... paddles, proceed as instructed in the Maintenance & Adjustments section. 2. See Figure 7-4. See Figure 7-5. Secure the replacement rubber paddles to the snow thrower housing. Section 7 - Remove the four carriage screws and flange lock nuts which secure them to the auger. Side View Hex Washer Screw ...to wear. Install the new shave plate, making sure the heads of the metal auger itself can result in contact with your snow thrower for service information for positioning and re-installing the new auger. 5. Doing so can come in serious damage to your engine....
... paddles, proceed as instructed in the Maintenance & Adjustments section. 2. See Figure 7-4. See Figure 7-5. Secure the replacement rubber paddles to the snow thrower housing. Section 7 - Remove the four carriage screws and flange lock nuts which secure them to the auger. Side View Hex Washer Screw ...to wear. Install the new shave plate, making sure the heads of the metal auger itself can result in contact with your snow thrower for service information for positioning and re-installing the new auger. 5. Doing so can come in serious damage to your engine....
221 LHP Operator's Manual
Page 18
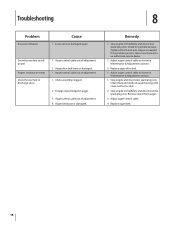
... object from auger. 3. Foreign object lodged in Maintenance & Adjustments section. 1. If the problem persists, take snow thrower to discharge snow 1. Auger control cable out of adjustment. 4. Tighten all bolts and nuts. Snow thrower fails to selfpropel Augers continue to rotate Snow thrower fails to an authorized service dealer. 1. Check for possible damage. Repair as shown in Maintenance...
... object from auger. 3. Foreign object lodged in Maintenance & Adjustments section. 1. If the problem persists, take snow thrower to discharge snow 1. Auger control cable out of adjustment. 4. Tighten all bolts and nuts. Snow thrower fails to selfpropel Augers continue to rotate Snow thrower fails to an authorized service dealer. 1. Check for possible damage. Repair as shown in Maintenance...
221 LHP Operator's Manual
Page 20
... period of express written warranty above , given by any person or entity, including a dealer or retailer, with your local authorized service dealer. B CUB CADET LLC MANUFACTURER'S LIMITED WARRANTY FOR SNOW THROWERS, CHIPPER-SHREDDERS, CHIPPER-SHREDDER VACUUMS, LOG SPLITTERS AND JET SWEEPS The limited warranty set forth below is in addition to any warranty for...
... period of express written warranty above , given by any person or entity, including a dealer or retailer, with your local authorized service dealer. B CUB CADET LLC MANUFACTURER'S LIMITED WARRANTY FOR SNOW THROWERS, CHIPPER-SHREDDERS, CHIPPER-SHREDDER VACUUMS, LOG SPLITTERS AND JET SWEEPS The limited warranty set forth below is in addition to any warranty for...
200 Series Snow Throwers Brochure
Page 1
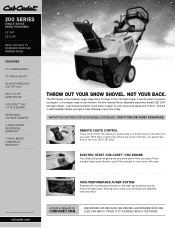
... expect from the operator's station lets you throw snow in the direction you expect, in the cub cadet lineup. ProVe iT To YourSeLF wiTH a TeST driVe. 200 SERIES SINGLE-STAGE SNOW THROWERS 221 HP 221 LHP ideaL For LigHT To moderaTe Snow and narrow PaTHS. THAT'S THE cUB cADET ADVANTAGE. it easier to clear snow with less effort. innoVaTiVe FeaTureS For an...
... expect from the operator's station lets you throw snow in the direction you expect, in the cub cadet lineup. ProVe iT To YourSeLF wiTH a TeST driVe. 200 SERIES SINGLE-STAGE SNOW THROWERS 221 HP 221 LHP ideaL For LigHT To moderaTe Snow and narrow PaTHS. THAT'S THE cUB cADET ADVANTAGE. it easier to clear snow with less effort. innoVaTiVe FeaTureS For an...
200 Series Snow Throwers Brochure
Page 2
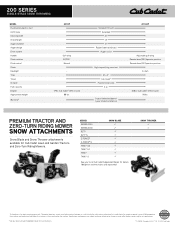
..." 13" 9" Rubber/steel reinforced Auger-assist High-impact/clog-resistant 8" x 2" Cub Cadet® Polymer/reversible 2 qt. 3-year limited residential 1-year limited commercial 221 LHP Adjustable gull wing Remote lever/190˚/operator position Remote lever/50˚/operator position...SNOW THROWERS MODEL Push button electric start Oil fill tube Clearing width Intake height Auger diameter Auger design Drive system Handle Chute rotation Pitch control Chute Headlight Tires Tread Scraper Fuel capacity Engine Approximate weight Warranty† 221 HP Gull wing EZ/190˚ Manual - 179cc Cub Cadet...
..." 13" 9" Rubber/steel reinforced Auger-assist High-impact/clog-resistant 8" x 2" Cub Cadet® Polymer/reversible 2 qt. 3-year limited residential 1-year limited commercial 221 LHP Adjustable gull wing Remote lever/190˚/operator position Remote lever/50˚/operator position...SNOW THROWERS MODEL Push button electric start Oil fill tube Clearing width Intake height Auger diameter Auger design Drive system Handle Chute rotation Pitch control Chute Headlight Tires Tread Scraper Fuel capacity Engine Approximate weight Warranty† 221 HP Gull wing EZ/190˚ Manual - 179cc Cub Cadet...


