Installation Guide
Page 1
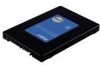
... the connectors on the drive. • Do not open the drive enclosure. Laptop Install page 2 Desktop Install page 4 1 Precautions • To protect your system's components from your existing drive onto your new Crucial SSD. Install Guide Crucial® 2.5-inch Solid State Drive Equipment Needed • Crucial® 2.5-inch SSD • Non-magnetic tip screwdriver • Your system's owner's manual Special Considerations If your Crucial SSD will void your warranty. Data migration software is...
... the connectors on the drive. • Do not open the drive enclosure. Laptop Install page 2 Desktop Install page 4 1 Precautions • To protect your system's components from your existing drive onto your new Crucial SSD. Install Guide Crucial® 2.5-inch Solid State Drive Equipment Needed • Crucial® 2.5-inch SSD • Non-magnetic tip screwdriver • Your system's owner's manual Special Considerations If your Crucial SSD will void your warranty. Data migration software is...
Installation Guide
Page 2
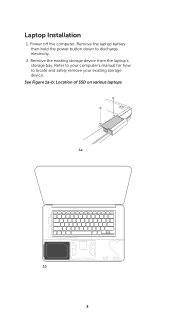
Remove the existing storage device from the laptop's storage bay. Power off the computer. See Figure 1a-b: Location of SSD on various laptops 1a. 1b. 2 Remove the laptop battery then hold the power button down to locate and safely remove your existing storage device. Refer to your computer's manual for how to discharge electricity. 2. Laptop Installation 1.
Remove the existing storage device from the laptop's storage bay. Power off the computer. See Figure 1a-b: Location of SSD on various laptops 1a. 1b. 2 Remove the laptop battery then hold the power button down to locate and safely remove your existing storage device. Refer to your computer's manual for how to discharge electricity. 2. Laptop Installation 1.
Installation Guide
Page 3
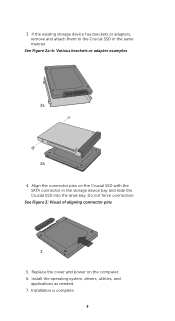
3. Install the operating system, drivers, utilities, and applications as needed. 7. Replace the cover and power on the Crucial SSD with the SATA connector in the same manner. See Figure 2a-b: Various brackets or adapter examples 2a. 2b. 4. Do not force connection. Installation is complete. 3 See Figure 3: Visual of aligning connector pins 3. 5. Align the connector pins on the computer. 6. If the existing storage device has brackets or adapters, remove and attach them to the Crucial SSD in the storage device bay and slide the Crucial SSD into the drive bay.
3. Install the operating system, drivers, utilities, and applications as needed. 7. Replace the cover and power on the Crucial SSD with the SATA connector in the same manner. See Figure 2a-b: Various brackets or adapter examples 2a. 2b. 4. Do not force connection. Installation is complete. 3 See Figure 3: Visual of aligning connector pins 3. 5. Align the connector pins on the computer. 6. If the existing storage device has brackets or adapters, remove and attach them to the Crucial SSD in the storage device bay and slide the Crucial SSD into the drive bay.
Installation Guide
Page 4
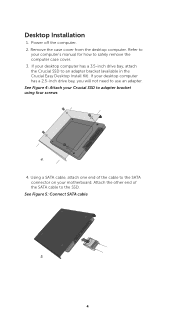
See Figure 5: Connect SATA cable 5. 4 If your motherboard. Power off the computer. 2. Using a SATA cable, attach one end of the SATA cable to safely remove the computer case cover. 3. Remove the case cover from the desktop computer. If your Crucial SSD to an adapter bracket (available in the Crucial Easy Desktop Install Kit). See Figure 4: Attach your desktop computer has a 3.5-inch drive bay, attach the Crucial SSD to adapter bracket using four...
See Figure 5: Connect SATA cable 5. 4 If your motherboard. Power off the computer. 2. Using a SATA cable, attach one end of the SATA cable to safely remove the computer case cover. 3. Remove the case cover from the desktop computer. If your Crucial SSD to an adapter bracket (available in the Crucial Easy Desktop Install Kit). See Figure 4: Attach your desktop computer has a 3.5-inch drive bay, attach the Crucial SSD to adapter bracket using four...
Installation Guide
Page 5
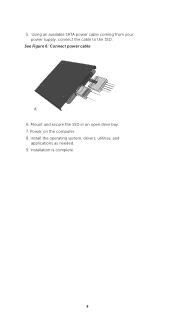
5. See Figure 6: Connect power cable 6. 6. Using an available SATA power cable coming from your power supply, connect the cable to the SSD. Mount and secure the SSD in an open drive bay. 7. Installation is complete. 5 Install the operating system, drivers, utilities, and applications as needed. 9. Power on the computer. 8.
5. See Figure 6: Connect power cable 6. 6. Using an available SATA power cable coming from your power supply, connect the cable to the SSD. Mount and secure the SSD in an open drive bay. 7. Installation is complete. 5 Install the operating system, drivers, utilities, and applications as needed. 9. Power on the computer. 8.

Installation Guide
Page 6
... trademarks or registered trademarks of their respective owners. Products and specifications are property of Micron Technology, Inc. Neither Crucial nor Micron Technology is subject to change without notice. All rights reserved. All other trademarks and service marks are subject to change without notice. Information is responsible for omissions or errors in typography or photography. 6 North and...
... trademarks or registered trademarks of their respective owners. Products and specifications are property of Micron Technology, Inc. Neither Crucial nor Micron Technology is subject to change without notice. All rights reserved. All other trademarks and service marks are subject to change without notice. Information is responsible for omissions or errors in typography or photography. 6 North and...

