User Guide
Page 3
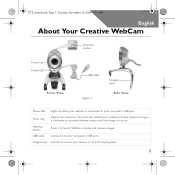
...'s USB port. Hinged lever Use this ring in a clockwise or counterclockwise motion until the image is connected to mount your camera on an LCD display panel. 3 Snapshot button Press it to launch WebCam Center and capture images. USB cable Connect it to your computer's USB port. CLE_multi.book Page 3 Tuesday, November 16, 2004 4:51 PM English About Your Creative WebCam Snapshot button Focus ring Power LED Front View USB cable Figure 1 Hinged lever Side View Power LED Lights...
...'s USB port. Hinged lever Use this ring in a clockwise or counterclockwise motion until the image is connected to mount your camera on an LCD display panel. 3 Snapshot button Press it to launch WebCam Center and capture images. USB cable Connect it to your computer's USB port. CLE_multi.book Page 3 Tuesday, November 16, 2004 4:51 PM English About Your Creative WebCam Snapshot button Focus ring Power LED Front View USB cable Figure 1 Hinged lever Side View Power LED Lights...
User Guide
Page 4
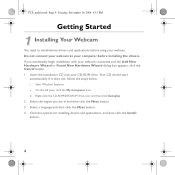
... region you accidentally begin installation with your computer before using your CD-ROM drive. If it does not, follow the steps below: i. Click the options for installing drivers and applications, and then click the Install button. 4 CLE_multi.book Page 4 Tuesday, November 16, 2004 4:51 PM Getting Started 1 Installing Your Webcam You need to your webcam connected and the Add New Hardware Wizard or Found New Hardware...
... region you accidentally begin installation with your computer before using your CD-ROM drive. If it does not, follow the steps below: i. Click the options for installing drivers and applications, and then click the Install button. 4 CLE_multi.book Page 4 Tuesday, November 16, 2004 4:51 PM Getting Started 1 Installing Your Webcam You need to your webcam connected and the Add New Hardware Wizard or Found New Hardware...
User Guide
Page 5
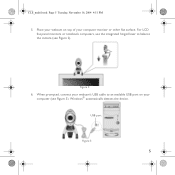
CLE_multi.book Page 5 Tuesday, November 16, 2004 4:51 PM 5. Place your webcam on your computer monitor or other flat surface. When prompted, connect your webcam's USB cable to balance the camera (see Figure 3). USB port Figure 3 5 For LCD flat panel monitors or notebook computers, use the integrated hinged lever to an available USB port on top of your computer (see Figure 2). Figure 2 6. Windows® automatically detects the device.
CLE_multi.book Page 5 Tuesday, November 16, 2004 4:51 PM 5. Place your webcam on your computer monitor or other flat surface. When prompted, connect your webcam's USB cable to balance the camera (see Figure 3). USB port Figure 3 5 For LCD flat panel monitors or notebook computers, use the integrated hinged lever to an available USB port on top of your computer (see Figure 2). Figure 2 6. Windows® automatically detects the device.
User Guide
Page 6
... USB 2.0 performance are installed on the screen to insert the Windows 98 SE or Windows Me CD, replace the Creative WebCam Live! ii. iv. Follow the instructions on your computer, and alerts you want to its fullest potential over a USB 2.0 connection: • install the USB 2.0 driver provided by your hardware vendor • download and install the latest Windows Service Pack for your operating system • if you are using Windows XP SP1, install Windows...
... USB 2.0 performance are installed on the screen to insert the Windows 98 SE or Windows Me CD, replace the Creative WebCam Live! ii. iv. Follow the instructions on your computer, and alerts you want to its fullest potential over a USB 2.0 connection: • install the USB 2.0 driver provided by your hardware vendor • download and install the latest Windows Service Pack for your operating system • if you are using Windows XP SP1, install Windows...
User Guide
Page 7
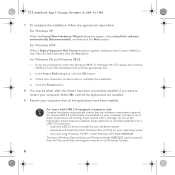
... Manager button. The entry "Creative WebCam Live! To view the photos in the image viewer, double-click the image files in the default media folder. Click the plus (+) sign next to capture an image. Images are saved as files in the Thumbnails/ Details pane. 7 Ultra" appears. 3 Using Your Creative WebCam Taking a Photo 1. Right-click the My Computer icon on your desktop or in the Windows Start menu. 2. In Windows XP and Windows...
... Manager button. The entry "Creative WebCam Live! To view the photos in the image viewer, double-click the image files in the default media folder. Click the plus (+) sign next to capture an image. Images are saved as files in the Thumbnails/ Details pane. 7 Ultra" appears. 3 Using Your Creative WebCam Taking a Photo 1. Right-click the My Computer icon on your desktop or in the Windows Start menu. 2. In Windows XP and Windows...
User Guide
Page 8
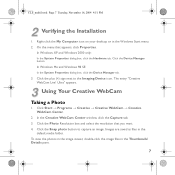
...; Creative → Creative WebCam Center → Face Tracking Utility. CLE_multi.book Page 8 Tuesday, November 16, 2004 4:51 PM Recording a Video 1. Click the Video Resolution box and select the resolution that you stop video recording. For more information, read the User's Guide on your CD-ROM/ DVD-ROM drive, and for the language the document is in the Thumbnails/ Details pane. Enabling Face Tracking With Face Tracking, your camera automatically zooms...
...; Creative → Creative WebCam Center → Face Tracking Utility. CLE_multi.book Page 8 Tuesday, November 16, 2004 4:51 PM Recording a Video 1. Click the Video Resolution box and select the resolution that you stop video recording. For more information, read the User's Guide on your CD-ROM/ DVD-ROM drive, and for the language the document is in the Thumbnails/ Details pane. Enabling Face Tracking With Face Tracking, your camera automatically zooms...

User Guide
Page 9
... Purchase for on-line troubleshooting and solutions (www.europe.creative.com/support) Register your product! Microsoft and Windows are hereby recognized as such. Customer Support Services and Warranty You can find Customer Support Services, Warranty and other information in ) Copyright © 2004 Creative Technology Ltd. All rights reserved. User's Guide d:\manual\\manual.chm (replace d:\ with the drive letter of your CD-ROM/DVD-ROM drive, with the region...
... Purchase for on-line troubleshooting and solutions (www.europe.creative.com/support) Register your product! Microsoft and Windows are hereby recognized as such. Customer Support Services and Warranty You can find Customer Support Services, Warranty and other information in ) Copyright © 2004 Creative Technology Ltd. All rights reserved. User's Guide d:\manual\\manual.chm (replace d:\ with the drive letter of your CD-ROM/DVD-ROM drive, with the region...


