Operation Manual
Page 1
to 5 p.m. (CT) WARm.G Before using this product, read this manual and follow all Safety Rules and Operating Instructions. Sears, Roebuckand Co., RoffmanEstates,IL 60179 U.S.A. Fri. 8 a.m. Operator'sManual ® 3800 PSi 4.0 GPM Model No. 580.752300 CPURSETSOSMUERREHWEALSPHLEINRE HOURS: Non. - Visit our Craftsman website: www.craftsmamcom Part No. 205732GS Draft A (01/10/2008) • Safety ,, Assembly ,, Operation ,, Maintenance ,, Parts ,, Espafiol, p. 34 ADVERTENCJA Antes de utilizar el producto, lea este manual y siga todas las Reglas de Seguridad e Instrucciones de Uso.
to 5 p.m. (CT) WARm.G Before using this product, read this manual and follow all Safety Rules and Operating Instructions. Sears, Roebuckand Co., RoffmanEstates,IL 60179 U.S.A. Fri. 8 a.m. Operator'sManual ® 3800 PSi 4.0 GPM Model No. 580.752300 CPURSETSOSMUERREHWEALSPHLEINRE HOURS: Non. - Visit our Craftsman website: www.craftsmamcom Part No. 205732GS Draft A (01/10/2008) • Safety ,, Assembly ,, Operation ,, Maintenance ,, Parts ,, Espafiol, p. 34 ADVERTENCJA Antes de utilizar el producto, lea este manual y siga todas las Reglas de Seguridad e Instrucciones de Uso.

Operation Manual
Page 2
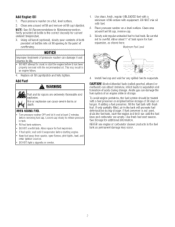
... from date of purchase if this pressure washer is the safety alert symbol. Follow safety messagesto avoid or reducethe risk of purchase, return it to any hazards involved. It is used to alert you may also have other Craftsman outlet, or Sears Parts & Repair Center in the United States or Canadafor free repair (or replacement if repair proves impossible). NOTICEindicates a situation that follow...
... from date of purchase if this pressure washer is the safety alert symbol. Follow safety messagesto avoid or reducethe risk of purchase, return it to any hazards involved. It is used to alert you may also have other Craftsman outlet, or Sears Parts & Repair Center in the United States or Canadafor free repair (or replacement if repair proves impossible). NOTICEindicates a situation that follow...
Operation Manual
Page 4
... Sears authorized parts ONLY. WHEN ADJUSTING OR MAKING REPAIRS TO YOUR PRESSURE WASHER • Disconnect the spark plug wire from the spark plug and place the wire where it and shorten its )ossible amputation. _ nderlying tissues, leading to avoid injury when spray gun kicks back. If equipment is disconnected, which does not havea trigger lock or trigger guard in place and in any safety...
... Sears authorized parts ONLY. WHEN ADJUSTING OR MAKING REPAIRS TO YOUR PRESSURE WASHER • Disconnect the spark plug wire from the spark plug and place the wire where it and shorten its )ossible amputation. _ nderlying tissues, leading to avoid injury when spray gun kicks back. If equipment is disconnected, which does not havea trigger lock or trigger guard in place and in any safety...
Operation Manual
Page 5
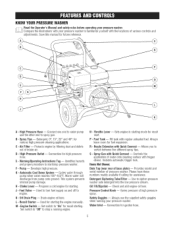
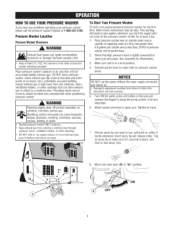
... damage. J - Engine Switch -- Sets engine in starting the engine manually. Checkand add engine oil here. Always use the supplied safety goggles when running engine. A - Identifies hazards and proper procedure to stop pressure washer. Fuel Valve -- K - P - H - Spray Gunwith Quick Connect -- Oil Fill/Dipstick -- Varies pressure of intake air. Water Inlet -- High PressureHose-- Protects engine by filtering dust and debris out of high pressure spray. G - H - Oil Drain Plug-- Always...
... damage. J - Engine Switch -- Sets engine in starting the engine manually. Checkand add engine oil here. Always use the supplied safety goggles when running engine. A - Identifies hazards and proper procedure to stop pressure washer. Fuel Valve -- K - P - H - Spray Gunwith Quick Connect -- Oil Fill/Dipstick -- Varies pressure of intake air. Water Inlet -- High PressureHose-- Protects engine by filtering dust and debris out of high pressure spray. G - H - Oil Drain Plug-- Always...

Operation Manual
Page 6
... problemswith the assembly of unit. Unpack the Pressure Washer 1. Checkall contents against the illustration on handle supports. Fill out and send in handle align with holes (D) on page 5. Make sure holes (D) in registration card. 2. Remove everything from carton. AssembJingYour Pressure Pasher Your Craftsman pressure washer will slide over the handle supports. 2. Attach handle. 3. Placehandle (B) onto handle supports (C) connected to fuel tank. 6. Tighten by cutting each piece before operation: 1. If any parts are...
... problemswith the assembly of unit. Unpack the Pressure Washer 1. Checkall contents against the illustration on handle supports. Fill out and send in handle align with holes (D) on page 5. Make sure holes (D) in registration card. 2. Remove everything from carton. AssembJingYour Pressure Pasher Your Craftsman pressure washer will slide over the handle supports. 2. Attach handle. 3. Placehandle (B) onto handle supports (C) connected to fuel tank. 6. Tighten by cutting each piece before operation: 1. If any parts are...
Operation Manual
Page 7
...of tank space for current ambient temperature. 3. Replace oil fill cap/dipstick and fully tighten. Loosencapslowlyto relievepressure in Maintenancesection. Use clean, fresh, regular UNLEADEDfuel with a minimum of an engine while in storage. Place pressure washer on a fiat, ]eve]surface. 2. ...air in the fuel tank as shown here. Verify provided oil bottle is not used, drain the fuel tank, start the engine and let it evaporatesbeforestartingengine. Cleanarea around oil fill and remove oil fill cap/dipstick. CAUTION! Cleanarea around fuel fill cap, remove cap. 3. Using oil...
...of tank space for current ambient temperature. 3. Replace oil fill cap/dipstick and fully tighten. Loosencapslowlyto relievepressure in Maintenancesection. Use clean, fresh, regular UNLEADEDfuel with a minimum of an engine while in storage. Place pressure washer on a fiat, ]eve]surface. 2. ...air in the fuel tank as shown here. Verify provided oil bottle is not used, drain the fuel tank, start the engine and let it evaporatesbeforestartingengine. Cleanarea around oil fill and remove oil fill cap/dipstick. CAUTION! Cleanarea around fuel fill cap, remove cap. 3. Using oil...
Operation Manual
Page 8
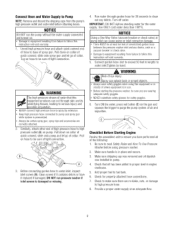
... gun and squeezethe trigger to water inlet.Tighten by hand. Checkthat oil has been added to proper level in length) to purge the pump system of tight connection. Add proper fuel to high pressure hose. 8. Checkto make sure there are no kinks, cuts, or damage to fuel tank. 6. Pull down on hose to base of water that this instructiownill void warranty...
... gun and squeezethe trigger to water inlet.Tighten by hand. Checkthat oil has been added to proper level in length) to purge the pump system of tight connection. Add proper fuel to high pressure hose. 8. Checkto make sure there are no kinks, cuts, or damage to fuel tank. 6. Pull down on hose to base of water that this instructiownill void warranty...
Operation Manual
Page 9
... carbon monoxide, an To Start Your Pressure Washer To start the engine after you have let the pressure washer sit idle for the first time, follow these instructions step-by hand. _ Bdreoarlethsisn,gccoalrobrolenssm, opnooisxoidnegcaasn. Turn ONthe water, press red button on the gun and squeezethe trigger to spray gun. Attach nozzle extension to purge the pump system of air and impurities. 6. Move fuel valve lever (B) to spray gun...
... carbon monoxide, an To Start Your Pressure Washer To start the engine after you have let the pressure washer sit idle for the first time, follow these instructions step-by hand. _ Bdreoarlethsisn,gccoalrobrolenssm, opnooisxoidnegcaasn. Turn ONthe water, press red button on the gun and squeezethe trigger to spray gun. Attach nozzle extension to purge the pump system of air and impurities. 6. Move fuel valve lever (B) to spray gun...
Operation Manual
Page 13
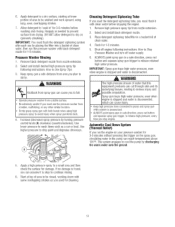
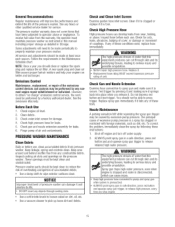
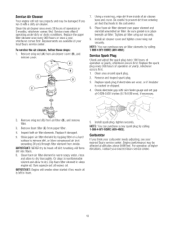
... your pressure washer for cleaning. 13 Placedetergent siphoning tube/filter in a safe direction, press red button and squeezespray gun trigger to strip paint and degrease driveways. ,_ u)onsdseibrllyeinagmtispsuutaetsio, nle. Increase (decrease) spray pressure by discharging the warm water onto the ground. 5. Pressure Washer Binsing 1. Remove black detergent nozzle from spray gun can cut through skin and its Kickback from nozzle extension. 2. Use higher pressure to release...
... your pressure washer for cleaning. 13 Placedetergent siphoning tube/filter in a safe direction, press red button and squeezespray gun trigger to strip paint and degrease driveways. ,_ u)onsdseibrllyeinagmtispsuutaetsio, nle. Increase (decrease) spray pressure by discharging the warm water onto the ground. 5. Pressure Washer Binsing 1. Remove black detergent nozzle from spray gun can cut through skin and its Kickback from nozzle extension. 2. Use higher pressure to release...
Operation Manual
Page 14
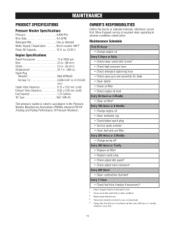
... noted below. PRODUCTSPECIFICATIONS Pressure Washer Specifications Pressure 3,800 PSi Flow Rate 4.0 GPM DetergentMix Useas directed Water Supply Temperature ....... Not to exceed IO0°F Pump Oil Capacity 12 fl. Replace if perforated or torn. 2 Service more often under dirty or dusty conditions. 3 Replace paper element only. 4 These items should be serviced by your servicing dealer. 5 Change after first 50 hours of Pressure Washers). FuelCapacity Oil Type 13 at 3600...
... noted below. PRODUCTSPECIFICATIONS Pressure Washer Specifications Pressure 3,800 PSi Flow Rate 4.0 GPM DetergentMix Useas directed Water Supply Temperature ....... Not to exceed IO0°F Pump Oil Capacity 12 fl. Replace if perforated or torn. 2 Service more often under dirty or dusty conditions. 3 Replace paper element only. 4 These items should be serviced by your servicing dealer. 5 Change after first 50 hours of Pressure Washers). FuelCapacity Oil Type 13 at 3600...
Operation Manual
Page 15
... free from the warranty, the operator must be able to loosen caked on the pressure washer. Check Gunand Nozzle Extension Examine hose connection to release retained high water pressure. Do not depress red button and test trigger. To correct the problem, immediately clean the spray tip following these tests. ALWAYS point spray gun in this equipment produces can cause injury. . All service and adjustments...
... free from the warranty, the operator must be able to loosen caked on the pressure washer. Check Gunand Nozzle Extension Examine hose connection to release retained high water pressure. Do not depress red button and test trigger. To correct the problem, immediately clean the spray tip following these tests. ALWAYS point spray gun in this equipment produces can cause injury. . All service and adjustments...
Operation Manual
Page 16
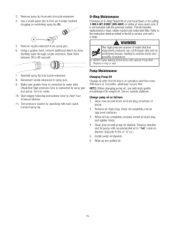
... completely drained, install oil drain plug and tighten firmly. 4. Install pump oil dipstick. 6. 3. Back flush between 30 to serviceyour unit's o-rings. Turn on dipstick (typically 0.35L or 12 oz.). 5. Test pressure washer by back flushing water through nozzle extension. Wipe up any spilled oil. 16 Using a garden hose, remove additional debris by operating with recommended oil to spray gun. 9. Referto the instruction sheetprovidedin the kit to 60...
... completely drained, install oil drain plug and tighten firmly. 4. Install pump oil dipstick. 6. 3. Back flush between 30 to serviceyour unit's o-rings. Turn on dipstick (typically 0.35L or 12 oz.). 5. Test pressure washer by back flushing water through nozzle extension. Wipe up any spilled oil. 16 Using a garden hose, remove additional debris by operating with recommended oil to spray gun. 9. Referto the instruction sheetprovidedin the kit to 60...
Operation Manual
Page 17
... pressure washer is on a level surface. 2. If needed, slowly pour oil into oil fill opening . Screw in fire or _¢ electric shock. Cleanarea around dipstick. Fill to drain completely. KEEPOUTOF REACHOF CHILDREN.DON'T POLLUTE.CONSERVERESOURCESR. ETURN USEDOIL TO COLLECTIONCENTERS. Disconnect spark plug wire and keep it away from the sparkplugand place the wire whereit cannotcontactsparkplug. Allow oil to edge of operation. Keep oil...
... pressure washer is on a level surface. 2. If needed, slowly pour oil into oil fill opening . Screw in fire or _¢ electric shock. Cleanarea around dipstick. Fill to drain completely. KEEPOUTOF REACHOF CHILDREN.DON'T POLLUTE.CONSERVERESOURCESR. ETURN USEDOIL TO COLLECTIONCENTERS. Disconnect spark plug wire and keep it away from the sparkplugand place the wire whereit cannotcontactsparkplug. Allow oil to edge of operation. Keep oil...
Operation Manual
Page 18
... beneath air filter. IMPORTANT:Enginewill smoke when started if too much oil is cracked or chipped. 4. install spark plug, tighten securely. NOTE:You can purchase new air filter elements by calling 1-800-4-1VlY-HOIV(l4E6g-4663). Carburetor if you run properly and may be damaged if you think your carburetor needs adjusting, see your local Sears service center. For operation at...
... beneath air filter. IMPORTANT:Enginewill smoke when started if too much oil is cracked or chipped. 4. install spark plug, tighten securely. NOTE:You can purchase new air filter elements by calling 1-800-4-1VlY-HOIV(l4E6g-4663). Carburetor if you run properly and may be damaged if you think your carburetor needs adjusting, see your local Sears service center. For operation at...

Operation Manual
Page 19
... (D), and remove deflector. 3. Removethe three 4 mm screws (C) from cylinder. 2. Sediment Cup Cleaning 1. Place o-ring in serious _ sEtrxuhcatuusrethseoart/dgaamseasgceafuneigl tnaitnekccoamusbiunsgtiablfeirse,. . Replace o-ring if there is availablefrom your nearest Sears service center. DONOTtouch hot partsandAVOIDhot exhaustgases. * Allowequipmento cool beforetouching. . Be careful to order a spark arrester, please call 1-SOO-4-MY-HOIVlE (469-4663). Move fuel valve to operate an engine...
... (D), and remove deflector. 3. Removethe three 4 mm screws (C) from cylinder. 2. Sediment Cup Cleaning 1. Place o-ring in serious _ sEtrxuhcatuusrethseoart/dgaamseasgceafuneigl tnaitnekccoamusbiunsgtiablfeirse,. . Replace o-ring if there is availablefrom your nearest Sears service center. DONOTtouch hot partsandAVOIDhot exhaustgases. * Allowequipmento cool beforetouching. . Be careful to order a spark arrester, please call 1-SOO-4-MY-HOIVlE (469-4663). Move fuel valve to operate an engine...
Operation Manual
Page 23
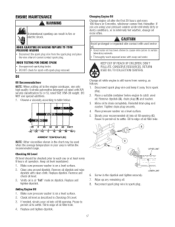
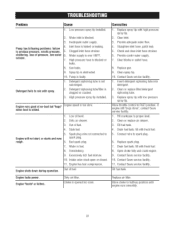
... hose. 8. Move throttle control to halfway position until engine runs smoothly. 23 Cleanor replace air cleaner. 3. Fiil fuel tank. 4. Open choke fully and crank engine. 9. Move choke to FASTposition, if engine still "bogs down", contact Sears service facility. 1. Inadequatewater supply. 4. Replacegun. 9. Insert detergent siphoning tube into detergent. 2. Engine will not start; or starts and runs rough. 6. 7. Spark plug wire...
... hose. 8. Move throttle control to halfway position until engine runs smoothly. 23 Cleanor replace air cleaner. 3. Fiil fuel tank. 4. Open choke fully and crank engine. 9. Move choke to FASTposition, if engine still "bogs down", contact Sears service facility. 1. Inadequatewater supply. 4. Replacegun. 9. Insert detergent siphoning tube into detergent. 2. Engine will not start; or starts and runs rough. 6. 7. Spark plug wire...
Operation Manual
Page 24
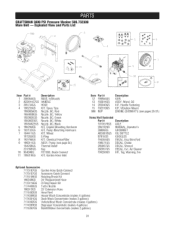
... KIT, Handle Fastening KIT, Vibration Mount ENGINE(GX390UT1)(seepages26-31) Items Not Illustrated Part # 191267RGS 205732GS 30809GS AB3061BGS 87815GS 194355GS 199571GS 205687GS 202057GS 194256GS Description AXLE MANUAL, Operator's GROMMET OIL BOTTLE GOGGLES DECAL,Eng Slow/Fast DECAL,Choke DECAL,Shroud DECAL,Cvr, Air Cleaner KIT, Tag, Warning, Srv Optional Accessories 7175187GS Garden Hose Quick Connect 7175197GS 7175199GS 190249GS Accessory Quick Connect Rotating Brush Kit 25' Replacement Hose...
... KIT, Handle Fastening KIT, Vibration Mount ENGINE(GX390UT1)(seepages26-31) Items Not Illustrated Part # 191267RGS 205732GS 30809GS AB3061BGS 87815GS 194355GS 199571GS 205687GS 202057GS 194256GS Description AXLE MANUAL, Operator's GROMMET OIL BOTTLE GOGGLES DECAL,Eng Slow/Fast DECAL,Choke DECAL,Shroud DECAL,Cvr, Air Cleaner KIT, Tag, Warning, Srv Optional Accessories 7175187GS Garden Hose Quick Connect 7175197GS 7175199GS 190249GS Accessory Quick Connect Rotating Brush Kit 25' Replacement Hose...
Operation Manual
Page 25
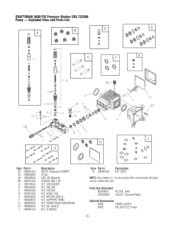
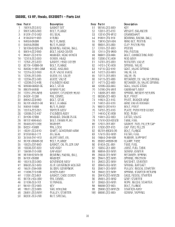
..., Oil Dipstick SCREW,M8 x 20 KIT, UNLOADER KIT, VALVES KIT, PISTON KIT, HOSETAIL KIT, WATERSEALS KIT, SUPPORTRING KIT, PUMP HEADHARDWARE KIT, OIL SEALS KIT, O-RINGS item Part # Description K 202902GS KIT, SEAT NOTE:item letters A - Parts Not illustrated B2384GS FILTER,Inlet 194298GS VALVE,Thermal Relief Optional Accessories 6039 PUMP SAVER 6033 OIL BOTTLE,Pump 25 K are service kits and include all parts shown within the box. CRAFTSMAH3880 PSI Pressure Washer 580.752300 Pump -- Exploded View and Parts List...
..., Oil Dipstick SCREW,M8 x 20 KIT, UNLOADER KIT, VALVES KIT, PISTON KIT, HOSETAIL KIT, WATERSEALS KIT, SUPPORTRING KIT, PUMP HEADHARDWARE KIT, OIL SEALS KIT, O-RINGS item Part # Description K 202902GS KIT, SEAT NOTE:item letters A - Parts Not illustrated B2384GS FILTER,Inlet 194298GS VALVE,Thermal Relief Optional Accessories 6039 PUMP SAVER 6033 OIL BOTTLE,Pump 25 K are service kits and include all parts shown within the box. CRAFTSMAH3880 PSI Pressure Washer 580.752300 Pump -- Exploded View and Parts List...
Operation Manual
Page 30
...,HEAD GASKET,HEADCOVER BOLT, FLANGE HOSE,VACUUM CLIP,VALVE GUIDE GUIDE,EX.VALVE GUIDE,VALVE CYLINDERHEAD BOLT,STUD SPARKPLUG GASKET,CYLINDERHEAD PIN, DOWEL BOLT,STUD BOLT, FLANGE NUT, FLANGE SWITCHASSY CYLINDERASSY WASHER, DRAIN PLUG BOLT, DRAIN PLUG WASHER PIN, LOCK SHAFT,GOVERNORARM OIL SEAL ALERT UNIT, OIL BOLT, FLANGE GASKET,OIL FILLERCAP CAPASSY CAPASSY BEARING,RADIAL BALL WASHER GOVERNORASSY CLIP, GOVERNORHOLDER SLIDER,GOVERNOR COVERASSY GASKET,CASECOVER PIN, DOWEL FLYWHEEL KEY...
...,HEAD GASKET,HEADCOVER BOLT, FLANGE HOSE,VACUUM CLIP,VALVE GUIDE GUIDE,EX.VALVE GUIDE,VALVE CYLINDERHEAD BOLT,STUD SPARKPLUG GASKET,CYLINDERHEAD PIN, DOWEL BOLT,STUD BOLT, FLANGE NUT, FLANGE SWITCHASSY CYLINDERASSY WASHER, DRAIN PLUG BOLT, DRAIN PLUG WASHER PIN, LOCK SHAFT,GOVERNORARM OIL SEAL ALERT UNIT, OIL BOLT, FLANGE GASKET,OIL FILLERCAP CAPASSY CAPASSY BEARING,RADIAL BALL WASHER GOVERNORASSY CLIP, GOVERNORHOLDER SLIDER,GOVERNOR COVERASSY GASKET,CASECOVER PIN, DOWEL FLYWHEEL KEY...
Operation Manual
Page 32
... on your Operating and Maintenance Instructions. Air injection system, Pulse valve e. Sears is performed at 1-800-469-4663. If any maintenanceor repairs. Magneto ignition system d. Catalyst System . Claims and Ceverage Exclusions Warranty claims shall be repaired or replaced by Sears. You are responsible for a period of two years, subject to explain the Emissions Control System Warranty on , non-original, or modified parts. 5. Carbon canister...
... on your Operating and Maintenance Instructions. Air injection system, Pulse valve e. Sears is performed at 1-800-469-4663. If any maintenanceor repairs. Magneto ignition system d. Catalyst System . Claims and Ceverage Exclusions Warranty claims shall be repaired or replaced by Sears. You are responsible for a period of two years, subject to explain the Emissions Control System Warranty on , non-original, or modified parts. 5. Carbon canister...


