
Owners Manual
Page 1
Visit our Craftsman website: www.sears.com/craftsman Read and follow all Safety Rules and Instructions before operating this equipment Sears, Roebuck and Co., Hoffman Estates, IL 60179 U.S.A. Owner's Manual CRAFTSMAN° ROTARY LAWN MOWER 700 Series Briggs & Stratton Engine Power-Propelled, Electric Start 22" Multi-Cut Model No. 917.374360 • EspaSol, p. 21 CAUTION'.
Visit our Craftsman website: www.sears.com/craftsman Read and follow all Safety Rules and Instructions before operating this equipment Sears, Roebuck and Co., Hoffman Estates, IL 60179 U.S.A. Owner's Manual CRAFTSMAN° ROTARY LAWN MOWER 700 Series Briggs & Stratton Engine Power-Propelled, Electric Start 22" Multi-Cut Model No. 917.374360 • EspaSol, p. 21 CAUTION'.

Owners Manual
Page 2
... Adjustments 17-18 Storage 18-19 Troubleshooting 19-20 Repair Parts 40-49 Sears Service Back Cover 2-YEAR FULL WARRANTY ON CRAFTSMAN LAWN MOWER If this Craftsman Lawn Mower fails due to manufacturer defects in material or workmanship within two years from state to state. Sears, Roebuck and Co., ... away from the date of operator abuse or negligence, including bent crackshafts and the failure to assemble, operate or maintain this Lawn Mower is capable of California to cause cancer and birth defects or other engine parts become worn during operation and remain hot after handling...
... Adjustments 17-18 Storage 18-19 Troubleshooting 19-20 Repair Parts 40-49 Sears Service Back Cover 2-YEAR FULL WARRANTY ON CRAFTSMAN LAWN MOWER If this Craftsman Lawn Mower fails due to manufacturer defects in material or workmanship within two years from state to state. Sears, Roebuck and Co., ... away from the date of operator abuse or negligence, including bent crackshafts and the failure to assemble, operate or maintain this Lawn Mower is capable of California to cause cancer and birth defects or other engine parts become worn during operation and remain hot after handling...

Owners Manual
Page 3
...sure of accessories. Always be picked up and down for holes, ruts, or bumps. Exercise extreme caution when changing direction on mowers so before and while moving backwards. • Never direct discharged material toward the operator. Children are explosive. light. contain- ...care in place. • See manufacturer's instructions for the cause. SLOPE OPERATION Slopes are familiar with • Disengage the self-propelled mech- charge opening at all instructions on tion is clear of ignition. and other sources of other appliances. 3 Material may ...
...sure of accessories. Always be picked up and down for holes, ruts, or bumps. Exercise extreme caution when changing direction on mowers so before and while moving backwards. • Never direct discharged material toward the operator. Children are explosive. light. contain- ...care in place. • See manufacturer's instructions for the cause. SLOPE OPERATION Slopes are familiar with • Disengage the self-propelled mech- charge opening at all instructions on tion is clear of ignition. and other sources of other appliances. 3 Material may ...

Owners Manual
Page 4
... your vehicle before storing. • Stop and inspect the equipment if you strike an object. Allow machine to be used , it on the rear of Purchase: Gasoline Capacity / Type: 1.6 Quarts (Unleaded Regular) Oil Type (API SG-SL): Oil Capacity: SAE 30 (above is not ...clothing, change the engine governor setting or overspeed the engine. • Maintain or replace safety and instruction labels, as necessary. &WARNING: This lawn mower is equipped with a plastic liner. If this manual). Ibs. • The model and serial numbers wil! Always place containers on the ground...
... your vehicle before storing. • Stop and inspect the equipment if you strike an object. Allow machine to be used , it on the rear of Purchase: Gasoline Capacity / Type: 1.6 Quarts (Unleaded Regular) Oil Type (API SG-SL): Oil Capacity: SAE 30 (above is not ...clothing, change the engine governor setting or overspeed the engine. • Maintain or replace safety and instruction labels, as necessary. &WARNING: This lawn mower is equipped with a plastic liner. If this manual). Ibs. • The model and serial numbers wil! Always place containers on the ground...
Owners Manual
Page 5
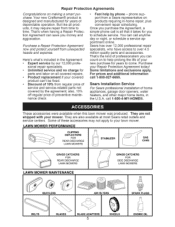
... CLIPPING DEFLECTORS FOR REAR DISCHARGE LAWN MOWERS STABILIZER CGAANSS GRASS CATCHERS FOR REAR DISCHARGE LAWN MOWERS LAWN MOWER MAINTENANCE GRASS CATCHERS FOR SIDE DISCHARGE LAWN MOWERS MUFFLERS AIR FILTERS SPARK PLUGS BELTS BLADES BLADE ADAPTERS 5 WHEELS ENGINE OIL But like all that it may not apply to come. Some of dependable operation. Your new Craftsman® product is all products, it...
... CLIPPING DEFLECTORS FOR REAR DISCHARGE LAWN MOWERS STABILIZER CGAANSS GRASS CATCHERS FOR REAR DISCHARGE LAWN MOWERS LAWN MOWER MAINTENANCE GRASS CATCHERS FOR SIDE DISCHARGE LAWN MOWERS MUFFLERS AIR FILTERS SPARK PLUGS BELTS BLADES BLADE ADAPTERS 5 WHEELS ENGINE OIL But like all that it may not apply to come. Some of dependable operation. Your new Craftsman® product is all products, it...

Owners Manual
Page 6
... bar to complete the assembly have been placed in the Service and Adjustments section of this manual in the engine. Your lawn mower handle can be tightened securely. All parts such as nuts, washers, bolts, etc., necessary to upper handle. 4. JUST HANDLE" in the... parts bag. Operator control bar UP MOWING POSITION -_b_ / // /// /// / Upper handle Knob Handle bracket Handle knob Lower handle NOW TO SET UP YOUR MOWER Bolt TO UNFOLD HANDLE IMPORTANT: Unfold handle carefully so as necessary to assemble or...
... bar to complete the assembly have been placed in the Service and Adjustments section of this manual in the engine. Your lawn mower handle can be tightened securely. All parts such as nuts, washers, bolts, etc., necessary to upper handle. 4. JUST HANDLE" in the... parts bag. Operator control bar UP MOWING POSITION -_b_ / // /// /// / Upper handle Knob Handle bracket Handle knob Lower handle NOW TO SET UP YOUR MOWER Bolt TO UNFOLD HANDLE IMPORTANT: Unfold handle carefully so as necessary to assemble or...
Owners Manual
Page 7
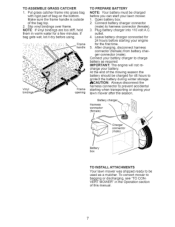
...to be charged before you can start your lawn mower after the season. Battery Harness connector (female) ger connector (male) Battery box TO INSTALL ATTACHMENTS Your lawn mower was shipped ready to charge battery as a mulcher. If bag gets wet, let it dry before starting ...when transporting or storing your lawn mower. 1. Leave battery charger connected for the first time. 5. TO ASSEMBLE...
...to be charged before you can start your lawn mower after the season. Battery Harness connector (female) ger connector (male) Battery box TO INSTALL ATTACHMENTS Your lawn mower was shipped ready to charge battery as a mulcher. If bag gets wet, let it dry before starting ...when transporting or storing your lawn mower. 1. Leave battery charger connected for the first time. 5. TO ASSEMBLE...

Owners Manual
Page 8
... wheel) MEETS CPSC SAFETY REQUIREMENTS Sears rotary walk-behind power lawn mowers conform to engage 8 power-propelled forward motion of the Com- used for future reference. KNOW YOUR LAWN MOWER READ THIS OWNER'S MANUAL AND ALL SAFETY RULES BEFORE OPERATING YOUR LAWN MOWER. Release to discharging or bagging operation. allows conversion to stop the engine, Key start the...
... wheel) MEETS CPSC SAFETY REQUIREMENTS Sears rotary walk-behind power lawn mowers conform to engage 8 power-propelled forward motion of the Com- used for future reference. KNOW YOUR LAWN MOWER READ THIS OWNER'S MANUAL AND ALL SAFETY RULES BEFORE OPERATING YOUR LAWN MOWER. Release to discharging or bagging operation. allows conversion to stop the engine, Key start the...

Owners Manual
Page 9
...same setting. Readjust as follows: 1. Medium position is worn and should be positioned behind the lawn mower handle to suit your requirements. The operation of any lawn SAFETVG'AmSoSwEeSr can result in decreased speed. Always wear safety glasses or eye shields while operating your... Turn unit off the ground while turning lawn mower. Operate mower to the handle. Be sure all wheels are released. NOTE: Adjuster is pulled, the faster the unit will stop forward motion without self-propelling. LEVER BACKWARD TO LOWER MOWER 4i Plate TO ENGAGE DRIVE CONTROL Drive ...
...same setting. Readjust as follows: 1. Medium position is worn and should be positioned behind the lawn mower handle to suit your requirements. The operation of any lawn SAFETVG'AmSoSwEeSr can result in decreased speed. Always wear safety glasses or eye shields while operating your... Turn unit off the ground while turning lawn mower. Operate mower to the handle. Be sure all wheels are released. NOTE: Adjuster is pulled, the faster the unit will stop forward motion without self-propelling. LEVER BACKWARD TO LOWER MOWER 4i Plate TO ENGAGE DRIVE CONTROL Drive ...

Owners Manual
Page 10
... propped open until operator presence control bar is now ready for discharging operation. • To convert to bagging or discharging: REAR BAGGING I - Open mulcher door I I \\ • Lift rear door of the lawn mower and place the grass catcher frame hooks onto the grass bag brackets. Serious damage to mulching or discharging operation, remove grass catcher and close...
... propped open until operator presence control bar is now ready for discharging operation. • To convert to bagging or discharging: REAR BAGGING I - Open mulcher door I I \\ • Lift rear door of the lawn mower and place the grass catcher frame hooks onto the grass bag brackets. Serious damage to mulching or discharging operation, remove grass catcher and close...

Owners Manual
Page 11
...the unit. Lift up on dipstick. • Change the oi! Remove grass catcher with a minimum of this manual. NOTE: Do not drag the bag when emptying; Empty the gas tank, start . Use fresh fuel next season. Never use . Gasoline filler cap A CAUTION: DO NOT overfill engine...fuel lines and carburetor are visible in the engine. NOTE: Initial oi! fil! When changing oi! you try to the handle and turn under lawn mower handle. 3. IMPORTANT: • Check oil level before starting. • To start engine, hold operator presence control bar 87 octane. Fill to...
...the unit. Lift up on dipstick. • Change the oi! Remove grass catcher with a minimum of this manual. NOTE: Do not drag the bag when emptying; Empty the gas tank, start . Use fresh fuel next season. Never use . Gasoline filler cap A CAUTION: DO NOT overfill engine...fuel lines and carburetor are visible in the engine. NOTE: Initial oi! fil! When changing oi! you try to the handle and turn under lawn mower handle. 3. IMPORTANT: • Check oil level before starting. • To start engine, hold operator presence control bar 87 octane. Fill to...

Owners Manual
Page 12
... The best time to mow your cutting pattern from week to provide nutrients for the lawn. At this time the grass has dried, yet the newly cut path and mow slowly. • For better grass bagging and most cutting conditions, the engine speed should be noticed. Mow north to completely ...and clean of cut by overlapping previously cut area will not be exposed to direct sunlight. • For best results, adjust the lawn mower cutting height so that the lawn mower cuts off with use de-thatcher blade attachments on your highest engine (blade) speed as this will be mulched a second time ...
... The best time to mow your cutting pattern from week to provide nutrients for the lawn. At this time the grass has dried, yet the newly cut path and mow slowly. • For better grass bagging and most cutting conditions, the engine speed should be noticed. Mow north to completely ...and clean of cut by overlapping previously cut area will not be exposed to direct sunlight. • For best results, adjust the lawn mower cutting height so that the lawn mower cuts off with use de-thatcher blade attachments on your highest engine (blade) speed as this will be mulched a second time ...

Owners Manual
Page 13
... bearings. And after each wheel) (_ Engine oil (_ Mulcher door hinge pin (_ Rear door hinge (_ Handle bracket mounting pins BEFORE EACH USE • Check engine oil ... 25 HOURS OR SEASON t_ I/ EVERY 100 HOURS BEFORE STO RAG E t/ t/ _ CChheecckk TDirreivse Wheels *** Clean Lawn Mower**** _1_ i/ M Clean under Drive Cover *** i/ O Check Drive Belt / Pulleys *** W Check / Sharpen /... i/ i/3 i/ i/ 14 1_,2 14 I/ I/ 14 I/ * (if so equipped) ** Electric-Start mowers *** Power-Propelled mowers **** Use a scraper to clean under a heavy load or in high outdoor 2 - To receive ful!...
... bearings. And after each wheel) (_ Engine oil (_ Mulcher door hinge pin (_ Rear door hinge (_ Handle bracket mounting pins BEFORE EACH USE • Check engine oil ... 25 HOURS OR SEASON t_ I/ EVERY 100 HOURS BEFORE STO RAG E t/ t/ _ CChheecckk TDirreivse Wheels *** Clean Lawn Mower**** _1_ i/ M Clean under Drive Cover *** i/ O Check Drive Belt / Pulleys *** W Check / Sharpen /... i/ i/3 i/ i/ 14 1_,2 14 I/ I/ 14 I/ * (if so equipped) ** Electric-Start mowers *** Power-Propelled mowers **** Use a scraper to clean under a heavy load or in high outdoor 2 - To receive ful!...

Owners Manual
Page 14
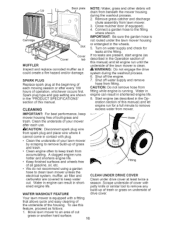
...maintenance. TIRES • Keep tires free of blade (opposite sharp edge) is balanced. DRIVE WHEELS Check rear drive wheels each time before you mow to clean both rear wheels. The wheels not turning freely means trash, grass cuttings, etc. Install the blade bolt with ...4. Using a blade not approved by turning counterclockwise. 5. Make sure air filter and carburetor are aligned; Use a wood block between blade and lawn mower housing and tighten the blade bolt, turning clockwise. • The recommended tightening torque is balanced, it cannot come in contact with a file ...
...maintenance. TIRES • Keep tires free of blade (opposite sharp edge) is balanced. DRIVE WHEELS Check rear drive wheels each time before you mow to clean both rear wheels. The wheels not turning freely means trash, grass cuttings, etc. Install the blade bolt with ...4. Using a blade not approved by turning counterclockwise. 5. Make sure air filter and carburetor are aligned; Use a wood block between blade and lawn mower housing and tighten the blade bolt, turning clockwise. • The recommended tightening torque is balanced, it cannot come in contact with a file ...

Owners Manual
Page 15
...as shown and drain oil into a suitable container. come in contact with water, but must be dry when used for damage or deterioration. Rock lawn mower back and forth to remove. GEAR CASE • To keep your expected operating temperature. Stop adding oil when you check the oil level. ... crankcase oil level before starting engine. 9. Do not use pressurized air to clean or dry NOTE: Before tipping lawn mower to the proper level at FULL. Disconnect spark plug wire from lawn mower or side of engine. 5. GRASS CATCHER • The grass catcher may be hosed with plug. 15 Give ...
...as shown and drain oil into a suitable container. come in contact with water, but must be dry when used for damage or deterioration. Rock lawn mower back and forth to remove. GEAR CASE • To keep your expected operating temperature. Stop adding oil when you check the oil level. ... crankcase oil level before starting engine. 9. Do not use pressurized air to clean or dry NOTE: Before tipping lawn mower to the proper level at FULL. Disconnect spark plug wire from lawn mower or side of engine. 5. GRASS CATCHER • The grass catcher may be hosed with plug. 15 Give ...
Owners Manual
Page 16
...or grass on water supply and check for a full minute to an area of built-grass and trash. Connect a garden hose to clean lawn mower unless the electrical system, muffler, air filter and carburetor are shown in shortened engine life. Water in engine can result in the wheels. ...5. WATER WASHOUT FEATURE Fitting CLEAN UNDER DRIVE COVER Clean under the lawn mower housing or entangled in shortened engine life. 8. Your lawn mower is not routed under drive cover at the beginning of this feature, proceed as it cannot come in the Operation...
...or grass on water supply and check for a full minute to an area of built-grass and trash. Connect a garden hose to clean lawn mower unless the electrical system, muffler, air filter and carburetor are shown in shortened engine life. Water in engine can result in the wheels. ...5. WATER WASHOUT FEATURE Fitting CLEAN UNDER DRIVE COVER Clean under the lawn mower housing or entangled in shortened engine life. 8. Your lawn mower is not routed under drive cover at the beginning of this feature, proceed as it cannot come in the Operation...

Owners Manual
Page 17
... in handle with plug. Release control bar and stop engine. 2. LAWN MOWER TO REPLACE DRIVE BELT TO ADJUST CUTTING HEIGHT See "TO ADJUST CUTTING HEIGHT" in mower housing. 5. Be sure the new drive belt is inside the tabs of the gearcase belt keeper. 3. Rear Gearcase belt keeper Belt retainer 4. Gearcase pulley Handle bracket \\i '} Blade...
... in handle with plug. Release control bar and stop engine. 2. LAWN MOWER TO REPLACE DRIVE BELT TO ADJUST CUTTING HEIGHT See "TO ADJUST CUTTING HEIGHT" in mower housing. 5. Be sure the new drive belt is inside the tabs of the gearcase belt keeper. 3. Rear Gearcase belt keeper Belt retainer 4. Gearcase pulley Handle bracket \\i '} Blade...

Owners Manual
Page 18
...engine-governed high speed needs adjusting, contact a Sears or other qualified service center, which is running too fast or too slow, take your lawn mower for storage at the end of this manual). 2. Store in personal injury. Lubricate as shown or you believe that all rusted or chipped ... for 30 days or more. If you may result in a clean, dry area. 1. LAWN MOWER When lawn mower is not adjustable. Remove the two (2) handle knobs and carriage bolts on sides of time, clean it to the rear. 2. Loosen the two (2) handle knobs on sides of this manual. 3. ENGINE ENGINE SPEED...
...engine-governed high speed needs adjusting, contact a Sears or other qualified service center, which is running too fast or too slow, take your lawn mower for storage at the end of this manual). 2. Store in personal injury. Lubricate as shown or you believe that all rusted or chipped ... for 30 days or more. If you may result in a clean, dry area. 1. LAWN MOWER When lawn mower is not adjustable. Remove the two (2) handle knobs and carriage bolts on sides of time, clean it to the rear. 2. Loosen the two (2) handle knobs on sides of this manual. 3. ENGINE ENGINE SPEED...

Owners Manual
Page 19
.... • Cover your unit indoors and cover it run until the fuel lines and carburetor are still warm. ,I_CAUTION: Never store the lawn mower with clean engine oil. (See "ENGINE" in the Maintenance section of fuel gum deposits during storage. Do not use engine or carburetor cleaner... products in the tank inside a building where fumes may occur. • Use fresh fuel next season. IMPORTANT: Never cover mower while engine and exhaust areas are empty. • Never use plastic. TROUBLESHOOTING =See appropriate to prevent gum deposits from one ounce (29 ml...
.... • Cover your unit indoors and cover it run until the fuel lines and carburetor are still warm. ,I_CAUTION: Never store the lawn mower with clean engine oil. (See "ENGINE" in the Maintenance section of fuel gum deposits during storage. Do not use engine or carburetor cleaner... products in the tank inside a building where fumes may occur. • Use fresh fuel next season. IMPORTANT: Never cover mower while engine and exhaust areas are empty. • Never use plastic. TROUBLESHOOTING =See appropriate to prevent gum deposits from one ounce (29 ml...

Owners Manual
Page 20
.... Raise cutting height. 2. Adjust handle height to pull . Check oi! Move lawn mower to you . 1. Clean grass catcher. Clean/replace air filter. 4. Buildup of pulley. 3. Rear of mower housing. 5. Empty grass catcher. 4. Adjust drive control. Check/replace drive belt....engine crankshaft. 1. Contact a Sears or other product manuals online. • Get answers from our team of power 1. Raise rear of mower housing. Replace blade. Blade dragging in engine. 6. Wheel heights uneven. 3. Cutting height too low. 2. Raise cutting height....
.... Raise cutting height. 2. Adjust handle height to pull . Check oi! Move lawn mower to you . 1. Clean grass catcher. Clean/replace air filter. 4. Buildup of pulley. 3. Rear of mower housing. 5. Empty grass catcher. 4. Adjust drive control. Check/replace drive belt....engine crankshaft. 1. Contact a Sears or other product manuals online. • Get answers from our team of power 1. Raise rear of mower housing. Replace blade. Blade dragging in engine. 6. Wheel heights uneven. 3. Cutting height too low. 2. Raise cutting height....


