

Operation Manual
Page 1
C 22cc 2 Cycle Engine • Assembly ®Operation Fuel Mix 16:1 o Maintenance e Repair Parts Sold _y Sears, "4 ff_ 530-067315-1-0!289 / koebuck and Co. Chicago, I ill., 60684 U_S..A, © Sears, Roebuck and Co, I989 A WAR_ING: Read theOperators _hnual and Follow All V_hrnings and Safety Instructions. FailureToDo SoCan Result in Serious Injury. IMPORTANT MANUAL Do Not Throw AwaY g' _/ARS operator's manual MODEL NO. 358.79710-22cc (15" Cutting Path) Always Wear Eye Protection During Operation .
C 22cc 2 Cycle Engine • Assembly ®Operation Fuel Mix 16:1 o Maintenance e Repair Parts Sold _y Sears, "4 ff_ 530-067315-1-0!289 / koebuck and Co. Chicago, I ill., 60684 U_S..A, © Sears, Roebuck and Co, I989 A WAR_ING: Read theOperators _hnual and Follow All V_hrnings and Safety Instructions. FailureToDo SoCan Result in Serious Injury. IMPORTANT MANUAL Do Not Throw AwaY g' _/ARS operator's manual MODEL NO. 358.79710-22cc (15" Cutting Path) Always Wear Eye Protection During Operation .

Operation Manual
Page 2
ONE YE.__RLIMITED WA_qRANTY ON CRAFTSMAN WEEDWACKER ® and maintenance instructions in material or workmanship "'_ Sears will repair fl'ee of charge any defect in the operator's manuat.
ONE YE.__RLIMITED WA_qRANTY ON CRAFTSMAN WEEDWACKER ® and maintenance instructions in material or workmanship "'_ Sears will repair fl'ee of charge any defect in the operator's manuat.

Operation Manual
Page 5
... and fuel TOOL SAFETY 1 Inspect the entire tool bclorc each u._' Rcn!.=,,: damaged parts Check tbr rue[ leaks and n_a!.,,_,,urc all fiasteners are in place and _ccurel) taxtcncu 2 Replace trimmer head parts that arc cracked _:hippcd or damaged in this manual, use care and goodjudgmento Contact...before transporting in a vehicle or storing, 3 Empty the fuel tank betbre storing the tool Use up all parts d'your body 2 A_low the engine to prevent the trimmer line from the trimmer head and muffler when the engine is properly attached. 5 Use only the specified Irimmerhead See' Specifica- Keep...
... and fuel TOOL SAFETY 1 Inspect the entire tool bclorc each u._' Rcn!.=,,: damaged parts Check tbr rue[ leaks and n_a!.,,_,,urc all fiasteners are in place and _ccurel) taxtcncu 2 Replace trimmer head parts that arc cracked _:hippcd or damaged in this manual, use care and goodjudgmento Contact...before transporting in a vehicle or storing, 3 Empty the fuel tank betbre storing the tool Use up all parts d'your body 2 A_low the engine to prevent the trimmer line from the trimmer head and muffler when the engine is properly attached. 5 Use only the specified Irimmerhead See' Specifica- Keep...

Operation Manual
Page 6
Operators Manual (Not Shown) -- Assist Handle A t0 Square Head Screw - fuel tank 16 Hex Wrench I 19 Bracket - ments. This unit is a violation of the law. Drive Shaft Housing ! Throttle Trigger Housing 1 13 18...Semi-Automatic Line Feed o 15" Cutting Path 2 Drive Shaft Assembly w/Safety Label 3 Shield 4 Trimmer Head 5 Assist Handle (See Inset) 6 8oz can, 2-cycle Engine Oil -- Shield 9 Hex Head Screw - Assist Handle B 1 1 t 2 Check parts against the list below 11 Flat Washer - Assist Handle 1 4 NotifyyourSearsStoreimmediatel)iJapart i_ mis_- 13 ...
Operators Manual (Not Shown) -- Assist Handle A t0 Square Head Screw - fuel tank 16 Hex Wrench I 19 Bracket - ments. This unit is a violation of the law. Drive Shaft Housing ! Throttle Trigger Housing 1 13 18...Semi-Automatic Line Feed o 15" Cutting Path 2 Drive Shaft Assembly w/Safety Label 3 Shield 4 Trimmer Head 5 Assist Handle (See Inset) 6 8oz can, 2-cycle Engine Oil -- Shield 9 Hex Head Screw - Assist Handle B 1 1 t 2 Check parts against the list below 11 Flat Washer - Assist Handle 1 4 NotifyyourSearsStoreimmediatel)iJapart i_ mis_- 13 ...

Operation Manual
Page 7
b. D_rE S_ HOUSING -- Figure 1 a Ptace the two Screws (from the loose parts bag) into the Nose Cone until secure. READ YOUR OPE_kTOR°S I_&NUAL 2,. _ yOU will significantly reduce the life of the toot If the Ffexible ... to provide its safe operation It is removed Dirt on the Drive Shaft Housing with tool A,_EMBLY STEPS I . Remove the packing cover from the loose parts bag) in the hex openings in the Maintenance section 1½' 3 ROOVE I . Tighten theScrewswith the small hexwrench provided just enough to !!! OCK.NUI" e Align the bottom...
b. D_rE S_ HOUSING -- Figure 1 a Ptace the two Screws (from the loose parts bag) into the Nose Cone until secure. READ YOUR OPE_kTOR°S I_&NUAL 2,. _ yOU will significantly reduce the life of the toot If the Ffexible ... to provide its safe operation It is removed Dirt on the Drive Shaft Housing with tool A,_EMBLY STEPS I . Remove the packing cover from the loose parts bag) in the hex openings in the Maintenance section 1½' 3 ROOVE I . Tighten theScrewswith the small hexwrench provided just enough to !!! OCK.NUI" e Align the bottom...

Operation Manual
Page 9
... HARDWARE SHO_ N ACTUAL SIZE F_g_ s 1 Approximately 2 inches of the shield) is pressed NOTE: To remove Trimmer Head, hold the Dust Cup with a wrench to the operator. Direct the widest part of the shield toward the engine. [CAU'riON: ] The Line Limiter (on the underside of line °...the Shield on the Arbor Shaft Figure 8, (Inset) b Hold the Dust Cup with a wrench and unthread the Trimmer Head_ 5. e Assemble washer and wing nut onto screw, Tighten securely, lCAUTION:I WIDEST PART OF SHIEr D 9 RAISEI) A HARD_ARE SHOWN ACTVAI SIZE 8RA_ KI-T / SCREW The length of the shield ...
... HARDWARE SHO_ N ACTUAL SIZE F_g_ s 1 Approximately 2 inches of the shield) is pressed NOTE: To remove Trimmer Head, hold the Dust Cup with a wrench to the operator. Direct the widest part of the shield toward the engine. [CAU'riON: ] The Line Limiter (on the underside of line °...the Shield on the Arbor Shaft Figure 8, (Inset) b Hold the Dust Cup with a wrench and unthread the Trimmer Head_ 5. e Assemble washer and wing nut onto screw, Tighten securely, lCAUTION:I WIDEST PART OF SHIEr D 9 RAISEI) A HARD_ARE SHOWN ACTVAI SIZE 8RA_ KI-T / SCREW The length of the shield ...

Operation Manual
Page 11
...of gasoline and oil is very important. Does not have proper additives for aii-cooled 2-cycle engines and can cause engine damage o AIYrOMO'I part oil) WARNING: Alcohol blended fuels, called gasohot (using ethanol or methanol), can attract moisture which requires a fuel mixture of America) --- Do... not mi_: gasoline and oil directly in the fuel tank 3. outdoors and where there are no sparks or flames. USE THE _'_LLOWINtG : (16 parts gasoline to I IVE OIL --- HOW TO MLX FUEL AND FNLIL T_K a Pour 1/2 of acids during storage. g Stop engine before storing for location...
...of gasoline and oil is very important. Does not have proper additives for aii-cooled 2-cycle engines and can cause engine damage o AIYrOMO'I part oil) WARNING: Alcohol blended fuels, called gasohot (using ethanol or methanol), can attract moisture which requires a fuel mixture of America) --- Do... not mi_: gasoline and oil directly in the fuel tank 3. outdoors and where there are no sparks or flames. USE THE _'_LLOWINtG : (16 parts gasoline to I IVE OIL --- HOW TO MLX FUEL AND FNLIL T_K a Pour 1/2 of acids during storage. g Stop engine before storing for location...
Operation Manual
Page 12
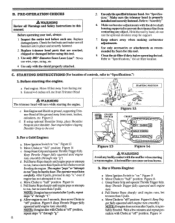
... Throttle Trigger fully squeezed until engine ru_L d Pull Starter Rope sharply until engine runs smoothly (through step "g ") d. Replace trimmer head parts that are in this tool. 3o Use only ,080" diameter Sears Laser Line ®, Never use the optional shoulder strap for...steps "a" through "gY 12 Figure 13 F_e Avoid any object. The operator must listen carefully, After 8 pulis, proceed to prevent the trimmer line from fueling site b. Move Choke to "Sg_cifications. '') 1. PRE_PE_TION CHECKS all fasteners are cracked, chipped or damaged before using optional...
... Throttle Trigger fully squeezed until engine ru_L d Pull Starter Rope sharply until engine runs smoothly (through step "g ") d. Replace trimmer head parts that are in this tool. 3o Use only ,080" diameter Sears Laser Line ®, Never use the optional shoulder strap for...steps "a" through "gY 12 Figure 13 F_e Avoid any object. The operator must listen carefully, After 8 pulis, proceed to prevent the trimmer line from fueling site b. Move Choke to "Sg_cifications. '') 1. PRE_PE_TION CHECKS all fasteners are cracked, chipped or damaged before using optional...

Operation Manual
Page 13
...5 more than 5 pulls. Keep others including children, animals, bystanders and helpers at least 30 feet NE away from fueling site_ b. Replace damaged parts before using the tool. 13 Keep Throttle THgger fully squeezed until engine pops, but no more pulls. Figure t4. If engine still does not ... to be less likely to "weld" on " Figure 13, C_ Move Choke to "Assembly-Drive Shaft Housing." ,il t, 100101.p011t i ......... The trimmer line will last longer and will throw objects and cut efficiently when the engine is run at a higher speed than flail throttle, At lower speeds...
...5 more than 5 pulls. Keep others including children, animals, bystanders and helpers at least 30 feet NE away from fueling site_ b. Replace damaged parts before using the tool. 13 Keep Throttle THgger fully squeezed until engine pops, but no more pulls. Figure t4. If engine still does not ... to be less likely to "weld" on " Figure 13, C_ Move Choke to "Assembly-Drive Shaft Housing." ,il t, 100101.p011t i ......... The trimmer line will last longer and will throw objects and cut efficiently when the engine is run at a higher speed than flail throttle, At lower speeds...

Operation Manual
Page 14
...to obtain the most eWmient line length is properb attached. LINE LIMI-fER CLrIS OFF EXCF.SS fINE TO ADVANCE LINE, TAP BO'ITOM OF TRIMMER LIGHTLY ON GROUND ONETIME , &l,,t_€ _t a Always wear a safety face shield or goggles. See "Accessories:' b Always wear heavy,... Breathing exhaust fumes can cause excessive wear to "Assembly _ _R _ ADVA__CE o The line will advance approxhnately 2 inches each user Replace damaged parts Check for jobs explained in danger of your balance. f, Keep others away when making carburetor adjustments. d Keep firm footing and balance. Do ...
...to obtain the most eWmient line length is properb attached. LINE LIMI-fER CLrIS OFF EXCF.SS fINE TO ADVANCE LINE, TAP BO'ITOM OF TRIMMER LIGHTLY ON GROUND ONETIME , &l,,t_€ _t a Always wear a safety face shield or goggles. See "Accessories:' b Always wear heavy,... Breathing exhaust fumes can cause excessive wear to "Assembly _ _R _ ADVA__CE o The line will advance approxhnately 2 inches each user Replace damaged parts Check for jobs explained in danger of your balance. f, Keep others away when making carburetor adjustments. d Keep firm footing and balance. Do ...

Operation Manual
Page 16
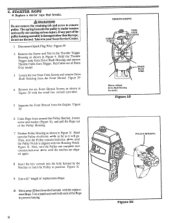
Do not use, Replace damaged parts before using the toolo d. D. c, Clean dirt and debris from the Trimmer Head Figure 25, 16 LINE EXIT Fi_¢ Fig_a_e APPROXIMATELY 2 INCHF_S OF LINE CAN BE PULLED FROM TIIE "rR/MMER HEAD EACH TIME THE TAP ... can iesult in excessive breakage, line welding and improper line feed, --Pre-wound spools offer the most convenient method for 'damage Replace damaged parts d_ WA_NliNG Trimmer head parts that are properly fastened as shown in Figure24, Then test the Lock Ring by the line Ihniter. --If line becomes too short it counterclockwise...
Do not use, Replace damaged parts before using the toolo d. D. c, Clean dirt and debris from the Trimmer Head Figure 25, 16 LINE EXIT Fi_¢ Fig_a_e APPROXIMATELY 2 INCHF_S OF LINE CAN BE PULLED FROM TIIE "rR/MMER HEAD EACH TIME THE TAP ... can iesult in excessive breakage, line welding and improper line feed, --Pre-wound spools offer the most convenient method for 'damage Replace damaged parts d_ WA_NliNG Trimmer head parts that are properly fastened as shown in Figure24, Then test the Lock Ring by the line Ihniter. --If line becomes too short it counterclockwise...

Operation Manual
Page 17
... Line ®. CORNERS F_ _8 CHOKE EXIT SIXYr 17 Hold the tool with your hand Do not use wire, rope, string, etc 7, Replace trimmer head parts that are in place and securely fastened, 3 Wash Filter in soap and water 4 Squeeze Filter dry and replace in Cover [c,_,trrltoN:] Do not ... Use a 40 foot length of 080" diameter Sears Laser Line ® 3,) Insert 1/16to 1/8 inch of the end of the Line through the hole in the Trimmer Head, follow "Installing Spool w/Line," steps "a-c?' a To replace the Line on existing Spool: L) Follow "Installing Spool w/Line," steps "a-cY and remove any way...
... Line ®. CORNERS F_ _8 CHOKE EXIT SIXYr 17 Hold the tool with your hand Do not use wire, rope, string, etc 7, Replace trimmer head parts that are in place and securely fastened, 3 Wash Filter in soap and water 4 Squeeze Filter dry and replace in Cover [c,_,trrltoN:] Do not ... Use a 40 foot length of 080" diameter Sears Laser Line ® 3,) Insert 1/16to 1/8 inch of the end of the Line through the hole in the Trimmer Head, follow "Installing Spool w/Line," steps "a-c?' a To replace the Line on existing Spool: L) Follow "Installing Spool w/Line," steps "a-cY and remove any way...
Operation Manual
Page 18
... shown in position. Then, turn counterclockwise _ ed again until the notches are align- Move away (10 feet) from the Front Shroud Figure 29 4. If any part of the Rope to hold the Pulley in Figure 31. Use a match and melt both ends of the pulley housing assembly is under tension and...
... shown in position. Then, turn counterclockwise _ ed again until the notches are align- Move away (10 feet) from the Front Shroud Figure 29 4. If any part of the Rope to hold the Pulley in Figure 31. Use a match and melt both ends of the pulley housing assembly is under tension and...

Operation Manual
Page 19
... Sg-XAF'Ir LLIBItLICATION o Lubricate the Flexible Drive Shaft: -- Before operating i[ the unit has been stored for 90 days or longer. o Use Flex Shaft Lube Part No. 530-030102. Turn the Flexible dIive shaft as necessary to allow it to seat into the drive gear at Rope Exit Hole so it... taut at the bottom of the Drive Shaft Housing 1L Follow the instructions in "Assembly" to reinstall the Throttle Cable and the Drive Shaft Housing 19 Figure I AND SC RE_ ID. After each ten (1O)hours of the Flexible Drive Shaft 9. Avoid laying the shaft on the tloor, ground or on...
... Sg-XAF'Ir LLIBItLICATION o Lubricate the Flexible Drive Shaft: -- Before operating i[ the unit has been stored for 90 days or longer. o Use Flex Shaft Lube Part No. 530-030102. Turn the Flexible dIive shaft as necessary to allow it to seat into the drive gear at Rope Exit Hole so it... taut at the bottom of the Drive Shaft Housing 1L Follow the instructions in "Assembly" to reinstall the Throttle Cable and the Drive Shaft Housing 19 Figure I AND SC RE_ ID. After each ten (1O)hours of the Flexible Drive Shaft 9. Avoid laying the shaft on the tloor, ground or on...

Operation Manual
Page 22
t Empty the fuel tank before storing, 3, Store tooI and fuel in essential fuel system parts such as the carburetor; inspect fuel line 5, See "CarburetorAdjustmentsY 6 Contact your Sears Service Center 1 See "Carburetor Adjustments !' 2 See "Carburetor Adjustments" 3 Loosen screw to prevent gum ...
t Empty the fuel tank before storing, 3, Store tooI and fuel in essential fuel system parts such as the carburetor; inspect fuel line 5, See "CarburetorAdjustmentsY 6 Contact your Sears Service Center 1 See "Carburetor Adjustments !' 2 See "Carburetor Adjustments" 3 Loosen screw to prevent gum ...

Operation Manual
Page 23
...-027480 580-027975 Shaft Warning Decal Shield Decal 23 Dust Cup Screw 1/4-10x1-1/16 Hub Ass'y, Spring Keyt Part No. No. 15 530-094523 16 580-015542 17 71-85810 18 580-094522 19 530-094521 20 71-85800 21 530-093653 22 530-030102 23 530-015768 #24 580-015774 25... 530-010959 26 530-067315 27 530-031111 28 530-031098 Description Spool Post Screw #i0-24x5/8 Spool w/Line Release Button Cover Cutting Head Ass'y. SEARS WEEDWACKER® REPAIR PARTS LIST...
...-027480 580-027975 Shaft Warning Decal Shield Decal 23 Dust Cup Screw 1/4-10x1-1/16 Hub Ass'y, Spring Keyt Part No. No. 15 530-094523 16 580-015542 17 71-85810 18 580-094522 19 530-094521 20 71-85800 21 530-093653 22 530-030102 23 530-015768 #24 580-015774 25... 530-010959 26 530-067315 27 530-031111 28 530-031098 Description Spool Post Screw #i0-24x5/8 Spool w/Line Release Button Cover Cutting Head Ass'y. SEARS WEEDWACKER® REPAIR PARTS LIST...

Operation Manual
Page 25
...) Starter Spring Starter Handle Rope Kit Screw Drive Coupling Washer Screw Locknut Screw Screw Screw Pulley Retainer Engine Gasket Kit (Hndi- SEARS WEEDWACKER® REPAIR PARTS LIST - 358.797100-22.0cc Key Pa_t No. No, 1 530-015778 2 530-027529 3 530-027530 4 530-015766 5 530-027528 6 530-015254 7 530-027526 8 ... 11 530-035262 12 530-019156 13 530-010729 14 530-015775 15 530-027955 16 530-027606 17 530-019154 18 530-027593 19 530-027594 2O 530-014005 21 530-010945 22 530-015126 23 530-015772 24 530-015780 25 530-027546 26 530-027547 27...
...) Starter Spring Starter Handle Rope Kit Screw Drive Coupling Washer Screw Locknut Screw Screw Screw Pulley Retainer Engine Gasket Kit (Hndi- SEARS WEEDWACKER® REPAIR PARTS LIST - 358.797100-22.0cc Key Pa_t No. No, 1 530-015778 2 530-027529 3 530-027530 4 530-015766 5 530-027528 6 530-015254 7 530-027526 8 ... 11 530-035262 12 530-019156 13 530-010729 14 530-015775 15 530-027955 16 530-027606 17 530-019154 18 530-027593 19 530-027594 2O 530-014005 21 530-010945 22 530-015126 23 530-015772 24 530-015780 25 530-027546 26 530-027547 27...

Operation Manual
Page 26
...Size to Cut as Replacement Replacement .... QUICK REFERENCE PAGE SHIELD ASSEMBLY REPAIR PARTS LIST SAFETY INSTRUCTIONS, WARNINGS SPARK PLUG GAP SPARK ARRESTORSPECIFICATIONS SPOOL Installation Maintenance ...Prewound SPECIAL NCfI'ICF Rewinding STARTER ROPE REPLACElVIENT STARTING INSTRUCTIONS STORAGE THROTTLE CABLE ASSEMBLY TRIMMER HEAD Assembly. TRI/_DIER LINE FEED ......... not to Use OPERATION Advancing the Line Mowing . IDLE... 9 14 20 6 I2 2 15 17 20 2 I1 28 t2 .5 22 lI It 17 19 I1 I1 11 11 21 I1 Ii 20 14,22 17,22 27 16 I7 16 14 17 I6...
...Size to Cut as Replacement Replacement .... QUICK REFERENCE PAGE SHIELD ASSEMBLY REPAIR PARTS LIST SAFETY INSTRUCTIONS, WARNINGS SPARK PLUG GAP SPARK ARRESTORSPECIFICATIONS SPOOL Installation Maintenance ...Prewound SPECIAL NCfI'ICF Rewinding STARTER ROPE REPLACElVIENT STARTING INSTRUCTIONS STORAGE THROTTLE CABLE ASSEMBLY TRIMMER HEAD Assembly. TRI/_DIER LINE FEED ......... not to Use OPERATION Advancing the Line Mowing . IDLE... 9 14 20 6 I2 2 15 17 20 2 I1 28 t2 .5 22 lI It 17 19 I1 I1 11 11 21 I1 Ii 20 14,22 17,22 27 16 I7 16 14 17 I6...

Operation Manual
Page 27
... for eye protection 3 Dress safely - repair or replace 5 Inspect and ensure the area to be cut is mixed, poured or stored 2 Use !6 parts regular unleaded gasoline to do so can result in serious injury_ Instructions. cycle engine oil 3 Use clean and fresh fuel not over 2 months old 4 ... site beIore starting engine START_G THE ENGLN'E L_ I Extend line 4-6 inches from the head 2 Rest the shietd on the ground supporting the trimmer head up offthe ground away fiomlobiects and on-lookers. 3 Keep throttle trigger squeezed fully until engine runs 4 Pull the starter rope sharply and ...
... for eye protection 3 Dress safely - repair or replace 5 Inspect and ensure the area to be cut is mixed, poured or stored 2 Use !6 parts regular unleaded gasoline to do so can result in serious injury_ Instructions. cycle engine oil 3 Use clean and fresh fuel not over 2 months old 4 ... site beIore starting engine START_G THE ENGLN'E L_ I Extend line 4-6 inches from the head 2 Rest the shietd on the ground supporting the trimmer head up offthe ground away fiomlobiects and on-lookers. 3 Keep throttle trigger squeezed fully until engine runs 4 Pull the starter rope sharply and ...

Operation Manual
Page 28
... is staffed by Sears-Trained. PRINTED tN U S A operator's manual MODEL NO, 353.797!00-22cc (15" Cutting Path) How to a Sears Repair Parts Distribution Center for handling. When you buy merchandise from any Sears Service Center and most Sears Stores WHEN ORDERING REPAIR... PARTS GIVE THE FOLLOWING INFORMATION AS SHOWN IN THIS LIST, I The PART NUMBER 2 The MODEL NUMBER 358.797100 ' 3 The PART DESCRIPt7ON 4 The NAME OF ITEM -22cc Gas Weedwacker _ If the parts you need are not stocked locally, your unit, All parts listed herein may be electronically ...
... is staffed by Sears-Trained. PRINTED tN U S A operator's manual MODEL NO, 353.797!00-22cc (15" Cutting Path) How to a Sears Repair Parts Distribution Center for handling. When you buy merchandise from any Sears Service Center and most Sears Stores WHEN ORDERING REPAIR... PARTS GIVE THE FOLLOWING INFORMATION AS SHOWN IN THIS LIST, I The PART NUMBER 2 The MODEL NUMBER 358.797100 ' 3 The PART DESCRIPt7ON 4 The NAME OF ITEM -22cc Gas Weedwacker _ If the parts you need are not stocked locally, your unit, All parts listed herein may be electronically ...


