
Operation Manual
Page 1
Visit our Craftsman website: www.sears.com/craftsman 7103147 Revision D Rev. Sears, Roebuck and Co., Hoffman Estates, IL 60179 U.S.A. Date 04/2009 Operator's anual T ° ZTS Zero-Turn Rear Engine Riders with Electric Start Model No. 107.289860 (21HP Briggs & Stratton Engine with 42" Mower) CAUTION: Before using this Nota: Una traducci6n en espaSol de este Manual...
Visit our Craftsman website: www.sears.com/craftsman 7103147 Revision D Rev. Sears, Roebuck and Co., Hoffman Estates, IL 60179 U.S.A. Date 04/2009 Operator's anual T ° ZTS Zero-Turn Rear Engine Riders with Electric Start Model No. 107.289860 (21HP Briggs & Stratton Engine with 42" Mower) CAUTION: Before using this Nota: Una traducci6n en espaSol de este Manual...

Operation Manual
Page 5
...RIDE-ON UNITS) 1. Tall grass can affect the stability of 3-1/2 feet (106 cm) vertically in the mowing area for towing. Avoid starting, stopping, or turning on the ground, speed too fast, inadequate braking, the type of machine is a rise of the unit. Keep all slopes requires extra caution• If...slope or if you last saw them . 13. they can hide obstacles• 3. Do not mow near drop-offs, ditches, or embankments• The mower could overturn the unit. Tow only with safe unit operation• Children who have to the unit and the mowing activity• Never assume that...
...RIDE-ON UNITS) 1. Tall grass can affect the stability of 3-1/2 feet (106 cm) vertically in the mowing area for towing. Avoid starting, stopping, or turning on the ground, speed too fast, inadequate braking, the type of machine is a rise of the unit. Keep all slopes requires extra caution• If...slope or if you last saw them . 13. they can hide obstacles• 3. Do not mow near drop-offs, ditches, or embankments• The mower could overturn the unit. Tow only with safe unit operation• Children who have to the unit and the mowing activity• Never assume that...
Operation Manual
Page 7
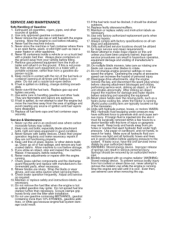
... fuel tank must be drained outdoors. 14. Always comply with safety devices. Never attempt to rotate. 21. Improper service procedures can result in serious personal injury. On multiple blade mowers, take care as spilled gasoline may collect. 2. ING: Hydraulic fluid escaping under high pressure. Use ... the engine is spilled on a trailer with a plastic bed liner. Mower blades are in an enclosed area where carbon monoxide fumes may ignite. Adjust and service as a hydro pump cooling fan, when the tractor is an open device. 9. After striking an object, inspect the machine...
... fuel tank must be drained outdoors. 14. Always comply with safety devices. Never attempt to rotate. 21. Improper service procedures can result in serious personal injury. On multiple blade mowers, take care as spilled gasoline may collect. 2. ING: Hydraulic fluid escaping under high pressure. Use ... the engine is spilled on a trailer with a plastic bed liner. Mower blades are in an enclosed area where carbon monoxide fumes may ignite. Adjust and service as a hydro pump cooling fan, when the tractor is an open device. 9. After striking an object, inspect the machine...
Operation Manual
Page 8
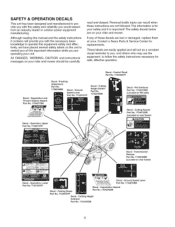
...Switch Part No. 1734276SlVl Decal - Parking Brake Part No. 7102578YP Decal - Contact a Sears Parts & Service Center for your rider and mower should be carefully read and obeyed. SAFETY & OPERATION DECALS This unit has been designed and manufactured to provide you with the necessary basic ...knowledge to operate this important information while you are operating your rider and mower. Decal - Tracking Adjustment Part No. 1726638SJVl Decal - Hot Surfaces Part No. 1734273SM (Located on your unit. The safety decals...
...Switch Part No. 1734276SlVl Decal - Parking Brake Part No. 7102578YP Decal - Contact a Sears Parts & Service Center for your rider and mower should be carefully read and obeyed. SAFETY & OPERATION DECALS This unit has been designed and manufactured to provide you with the necessary basic ...knowledge to operate this important information while you are operating your rider and mower. Decal - Tracking Adjustment Part No. 1726638SJVl Decal - Hot Surfaces Part No. 1734273SM (Located on your unit. The safety decals...

Operation Manual
Page 14
...starting the rider. Move the parking brake lever across and into the locking notch to engage and lock the parking brake. Transmission ReleaseLevers Mower Blade Switch ignition Switch Figure 4. Parking Brake Lever Move the parking brake lever (bottom inset, Figure 4) up and across and down... to the CHOKE position for steering instructions. The engine will turn. NOTE: The parking brake must be disengaged before operating the ground speed levers. _r3_ Throttle/Choke Control (ChokeO-Matic) The throttle/choke...
...starting the rider. Move the parking brake lever across and into the locking notch to engage and lock the parking brake. Transmission ReleaseLevers Mower Blade Switch ignition Switch Figure 4. Parking Brake Lever Move the parking brake lever (bottom inset, Figure 4) up and across and down... to the CHOKE position for steering instructions. The engine will turn. NOTE: The parking brake must be disengaged before operating the ground speed levers. _r3_ Throttle/Choke Control (ChokeO-Matic) The throttle/choke...

Operation Manual
Page 15
...pushed by hand. NOTE: Never leave the ignition switch in the Safety and Operation sections before turning the mower blades ON, and while mowing. Fuel Tank To remove the fuel tank cap, turn the mower blades ON, pull the switch up. The cutting height gauge indicates the position of the switch... and function of the rider, just behind the driver's left leg. Ignition Switch The ignition switch starts and stops the engine; To turn the mower blades OFF, push the switch down. Always set the engine speed control to run and powers the electrical system. See PUSHING THE UNIT...
...pushed by hand. NOTE: Never leave the ignition switch in the Safety and Operation sections before turning the mower blades ON, and while mowing. Fuel Tank To remove the fuel tank cap, turn the mower blades ON, pull the switch up. The cutting height gauge indicates the position of the switch... and function of the rider, just behind the driver's left leg. Ignition Switch The ignition switch starts and stops the engine; To turn the mower blades OFF, push the switch down. Always set the engine speed control to run and powers the electrical system. See PUSHING THE UNIT...

Operation Manual
Page 16
...key. FUEL RECOMMENDATIONS For daily operation: Use only unleaded gasoline with a rear-mounted grass catcher. To reduce fire hazard, keep the engine, rider and mower free of slopes, not up to ride on the unit. Gasohol (up and down. For storage: CAUTION: Alcohol blended fuels (called gasohol or using...To add fuel: 1. CHECKS BEFORE STARTING • Check that is at least one foot wider than the width of the rear wheels of this zero-turn rider on a trailer or truck using ethanol or methanol) can damage the fuel system of an engine while in storage. See STORAGE instructions for ...
...key. FUEL RECOMMENDATIONS For daily operation: Use only unleaded gasoline with a rear-mounted grass catcher. To reduce fire hazard, keep the engine, rider and mower free of slopes, not up to ride on the unit. Gasohol (up and down. For storage: CAUTION: Alcohol blended fuels (called gasohol or using...To add fuel: 1. CHECKS BEFORE STARTING • Check that is at least one foot wider than the width of the rear wheels of this zero-turn rider on a trailer or truck using ethanol or methanol) can damage the fuel system of an engine while in storage. See STORAGE instructions for ...

Operation Manual
Page 17
... FAST position to increase engine speed and SLOW position to the RUN position. 5. Start the engine (see STOPPING THE RIDER AND ENGINE). Turn the mower blades ON (pull switch up). 5. Begin mowing. PUSHING THE RIDER BY HAND NOTE: Do not disengage the transmission if parked on the... mower blades, or driving the unit. Push Position C. Turn off the mower blades by pushing the mower blade switch down follow the procedure given in to their START/PARK positions, engage the parking brake...
... FAST position to increase engine speed and SLOW position to the RUN position. 5. Start the engine (see STOPPING THE RIDER AND ENGINE). Turn the mower blades ON (pull switch up). 5. Begin mowing. PUSHING THE RIDER BY HAND NOTE: Do not disengage the transmission if parked on the... mower blades, or driving the unit. Push Position C. Turn off the mower blades by pushing the mower blade switch down follow the procedure given in to their START/PARK positions, engage the parking brake...
Operation Manual
Page 20
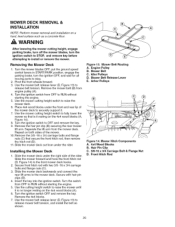
... Hitch Rod 20 WARNING After lowering the mower cutting height, engage parking brake, turn off the mower blades, turn the ignition OFF, and wait for all moving parts to stop. 2. Removing the Mower Deck 1. Remove the mower belt (B) from the mower deck. Separate the lift arm from engine pulley (A). 4. Turn the ignition switch OFF and remove the key...
... Hitch Rod 20 WARNING After lowering the mower cutting height, engage parking brake, turn off the mower blades, turn the ignition OFF, and wait for all moving parts to stop. 2. Removing the Mower Deck 1. Remove the mower belt (B) from the mower deck. Separate the lift arm from engine pulley (A). 4. Turn the ignition switch OFF and remove the key...
Operation Manual
Page 21
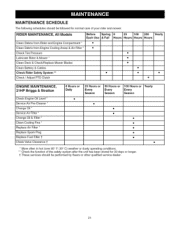
...unit has been stored for 30 days or longer. 1"These services should be performed by Sears or other qualified service dealer. 21 RIDER MAINTENANCE, All Models Before Spring 8 25 100 200 Yearly Each Use & Fall Hours Hours Hours Hours Clean Debris from ...Rider and Engine Compartment * • Clean Debris from Engine Cooling Areas & Air Filter * • Check Tire Pressure Lubricate Rider & Mower * Clean Deck & Check/Replace Mower Blades Clean Battery & Cables Check Rider Safety System ** • Check / Adjust PTO Clutch • • • • •...
...unit has been stored for 30 days or longer. 1"These services should be performed by Sears or other qualified service dealer. 21 RIDER MAINTENANCE, All Models Before Spring 8 25 100 200 Yearly Each Use & Fall Hours Hours Hours Hours Clean Debris from ...Rider and Engine Compartment * • Clean Debris from Engine Cooling Areas & Air Filter * • Check Tire Pressure Lubricate Rider & Mower * Clean Deck & Check/Replace Mower Blades Clean Battery & Cables Check Rider Safety System ** • Check / Adjust PTO Clutch • • • • •...
Operation Manual
Page 22
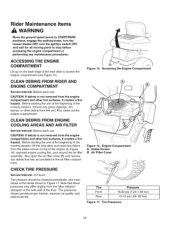
... surfaces, it creates a fire hazard. Tire Pressures 22 Rider Maintenance Items WARNING Move the ground speed levers to START/PARK positions, engage the parking brake, turn the mower blades OFF, turn the ignition switch OFF, and wait for all moving parts to access the engine compartment (see Figure 15).
... surfaces, it creates a fire hazard. Tire Pressures 22 Rider Maintenance Items WARNING Move the ground speed levers to START/PARK positions, engage the parking brake, turn the mower blades OFF, turn the ignition switch OFF, and wait for all moving parts to access the engine compartment (see Figure 15).

Operation Manual
Page 23
... grease. Mower Lubrication t4 _. Lubricating Mower Lift 23 Grease: • front wheel bushings • mower arbors • front wheel grease fittings Use grease fittings when present. x,_/" _ i i7 Figure 19. Arbor Lubrication (3-Blade Model Shown, All Models Similar) \ Figure 21. Lubricating ... 22 as well as the following lubrication points. Oil: • brake linkage •• hfryadmroe lpinivkoatgepoints • mower deck height adjustment linkage Generally, all greases are compatible. Figure 20. Lubricating Rider \ Figure 18. LUBRICATION Service Interval:...
... grease. Mower Lubrication t4 _. Lubricating Mower Lift 23 Grease: • front wheel bushings • mower arbors • front wheel grease fittings Use grease fittings when present. x,_/" _ i i7 Figure 19. Arbor Lubrication (3-Blade Model Shown, All Models Similar) \ Figure 21. Lubricating ... 22 as well as the following lubrication points. Oil: • brake linkage •• hfryadmroe lpinivkoatgepoints • mower deck height adjustment linkage Generally, all greases are compatible. Figure 20. Lubricating Rider \ Figure 18. LUBRICATION Service Interval:...
Operation Manual
Page 24
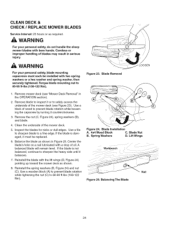
... a file to sharpen blade to 80-90 ft-lbs (108-122 Nm). Blade Installation A. 4x4 Wood Block C. Careless or improper handling of the mower deck. 5. Use a wooden block (A) to prevent blade rotation while tightening the nut (C) to safely access the underside of oil. Lift Wings Workbench Nail... Figure 24), spring washers (B), and blade. . Blade Nut B. Use a block of wood to prevent blade rotation while loosening the capscrew by turning it or to 80-90 ft-lbs (108-122 Nm). WARNING For your personal safety, blade mounting capscrews must be installed with a drop of...
... a file to sharpen blade to 80-90 ft-lbs (108-122 Nm). Blade Installation A. 4x4 Wood Block C. Careless or improper handling of the mower deck. 5. Use a wooden block (A) to prevent blade rotation while tightening the nut (C) to safely access the underside of oil. Lift Wings Workbench Nail... Figure 24), spring washers (B), and blade. . Blade Nut B. Use a block of wood to prevent blade rotation while loosening the capscrew by turning it or to 80-90 ft-lbs (108-122 Nm). WARNING For your personal safety, blade mounting capscrews must be installed with a drop of...

Operation Manual
Page 25
... belt should you attempt to start the engine. NOTE: Once the engine has stopped, the mower blade switch must be turned OFF, the ground speed control levers must be in the ENGAGE position in ENGAGE position. See your local authorized dealer. Explosion hazard... area, away from the battery, negative cable first (B, Figure 26). 2. Check their START/PARK positions, AND • Parking brake lever is turned OFE If mower drive belt does not stop within five seconds, contact your local authorized dealer. ENGINE SHOULD SHUT OFF IF: • Operator rises off seat with...
... belt should you attempt to start the engine. NOTE: Once the engine has stopped, the mower blade switch must be turned OFF, the ground speed control levers must be in the ENGAGE position in ENGAGE position. See your local authorized dealer. Explosion hazard... area, away from the battery, negative cable first (B, Figure 26). 2. Check their START/PARK positions, AND • Parking brake lever is turned OFE If mower drive belt does not stop within five seconds, contact your local authorized dealer. ENGINE SHOULD SHUT OFF IF: • Operator rises off seat with...
Operation Manual
Page 26
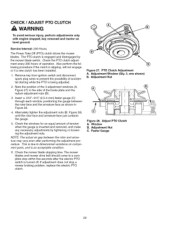
...removed, and make any necessary adjustments by the mower blade switch. Insert a .012"-.015" (2,5-4 mm) feeler gauge (C) through each window, positioning the gauge between the rotor and armature may vary even after the electric PTO switch is turned off. NOTE: The actual air gap between... / ADJUST PTO CLUTCH WARNING To avoid serious injury, perform adjustments only with engine stopped, key removed and tractor on component parts, and is an acceptable condition. 6. Check the mower blade stopping time. Alternately tighten the adjustment nuts (B, Figure 28) until the rotor face and armature face...
...removed, and make any necessary adjustments by the mower blade switch. Insert a .012"-.015" (2,5-4 mm) feeler gauge (C) through each window, positioning the gauge between the rotor and armature may vary even after the electric PTO switch is turned off. NOTE: The actual air gap between... / ADJUST PTO CLUTCH WARNING To avoid serious injury, perform adjustments only with engine stopped, key removed and tractor on component parts, and is an acceptable condition. 6. Check the mower blade stopping time. Alternately tighten the adjustment nuts (B, Figure 28) until the rotor face and armature face...
Operation Manual
Page 30
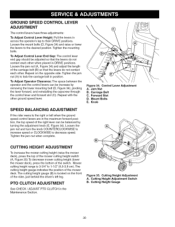
...Adjustment Switch B. Cutting Height Gauge 30 Mount Bolts E. Loosen the jam nut and turn the knob COUNTERCLOCKWISE to increase speed or CLOCKWISE to the desired position. Tighten the jam nut when complete. Mower cutting height range is located on the opposite side. Cutting Height Adjustment A. Tighten... the mounting bolts. To Adjust Control Lever End Gap: The control lever end gap should be increase by turning the adjustment knob (E, Figure 34). To...
...Adjustment Switch B. Cutting Height Gauge 30 Mount Bolts E. Loosen the jam nut and turn the knob COUNTERCLOCKWISE to increase speed or CLOCKWISE to the desired position. Tighten the jam nut when complete. Mower cutting height range is located on the opposite side. Cutting Height Adjustment A. Tighten... the mounting bolts. To Adjust Control Lever End Gap: The control lever end gap should be increase by turning the adjustment knob (E, Figure 34). To...

Operation Manual
Page 32
... Figure 37). 5. Side to mid position. Set the cutting height to Side Leveling If the cut . MOWER DECK LEVELING ADJUSTMENTS WARNING Before adjusting the mower, turn the mower blades OFF, turn the ignition switch OFF, remove the key, and allow all moving parts to stop . 2. Check for all... moving parts to stop . See CHECK TIRE PRESSURE. 4. Side-to adjust the mower level. Loosen the jam nuts (C)...
... Figure 37). 5. Side to mid position. Set the cutting height to Side Leveling If the cut . MOWER DECK LEVELING ADJUSTMENTS WARNING Before adjusting the mower, turn the mower blades OFF, turn the ignition switch OFF, remove the key, and allow all moving parts to stop . 2. Check for all... moving parts to stop . See CHECK TIRE PRESSURE. 4. Side-to adjust the mower level. Loosen the jam nuts (C)...

Operation Manual
Page 33
When adjusted correctly, tighten the rear jam nuts (B) to remove the mower deck. 4. MOWER BELT REPLACEMENT 1. Use the idler pulley arm (C, Figure 42) to release belt tension and remove the mower belt (A) from the remaining deck pulleys. Figure 41. Front Jam Nut Leveling Figure 42. Turn the blades front-to adjust the deck level. Park the rider...
When adjusted correctly, tighten the rear jam nuts (B) to remove the mower deck. 4. MOWER BELT REPLACEMENT 1. Use the idler pulley arm (C, Figure 42) to release belt tension and remove the mower belt (A) from the remaining deck pulleys. Figure 41. Front Jam Nut Leveling Figure 42. Turn the blades front-to adjust the deck level. Park the rider...
Operation Manual
Page 34
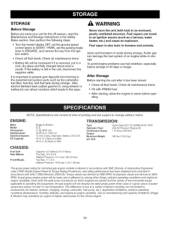
... to the sepa- ENGINE: Make Model Horsepower Displacement Electrical System Oil Capacity Briggs & Stratton ELS 21 @ 3600 rpm 32.95 cu in a given piece of power equipment (actual "on which ... unit (with fuel) in the Safety Rules section, then perform the following steps: • Turn the mower blades OFF, set the ground speed control levers to START / PARK, set the parking brake...acids during storage. Alternator, Battery: 230 CCA 44 oz (1.3 liters) w/o filter; 48 oz (1.42 liters) w/filter TRANSlVlISSION: Type Hydraulic Fluid Continuous Torque Output Maximum Weight per Axle Hydro-Gear EZT ...
... to the sepa- ENGINE: Make Model Horsepower Displacement Electrical System Oil Capacity Briggs & Stratton ELS 21 @ 3600 rpm 32.95 cu in a given piece of power equipment (actual "on which ... unit (with fuel) in the Safety Rules section, then perform the following steps: • Turn the mower blades OFF, set the ground speed control levers to START / PARK, set the parking brake...acids during storage. Alternator, Battery: 230 CCA 44 oz (1.3 liters) w/o filter; 48 oz (1.42 liters) w/filter TRANSlVlISSION: Type Hydraulic Fluid Continuous Torque Output Maximum Weight per Axle Hydro-Gear EZT ...
Operation Manual
Page 35
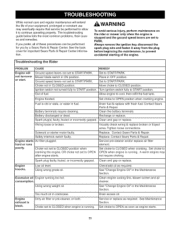
... oil as required. See "Change Engine Oil" in the Maintenance Section. Engine exhaust is running. hetroubleshooting guidebelowliststhe mostcommonproblemsth, eircausesandremedies. Turn ignition switch fully to prevent accidental starting of fuel. i Engine flooded. Contact Sears Parts & Repair. Clean and gap or ...in the Maintenance Section. Service or replace as required. AWARNING To avoid serious injury, perform maintenance on the rider or mower only when the engine is running too hot. Always remove the ignition key, disconnect the spark plug wire and fasten...
... oil as required. See "Change Engine Oil" in the Maintenance Section. Engine exhaust is running. hetroubleshooting guidebelowliststhe mostcommonproblemsth, eircausesandremedies. Turn ignition switch fully to prevent accidental starting of fuel. i Engine flooded. Contact Sears Parts & Repair. Clean and gap or ...in the Maintenance Section. Service or replace as required. AWARNING To avoid serious injury, perform maintenance on the rider or mower only when the engine is running too hot. Always remove the ignition key, disconnect the spark plug wire and fasten...


