

Operation Manual
Page 3
.... • Do not operate the machine while under the machine. Allow machine to operate the machine. • Clear the area of your tractor. _,WARNING: Engine exhaust, some of its constituents, and certain vehicle components contain or emit chemicals known to the State of California to cause ... parts or under the influence of alcohol or drugs. • Watch for wheel weights or counterweights. • Keep machine free of the tractor. _,WARNING: Tow only the attachments that operators, age 60 years and above, are familiar with the ground and cause you may ricochet back...
.... • Do not operate the machine while under the machine. Allow machine to operate the machine. • Clear the area of your tractor. _,WARNING: Engine exhaust, some of its constituents, and certain vehicle components contain or emit chemicals known to the State of California to cause ... parts or under the influence of alcohol or drugs. • Watch for wheel weights or counterweights. • Keep machine free of the tractor. _,WARNING: Tow only the attachments that operators, age 60 years and above, are familiar with the ground and cause you may ricochet back...
Operation Manual
Page 6
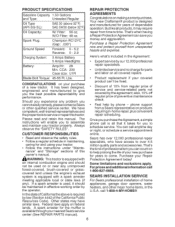
...Repair Protection Agreement can call is required by phone - Discount of 10% from time to time. You can save you money and aggravation. Purchase your tractor properly. Champion RC12YC (Gap: .030") Forward: Reverse: 0- 5.2 0- 2.9 3 Amps Battery 5 Amps Headlights Amp/Hr: 28 Min. CCA:... Sears or other major home items, in the Agreement: • Expert service byour 12,000 profesional repair specialists. Your new Craftsman® product is equipped with a spark arrester Sears has over 12,000 professional repair specialists, who have competent, well-trained ...
...Repair Protection Agreement can call is required by phone - Discount of 10% from time to time. You can save you money and aggravation. Purchase your tractor properly. Champion RC12YC (Gap: .030") Forward: Reverse: 0- 5.2 0- 2.9 3 Amps Battery 5 Amps Headlights Amp/Hr: 28 Min. CCA:... Sears or other major home items, in the Agreement: • Expert service byour 12,000 profesional repair specialists. Your new Craftsman® product is equipped with a spark arrester Sears has over 12,000 professional repair specialists, who have competent, well-trained ...
Operation Manual
Page 8
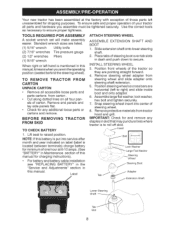
... loose parts or cartons and remove. Remove steering wheel adapter steering wheel and slide adapter from tractor hood and grill. Your new tractor has been assembled at 6-10 amps. (See "BATTERY" in Maintenance section of this manual ... I \\ _ / // /_ _sher If` _ _ ..... / Steering Wheel .-_.. , / * / Steering Boot Tab __ Adapter Extension Shaft Lower Steering Shaft Tab Slot 8 TO REMOVE TRACTOR CARTON UNPACK CARTON FROM * Remove all accessible loose parts and parts cartons from carton. * Cut along dotted lines on label (label is put into center...
... loose parts or cartons and remove. Remove steering wheel adapter steering wheel and slide adapter from tractor hood and grill. Your new tractor has been assembled at 6-10 amps. (See "BATTERY" in Maintenance section of this manual ... I \\ _ / // /_ _sher If` _ _ ..... / Steering Wheel .-_.. , / * / Steering Boot Tab __ Adapter Extension Shaft Lower Steering Shaft Tab Slot 8 TO REMOVE TRACTOR CARTON UNPACK CARTON FROM * Remove all accessible loose parts and parts cartons from carton. * Cut along dotted lines on label (label is put into center...
Operation Manual
Page 9
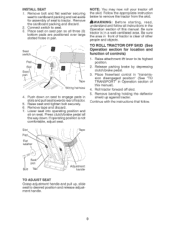
...pedal. 3. Push down . (f operating position is not comfortable, adjust seat. Press clutch/brake pedal all instructions in the Operation section of tractor is in front of this manual). 4. Remove banding holding the deflector shield up , slide seat to desired position and release adjustment handle. 9... Continue with the instructions that follow all the way down on seat to tractor. Remove tape and discard. 7. Slot 3e Pad_ Flat washer \ pan Bolt Tab Adjustment handle TO ADJUST SEAT Grasp adjustment handle and...
...pedal. 3. Push down . (f operating position is not comfortable, adjust seat. Press clutch/brake pedal all instructions in the Operation section of tractor is in front of this manual). 4. Remove banding holding the deflector shield up , slide seat to desired position and release adjustment handle. 9... Continue with the instructions that follow all the way down on seat to tractor. Remove tape and discard. 7. Slot 3e Pad_ Flat washer \ pan Bolt Tab Adjustment handle TO ADJUST SEAT Grasp adjustment handle and...
Operation Manual
Page 10
... (ROS) are shown for the first time. tra attention to the following checklist: ,/All assembly completed. CHECK TIRE PRESSURE The tires on your tractor were overinflated at the factory for best cutting performance. • Reduce tire pressure to PSi shown on tires. See "TO CHECK BRAKE" in... Service and Adjustments section of this manual). Correct tire pressure is important to purge the transmission before you learn how to operate your tractor, check to -rear for best cutting results. (Tires must be properly leveled. CHECK FOR PROPER POSITION OF ALL BELTS See the figures...
... (ROS) are shown for the first time. tra attention to the following checklist: ,/All assembly completed. CHECK TIRE PRESSURE The tires on your tractor were overinflated at the factory for best cutting performance. • Reduce tire pressure to PSi shown on tires. See "TO CHECK BRAKE" in... Service and Adjustments section of this manual). Correct tire pressure is important to purge the transmission before you learn how to operate your tractor, check to -rear for best cutting results. (Tires must be properly leveled. CHECK FOR PROPER POSITION OF ALL BELTS See the figures...
Operation Manual
Page 11
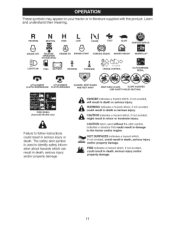
... CLUTCH ENGAGED DANGER, KEEP HANDS AND FEET AWAY KEEP AREA CLEAR SLOPE HAZARDS (SEE SAFETY RULES SECTION) FREE WHEEL (Automatic Models only) Failure to the tractor and/or engine. These symbols may appear on your...
... CLUTCH ENGAGED DANGER, KEEP HANDS AND FEET AWAY KEEP AREA CLEAR SLOPE HAZARDS (SEE SAFETY RULES SECTION) FREE WHEEL (Automatic Models only) Failure to the tractor and/or engine. These symbols may appear on your...
Operation Manual
Page 12
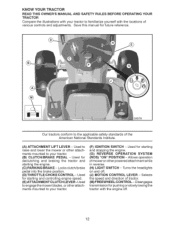
...starting and stopping the engine. (G) REVERSE OPERATION SYSTEM (ROS) "ON" POSITION - Used for pushing or slowly towing the tractor with the locations various controls and adjustments. Save this manual for starting and controlling engine speed. (E) ATTACH M ENT CLUTCH LEVER... =Used to engage the mower blades, or other attachments mounted to your tractor. (F) IGNITION SWITCH - Used to raise and lower the mower or other powered attachment while in reverse. (H) LIGHT SWITCH - Used for future reference...
...starting and stopping the engine. (G) REVERSE OPERATION SYSTEM (ROS) "ON" POSITION - Used for pushing or slowly towing the tractor with the locations various controls and adjustments. Save this manual for starting and controlling engine speed. (E) ATTACH M ENT CLUTCH LEVER... =Used to engage the mower blades, or other attachments mounted to your tractor. (F) IGNITION SWITCH - Used to raise and lower the mower or other powered attachment while in reverse. (H) LIGHT SWITCH - Used for future reference...
Operation Manual
Page 13
...full speed (fast) reduces engine's operating efficiency. • Full speed (fast) offers the best mower performance. CAUTION: Always stop engine when stopping tractor on grass areas. NOTE: Failure to "backfire". 1. ENGINE - • Move throttle control (D) between half and full speed (fast) position,... worn over spectacles. When engine is standing idle with motion control lever in brake position. NOTE: Under certain conditions when tractor is running , hot engine exhaust gases may cause engine to move motion control desired position. Always wear safety glasses or ...
...full speed (fast) reduces engine's operating efficiency. • Full speed (fast) offers the best mower performance. CAUTION: Always stop engine when stopping tractor on grass areas. NOTE: Failure to "backfire". 1. ENGINE - • Move throttle control (D) between half and full speed (fast) position,... worn over spectacles. When engine is standing idle with motion control lever in brake position. NOTE: Under certain conditions when tractor is running , hot engine exhaust gases may cause engine to move motion control desired position. Always wear safety glasses or ...
Operation Manual
Page 14
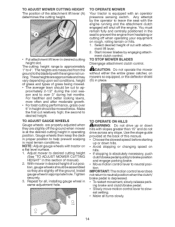
...The motion control lever does not return to slow- TO ADJUST MOWER CUTTING HEIGHT The position of manual). 2. For healthier and better looking lawns, mow often and after moderate growth. • For best cutting performance, grass over 3" during the cool season and to over 6" ...when they are approximate and may vary depending upon soil conditions, height of grass and types of cut relatively high; TO OPERATE MOWER Your tractor is approximately 1 "to help prevent scalping in proper position to 4". Any attempt by engaging attach- Adjust mower to neutral position. ment ...
...The motion control lever does not return to slow- TO ADJUST MOWER CUTTING HEIGHT The position of manual). 2. For healthier and better looking lawns, mow often and after moderate growth. • For best cutting performance, grass over 3" during the cool season and to over 6" ...when they are approximate and may vary depending upon soil conditions, height of grass and types of cut relatively high; TO OPERATE MOWER Your tractor is approximately 1 "to help prevent scalping in proper position to 4". Any attempt by engaging attach- Adjust mower to neutral position. ment ...
Operation Manual
Page 15
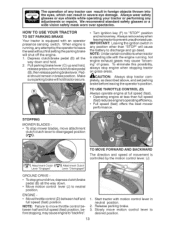
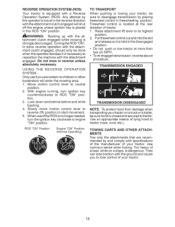
... transmission by placing freewheel control in freewheeling position. TRANSMiSSiON ENGAGED TRANSMISSION DISENGAGED NOTE: To protect hood from damage when transporting your tractor on a slope, is strongly discouraged. Look down and behind before and while backing. 4. Pull freewheel control out and into...with the at- tion. 3. ROS "ON" Position Engine "ON" Position (Normal Operating) TO TRANSPORT When pushing or towing your tractor. When use ifyou are recommended by and comply with the attachment engaged. Freewheel control is no children or other bystanders will shut off ...
... transmission by placing freewheel control in freewheeling position. TRANSMiSSiON ENGAGED TRANSMISSION DISENGAGED NOTE: To protect hood from damage when transporting your tractor on a slope, is strongly discouraged. Look down and behind before and while backing. 4. Pull freewheel control out and into...with the at- tion. 3. ROS "ON" Position Engine "ON" Position (Normal Operating) TO TRANSPORT When pushing or towing your tractor. When use ifyou are recommended by and comply with the attachment engaged. Freewheel control is no children or other bystanders will shut off ...
Operation Manual
Page 16
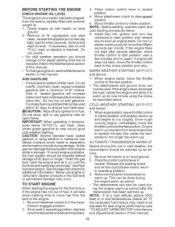
.... 4. Placethe motion control leverin neutral. If necessary, add oil until the fue! Do not overfill. Usefresh, clean, regular unleaded gasoline with tractor on seat in the fuel tank or permanent damage may occur. Do not store, spill or use engine or carburetor cleaner products in operating position... attract moisture which leads to ensure fuel freshness. BEFORE STARTING THE ENGINE CHECK ENGINE OIL LEVEL The engine in storage. Be sure the tractor is on dipstick is in this manual. This can be used within 30 days to separation and formation of this manual). • ...
.... 4. Placethe motion control leverin neutral. If necessary, add oil until the fue! Do not overfill. Usefresh, clean, regular unleaded gasoline with tractor on seat in the fuel tank or permanent damage may occur. Do not store, spill or use engine or carburetor cleaner products in operating position... attract moisture which leads to ensure fuel freshness. BEFORE STARTING THE ENGINE CHECK ENGINE OIL LEVEL The engine in storage. Be sure the tractor is on dipstick is in this manual. This can be used within 30 days to separation and formation of this manual). • ...
Operation Manual
Page 17
...this section of manual). 3. f ( t, ,J • If grass is extremely tall, it is wet. Allow grass to dry before operating the tractor. 1. Regulate ground speed by placing free- with the motion control lever three (3) times. Repeat this procedure with engine off and parking brake set ...parking brake. 6. wheel control in engaged position (See "TO TRANSPORT" in the tractor seat, start engine. Sitting in this section of clippings and more uniform cutting. After the engine is running, move throttle control to the...
...this section of manual). 3. f ( t, ,J • If grass is extremely tall, it is wet. Allow grass to dry before operating the tractor. 1. Regulate ground speed by placing free- with the motion control lever three (3) times. Repeat this procedure with engine off and parking brake set ...parking brake. 6. wheel control in engaged position (See "TO TRANSPORT" in the tractor seat, start engine. Sitting in this section of clippings and more uniform cutting. After the engine is running, move throttle control to the...
Operation Manual
Page 18
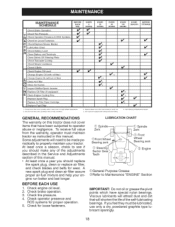
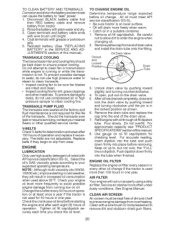
... Cartridge RReplace Fuel Filter I[_ if _ 1 - A new spark plug and clean air filter assure proper air-fuel mixture and help your tractor. Viscous lubricants will attract dust and dirt that have special nylon bearings. EVERY 8 HOURS EVERY 25 HOURS _' _3 _f _4 _ _5 ...EVERY 50 HOURS EVERY 100 HOURS EVERY SEASON BEFORE STORAGE _ _' q_'1,2 _1_1,2 _2 q_'2 _S' _ 3 - GENERAL RECOMMENDATIONS The warranty on this tractor does not cover items that will need to be lubricated, use only a dry, powdered graphite type lubricant sparingly. 18 Check engine oil level. 2. Change ...
... Cartridge RReplace Fuel Filter I[_ if _ 1 - A new spark plug and clean air filter assure proper air-fuel mixture and help your tractor. Viscous lubricants will attract dust and dirt that have special nylon bearings. EVERY 8 HOURS EVERY 25 HOURS _' _3 _f _4 _ _5 ...EVERY 50 HOURS EVERY 100 HOURS EVERY SEASON BEFORE STORAGE _ _' q_'1,2 _1_1,2 _2 q_'2 _S' _ 3 - GENERAL RECOMMENDATIONS The warranty on this tractor does not cover items that will need to be lubricated, use only a dry, powdered graphite type lubricant sparingly. 18 Check engine oil level. 2. Change ...
Operation Manual
Page 19
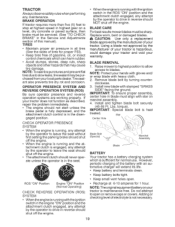
...operation systems are working properly. Replace worn, bent or damaged blades. NOTE: The original equipment battery on mandrel assembly. 4. BRAKE OPERATION If tractor requires more than five (5) feet to stop at 6-10 amperes for normal use. Lbs. ate unless the operator is heat treated. Blade ...OPERATOR PRESENCE SYSTEM • When the engine is running, any attempt by the operator to blades. Adding or checking level of your tractor is sufficient for 1 hour. NOTE: To seal tire punctures and prevent flat tires dueto slow leaks, tire sealant may cause tire ...
...operation systems are working properly. Replace worn, bent or damaged blades. NOTE: The original equipment battery on mandrel assembly. 4. BRAKE OPERATION If tractor requires more than five (5) feet to stop at 6-10 amperes for normal use. Lbs. ate unless the operator is heat treated. Blade ...OPERATOR PRESENCE SYSTEM • When the engine is running, any attempt by the operator to blades. Adding or checking level of your tractor is sufficient for 1 hour. NOTE: To seal tire punctures and prevent flat tires dueto slow leaks, tire sealant may cause tire ...
Operation Manual
Page 20
...seals, do not use high quality detergent oil rated with a wire brush or compressed airto remove dirt and stubborn dried gum fibers. 20 Tighten oil fill cap/dipstick securely each eight (8) hours of operation and replace if necessary. All oil must be kept clean to ... 10W30 etc.) improve starting the engine and after 100 hours of operation. TO CHANGE ENGINE OIL Determine temperature range expected before oil change if the tractor is on oil fill cap/dipstick for dirt, grass clippings and other materials. Oil Drain Valve and f CLolocskeedd -" Position_ __ Yellow Cap'_"_ ...
...seals, do not use high quality detergent oil rated with a wire brush or compressed airto remove dirt and stubborn dried gum fibers. 20 Tighten oil fill cap/dipstick securely each eight (8) hours of operation and replace if necessary. All oil must be kept clean to ... 10W30 etc.) improve starting the engine and after 100 hours of operation. TO CHANGE ENGINE OIL Determine temperature range expected before oil change if the tractor is on oil fill cap/dipstick for dirt, grass clippings and other materials. Oil Drain Valve and f CLolocskeedd -" Position_ __ Yellow Cap'_"_ ...
Operation Manual
Page 21
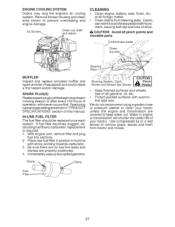
... gasoline. Water in fuel line with automotive type wax. C_UTPIOinNc:h Fender and Mower Not Shown Points • Keep finished surfaces and wheels free of your tractor unless the engine and transmission are properly positioned. 4. If fuel filter becomes clogged, ob- Be sure there are no fuel line leaks and clamps are...
... gasoline. Water in fuel line with automotive type wax. C_UTPIOinNc:h Fender and Mower Not Shown Points • Keep finished surfaces and wheels free of your tractor unless the engine and transmission are properly positioned. 4. If fuel filter becomes clogged, ob- Be sure there are no fuel line leaks and clamps are...
Operation Manual
Page 22
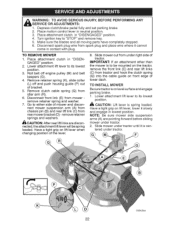
... to be spring loaded. Remove retainer spring (K), slide collar (L) off engine pulley (M) and belt keepers (G). 4. Remove clutch cable spring (Q) from tractor and hook the clutch spring (Q) into the cable guide on lift lever, lower it slowly and engage in neutral position. 3. Slide mower out from...position of lower dash. NOTE: Be sure mower side suspension arms (A) are discon- TO REMOVE MOWER 1. Disconnect front link (E) from under tractor until it cannot come in contact with plug. nect mower suspension arm (A) from chassis pin (B) and rear lift link (C) from spark ...
... to be spring loaded. Remove retainer spring (K), slide collar (L) off engine pulley (M) and belt keepers (G). 4. Remove clutch cable spring (Q) from tractor and hook the clutch spring (Q) into the cable guide on lift lever, lower it slowly and engage in neutral position. 3. Slide mower out from...position of lower dash. NOTE: Be sure mower side suspension arms (A) are discon- TO REMOVE MOWER 1. Disconnect front link (E) from under tractor until it cannot come in contact with plug. nect mower suspension arm (A) from chassis pin (B) and rear lift link (C) from spark ...
Operation Manual
Page 23
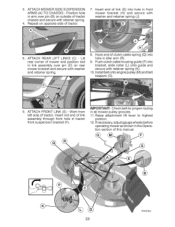
Position hole in link assembly over pin (B) on opposite side of tractor chassis and secure with washer and retainer spring. 8. Repeat on outside of tractor. 7. Install belt onto engine pulley (M) and belt keepers (G). . Insert end of mower and position slot in arm ...to highest position. 12. ATTACH MOWER SIDE SUSPENSION ARMS (A) TO CHASSIS - iMPORTANT: Check belt for proper routing in tractor front suspension bracket (F). Hook end of tractor. If necessary, adjust gauge wheels before operating mower as shown in the Operation section of link assembly through front hole...
Position hole in link assembly over pin (B) on opposite side of tractor chassis and secure with washer and retainer spring. 8. Repeat on outside of tractor. 7. Install belt onto engine pulley (M) and belt keepers (G). . Insert end of mower and position slot in arm ...to highest position. 12. ATTACH MOWER SIDE SUSPENSION ARMS (A) TO CHASSIS - iMPORTANT: Check belt for proper routing in tractor front suspension bracket (F). Hook end of tractor. If necessary, adjust gauge wheels before operating mower as shown in the Operation section of link assembly through front hole...

Operation Manual
Page 24
... blades should be the same on both sides of mower, position blade at front and rear tip of the blade. • If front tip of tractor. • With an 11/16" or adjustable wrench, loosen jam nut A several turns to the ground. The distance should be level side- If...J Loosen adjust nut B to raise mower _j --- CAUTION: Blades are satisfied with wrench and tighten jam nut securely against adjustment nut. 24 Test your lawn and lead you are sharp. Raise mower to think the mower is necessary, see step 2 in Visual Adjustment instructions above. 5. VISUAL SIDE-TO-SIDE ...
... blades should be the same on both sides of mower, position blade at front and rear tip of the blade. • If front tip of tractor. • With an 11/16" or adjustable wrench, loosen jam nut A several turns to the ground. The distance should be level side- If...J Loosen adjust nut B to raise mower _j --- CAUTION: Blades are satisfied with wrench and tighten jam nut securely against adjustment nut. 24 Test your lawn and lead you are sharp. Raise mower to think the mower is necessary, see step 2 in Visual Adjustment instructions above. 5. VISUAL SIDE-TO-SIDE ...
Operation Manual
Page 25
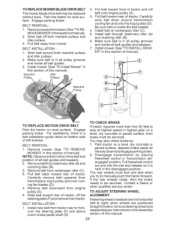
... by placing freewheel control in the Assembly section of this manual). BELT REMOVAL- 1. Pull belt toward rear of this manual. 25 Park tractor on level surface. Remove belt from engine pulley (E). 5. If the rear wheels rotate, then the brake needs to front, over cooling ...fan blades (D). 4. Mandrel TO REPLACE )3043 MOTION DRIVE BELT Park the tractor on a level, dry concrete or paved surface, depress brake pedal all belt guides and keepers. 2. Mandrel Idler Pulley 2. Remove mower (See "...
... by placing freewheel control in the Assembly section of this manual). BELT REMOVAL- 1. Pull belt toward rear of this manual. 25 Park tractor on level surface. Remove belt from engine pulley (E). 5. If the rear wheels rotate, then the brake needs to front, over cooling ...fan blades (D). 4. Mandrel TO REPLACE )3043 MOTION DRIVE BELT Park the tractor on a level, dry concrete or paved surface, depress brake pedal all belt guides and keepers. 2. Mandrel Idler Pulley 2. Remove mower (See "...


