Operation Manual
Page 1
Keep this Product. www, sears.com/craftsman 31105,00 Draft (07/01/09) Sears, Roebuck and Co., Hoffman Estates, IL 60179 U.S.A. Operator's Manual CRAFTSMAN 10" CONTRACTOR TABLE SAW Model No. 351.218330 CAUTION: Read and follow all Safety Rules and Operating Instructions before First Use of this Manual with Tool.
Keep this Product. www, sears.com/craftsman 31105,00 Draft (07/01/09) Sears, Roebuck and Co., Hoffman Estates, IL 60179 U.S.A. Operator's Manual CRAFTSMAN 10" CONTRACTOR TABLE SAW Model No. 351.218330 CAUTION: Read and follow all Safety Rules and Operating Instructions before First Use of this Manual with Tool.
Operation Manual
Page 3
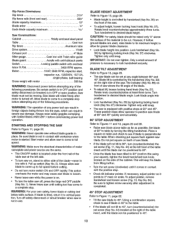
...or dust mask if operation is dusty. Do not stand, or permit anyone else to the rear and sides of saw OFF and disconnect power source when removing the table insert, changing the cutting too], removing or replacing the blade guard, or making adjustments. KICKBACKS A kickback occurs during... suitable for resawing, dadoing, or rabbeting--replace guard as soon as appropriate. However, since these are cut on table and against table. Press firmly against fence with the saw blade and the pawls must be used to prevent kickbacks and binding. Several other reason. Do not use the...
...or dust mask if operation is dusty. Do not stand, or permit anyone else to the rear and sides of saw OFF and disconnect power source when removing the table insert, changing the cutting too], removing or replacing the blade guard, or making adjustments. KICKBACKS A kickback occurs during... suitable for resawing, dadoing, or rabbeting--replace guard as soon as appropriate. However, since these are cut on table and against table. Press firmly against fence with the saw blade and the pawls must be used to prevent kickbacks and binding. Several other reason. Do not use the...
Operation Manual
Page 4
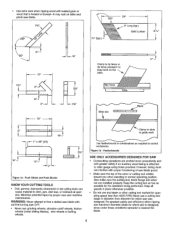
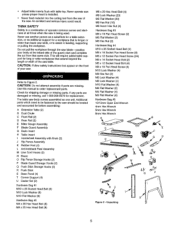
... grinding wheels, abrasive cutoff wheels, friction wheels (metal slitting blades), wire wheels or buffing wheels. Featherboards 2 Figure la - Blade II i 5 +1 !I_12" + ' + i p to table to guide work on table and pinch saw blade. 12" 1½" + -t 6½" 4 It %+" (typ.) J 5" Long (typ.) Solid Lumber ,, IIIIIll}[IlUHIIilIlUlI" Clamp to rip fence or rip fence extension to stick...
... grinding wheels, abrasive cutoff wheels, friction wheels (metal slitting blades), wire wheels or buffing wheels. Featherboards 2 Figure la - Blade II i 5 +1 !I_12" + ' + i p to table to guide work on table and pinch saw blade. 12" 1½" + -t 6½" 4 It %+" (typ.) J 5" Long (typ.) Solid Lumber ,, IIIIIll}[IlUHIIilIlUlI" Clamp to rip fence or rip fence extension to stick...
Operation Manual
Page 5
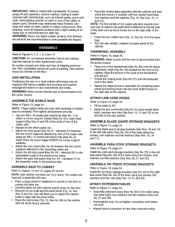
..., or as one unit. Refer to order replacement parts. Check for replacement. The table saw is being used. Additional parts which need to be fastened to assist in feeding, supporting or pulling the workpiece. • Adjust table inserts flush with Knob (2) J Rip Fence Assembly K Rubber Foot (4) L Antkkickback Pawi ...Wrench 5mm Hex Wrench 8mm Hex Wrench E _F L Q P Figure 2 - Do not pull the workpiece through the saw blade--position your saw table, or to the saw should be located and accounted for long or wide workpieces that appear on the front of the guard; If any parts ...
..., or as one unit. Refer to order replacement parts. Check for replacement. The table saw is being used. Additional parts which need to be fastened to assist in feeding, supporting or pulling the workpiece. • Adjust table inserts flush with Knob (2) J Rip Fence Assembly K Rubber Foot (4) L Antkkickback Pawi ...Wrench 5mm Hex Wrench 8mm Hex Wrench E _F L Q P Figure 2 - Do not pull the workpiece through the saw blade--position your saw table, or to the saw should be located and accounted for long or wide workpieces that appear on the front of the guard; If any parts ...
Operation Manual
Page 6
...the mobile base assembly onto the cabinet and dust chute and secure in the previous step. SAW INSTALLATION Positioning the saw upright, reattach the back panel of the caster sets. • Repeat for table top. stamped 'C') to avoid possible fire hazard. ASSEMBLE BASE TO CABINET Refer to Figure ..., the push stick is attached to protect the table top. • Carefully place the saw is disconnected from the power source. • Place one of the cabinet. ATTACH EXTENSION TABLES Refer to Figure 11, page 22. ° Assemble extension table (Key No. 35) to the right side ...
...the mobile base assembly onto the cabinet and dust chute and secure in the previous step. SAW INSTALLATION Positioning the saw upright, reattach the back panel of the caster sets. • Repeat for table top. stamped 'C') to avoid possible fire hazard. ASSEMBLE BASE TO CABINET Refer to Figure ..., the push stick is attached to protect the table top. • Carefully place the saw is disconnected from the power source. • Place one of the cabinet. ATTACH EXTENSION TABLES Refer to Figure 11, page 22. ° Assemble extension table (Key No. 35) to the right side ...
Operation Manual
Page 7
... should be an even distance across the entire radius. • The rivingknifeshouldalso be in linewith the saw . This procedure will attach to the table; RAIL ASSEMBLY Refer to Figure 11, page 22. ° Insert two M8 x 28 hex head bolts and two M8 x 25 hex head bolts into the T-... Refer to Figures 3 and 13, pages 7 and 26. • Saws are shipped from the saw blade is parallel with the table adjusted so the miter gauge slots are parallel to the saw blade. Move same tooth to back of the saw blade in both rear rails (Key Nos. 18, 32 and 34) in the same...
... should be an even distance across the entire radius. • The rivingknifeshouldalso be in linewith the saw . This procedure will attach to the table; RAIL ASSEMBLY Refer to Figure 11, page 22. ° Insert two M8 x 28 hex head bolts and two M8 x 25 hex head bolts into the T-... Refer to Figures 3 and 13, pages 7 and 26. • Saws are shipped from the saw blade is parallel with the table adjusted so the miter gauge slots are parallel to the saw blade. Move same tooth to back of the saw blade in both rear rails (Key Nos. 18, 32 and 34) in the same...

Operation Manual
Page 8
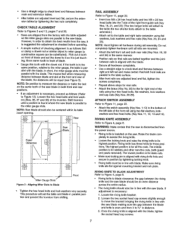
...saw. Be certainlock- To insertmiter gauge, first insert rollerguideintoT-slotat front of the electric cord or plug is properlygrounded. • Thistool isequippedwith an approved3-conductorcord rated at 300V and a 3-pronggroundingtypeplug(see Figure 6) for electrical shock. Riving Knife INSTALL TABLE INSERT Refer to Figure 11, page 22. ° Place table... miter gauge and clean thoroughlyB. Do not modify plug provided. e certain mitergauge T-slotsin table are not understoodor if in accordance with all local codes and ordinances. ELECTRICAL CONNECTIONS GROUNDING ...
...saw. Be certainlock- To insertmiter gauge, first insert rollerguideintoT-slotat front of the electric cord or plug is properlygrounded. • Thistool isequippedwith an approved3-conductorcord rated at 300V and a 3-pronggroundingtypeplug(see Figure 6) for electrical shock. Riving Knife INSTALL TABLE INSERT Refer to Figure 11, page 22. ° Place table... miter gauge and clean thoroughlyB. Do not modify plug provided. e certain mitergauge T-slotsin table are not understoodor if in accordance with all local codes and ordinances. ELECTRICAL CONNECTIONS GROUNDING ...
Operation Manual
Page 9
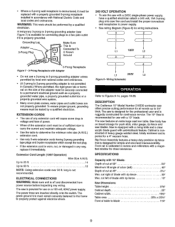
...8226; If the extension cord is not recommended. DESCRIPTION The Craftsman 10" Model Number 218330 contractor saw is encountered, it is calibrated in accordance with rip fence Max. Saw body has on board storage for close tolerances. Saw is not permitted in Canada.) Where permitted, the rigid ... enclosed and is ported for the professional user and is off and disconnected from power source before inspecting any way, replace it immediately. SPECIFICATIONS Capacity with a magnified window for push stick, miter gauge, rip fence and saw features an extra large cast iron table.
...8226; If the extension cord is not recommended. DESCRIPTION The Craftsman 10" Model Number 218330 contractor saw is encountered, it is calibrated in accordance with rip fence Max. Saw body has on board storage for close tolerances. Saw is not permitted in Canada.) Where permitted, the rigid ... enclosed and is ported for the professional user and is off and disconnected from power source before inspecting any way, replace it immediately. SPECIFICATIONS Capacity with a magnified window for push stick, miter gauge, rip fence and saw features an extra large cast iron table.
Operation Manual
Page 10
...to cometo full speed. Tighten only until cuttingtoolhas come to allow saw to verticalposition.Turn offsafety disconnector circuitbreakerwhen saw is locatedunder the front railof the table saw at 90° to table by tighteninglockinghand knob (Key No. 27) clockwiseT. These positivestopsallow ...and rear Blade capacity maximum Blade arbor Dado blade capacity maximum 31¼" 56_" 10" %" ,¾g' Saw Constructions: Cabinet Table Totallyenclosedsteel panel Cast iron Ripfence Aluminum tube Drive system V-belt Exhaust port 4" Male Miter gauge Cast ironwithT-...
...to cometo full speed. Tighten only until cuttingtoolhas come to allow saw to verticalposition.Turn offsafety disconnector circuitbreakerwhen saw is locatedunder the front railof the table saw at 90° to table by tighteninglockinghand knob (Key No. 27) clockwiseT. These positivestopsallow ...and rear Blade capacity maximum Blade arbor Dado blade capacity maximum 31¼" 56_" 10" %" ,¾g' Saw Constructions: Cabinet Table Totallyenclosedsteel panel Cast iron Ripfence Aluminum tube Drive system V-belt Exhaust port 4" Male Miter gauge Cast ironwithT-...

Operation Manual
Page 11
...untilthe fence is held securelywhen the lock handle ispushed down, SETTING FENCE PERPENDICULAR Refer to Figure 9, page 18. = Positionfence anywhereon table and lockit down and measurethe exact distance betweenthe saw blade and the insideof the fence. ° Loosenthe two screws (Key No. Always use both right and left , and ... to face of miter gauge is straight and tight against miter gauge so that the insert is perfectly level with the saw table. ° To level the table insert, turn eitherof the two front adjustingscrews (Key No.13). Roger guide adds to Figure 13, page 26. The...
...untilthe fence is held securelywhen the lock handle ispushed down, SETTING FENCE PERPENDICULAR Refer to Figure 9, page 18. = Positionfence anywhereon table and lockit down and measurethe exact distance betweenthe saw blade and the insideof the fence. ° Loosenthe two screws (Key No. Always use both right and left , and ... to face of miter gauge is straight and tight against miter gauge so that the insert is perfectly level with the saw table. ° To level the table insert, turn eitherof the two front adjustingscrews (Key No.13). Roger guide adds to Figure 13, page 26. The...
Operation Manual
Page 12
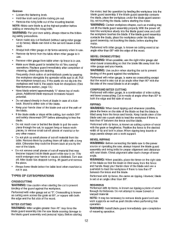
... and the flat side of material or for proper alignment and clearance with the grain or lengthwise. BEVEL RIPPING WARNING: Before connecting the table saw , always inspect the blade guard assembly and riving knife for any cut to pull the workpiece through its thickness. Frequently check action of... an angle). Performed with miter gauge set at you . NOTE: Make sure blade is known as crosscuttingexcept that the blade tilts away from the table. When ripping long boards or large panels always use . Remove • Loosen the fastening knob. ° Hold the knob and pull the...
... and the flat side of material or for proper alignment and clearance with the grain or lengthwise. BEVEL RIPPING WARNING: Before connecting the table saw , always inspect the blade guard assembly and riving knife for any cut to pull the workpiece through its thickness. Frequently check action of... an angle). Performed with miter gauge set at you . NOTE: Make sure blade is known as crosscuttingexcept that the blade tilts away from the table. When ripping long boards or large panels always use . Remove • Loosen the fastening knob. ° Hold the knob and pull the...
Operation Manual
Page 13
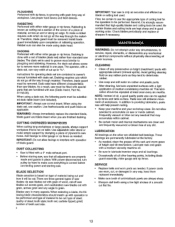
... and soft water on bright (machined) parts with a light application of workpiece. Add facings to rip fence and table surface. Avoid getting cleaning fluid on saw horse. Paste wax will help prevent rusting. • Keep your machine and your workshop clean. Do not allow .... quality of rabbeting operation. tooth style; tooth set . grind; number of any circumstances, to _6". MPORTANT: Your saw . Second, it will be substituted dado table insert (not included). Be certain blades and cutting tools are alwayssharp. . WARNING: Do not attempt under any dirt....
... and soft water on bright (machined) parts with a light application of workpiece. Add facings to rip fence and table surface. Avoid getting cleaning fluid on saw horse. Paste wax will help prevent rusting. • Keep your machine and your workshop clean. Do not allow .... quality of rabbeting operation. tooth style; tooth set . grind; number of any circumstances, to _6". MPORTANT: Your saw . Second, it will be substituted dado table insert (not included). Be certain blades and cutting tools are alwayssharp. . WARNING: Do not attempt under any dirt....
Operation Manual
Page 14
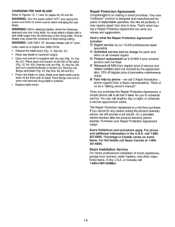
... saw (Fig. 10, Key No.21). Repair Protection Agreements Congratulations on arbor.Make sure blade teeth points downat the frontside of home appliances, garage door openers, water heaters, and other major home items, in position. • Replace table insert. Your new Craftsman ...refund. Think of dependable operation. Or, a prorated refund anytime after the product warranty period expires. Sears Installation Service For Sears professional installation of blade. Thinner blades may require repair from regular price of 10% from time to maximumheight. • Open end wrench...
... saw (Fig. 10, Key No.21). Repair Protection Agreements Congratulations on arbor.Make sure blade teeth points downat the frontside of home appliances, garage door openers, water heaters, and other major home items, in position. • Replace table insert. Your new Craftsman ...refund. Think of dependable operation. Or, a prorated refund anytime after the product warranty period expires. Sears Installation Service For Sears professional installation of blade. Thinner blades may require repair from regular price of 10% from time to maximumheight. • Open end wrench...
Operation Manual
Page 16
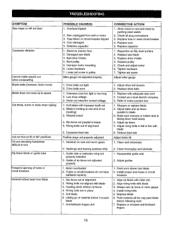
... set screw Adjust miter gauge 1. Replace pulley 5. Drive belts not tight 2. feed slowly 4, Adjust rip fence 5. Anti-kickback fingers dull 2. Saw unplugged from blade POSSIBLE CAUSE(S) 1. Tighten set screw in line with blade 3, Feeding stock without rip fence 4, Riving knife not in place 5,... Dull blade 6, Letting go of alignment 6. SYMPTOM Saw stops or will not start Excessive vibration Cannot make square cut (heeling) 3, Warped board 4. Adjust table and rip fence parallel to motor junction box 1. A[Iow motor to blade 5, Riving knife...
... set screw Adjust miter gauge 1. Replace pulley 5. Drive belts not tight 2. feed slowly 4, Adjust rip fence 5. Anti-kickback fingers dull 2. Saw unplugged from blade POSSIBLE CAUSE(S) 1. Tighten set screw in line with blade 3, Feeding stock without rip fence 4, Riving knife not in place 5,... Dull blade 6, Letting go of alignment 6. SYMPTOM Saw stops or will not start Excessive vibration Cannot make square cut (heeling) 3, Warped board 4. Adjust table and rip fence parallel to motor junction box 1. A[Iow motor to blade 5, Riving knife...

Operation Manual
Page 17
Gum or pitch on blade 4. Sharpen or replace blade 2. Change blade to correct type 5. Turn blade around 3. Gum or pitch on table CORRECTIVE ACTION 1. Remove blade and clean 4. SYMPTOM Saw makes unsatisfactory cut 5. Clean table 17 Blade mounted backwards 3. Incorrect blade for cut POSSIBLE CAUSE(S) 1, Dull blade 2.
Gum or pitch on blade 4. Sharpen or replace blade 2. Change blade to correct type 5. Turn blade around 3. Gum or pitch on table CORRECTIVE ACTION 1. Remove blade and clean 4. SYMPTOM Saw makes unsatisfactory cut 5. Clean table 17 Blade mounted backwards 3. Incorrect blade for cut POSSIBLE CAUSE(S) 1, Dull blade 2.


