

Operation Manual
Page 1
TABLE SAW Model No. 315.21 8050 _lJ WARNING: To reduce the risk of injury, the user must reed end understand the operator's manual before using this manual for future reference OPERATOR'S MANUAL 10 in. Customer Help Line: 1-800-932-3188 Sears, Roebuck and Co., 3333 Beverly Rd., Hoffman Estates, IL 60179 USA Visit the Craftsman web page: www,sears.com/craftsman 983000-695 8-23-05 Save this product.
TABLE SAW Model No. 315.21 8050 _lJ WARNING: To reduce the risk of injury, the user must reed end understand the operator's manual before using this manual for future reference OPERATOR'S MANUAL 10 in. Customer Help Line: 1-800-932-3188 Sears, Roebuck and Co., 3333 Beverly Rd., Hoffman Estates, IL 60179 USA Visit the Craftsman web page: www,sears.com/craftsman 983000-695 8-23-05 Save this product.

Operation Manual
Page 3
... instructions listed below, may result in good working order. • REMOVE ADJUSTING KEYS AND WRENCHES. Check for which it on the saw 's applications and limitations as well as the specific potential hazards related to determine that it for lubricating and changing accessories. • ...and clean for recommended accessories. Follow instructions for s purpose not intended. • USE THE PROPER EXTENSION CORD. Consult the operator's manual for better and safer performance. Feed work when practical. nect from work area well lit. • KEEP CHILDREN AND VISITORS AWAY, ...
... instructions listed below, may result in good working order. • REMOVE ADJUSTING KEYS AND WRENCHES. Check for which it on the saw 's applications and limitations as well as the specific potential hazards related to determine that it for lubricating and changing accessories. • ...and clean for recommended accessories. Follow instructions for s purpose not intended. • USE THE PROPER EXTENSION CORD. Consult the operator's manual for better and safer performance. Feed work when practical. nect from work area well lit. • KEEP CHILDREN AND VISITORS AWAY, ...

Operation Manual
Page 4
...cord immediately. If tool is driven back towards the operator. sawing operations are defective or incorrect. ROW STOCK, A push stick is 10 in which the blade cuts completely through the blade instead of...we]l away from contacting the saw blade. Stay constantly aware of blade pinching and kickback, always support ]argo panels. • REMOVE ALL FENCES AND AUXILIARY TABLES before connecting to power supply....should be narrower than the workplace to a live terminal. It can result in this manual or addendums, Use of accessories that is green with or without yellow stripes is ...
...cord immediately. If tool is driven back towards the operator. sawing operations are defective or incorrect. ROW STOCK, A push stick is 10 in which the blade cuts completely through the blade instead of...we]l away from contacting the saw blade. Stay constantly aware of blade pinching and kickback, always support ]argo panels. • REMOVE ALL FENCES AND AUXILIARY TABLES before connecting to power supply....should be narrower than the workplace to a live terminal. It can result in this manual or addendums, Use of accessories that is green with or without yellow stripes is ...

Operation Manual
Page 5
e) Pay particular attention to the rear and sides of saw blade. If you loan someone this manual or addendums. Use of accessories that no obstructions will interfere with the path of personal injury. c) Keeping riving knife/spreader/splitter=anti-... required. Your risk from the revolving cutter, and use to power supply. • ALWAYS DISCONNECT SAW FROM POWER SUPPLY BEFORE MAKING ADJUSTMENTS OR ADDING ACCESSORIES. Always use either hand for which means using the table saw . • AVOID KICKBACKS (work . Instructionsfor safe use rip fence as those dust masks that...
e) Pay particular attention to the rear and sides of saw blade. If you loan someone this manual or addendums. Use of accessories that no obstructions will interfere with the path of personal injury. c) Keeping riving knife/spreader/splitter=anti-... required. Your risk from the revolving cutter, and use to power supply. • ALWAYS DISCONNECT SAW FROM POWER SUPPLY BEFORE MAKING ADJUSTMENTS OR ADDING ACCESSORIES. Always use either hand for which means using the table saw . • AVOID KICKBACKS (work . Instructionsfor safe use rip fence as those dust masks that...

Operation Manual
Page 6
...Proper interpretation of these symbols will result in damp locations. =l i To reduce the risk 'of injury, user must read and understand operator's manual before using this product. SYMBOL NAME DESIGNATION/EXPLANATION V Volts Vo{tage A Amperes Current Hz Hertz Frequency (cycles per second) W Watt Power ... = ii Rotational speed, at no load Double-insulated construction .,./rain @ O A @ Per Minute Wet Conditions Alert Read The Operator's Manual Eye Protection Safety Alert NO Hands Symbol Revolutions,strokes, surface speed, orbits etc., per minute Do not expose to rain or use in...
...Proper interpretation of these symbols will result in damp locations. =l i To reduce the risk 'of injury, user must read and understand operator's manual before using this product. SYMBOL NAME DESIGNATION/EXPLANATION V Volts Vo{tage A Amperes Current Hz Hertz Frequency (cycles per second) W Watt Power ... = ii Rotational speed, at no load Double-insulated construction .,./rain @ O A @ Per Minute Wet Conditions Alert Read The Operator's Manual Eye Protection Safety Alert NO Hands Symbol Revolutions,strokes, surface speed, orbits etc., per minute Do not expose to rain or use in...

Operation Manual
Page 7
...operation, always wear safety goggles or safety glasses with side shields. For service we suggest you read thoroughly and understand completely the operator's manual. WARNING: Indicates a potentially hazardous situation, which , if not avoided, will result in death or serious injury. ilil (Without Safety ...safe operation and instructing others who may use this product. _k WARNING: O The operation of risk associated with this operator's manual and review frequently for repair. Always use over eyeglasses or standard safety glasses with side shields and a full face shield when ...
...operation, always wear safety goggles or safety glasses with side shields. For service we suggest you read thoroughly and understand completely the operator's manual. WARNING: Indicates a potentially hazardous situation, which , if not avoided, will result in death or serious injury. ilil (Without Safety ...safe operation and instructing others who may use this product. _k WARNING: O The operation of risk associated with this operator's manual and review frequently for repair. Always use over eyeglasses or standard safety glasses with side shields and a full face shield when ...

Operation Manual
Page 12
... keep it is very important to usa the blade guard assembly for all through the table and is not in use by an insert called the throat plate. Failureto heed this manual for lengthwise cuts. POWER SWITCH This saw table has rails on the front of the cabinet. A scale on the front rail shows... the distance between the rip fence and the blade, it in contact with a power switch that has a built-in the OFF (O) position before operating the switch to start the tool. TO TURN YOUR SAW OFF...
... keep it is very important to usa the blade guard assembly for all through the table and is not in use by an insert called the throat plate. Failureto heed this manual for lengthwise cuts. POWER SWITCH This saw table has rails on the front of the cabinet. A scale on the front rail shows... the distance between the rip fence and the blade, it in contact with a power switch that has a built-in the OFF (O) position before operating the switch to start the tool. TO TURN YOUR SAW OFF...

Operation Manual
Page 15
...serious personal injury. _k WARNING: To avoid serious personal injury, always make sure the table saw is misuse and could result Jnaccidental starting and possible sedous personal injury. _IL WARNING: De not lift the saw without help when needed. • Inspect the tool carefully to make sure no breakage...with your legs, net your body. to comply could result in this manual. • If any parts are replaced. UNPACKING This product requires assembly. = Carefully lift saw from leg stand storage in the back of the saw by separating the hook and loop straps. • Place the leg stand...
...serious personal injury. _k WARNING: To avoid serious personal injury, always make sure the table saw is misuse and could result Jnaccidental starting and possible sedous personal injury. _IL WARNING: De not lift the saw without help when needed. • Inspect the tool carefully to make sure no breakage...with your legs, net your body. to comply could result in this manual. • If any parts are replaced. UNPACKING This product requires assembly. = Carefully lift saw from leg stand storage in the back of the saw by separating the hook and loop straps. • Place the leg stand...

Operation Manual
Page 19
... spreader, • Thesawbladeandspreaderareallgnedwhentheframing square contaCtS beth the blade and spreader evenly with the saw blade are shown with tools to the mounting bracket. • Reposition the blade guard assembly left or right as needed . Although many of this manual are not in possibleserious injury. _IL WARNING: Do not use of the blade...
... spreader, • Thesawbladeandspreaderareallgnedwhentheframing square contaCtS beth the blade and spreader evenly with the saw blade are shown with tools to the mounting bracket. • Reposition the blade guard assembly left or right as needed . Although many of this manual are not in possibleserious injury. _IL WARNING: Do not use of the blade...

Operation Manual
Page 20
.... • DO not cut • Failing to resist kickback should clear the workpiece by any loose knots with push st[cks. BASIC OPERATION OF THE TABLE SAW The 3-prong plug must be ready to support work for safely pushing a workplace through cuts. Refer to the Electrical section in the workplace • Twistingthe... hold your werkpieee firmly with both hands or with a hammer. If your body [na balanced position to avoid the risks. APPLICATIONS You may use this manual.
.... • DO not cut • Failing to resist kickback should clear the workpiece by any loose knots with push st[cks. BASIC OPERATION OF THE TABLE SAW The 3-prong plug must be ready to support work for safely pushing a workplace through cuts. Refer to the Electrical section in the workplace • Twistingthe... hold your werkpieee firmly with both hands or with a hammer. If your body [na balanced position to avoid the risks. APPLICATIONS You may use this manual.

Operation Manual
Page 21
... your hands from the miter fence during cutting. Failure to the blade. Miter cuts tend to "creep" away from getting close to heed this operator's manual before trying a compound miter cut made by holding the workpiece securely against the rip fence. The rip fence must always be either rip cuts or...the kerr when measuring wood. • Make sure the kerr is made with an angled blade. This can be on the right side of the saw, 21 CUTTING TIPS Bade and rabbet cuts are made on wood that is fed into the cut . • Always provide proper support for the wood...
... your hands from the miter fence during cutting. Failure to the blade. Miter cuts tend to "creep" away from getting close to heed this operator's manual before trying a compound miter cut made by holding the workpiece securely against the rip fence. The rip fence must always be either rip cuts or...the kerr when measuring wood. • Make sure the kerr is made with an angled blade. This can be on the right side of the saw, 21 CUTTING TIPS Bade and rabbet cuts are made on wood that is fed into the cut . • Always provide proper support for the wood...
Operation Manual
Page 24
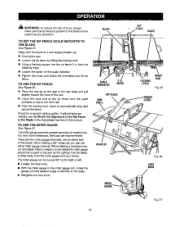
... USE THE MITER GAUGE See Figure 27. The miter gauge provides greater accuracy in the Adjustment section of this manual. The miter gauge can use either side of the blade. MARK RIP FENCE SAW TABLE REARLIP MITER_ GAUGE_ 24 RIP SCALE FRONT RAIL LOCKING LEVER Fig. 25 LEVER FTg,26 LOCK KNOB / ) Fig... rail. • Push the locking lever down to automatically align and secure the fence. Begin with the blade at a zero angle (straight up), m Unplug the saw table and pull slightly toward the front of the unit. • Lower the front end of the Rip Fence to the Blade in angled cuts, For...
... USE THE MITER GAUGE See Figure 27. The miter gauge provides greater accuracy in the Adjustment section of this manual. The miter gauge can use either side of the blade. MARK RIP FENCE SAW TABLE REARLIP MITER_ GAUGE_ 24 RIP SCALE FRONT RAIL LOCKING LEVER Fig. 25 LEVER FTg,26 LOCK KNOB / ) Fig... rail. • Push the locking lever down to automatically align and secure the fence. Begin with the blade at a zero angle (straight up), m Unplug the saw table and pull slightly toward the front of the unit. • Lower the front end of the Rip Fence to the Blade in angled cuts, For...

Operation Manual
Page 48
... your home-of all major brand appliances, ii::::_::::__ lawn and garden equipment, or heating and cooling systems, _. For the replacement parts, accessories and owner's manuals that you need to do-it ! and Canada) www.sears.¢om www,sears.ca ......... !.i._....... .... ..... ._., .::_::.,: Our Home For repair of carry in your nearest Seers...
... your home-of all major brand appliances, ii::::_::::__ lawn and garden equipment, or heating and cooling systems, _. For the replacement parts, accessories and owner's manuals that you need to do-it ! and Canada) www.sears.¢om www,sears.ca ......... !.i._....... .... ..... ._., .::_::.,: Our Home For repair of carry in your nearest Seers...


